Before you trash it send it all to Frank Derrico or Warpig on MS.com. for a pro fix. Dont throw it away, get off it and sit on it for awhile till you figure out what you're going to do. Somebody may be following this thread that could do it, I would do it but I just bought another house and Ill be tied up with that for a few months but would like to tackle it if you want to wait. I'm slow but the price is right, FOC if you can get it to me. Mid to late summer is when I work in the shop anyhow.
You are using an out of date browser. It may not display this or other websites correctly.
You should upgrade or use an alternative browser.
You should upgrade or use an alternative browser.
Help me with Enfield stock repair
- Thread starter toolness1
- Start date
The #1 community for Gun Owners of the Northeast
Member Benefits:
No ad networks! Discuss all aspects of firearm ownership Discuss anti-gun legislation Buy, sell, and trade in the classified section Chat with Local gun shops, ranges, trainers & other businesses Discover free outdoor shooting areas View up to date on firearm-related events Share photos & video with other members ...and so much more!
Member Benefits:
MilsurpDan
Ultimate Member
Geez, that sucks. Sorry to see that. After my own experience and seeing other No. 1 Mk. III's with the same issue. I think they're the worst made/designed military rifle stock.
Geez, that sucks. Sorry to see that. After my own experience and seeing other No. 1 Mk. III's with the same issue. I think they're the worst made/designed military rifle stock.
Maybe just the least understood
toolness1
Ultimate Member
Geez, that sucks. Sorry to see that. After my own experience and seeing other No. 1 Mk. III's with the same issue. I think they're the worst made/designed military rifle stock.
I have to agree. This thing is beyond repair. The entire area that surrounds the action is completely rotted and cracked and just in horrid shape. The rear pillar isn't even tight, the wood is all cracked and rotted around it.
I am trying to decide what to do. The only forends I can find are taken off drill rifles. Springfield sporters has a whole stock set for 120, liberty tree has just the forend for 100.
I could hold out and find a nice one on gunbroker or ebay, but it would be expensive and would stick out like a sore thumb against the rest of the wood.
I really want to keep this thing original, but I am also very tempted to just buy a ATI sporter stock and forget about it.
I have hardly gotten to shoot the thing. The bore is immaculate.
Edit: Also, even if I do buy a replacement, what are the chances it's going to fit correctly and not just crack all to hell when I go to shoot it? Looks like a replacement could very well have the same issues I ran into with this one.
iH8DemLibz
When All Else Fails.
Not to self: Take wanting an SMLE off the must buy list.
OP, When all else fails.....no not JB Weld.
Boyd's Stocks.
OP, When all else fails.....no not JB Weld.
Boyd's Stocks.
toolness1
Ultimate Member
Not to self: Taking wanting an SMLE off the must buy list.
An Ishapore at least...The stock doesn't show signs of being beat up, it's just crappy soft wood that got oil soaked and broke down.
I would think the stock you have is better than a replacement, its still going to need fitted or you could wind up with the same thing.
toolness1
Ultimate Member
I would think the stock you have is better than a replacement, its still going to need fitted or you could wind up with the same thing.
You don't realize the full extent of the damage. The entire rear of the stock is broken into pieces, cracked completely in half, there's not enough good wood to hold any repairs.
Maybe a pro could fix it for a few hundred dollars, but it's way beyond me and nobody around here can help
Edit: Oops I totally missed your post above. I'm in no hurry so if you want to tackle it in a few months that would be great, but I'm paying you at least 100 bucks if you fix it.
It will be deep surgery but its worth a shot and will probably have some dowels or pegs through it if its that bad.
iH8DemLibz
When All Else Fails.
I would edge glue it so it's at least secured.
Then I would cross-cut a series of dado cuts and insert wooden keys. Then work them down flush with outside of the stock.
You'd see the side grain in the keys, but it would be a sound repair.
Then I would cross-cut a series of dado cuts and insert wooden keys. Then work them down flush with outside of the stock.
You'd see the side grain in the keys, but it would be a sound repair.
toolness1
Ultimate Member
It will be deep surgery but its worth a shot and will probably have some dowels or pegs through it if its that bad.
Not a problem! Thanks for the help. I'll check back with you in July?
303_enfield
Ultimate Member
Got the tools and materials I needed to get started on this thing. Went to take it apart, and this is what I found.
That's it. This thing is trash. There's too much damage. I guess I'll hunt down a replacement, although I feel like just giving up and sticking it in a sporter stock at this point.
Sent from my SM-G920R4 using Tapatalk
Looks like somebody tried to remove the buttstock bolt first. Check Springfield Sporters for a replacement or fleabay.
Good luck!
toolness1
Ultimate Member
Gave up the idea of repairing this stock (although I will preserve it for a rainy day when I am better at woodworking), so I bought a drill rifle set from Springfield Sporters. The forend appears solid under an inch of grease, hopefully no surprises once I get it degreased.
Anyone have a set of instructions on how to fit that draw area in the rear so I don't just end up busting this drill rifle stock apart like my original stock?
Anyone have a set of instructions on how to fit that draw area in the rear so I don't just end up busting this drill rifle stock apart like my original stock?
toolness1
Ultimate Member
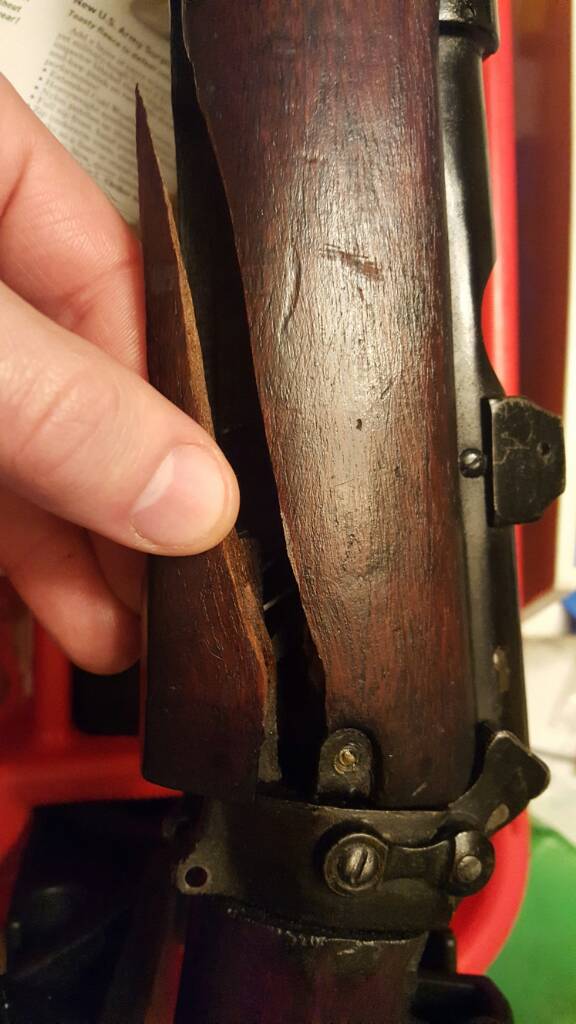
Ok, so I have an issue. There's no way this stock is going on with the lip hitting the charger bridge. Is it normal to have to trim some wood away here when replacing a forend? This is exactly where my old stock broke because that charger bridge was nailing against it. Looking at pics online I see a nice gap between the bridge and that lip on the stock.
I realize the stock slides up at an angle, but if I push any harder that sharp edge of metal is just wanting to dig right in. Should I just relieve some wood in that area?
Also, I see a crack I'm going to have to repair with some vertical toothpick and acraglass action. This rifle has been a nightmare.
Attachments

https://www.milsurps.com/showthread.php?t=16948
Heres a good place to start, everything thing you need to know can be found on the site. Take your time and proceed slowly, only after thoroughly digesting the process.
Fitting wood to the these rifles can be complicated to get them right but by having the parts in hand, understanding how they relate to one another and then carefully fitting to the letter it will become easier once you have become familiar with the process.
If I had a stripped action/body and your broken stock parts I would like to take a crack at refitting the old one.
Lower the fore stock a little to get it past the charger bridge, Im not sure why it will not go past it they fit like a glove. Make sure there's no debris or excess finish in the way and check the draws to see if they have been pegged or for uneven contact with everything else out of the way.
toolness1
Ultimate Member
https://www.milsurps.com/showthread.php?t=16948
Heres a good place to start, everything thing you need to know can be found on the site. Take your time and proceed slowly, only after thoroughly digesting the process.
Fitting wood to the these rifles can be complicated to get them right but by having the parts in hand, understanding how they relate to one another and then carefully fitting to the letter it will become easier once you have become familiar with the process.
If I had a stripped action/body and your broken stock parts I would like to take a crack at refitting the old one.
Lower the fore stock a little to get it past the charger bridge, Im not sure why it will not go past it they fit like a glove. Make sure there's no debris or excess finish in the way and check the draws to see if they have been pegged or for uneven contact with everything else out of the way.
I've been doing a lot of reading on there and also got Roger Wadham's book on Enfield accurizing, it's just totally overwhelming, fitting and bedding these is really complicated compared to anything else I've done.
I don't understand what you mean by "Lower the fore stock a little to get it past the charger bridge"?
I looked at a ton of pics of No1 Mk3's and haven't seen any with the side plate on the charger bridge as big and sharp as mine. Most are smaller and have rounded edges, not a big sharp rectangle like mine. Strange...
I was just doing a test fit before I dust the forend to check how it fits and see where I need to do some work. I know I can't just stick it on and go shoot, unfortunately....
I have all the tools to do it and I'll be saving my old stock but maaaaaan it's really bad. The entire rear is totally demolished as well as that big chunk out of the side. My repair I did held up really well considering that charger bridge was slamming against it upon recoil, that's the most solid part at the back of the stock! Ugly though...
Not the best description I know, when you install and remove the fore-end, try to have it level feeling the point where the recoil lugs on the body meet the stock and then slide/move the stock the 14-22 degrees or whatever it is until they meet, mating them together. When you remove, tap the stock with a wooden dowel above the draws before you lever the front of the stock down. They will be tight with the stock moving rearwards until it meets the bottom of the action/body.
It could also be that the mortise for the charger lug needs a small bit of wood removed where the lug enters at the top rear, a small bevel to allow it to fall in to place.
Measure the lug and the mortise and see if it will fit when its together.
It could also be that the mortise for the charger lug needs a small bit of wood removed where the lug enters at the top rear, a small bevel to allow it to fall in to place.
Measure the lug and the mortise and see if it will fit when its together.
I've been doing a lot of reading on there and also got Roger Wadham's book on Enfield accurizing, it's just totally overwhelming, fitting and bedding these is really complicated compared to anything else I've done.
I don't understand what you mean by "Lower the fore stock a little to get it past the charger bridge"?
I looked at a ton of pics of No1 Mk3's and haven't seen any with the side plate on the charger bridge as big and sharp as mine. Most are smaller and have rounded edges, not a big sharp rectangle like mine. Strange...
I was just doing a test fit before I dust the forend to check how it fits and see where I need to do some work. I know I can't just stick it on and go shoot, unfortunately....
I have all the tools to do it and I'll be saving my old stock but maaaaaan it's really bad. The entire rear is totally demolished as well as that big chunk out of the side. My repair I did held up really well considering that charger bridge was slamming against it upon recoil, that's the most solid part at the back of the stock! Ugly though...
My SMLE has the more rounded plate for the charger bridge, and tons (by comparison) of room around it. I know, good for me...not very helpful for you
 :rolleyes:") But...I did some poking around, and the larger squared plate seems to be an Ishapore thing (and, seemingly more in later models, especially the 2A1). I suspect it was done that way to eliminate some machining...maybe something they did over there after the British left?
But...I did some poking around, and the larger squared plate seems to be an Ishapore thing (and, seemingly more in later models, especially the 2A1). I suspect it was done that way to eliminate some machining...maybe something they did over there after the British left?  There are examples online and in my Enfield book that look like yours, so I don't think that means your rifle is "weird." It just means that stock isn't going to fit it right without a little adjustment. I'm no expert on the subject, but I personally would much rather trim wood than metal.
Looking back at your earlier pics, it's pretty plain to see that that stock didn't fit right either, and that's why it broke.
I'm still learning Enfields, so, like I said, I'm no expert. I encourage you to keep researching before you start carving on your stock...but...if it was mine, I'd do some careful relieving of wood around the plate until it fit
")
toolness1
Ultimate Member
Thanks for the input, I can use all I can get!My SMLE has the more rounded plate for the charger bridge, and tons (by comparison) of room around it. I know, good for me...not very helpful for you
Looking back at your earlier pics, it's pretty plain to see that that stock didn't fit right either, and that's why it broke.
I'm still learning Enfields, so, like I said, I'm no expert. I encourage you to keep researching before you start carving on your stock...but...if it was mine, I'd do some careful relieving of wood around the plate until it fit
I will definitely be diving deeper into my sources before I do any removal.
Also, looks can be deceiving. I also noticed a bit ago that the draws were showing (very equal) signs of being pushed against just from me test fitting the forend, so that makes me happy that there will be a tight fit back there. I was worried it might be sloppy and I would need to add material.
It might actually fit in the charger bridge area with very little removal once it can slide the rest of the way up and back.
Sent from my SM-G920R4 using Tapatalk
toolness1
Ultimate Member
Not the best description I know, when you install and remove the fore-end, try to have it level feeling the point where the recoil lugs on the body meet the stock and then slide/move the stock the 14-22 degrees or whatever it is until they meet, mating them together. When you remove, tap the stock with a wooden dowel above the draws before you lever the front of the stock down. They will be tight with the stock moving rearwards until it meets the bottom of the action/body.
It could also be that the mortise for the charger lug needs a small bit of wood removed where the lug enters at the top rear, a small bevel to allow it to fall in to place.
Measure the lug and the mortise and see if it will fit when its together. View attachment 219476
Ok I see what you're saying, thanks.
The draws are definitely going to need adjusted slightly as well, but I am going to leave it alone until I do more reading so I don't get ahead of myself.
Users who are viewing this thread
Total: 3 (members: 0, guests: 3)

Forum statistics
Latest threads
-

-
-
-
-

-
 Ruger America in .308.....Tight Chamber?.....Not a Gen II Rifle. (1 Viewer)
- Started by Coehorn
- Replies: 10
-