stu929
M1 Addict
Sistema Colt 1911 Overhaul & Rust Blue Tutorial....Picture Heavy
After seeing a few people buying and restoring Sistema Colts I decided I wanted a project. The wife got me a representative example for fathers day and I got exactly what I expected, a working but somewhat rusty pistol. This after all was what I was hoping for as I had a good idea of what I wanted to do with it and I wanted to project to tinker with. I decided to rust blue the pistol as I had seen several others try this with very nice results, these would also be a great candidate for a new park or cerakote job but I like the very deep blue almost black look....
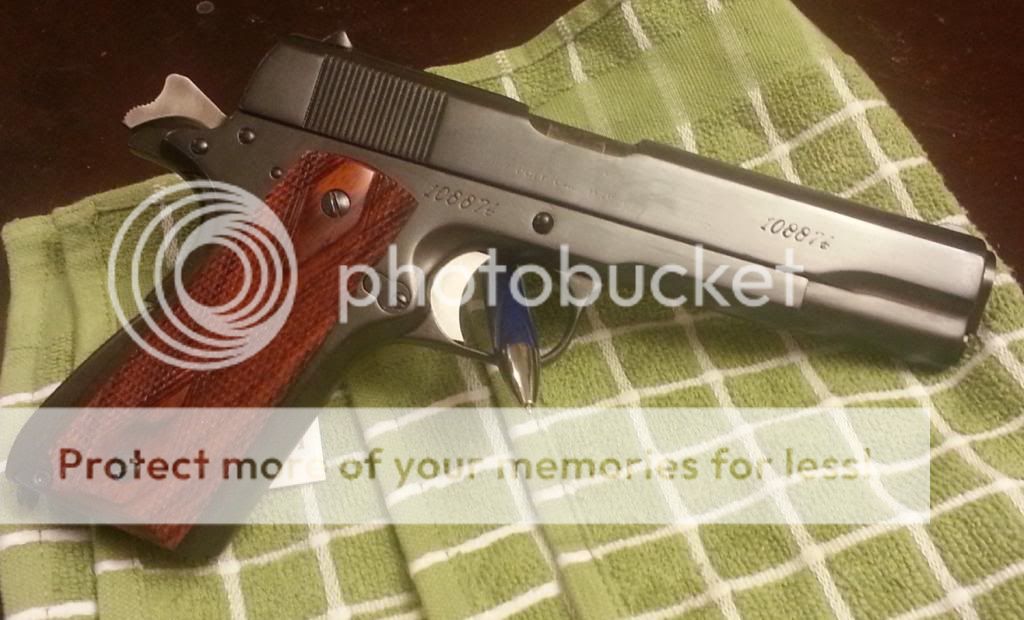
As received.....working but very rough
 [/URL][/IMG]
Giving it a bath in Evaporust. Amazing stuff cleaned up most of the rust and helped out immensely
 [/URL][/IMG]
After some sanding and a few sore thumbs later I replaced the grips, fire controls with Cylinder and Slide, and a short trigger to fit my hands.
 [/URL][/IMG]
Sorry I don't have pictures of the degreasing honestly they are just soaks and use of a tooth brush to ensure all oil is off of the pistol before you start the rusting process.
Wipe down #3 of express blue and back into the toaster oven to rust!
 [/URL][/IMG]
On to the pot to boil
 [/URL][/IMG]
Time to card (brush) off the excess rust and start the process again
 [/URL][/IMG]
3 cycles in....
 [/URL][/IMG]
5 rusting cycles in, I still want to go a little darker.

Finally the finished product.

Now for the how too part since I had a few people reach out and ask.
As far as the actual blueing of the pistol it was easier than I thought it would be.
Supplies
Stainless Steel pot (Good will is a great place you can find one for 5-6 bucks)
Rubber Gloves (You will need a handful of these)
Rust/Blue remover ( to get all of the old finish off Naval Jelly can work as well. I used Evaporust and combinations of sand paper finishing with 320 grit as recommended. If you go with a much higher grit it will get a mirror finish which is not what I was looking for)
Carding brushes or carding wheel ( I got two small brushes from brownells )
Mark Lee Express Blue (Brownells )
Acetone
Brake Cleaner
Cotton balls ( I used probably 20 )
Distilled water (Must be distilled)
Baking Soda (To neutralize bluing at last step)
Tongs
Denim strips to help with carding
Oil/Lubricant for final stage ( I used Mobil 1) some people use CLP/BLO any good oil should work. I have hear something like BLO can get gummy though.
Whenever handling parts use your gloves to prevent oils on your hands from getting on the metal. I had a spot or two I must have touched I caught after the first cycle I degreased it and it blended in well but always look for areas oil may be leaching or if you touch it with your hand as it will not rust like the rest of the pistol.
With a project like this metal prep is the key step. You need clean bare metal if you want the finish to be even. I used Evaporust to both remove the rust and the bluing that was still there, I also used several grits of sandpaper to clean up pitting and prep the metal. I would not go finer than 320 as it will get a mirror look and that is not what I was looking for.
1. Degreasing and cleaning, oil is your enemy if it wont rust it wont take color. Must get all oil off the pistol before starting. Spray all parts with brake cleaner.
1A. Acetone soak 30 minutes
1B. Hot water and dish soap 20 minutes (Remove and let dry, again I used the toaster over, compressed air works as does a hair dryer)
2. Warm the pistol up and apply an even coat of Express Blue.
3. Let sit to develope a nice coat of red rust 10-20 minutes ( I placed it in a toaster over on 150 to help the process)
4. Boil in pot of distilled water 8-10 minutes ( Turns the red rust to black )
5. Remove parts and card them ( Some use a carding wheel, I got two brushed, strips of denim also work well for some small areas)
6. Repeat steps 2-5 until you get the desired color you like ( each cycle it will get a little harder to rust or take a little longer, but it will also get darker. If you see spots that aren't rusting degrease again before moving on, they should blend in as you do more cycles)
7. Once the desired color is reached submerge the parts in water and baking soda mix to neutralize the Wilson Rust solution then rinse out with water after soak ( I left mine for 15 min some say an hour )
8. Apply oil ( Again instructions vary some say an hour some say overnight, I wanted to make sure mine did not get gummy though so I let mine sit for an hour then wiped it down, this is less likely with Mobil 1) The oil process does darken the metal even more which I was happy about as I was going for a charcoal color
9. Reassemble and enjoy your work!
Now as a note if at any point during the process you see a spot not rusting when you repeat the cycle you can degrease it again and I would recommend it if theres a spot not rusting. I had that exact thing happen in two spots and I used some denatured alcohol and soaked it and wiped it down and the next cycle it rusted better. Luckily it blended well and you really can't tell.
I lost count but I believe I did 8 cycles of rusting and carding. I am very happy with the results the prep took a while but I did all of the blueing in an afternoon and put the pistol back together last night.
I know this sounds like a lot of work it honestly wasn't that bad I'm just trying to be as detailed as possible so that if you try it you know what to expect. The metal prep on this pistol took much longer than the bluing. I worked from home yesterday and did the bluing in between the other things I had going on. I started around noon and it probably took 7 hrs. Much of that is spent waiting for it to rust then boil, while I was waiting I did admin work. If I can find a tank large enough this may have convinced me to rehab an old Mossburg pump I have that is in desperate need of love.
I saved all the old parts but as of right now don't see myself going back to them anytime soon. The C&C trigger group is a huge improvement and the original grips did not fit well at all. I also was able to get a NOS colt barrel that dropped right in as well and helped to improve how she shot! I'm also happy to say I was able to get rid of the ugly Sarco stamp, this was a bit of a chore but its gone and doesn't look like it was ever there")
If anyone has any question feel free to reach out I'm more than willing to help. As I said this was my first attempt and I couldn't be happier.
Steve
After seeing a few people buying and restoring Sistema Colts I decided I wanted a project. The wife got me a representative example for fathers day and I got exactly what I expected, a working but somewhat rusty pistol. This after all was what I was hoping for as I had a good idea of what I wanted to do with it and I wanted to project to tinker with. I decided to rust blue the pistol as I had seen several others try this with very nice results, these would also be a great candidate for a new park or cerakote job but I like the very deep blue almost black look....
As received.....working but very rough
Giving it a bath in Evaporust. Amazing stuff cleaned up most of the rust and helped out immensely
After some sanding and a few sore thumbs later I replaced the grips, fire controls with Cylinder and Slide, and a short trigger to fit my hands.
Sorry I don't have pictures of the degreasing honestly they are just soaks and use of a tooth brush to ensure all oil is off of the pistol before you start the rusting process.
Wipe down #3 of express blue and back into the toaster oven to rust!
On to the pot to boil
Time to card (brush) off the excess rust and start the process again
3 cycles in....
5 rusting cycles in, I still want to go a little darker.
Finally the finished product.
Now for the how too part since I had a few people reach out and ask.
As far as the actual blueing of the pistol it was easier than I thought it would be.
Supplies
Stainless Steel pot (Good will is a great place you can find one for 5-6 bucks)
Rubber Gloves (You will need a handful of these)
Rust/Blue remover ( to get all of the old finish off Naval Jelly can work as well. I used Evaporust and combinations of sand paper finishing with 320 grit as recommended. If you go with a much higher grit it will get a mirror finish which is not what I was looking for)
Carding brushes or carding wheel ( I got two small brushes from brownells )
Mark Lee Express Blue (Brownells )
Acetone
Brake Cleaner
Cotton balls ( I used probably 20 )
Distilled water (Must be distilled)
Baking Soda (To neutralize bluing at last step)
Tongs
Denim strips to help with carding
Oil/Lubricant for final stage ( I used Mobil 1) some people use CLP/BLO any good oil should work. I have hear something like BLO can get gummy though.
Whenever handling parts use your gloves to prevent oils on your hands from getting on the metal. I had a spot or two I must have touched I caught after the first cycle I degreased it and it blended in well but always look for areas oil may be leaching or if you touch it with your hand as it will not rust like the rest of the pistol.
With a project like this metal prep is the key step. You need clean bare metal if you want the finish to be even. I used Evaporust to both remove the rust and the bluing that was still there, I also used several grits of sandpaper to clean up pitting and prep the metal. I would not go finer than 320 as it will get a mirror look and that is not what I was looking for.
1. Degreasing and cleaning, oil is your enemy if it wont rust it wont take color. Must get all oil off the pistol before starting. Spray all parts with brake cleaner.
1A. Acetone soak 30 minutes
1B. Hot water and dish soap 20 minutes (Remove and let dry, again I used the toaster over, compressed air works as does a hair dryer)
2. Warm the pistol up and apply an even coat of Express Blue.
3. Let sit to develope a nice coat of red rust 10-20 minutes ( I placed it in a toaster over on 150 to help the process)
4. Boil in pot of distilled water 8-10 minutes ( Turns the red rust to black )
5. Remove parts and card them ( Some use a carding wheel, I got two brushed, strips of denim also work well for some small areas)
6. Repeat steps 2-5 until you get the desired color you like ( each cycle it will get a little harder to rust or take a little longer, but it will also get darker. If you see spots that aren't rusting degrease again before moving on, they should blend in as you do more cycles)
7. Once the desired color is reached submerge the parts in water and baking soda mix to neutralize the Wilson Rust solution then rinse out with water after soak ( I left mine for 15 min some say an hour )
8. Apply oil ( Again instructions vary some say an hour some say overnight, I wanted to make sure mine did not get gummy though so I let mine sit for an hour then wiped it down, this is less likely with Mobil 1) The oil process does darken the metal even more which I was happy about as I was going for a charcoal color
9. Reassemble and enjoy your work!
Now as a note if at any point during the process you see a spot not rusting when you repeat the cycle you can degrease it again and I would recommend it if theres a spot not rusting. I had that exact thing happen in two spots and I used some denatured alcohol and soaked it and wiped it down and the next cycle it rusted better. Luckily it blended well and you really can't tell.
I lost count but I believe I did 8 cycles of rusting and carding. I am very happy with the results the prep took a while but I did all of the blueing in an afternoon and put the pistol back together last night.
I know this sounds like a lot of work it honestly wasn't that bad I'm just trying to be as detailed as possible so that if you try it you know what to expect. The metal prep on this pistol took much longer than the bluing. I worked from home yesterday and did the bluing in between the other things I had going on. I started around noon and it probably took 7 hrs. Much of that is spent waiting for it to rust then boil, while I was waiting I did admin work. If I can find a tank large enough this may have convinced me to rehab an old Mossburg pump I have that is in desperate need of love.
I saved all the old parts but as of right now don't see myself going back to them anytime soon. The C&C trigger group is a huge improvement and the original grips did not fit well at all. I also was able to get a NOS colt barrel that dropped right in as well and helped to improve how she shot! I'm also happy to say I was able to get rid of the ugly Sarco stamp, this was a bit of a chore but its gone and doesn't look like it was ever there
If anyone has any question feel free to reach out I'm more than willing to help. As I said this was my first attempt and I couldn't be happier.
Steve
Last edited:


") the reason I mention even application is there was a spot that must have had a little oil and the rust solution beaded up and I missed it the first time. It was obvious the second application as I was paying attention to the spot as it did not rust the first cycles like the other parts.
the reason I mention even application is there was a spot that must have had a little oil and the rust solution beaded up and I missed it the first time. It was obvious the second application as I was paying attention to the spot as it did not rust the first cycles like the other parts.