D.I.Y. Wireless Range Target Cam
The do it yourself guide to building your own Wireless Target Cam for under $150
Table of contents
Section 1 – Introduction and Project Background
Section 2 – Basic Concepts to building your own Target Cam
Section 3 – Tools you will likely need
Section 4 – Parts List and Parts Options
Section 5 – Assembly
Section 6 – Wireless Network Setup
**These sections to be added later**
Section 7 – IP Camera Setup and viewing
Section 8 – Additional Information and Wrap-Up [Time to Build Stuff!]
Section 1 - Introduction and Project Background
It’s nice to sometimes have a bit of project background before diving in so let’s kick this off. If you are a long time shooter you’ve probably got all the equipment you need for shooting at the range. This guide may be informative but know first that there is nothing really new or groundbreaking being posted here. There are already a number of high quality wireless range cams on the market along with traditional quality optical spotting scopes. If you are shooter with ample money to spend on your hobby or passion you’ll already know what you want if you haven’t already spent the money to get those toys. If you are interested in CMP or NRA high power match shooting you’ll need a nice optical spotting scope period.
I’d like to consider this a post geared towards newer shooters at the range and perhaps new rifle owners. Those who are tinkerers with a D.I.Y. mindset would probably find this useful. I’m actually hopeful that people do find this useful and in fact contribute their own experience by offering suggestions to make this build better and cheaper.
This idea started for me about 6 months ago during my very first trip to A.G.C. I was a brand new member and brand new shooter. My first trip to the range I showed up with my new AR-15, box of ammo, my poorly built target frame not much else. I set up my frame at 100yds right away and started firing. I thought I would be able to just look through my scope and see how I was doing. However like a big noob dumb-ass that I was hadn’t figured on the fact that my rifle scope was nowhere close to Zero and I had blown about 40 rounds before I was reliably hitting paper.
It was very quickly that I realized I needed some sort of spotting scope to make my range trips more effective and productive. Even on my first day to the range I was lucky to meet a ton of total strangers who were more than willing to share their experiences and offer advice so I went shopping for a spotting scope and started my quest for information at MDS as well as some of the other popular shooting forums like AR-15.com, Snipers Hide and Savage Shooters. It was a discussion on Savage Shooters where I first stumbled across a very old post related to building a remote target cam. It sounded interesting but I didn’t really move in that direction. I wanted to shoot more and I planned to buy a spotting scope at Bass Pro. I had a father’s day present coming and figured I would be off the range fully prepared the following weekend. After speaking to the guy behind the counter it seemed clear that I could spend $200 on a nice spotting scope and my needs would be covered. I left with a Pursuit X-1 Compact Spotting Scope. Here is a LINK to a post on MDS about that purchase. Suffice it to say, that crappy scope didn’t do the job. It was a total waste of money and time. I ended up returning it and Bass Pro doesn’t even sell it any more. Lesson Learned.
I went back to the interwebs and looked closer at other options. I found more links to wireless target cams like the Bullseye Target Cam as well as several other DIY projects, some dating back a number of years using wired cameras. It seemed that the basic concept was fairly simple. I did discover a link on MDS posted in 2012 where someone started a discussion about building a target cam and I had posted my early progress within that thread. Here is the LINK. I considered just building on that discussion but I think the DIY post will be a better way to start a new discussion and hopefully collect input from other forum members. If any new ideas come out of the discussion and others decide to build their own systems hopefully we can keep those discussions consolidated here.
Section 2 – Basic Concepts to Building your own Target Cam
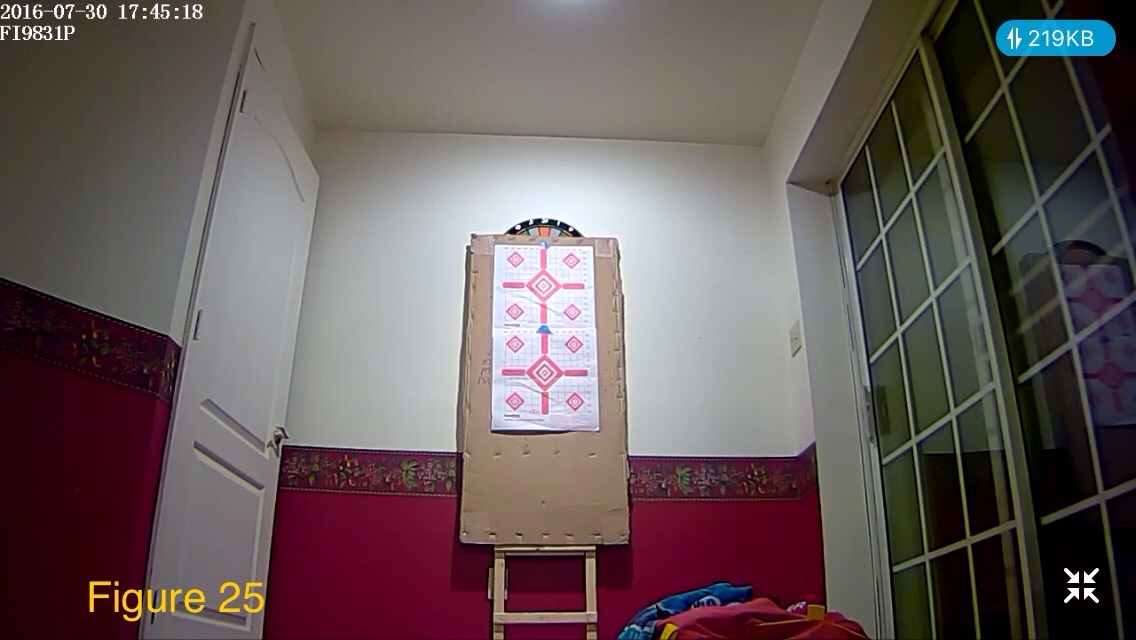
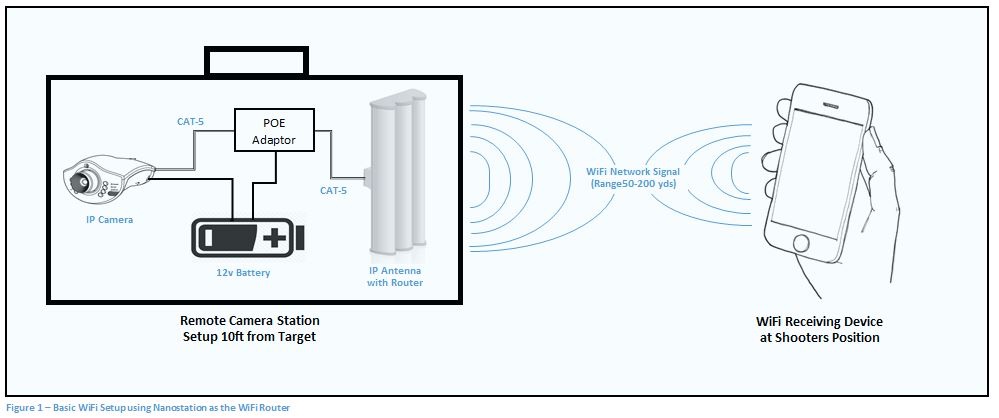
Like I mentioned above the basic concept is very simple. Consider that it’s it’s most basic and lowest cost form, we are going to take a wired IP Security cam connected to a battery along with a Wifi Router and a high gain Wifi Antenna and place them in a box which can be positioned down range near the target and beam a Wifi Signal back to your Phone, Tablet or Laptop at the shooting station. (Figure 1) If your goal was to only shoot at 100 yards (maybe 200 yards) this would be all you would need. I tested this setup at 200 yards connected to my iPhone 5 and it worked fine. It’s very likely that you could even build this setup for less than $100 without getting too fancy if you found some components on sale.
***Edit 10/29/17 - I realized that this method shown below does not work exactly as I've drawn. What was happening is that I had enabled wifi during the test and the antenna on the camera was connecting through Wifi to obtain and IP and not through the CAT5 Port. So the single antenna M2 setup works without the CAT5 Cable connected. There are some antenna types which have two CAT5 Ports on these models you can connect the camera to the LAN port on the antenna and this method will work as depicted below.
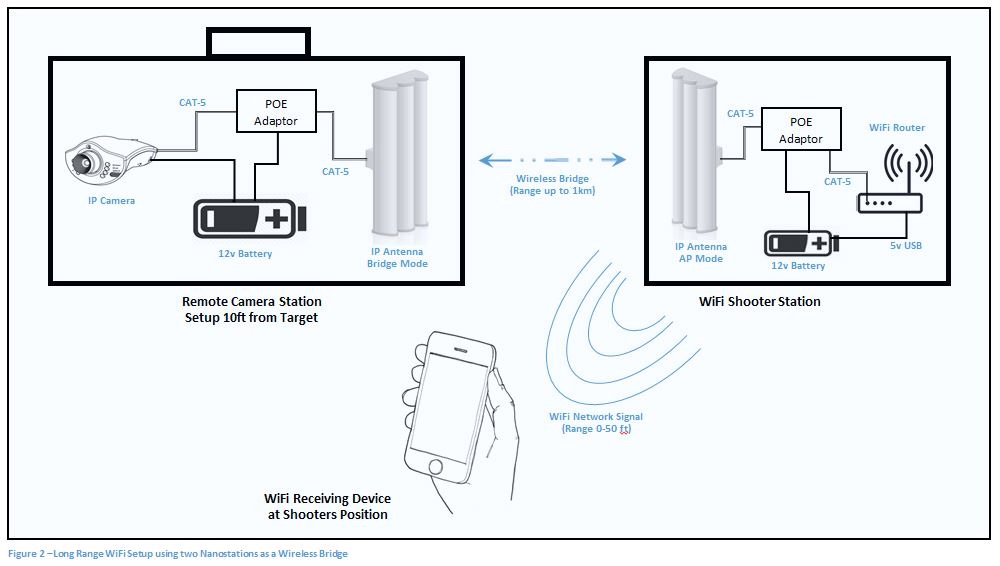
If you goal is to shoot regularly at 200 yards or more or simply wanted a higher bit rate video feed you would need to add a remote receiving antenna and wifi router. This would add about $75 to the build cost. At this point you would have a functioning range camera that should be good out to 600 yards. I have not yet tested my build to 600 yards but the antennas are supposedly able to communicate out to 1km.
While these two basic systems would cover most range cam needs you can easily upgrade the bridge antennas to larger more powerful models to extend the range. More powerful antennas would allow for a greater bandwidth which increases the video bit rate transmission quality and higher resolutions. Better cameras or lenses increase resolution. Bigger batteries allow for longer up time. However the basic functionality still remains the same.
Section 3 – Tools you will likely need
Most gun owners are probably fairly competent tool users and I would venture to guess have quite functional home workshops. Just to keep this DIY complete I’ll just list the tools that I think would be useful or that I actually used, but there is quite a bit of latitude here.
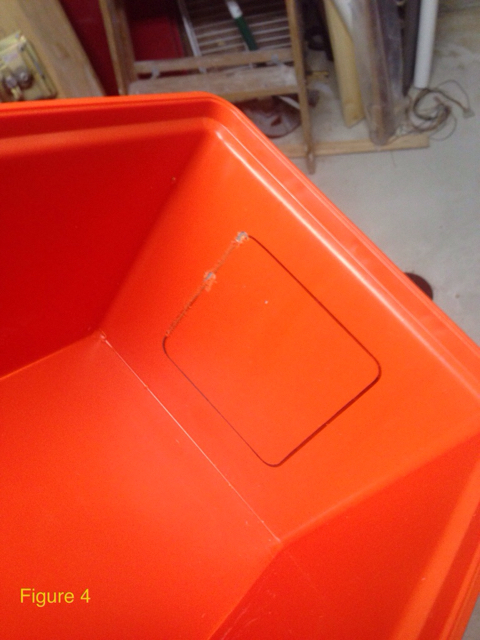
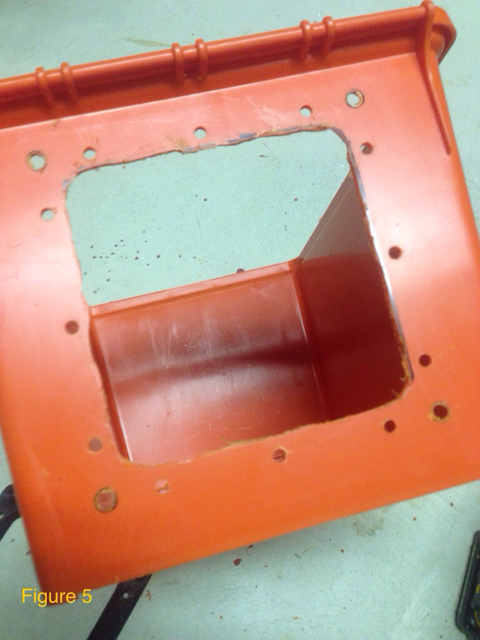
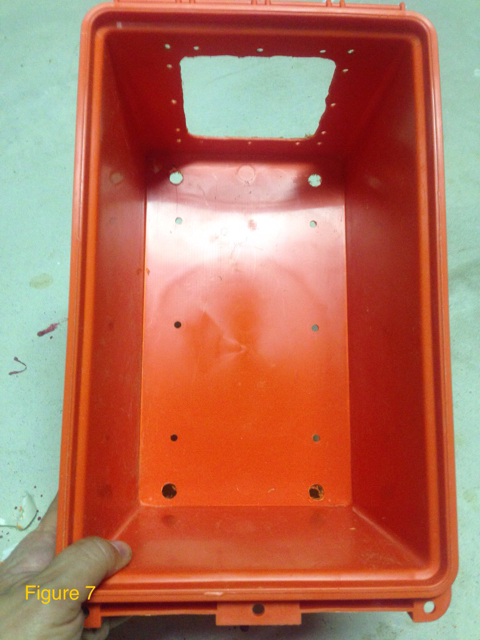
Rotary Cutting Tool – This is primarily used to modify the case to cut the hole for the camera. I have a Roto-Zip but Ryobi and Dremmel tools will work just as well. If you don’t have one, you can cut the plastic with a drill it will just take a bit more time.
Hole Saw – If you choose to use a fixed position camera you can easily use a standard 2” or 3” hole saw to drill a perfect circle through the side of your case.
Drill/Drill Press – I needed the drill to create a base plate to attach my devices to attach leveling feet.
Miter/Table Saw – My design had several wood and Plexiglas parts that were easier to cut with a table saw and miter saw. Obviously this is not necessary but helpful.
Tap & Die Set – If you are going to design and build your own brackets and braces to mount hardware within the case this is useful but again not necessary.
Soldering Iron Kit – I built a few custom length wiring harness to connect the battery to the camera and POE adapters. I could have just used the cables at their standard length but I just felt it’s nicer to have them only as long as really needed.
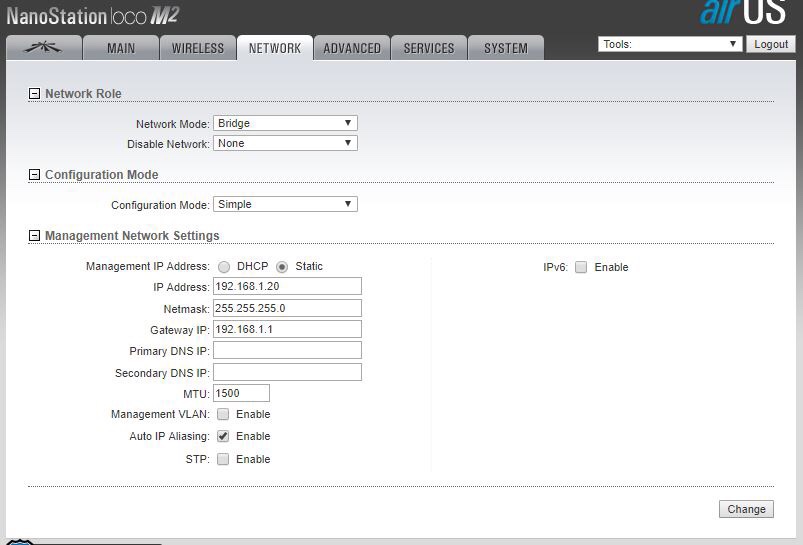
Laptop or PC – You’ll need a laptop or PC with a standard Ethernet port. This is required for programming and setting up the network parameters on the Nanostations, Router and likely the IP Camera.
Section 4 – Parts List and Parts Options
I’m going to list the exact parts I used along with approximate pricing and links to the supply source. However during the build this project evolved and I’ve identified some alternate parts which are also usable. Some are better quality or lower price than I may have originally purchased or alternatives that I would purchase if I were building this again. Basically consider the parts list as a very loose guide. I would be interested to see if others have experiences with other brands or products which may perform better than what I’ve listed.
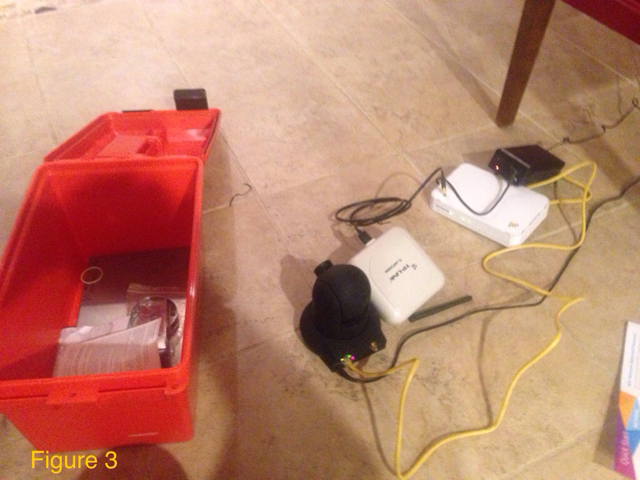
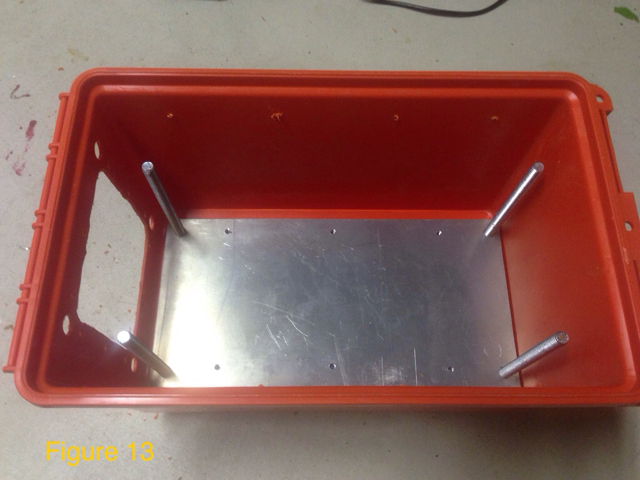
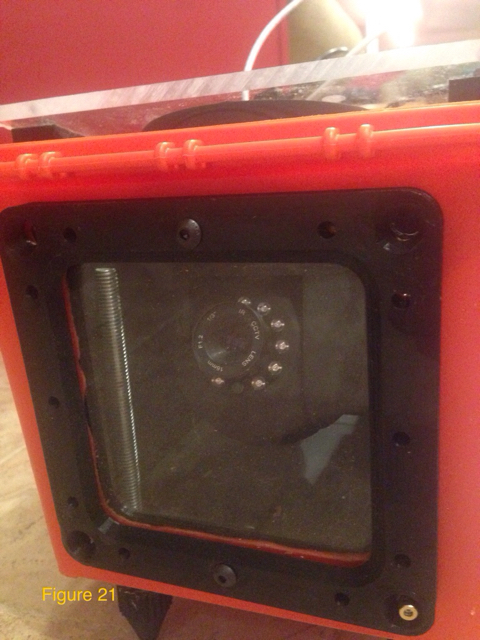
Remote Camera Case – This can really be any plastic box large enough to hold your components. There is no reason it couldn’t also be made from a large Tupperware container, plywood or even a cardboard box. Unless you are planning to specifically mount your Bridge Antenna outside of the case it just cannot be metal.
The things to consider when choosing a box are to decide what you want to do with it in addition to simply holding the remote components. One advantage of choosing with the larger case would be to create a storage compartment for the Shooters Station Antenna, Router and Battery. However if you are going to build a separate case for those items the smaller case is probably the way to go. I think a waterproof case is nice.
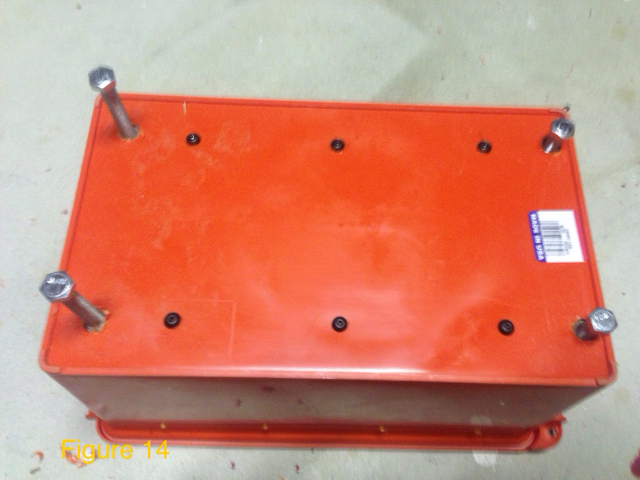
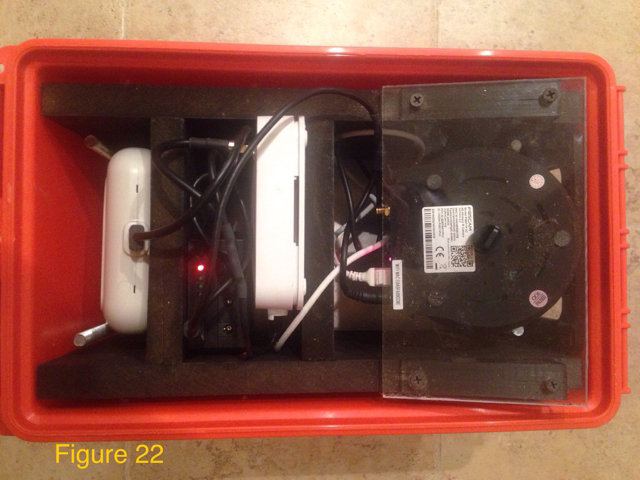
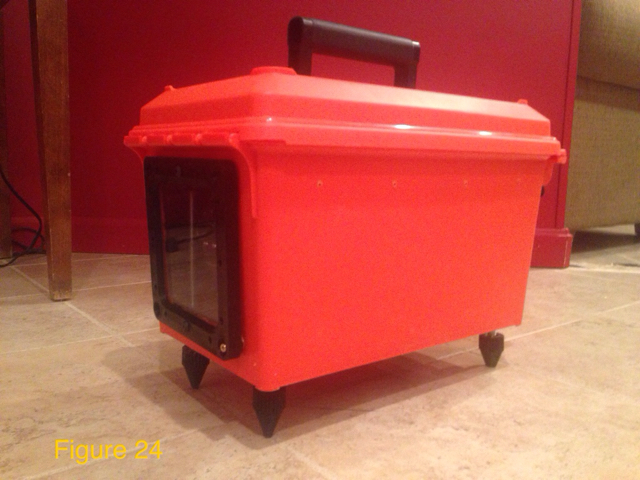
MTM Ammo Can available for $12.99 from Amazon Prime. It’s comes in Orange or Green. It’s also water tight. The reason I choose this model was because I thought I needed a large case like this to fit all of the components.
However the latest design which does not require a router inside of the Remote Unit could easily fit into a much smaller Ammo Case like this Plano model for about $9.
IP Camera – Wireless IP security cameras are cheap. You can find them from $20 used to over $100 for 1080P HD resolution models. The first step in choosing the camera is deciding which type you will use. Whichever brand or type you buy make sure it has an Ethernet cable port so you can connect it directly to the Wireless Bridge Antenna.
***Update 10/30/17 - I tried to use a different brand camera that we had setup at work from a company called Dericam. I was able to connect to the system when also connected to the interned, but i could not get this model to work at the range. It appears that some models of IP-Cams must be able to connect to the internet to work with their phone software. Others do not. Since you would likely not have internet access at a range, be sure to use an IP camera that can work with their phone or tablet app under any circumstances.
There are two main types. Some models have a movable Pan/Tilt head which is controlled by the remote software on your laptop or phone. This style is nice because you can zoom in very close to your target and then tilt up to view other areas just as closely. I often multiple targets on the frame and I like to zoom right onto the actual target I’m shooting. Also by using a Pan/Tilt type you can change the wide angle lens for a longer focal length model. This allows you to place your Remote Cam further away from the target which gives you a flatter target appearance.
The second type just has a fixed lens and a wider field of view. When using this type of camera you will need to place your Remote Cam closer to the target and be sure you are aiming the camera directly at the center of your target. You will still be able to use the software to zoom into specific areas of the target but since you will be viewing the target at a lower angle the image will appear distorted by the camera perspective. This is the style of camera that the Bullseye Target cam uses and it works fine.
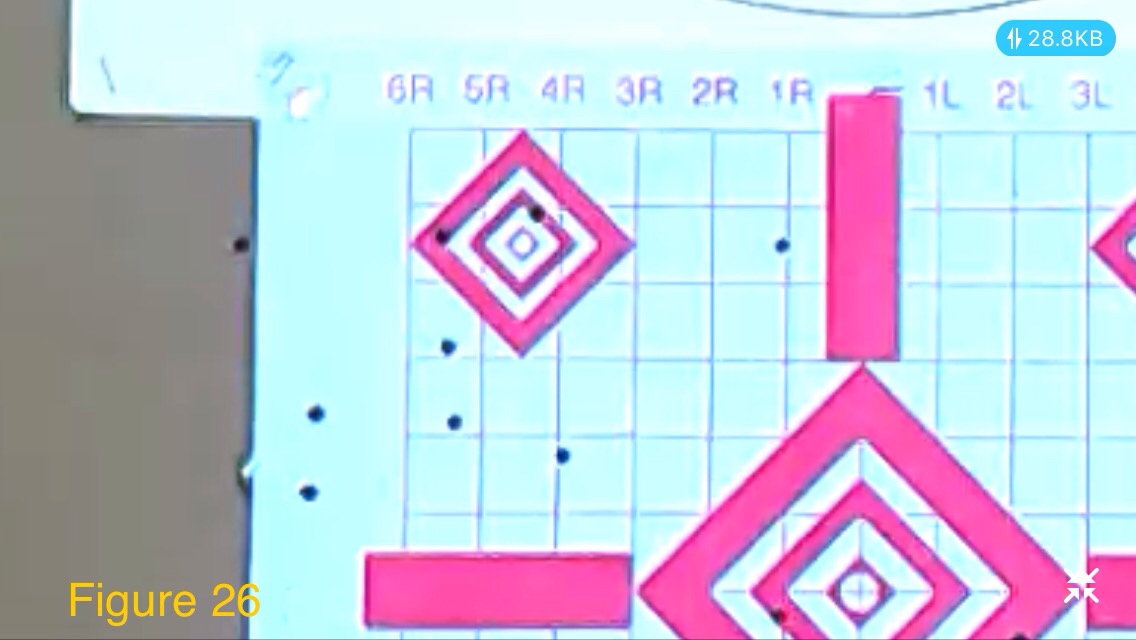
After you decide on the type you need to choose the resolution. Cheaper cameras come typically with 1.0 MP or 1.2 MP cameras. Newer models are available in HD 1080P. The higher resolution camera will allow you to zoom in closer with the software and resolve small bullet hole details with greater accuracy. So far I’m very happy with 720P resolution.
Finally you will find models which have night vision and audio recording. You may even find more expensive types with actual mechanical zoom and iris. I would guess that most of these options would be overkill. There is one option which may be useful however and that is cameras which can be powered directly over Ethernet Cable. Since the Bridge Antenna requires POE it may just make the wiring of the camera a bit easier.
Before I get into my recommendations I just want to say that I have setup several wired and wireless Foscam security cameras at work and found them to be fairly simple to add to an existing network. Like most products from China directly marketed to U.S. consumers the instructions or online support can be lacking at times, but the Foscam brand is better than most of the lower priced options. Below are three descent options that I have used.
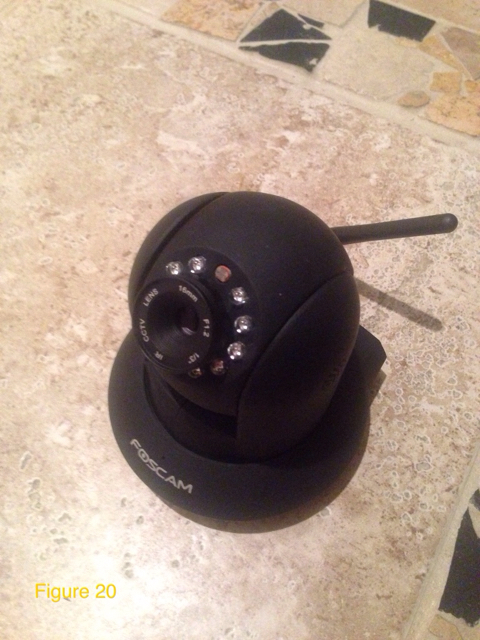
Foscam FI9831P Camera available on Amazon for $80. This is the model I’m using in my system. It has 960P video resolution which is very clear and it also has Tilt/Pan capabilities. I did change the lens which I’ll discuss later but still a great cam.
Foscam FI9821P Camera available from amazon for $48. You can find these used for $25 on amazon. This is the model I’ve used at work and when I first tested my cam idea I borrowed one of these from work. The resolution is only 1 megapixel, but you do not need great resolution for a target cam. The first models of the Bullseye Target cam used a 1mp camera if I’m not mistaken. This model also has Tilt/Pan capabilities.
Foscam C1 Indoor HD 720P Camera from amazon for $60. This is a fixed field of view camera at 720P the image quality is good. I think this is the exact same model used in the newer Bullseye Cam system.
Telephoto Lens – I found that the standard lens that comes with most IP Security cameras has a fairly wide field of view usually between 70° and 115° While they still work you are forced to bring the camera unit closer to the target. Again when the camera is closer to the target the viewing angle is also greater which creates a more distorted perspective view of the target because you are looking up at it.
What I realized is that the the Foscam units have a standard 12mm X 0.5 thread pitch CCTV mount. So you can unscrew the lens from the camera and install any 12mmX0.5 threaded lens. Choosing a longer focal lens will allow you to place the camera further from the target frame to achieve a flatter image without loosing detail resolution.
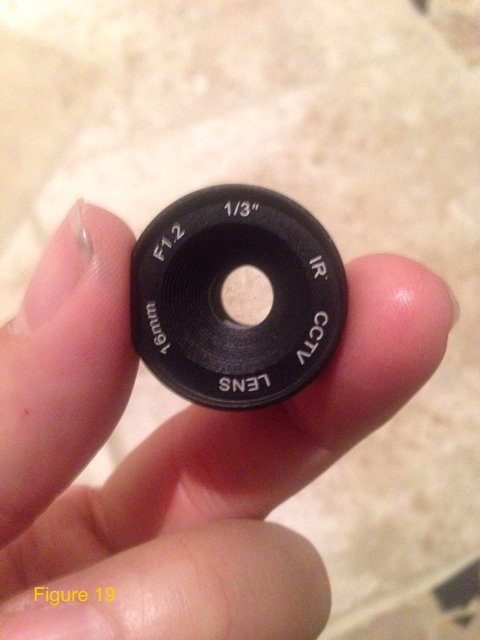
F1.2 16mm Fixed IR Board Lens 1/3" for CCTV Camera from Amazon for $10. This is the lens that I'm currently using in my setup. It allows me to position the camera about 10-12ft from the target.
F1.2 25mm Fixed IR Board Lens 1/3" for CCTV Camera from Amazon for $10. I tried this one too. It works but the glass is smaller so I think that while the zoom factor was better and gave me a flatter image, the actual image quality was lower. Perhaps there are other longer focal length lenses that would work.
9-22mm 1/3" IR F1.4 CCTV Video Vari-focal Zoom Lens from Amazon for $14. I have not tried this lens yet. It may be a good choice in that it has a variable focal zoom and an adjustable iris which would allow a greater depth of field.
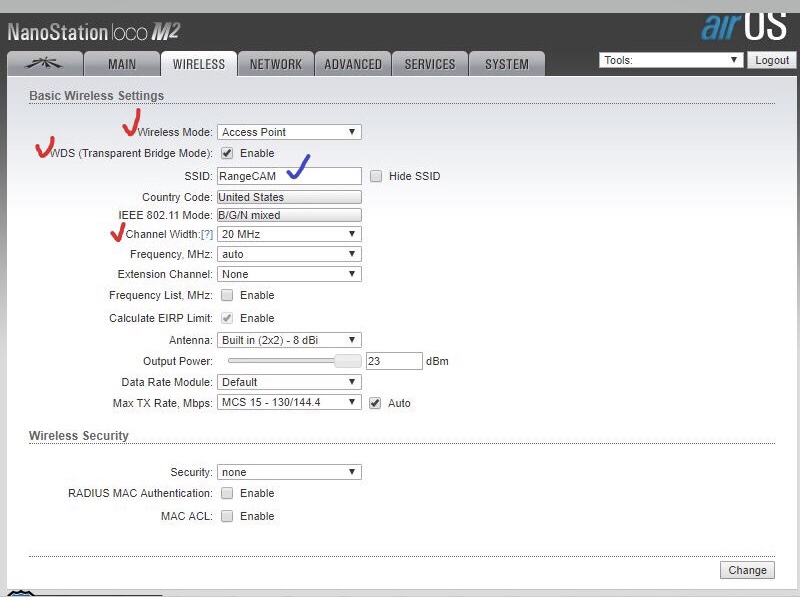
Wireless Bridge Antenna – This was the hardest part of the process for me. I wasted a lot of time and money trying out how to extend the signal from the Remote Target Cam to the Shooting Station. If you read my link to the original build MDS thread you’ll see that I was using a simple Hi Gain Wifi Antenna to try and beam a wireless signal from the router in lieu of the small plastic antenna that came with the router. I was able to barely shoot at 100 yards however the video feed was only usable at the lowest resolution and with quite a bit of disconnection issues. Eventually I added a second router and another Hi Gain antenna at the shooters station pointing back towards the Range Cam. This worked better at 100 yards and just barely worked at 200 yards at the lowest bit-rate and video resolution. The two Hi Gain antennas cost about $25 each.
After doing more research it seemed that to have a longer range I would need to have better antennas but simple Higher Gain Yagi antennas were approaching $50 each and they are big and cumbersome. They don’t fit into the remote case or my range bag like the smaller antennas. Eventually one of my friends purchased the Bullseye Target cam 600 yard version. He snapped a photo and posted it on MDS. I could see in the picture that they were not using a standard Hi Gain antenna. From best I can tell they are using a specialized network bridge/repeater with built in antenna. I think they use the Ubiquity Nanostation in the Bullseye system. This model is rated for 10km range at 25mbps.
So once I discovered Ubiquiti network products it became clear that they have a wide range of products suited for extending network range wirelessly. They systems are not really consumer based products but rather intended for network engineers and professionals. Looking further I found that they have a newer version of the Nanostation linked above called the Nanostation Loco M2 for $46 on Amazon. This version is similar to the previous model but it’s smaller and also has a built in standard Wifi router along with their range extending antenna technology.
Remember if you are building the Shooters Station to extend range you will need two of these.
Power Supply – The Ubiquity Antenna’s require 12-24vdc the wireless camera runs on 5-12vdc and if you go with the extend range build you’ll need a 5v USB power supply for the TP-Link router. There are again a lot of options here including just building your own 12v rechargeable battery pack. The things to consider are how many milliamp hours capacity the battery you choose has and how many power ports are available.
My first build had the router mounted inside of the Remote Case. I had no idea how large of a battery I would need so just started with larger than I thought I would need. In reality even with the Router I tested the 8300mAh battery by fully charging it and then leaving the system on for 12 hours. It only used about 2/3 of the total charge. So my guess is that considering most range trips are usually less than 4-5 hours I believe that a 3500 mAh battery should prove to be more than adequate.
TalentCell Rechargeable 72W 100WH 12V/8300mAh available at Amazon for $49. This comes with a charger too. It has a 12v port, 9v port and a standard 5v USB port. This is the model I used in my build.
HitLights Rechargeable 12V DC Lithium Ion Battery Packon Amazon for $24. It only has one 12v port but that’s all you need for the Remote Station if you build your own splitter harness. What’s nice is that it’s only about the size of a deck of standard playing cards.
POE Injector Adapters are required to transfer power from the battery pack into the CAT-5 Cable to the Ubiquiti Nanostations. They can also be found at Amazon here LINK
In you decide to build the Shooters Station router/antenna setup you’ll also need a battery there. I’m using and old USB phone charging battery and one of these 5v to 12v converters to bump the voltage for the POE antenna adapter.
Shooters Station Router – This item is optional and only required if you are adding the Shooters Station router to extend range. Really you can use any Wifi Router with at least one Ethernet port to connect to the Ubiquiti Nanostation Bridge Antenna. I had a Netgear router that I recycled for my first build but I really wanted something smaller that I could just throw into my range bag. I settled on the TP-LINK TL-WR802N available at Amazon for $25.
This thing is small but it’s just as powerful as any larger Netgear Wifi Router. It only draws a few watts of power so battery life at the Shooters Station should be many hours.
**I’m actually not 100% sure this additional router is really necessary. I know that the Ubiquity Nanostation Loco M2 has a built in router, but I spent 5-6 hours trying to figure out how to have the Antenna at the Shooter Station function as a Wifi router and also work as a Wireless Bridge to the Remote Target Camera. It appears that this functionality is part of the Nanostation but the device setup is not very intuitive. Hopefully one you shooters are more network savvy than me and can figure out how to eliminate a $25 component from the build.**
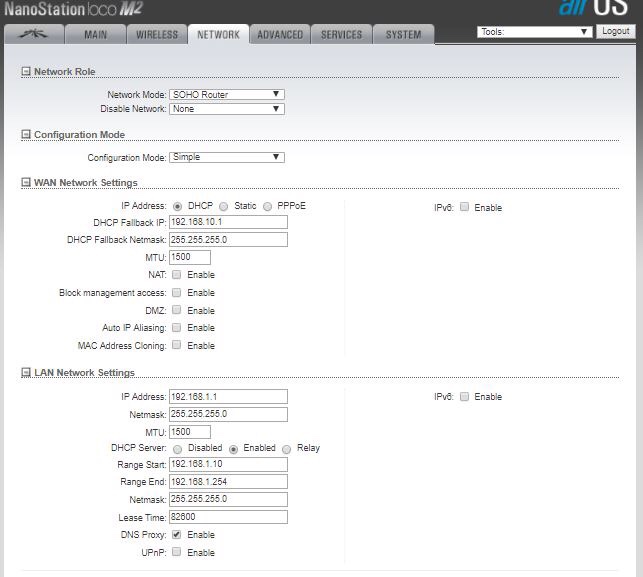
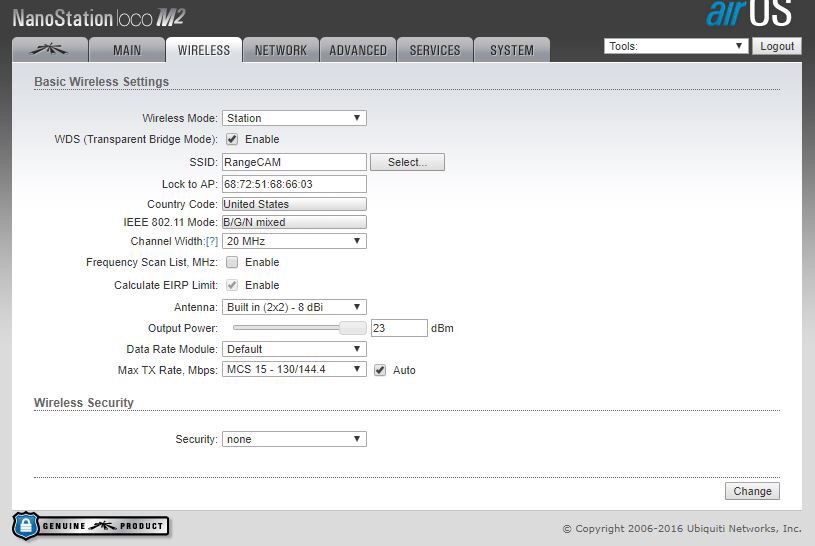
***Update 10/29/17 - The additional router is not needed when using two M2 antennas. I was able to figure out how to properly setup internal router functions using the Ubiquiti control panel. Instructions are now included in the network setup section 6. Please note that if you intend to only use ONE M2 antenna you will still need the additional router if you intend to connect to the Camera using a CAT5 Cable.
Continued on Part II
The do it yourself guide to building your own Wireless Target Cam for under $150
Table of contents
Section 1 – Introduction and Project Background
Section 2 – Basic Concepts to building your own Target Cam
Section 3 – Tools you will likely need
Section 4 – Parts List and Parts Options
Section 5 – Assembly
Section 6 – Wireless Network Setup
**These sections to be added later**
Section 7 – IP Camera Setup and viewing
Section 8 – Additional Information and Wrap-Up [Time to Build Stuff!]
Section 1 - Introduction and Project Background
It’s nice to sometimes have a bit of project background before diving in so let’s kick this off. If you are a long time shooter you’ve probably got all the equipment you need for shooting at the range. This guide may be informative but know first that there is nothing really new or groundbreaking being posted here. There are already a number of high quality wireless range cams on the market along with traditional quality optical spotting scopes. If you are shooter with ample money to spend on your hobby or passion you’ll already know what you want if you haven’t already spent the money to get those toys. If you are interested in CMP or NRA high power match shooting you’ll need a nice optical spotting scope period.
I’d like to consider this a post geared towards newer shooters at the range and perhaps new rifle owners. Those who are tinkerers with a D.I.Y. mindset would probably find this useful. I’m actually hopeful that people do find this useful and in fact contribute their own experience by offering suggestions to make this build better and cheaper.
This idea started for me about 6 months ago during my very first trip to A.G.C. I was a brand new member and brand new shooter. My first trip to the range I showed up with my new AR-15, box of ammo, my poorly built target frame not much else. I set up my frame at 100yds right away and started firing. I thought I would be able to just look through my scope and see how I was doing. However like a big noob dumb-ass that I was hadn’t figured on the fact that my rifle scope was nowhere close to Zero and I had blown about 40 rounds before I was reliably hitting paper.
It was very quickly that I realized I needed some sort of spotting scope to make my range trips more effective and productive. Even on my first day to the range I was lucky to meet a ton of total strangers who were more than willing to share their experiences and offer advice so I went shopping for a spotting scope and started my quest for information at MDS as well as some of the other popular shooting forums like AR-15.com, Snipers Hide and Savage Shooters. It was a discussion on Savage Shooters where I first stumbled across a very old post related to building a remote target cam. It sounded interesting but I didn’t really move in that direction. I wanted to shoot more and I planned to buy a spotting scope at Bass Pro. I had a father’s day present coming and figured I would be off the range fully prepared the following weekend. After speaking to the guy behind the counter it seemed clear that I could spend $200 on a nice spotting scope and my needs would be covered. I left with a Pursuit X-1 Compact Spotting Scope. Here is a LINK to a post on MDS about that purchase. Suffice it to say, that crappy scope didn’t do the job. It was a total waste of money and time. I ended up returning it and Bass Pro doesn’t even sell it any more. Lesson Learned.
I went back to the interwebs and looked closer at other options. I found more links to wireless target cams like the Bullseye Target Cam as well as several other DIY projects, some dating back a number of years using wired cameras. It seemed that the basic concept was fairly simple. I did discover a link on MDS posted in 2012 where someone started a discussion about building a target cam and I had posted my early progress within that thread. Here is the LINK. I considered just building on that discussion but I think the DIY post will be a better way to start a new discussion and hopefully collect input from other forum members. If any new ideas come out of the discussion and others decide to build their own systems hopefully we can keep those discussions consolidated here.
Section 2 – Basic Concepts to Building your own Target Cam
Like I mentioned above the basic concept is very simple. Consider that it’s it’s most basic and lowest cost form, we are going to take a wired IP Security cam connected to a battery along with a Wifi Router and a high gain Wifi Antenna and place them in a box which can be positioned down range near the target and beam a Wifi Signal back to your Phone, Tablet or Laptop at the shooting station. (Figure 1) If your goal was to only shoot at 100 yards (maybe 200 yards) this would be all you would need. I tested this setup at 200 yards connected to my iPhone 5 and it worked fine. It’s very likely that you could even build this setup for less than $100 without getting too fancy if you found some components on sale.
***Edit 10/29/17 - I realized that this method shown below does not work exactly as I've drawn. What was happening is that I had enabled wifi during the test and the antenna on the camera was connecting through Wifi to obtain and IP and not through the CAT5 Port. So the single antenna M2 setup works without the CAT5 Cable connected. There are some antenna types which have two CAT5 Ports on these models you can connect the camera to the LAN port on the antenna and this method will work as depicted below.
If you goal is to shoot regularly at 200 yards or more or simply wanted a higher bit rate video feed you would need to add a remote receiving antenna and wifi router. This would add about $75 to the build cost. At this point you would have a functioning range camera that should be good out to 600 yards. I have not yet tested my build to 600 yards but the antennas are supposedly able to communicate out to 1km.
While these two basic systems would cover most range cam needs you can easily upgrade the bridge antennas to larger more powerful models to extend the range. More powerful antennas would allow for a greater bandwidth which increases the video bit rate transmission quality and higher resolutions. Better cameras or lenses increase resolution. Bigger batteries allow for longer up time. However the basic functionality still remains the same.
Section 3 – Tools you will likely need
Most gun owners are probably fairly competent tool users and I would venture to guess have quite functional home workshops. Just to keep this DIY complete I’ll just list the tools that I think would be useful or that I actually used, but there is quite a bit of latitude here.
Rotary Cutting Tool – This is primarily used to modify the case to cut the hole for the camera. I have a Roto-Zip but Ryobi and Dremmel tools will work just as well. If you don’t have one, you can cut the plastic with a drill it will just take a bit more time.
Hole Saw – If you choose to use a fixed position camera you can easily use a standard 2” or 3” hole saw to drill a perfect circle through the side of your case.
Drill/Drill Press – I needed the drill to create a base plate to attach my devices to attach leveling feet.
Miter/Table Saw – My design had several wood and Plexiglas parts that were easier to cut with a table saw and miter saw. Obviously this is not necessary but helpful.
Tap & Die Set – If you are going to design and build your own brackets and braces to mount hardware within the case this is useful but again not necessary.
Soldering Iron Kit – I built a few custom length wiring harness to connect the battery to the camera and POE adapters. I could have just used the cables at their standard length but I just felt it’s nicer to have them only as long as really needed.
Laptop or PC – You’ll need a laptop or PC with a standard Ethernet port. This is required for programming and setting up the network parameters on the Nanostations, Router and likely the IP Camera.
Section 4 – Parts List and Parts Options
I’m going to list the exact parts I used along with approximate pricing and links to the supply source. However during the build this project evolved and I’ve identified some alternate parts which are also usable. Some are better quality or lower price than I may have originally purchased or alternatives that I would purchase if I were building this again. Basically consider the parts list as a very loose guide. I would be interested to see if others have experiences with other brands or products which may perform better than what I’ve listed.
Remote Camera Case – This can really be any plastic box large enough to hold your components. There is no reason it couldn’t also be made from a large Tupperware container, plywood or even a cardboard box. Unless you are planning to specifically mount your Bridge Antenna outside of the case it just cannot be metal.
The things to consider when choosing a box are to decide what you want to do with it in addition to simply holding the remote components. One advantage of choosing with the larger case would be to create a storage compartment for the Shooters Station Antenna, Router and Battery. However if you are going to build a separate case for those items the smaller case is probably the way to go. I think a waterproof case is nice.
MTM Ammo Can available for $12.99 from Amazon Prime. It’s comes in Orange or Green. It’s also water tight. The reason I choose this model was because I thought I needed a large case like this to fit all of the components.
However the latest design which does not require a router inside of the Remote Unit could easily fit into a much smaller Ammo Case like this Plano model for about $9.
IP Camera – Wireless IP security cameras are cheap. You can find them from $20 used to over $100 for 1080P HD resolution models. The first step in choosing the camera is deciding which type you will use. Whichever brand or type you buy make sure it has an Ethernet cable port so you can connect it directly to the Wireless Bridge Antenna.
***Update 10/30/17 - I tried to use a different brand camera that we had setup at work from a company called Dericam. I was able to connect to the system when also connected to the interned, but i could not get this model to work at the range. It appears that some models of IP-Cams must be able to connect to the internet to work with their phone software. Others do not. Since you would likely not have internet access at a range, be sure to use an IP camera that can work with their phone or tablet app under any circumstances.
There are two main types. Some models have a movable Pan/Tilt head which is controlled by the remote software on your laptop or phone. This style is nice because you can zoom in very close to your target and then tilt up to view other areas just as closely. I often multiple targets on the frame and I like to zoom right onto the actual target I’m shooting. Also by using a Pan/Tilt type you can change the wide angle lens for a longer focal length model. This allows you to place your Remote Cam further away from the target which gives you a flatter target appearance.
The second type just has a fixed lens and a wider field of view. When using this type of camera you will need to place your Remote Cam closer to the target and be sure you are aiming the camera directly at the center of your target. You will still be able to use the software to zoom into specific areas of the target but since you will be viewing the target at a lower angle the image will appear distorted by the camera perspective. This is the style of camera that the Bullseye Target cam uses and it works fine.
After you decide on the type you need to choose the resolution. Cheaper cameras come typically with 1.0 MP or 1.2 MP cameras. Newer models are available in HD 1080P. The higher resolution camera will allow you to zoom in closer with the software and resolve small bullet hole details with greater accuracy. So far I’m very happy with 720P resolution.
Finally you will find models which have night vision and audio recording. You may even find more expensive types with actual mechanical zoom and iris. I would guess that most of these options would be overkill. There is one option which may be useful however and that is cameras which can be powered directly over Ethernet Cable. Since the Bridge Antenna requires POE it may just make the wiring of the camera a bit easier.
Before I get into my recommendations I just want to say that I have setup several wired and wireless Foscam security cameras at work and found them to be fairly simple to add to an existing network. Like most products from China directly marketed to U.S. consumers the instructions or online support can be lacking at times, but the Foscam brand is better than most of the lower priced options. Below are three descent options that I have used.
Foscam FI9831P Camera available on Amazon for $80. This is the model I’m using in my system. It has 960P video resolution which is very clear and it also has Tilt/Pan capabilities. I did change the lens which I’ll discuss later but still a great cam.
Foscam FI9821P Camera available from amazon for $48. You can find these used for $25 on amazon. This is the model I’ve used at work and when I first tested my cam idea I borrowed one of these from work. The resolution is only 1 megapixel, but you do not need great resolution for a target cam. The first models of the Bullseye Target cam used a 1mp camera if I’m not mistaken. This model also has Tilt/Pan capabilities.
Foscam C1 Indoor HD 720P Camera from amazon for $60. This is a fixed field of view camera at 720P the image quality is good. I think this is the exact same model used in the newer Bullseye Cam system.
Telephoto Lens – I found that the standard lens that comes with most IP Security cameras has a fairly wide field of view usually between 70° and 115° While they still work you are forced to bring the camera unit closer to the target. Again when the camera is closer to the target the viewing angle is also greater which creates a more distorted perspective view of the target because you are looking up at it.
What I realized is that the the Foscam units have a standard 12mm X 0.5 thread pitch CCTV mount. So you can unscrew the lens from the camera and install any 12mmX0.5 threaded lens. Choosing a longer focal lens will allow you to place the camera further from the target frame to achieve a flatter image without loosing detail resolution.
F1.2 16mm Fixed IR Board Lens 1/3" for CCTV Camera from Amazon for $10. This is the lens that I'm currently using in my setup. It allows me to position the camera about 10-12ft from the target.
F1.2 25mm Fixed IR Board Lens 1/3" for CCTV Camera from Amazon for $10. I tried this one too. It works but the glass is smaller so I think that while the zoom factor was better and gave me a flatter image, the actual image quality was lower. Perhaps there are other longer focal length lenses that would work.
9-22mm 1/3" IR F1.4 CCTV Video Vari-focal Zoom Lens from Amazon for $14. I have not tried this lens yet. It may be a good choice in that it has a variable focal zoom and an adjustable iris which would allow a greater depth of field.
Wireless Bridge Antenna – This was the hardest part of the process for me. I wasted a lot of time and money trying out how to extend the signal from the Remote Target Cam to the Shooting Station. If you read my link to the original build MDS thread you’ll see that I was using a simple Hi Gain Wifi Antenna to try and beam a wireless signal from the router in lieu of the small plastic antenna that came with the router. I was able to barely shoot at 100 yards however the video feed was only usable at the lowest resolution and with quite a bit of disconnection issues. Eventually I added a second router and another Hi Gain antenna at the shooters station pointing back towards the Range Cam. This worked better at 100 yards and just barely worked at 200 yards at the lowest bit-rate and video resolution. The two Hi Gain antennas cost about $25 each.
After doing more research it seemed that to have a longer range I would need to have better antennas but simple Higher Gain Yagi antennas were approaching $50 each and they are big and cumbersome. They don’t fit into the remote case or my range bag like the smaller antennas. Eventually one of my friends purchased the Bullseye Target cam 600 yard version. He snapped a photo and posted it on MDS. I could see in the picture that they were not using a standard Hi Gain antenna. From best I can tell they are using a specialized network bridge/repeater with built in antenna. I think they use the Ubiquity Nanostation in the Bullseye system. This model is rated for 10km range at 25mbps.
So once I discovered Ubiquiti network products it became clear that they have a wide range of products suited for extending network range wirelessly. They systems are not really consumer based products but rather intended for network engineers and professionals. Looking further I found that they have a newer version of the Nanostation linked above called the Nanostation Loco M2 for $46 on Amazon. This version is similar to the previous model but it’s smaller and also has a built in standard Wifi router along with their range extending antenna technology.
Remember if you are building the Shooters Station to extend range you will need two of these.
Power Supply – The Ubiquity Antenna’s require 12-24vdc the wireless camera runs on 5-12vdc and if you go with the extend range build you’ll need a 5v USB power supply for the TP-Link router. There are again a lot of options here including just building your own 12v rechargeable battery pack. The things to consider are how many milliamp hours capacity the battery you choose has and how many power ports are available.
My first build had the router mounted inside of the Remote Case. I had no idea how large of a battery I would need so just started with larger than I thought I would need. In reality even with the Router I tested the 8300mAh battery by fully charging it and then leaving the system on for 12 hours. It only used about 2/3 of the total charge. So my guess is that considering most range trips are usually less than 4-5 hours I believe that a 3500 mAh battery should prove to be more than adequate.
TalentCell Rechargeable 72W 100WH 12V/8300mAh available at Amazon for $49. This comes with a charger too. It has a 12v port, 9v port and a standard 5v USB port. This is the model I used in my build.
HitLights Rechargeable 12V DC Lithium Ion Battery Packon Amazon for $24. It only has one 12v port but that’s all you need for the Remote Station if you build your own splitter harness. What’s nice is that it’s only about the size of a deck of standard playing cards.
POE Injector Adapters are required to transfer power from the battery pack into the CAT-5 Cable to the Ubiquiti Nanostations. They can also be found at Amazon here LINK
In you decide to build the Shooters Station router/antenna setup you’ll also need a battery there. I’m using and old USB phone charging battery and one of these 5v to 12v converters to bump the voltage for the POE antenna adapter.
Shooters Station Router – This item is optional and only required if you are adding the Shooters Station router to extend range. Really you can use any Wifi Router with at least one Ethernet port to connect to the Ubiquiti Nanostation Bridge Antenna. I had a Netgear router that I recycled for my first build but I really wanted something smaller that I could just throw into my range bag. I settled on the TP-LINK TL-WR802N available at Amazon for $25.
This thing is small but it’s just as powerful as any larger Netgear Wifi Router. It only draws a few watts of power so battery life at the Shooters Station should be many hours.
**I’m actually not 100% sure this additional router is really necessary. I know that the Ubiquity Nanostation Loco M2 has a built in router, but I spent 5-6 hours trying to figure out how to have the Antenna at the Shooter Station function as a Wifi router and also work as a Wireless Bridge to the Remote Target Camera. It appears that this functionality is part of the Nanostation but the device setup is not very intuitive. Hopefully one you shooters are more network savvy than me and can figure out how to eliminate a $25 component from the build.**
***Update 10/29/17 - The additional router is not needed when using two M2 antennas. I was able to figure out how to properly setup internal router functions using the Ubiquiti control panel. Instructions are now included in the network setup section 6. Please note that if you intend to only use ONE M2 antenna you will still need the additional router if you intend to connect to the Camera using a CAT5 Cable.
Continued on Part II
Last edited: