Looking for someone to teach/tutor Arduino Programming

The #1 community for Gun Owners of the Northeast

Member Benefits:

  • No ad networks!
  • Discuss all aspects of firearm ownership
  • Discuss anti-gun legislation
  • Buy, sell, and trade in the classified section
  • Chat with Local gun shops, ranges, trainers & other businesses
  • Discover free outdoor shooting areas
  • View up to date on firearm-related events
  • Share photos & video with other members
  • ...and so much more!
  • ToolAA

    Ultimate Member
    MDS Supporter
    Jun 17, 2016
    10,587
    God's Country
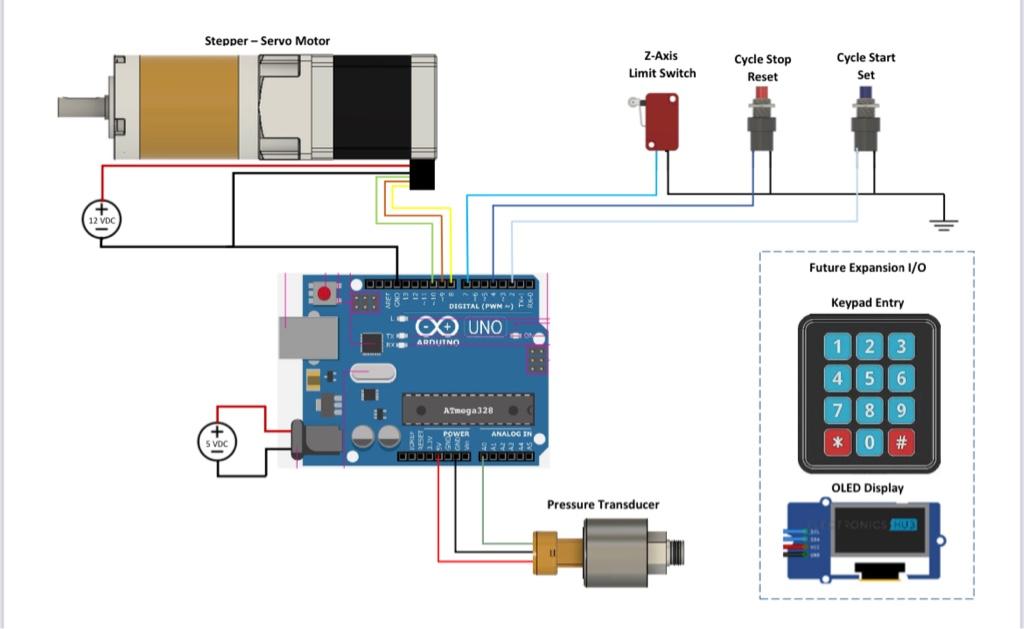
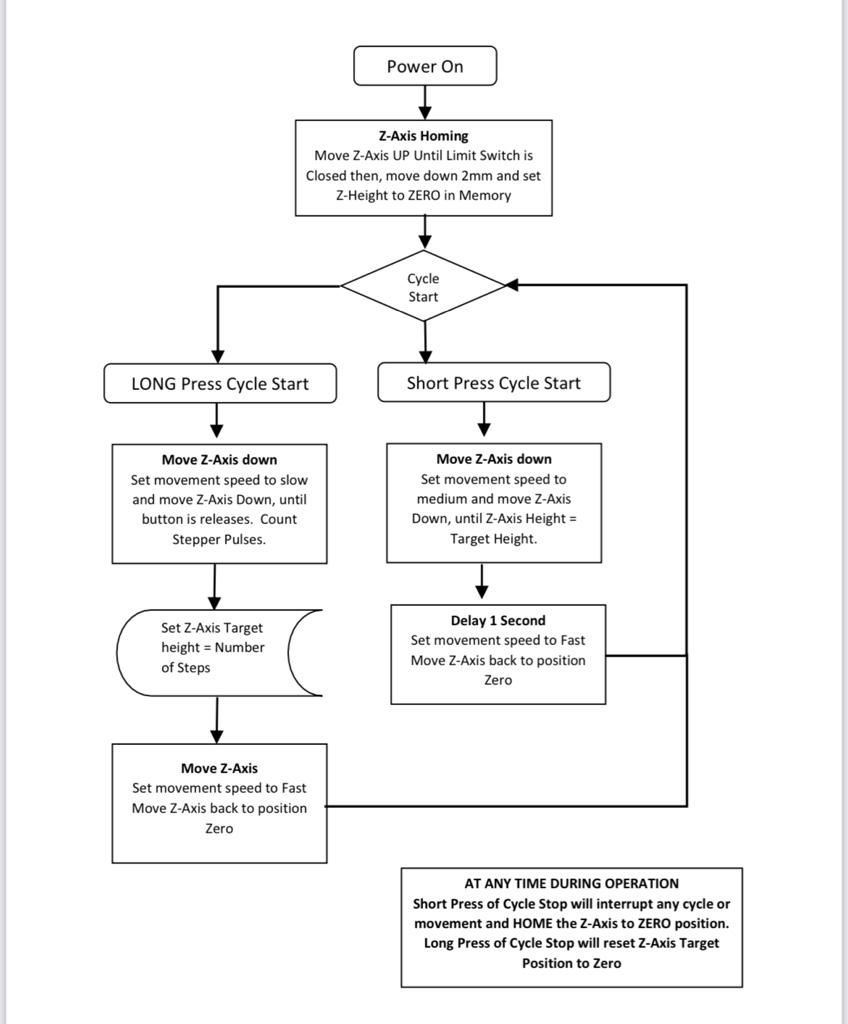
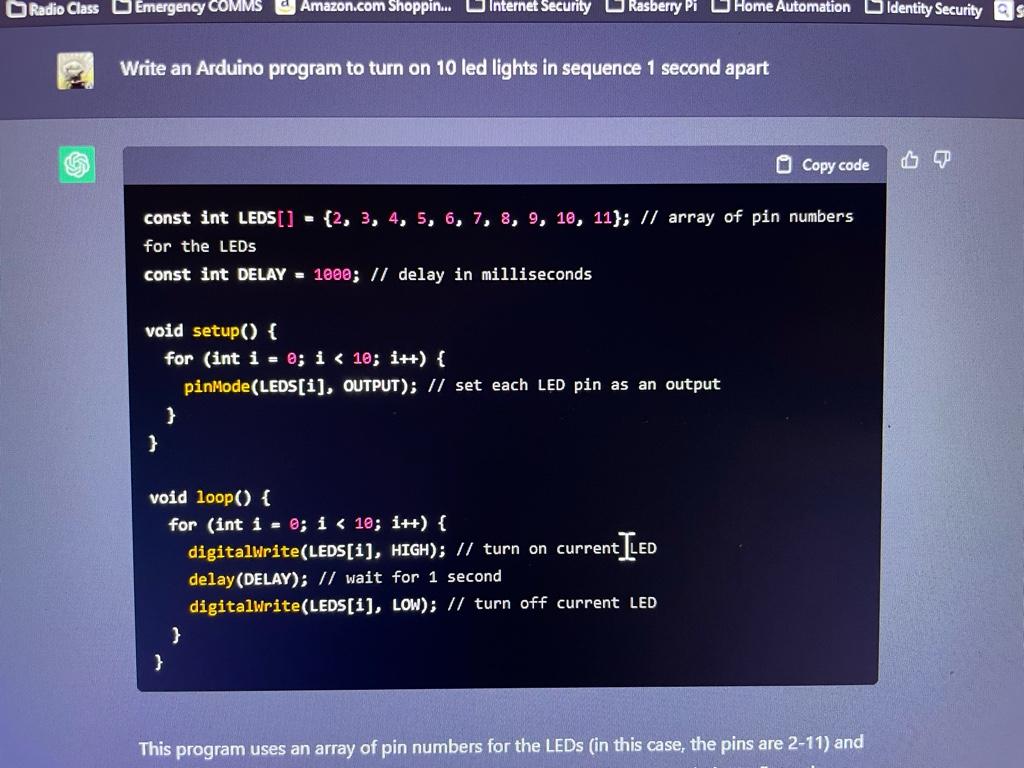
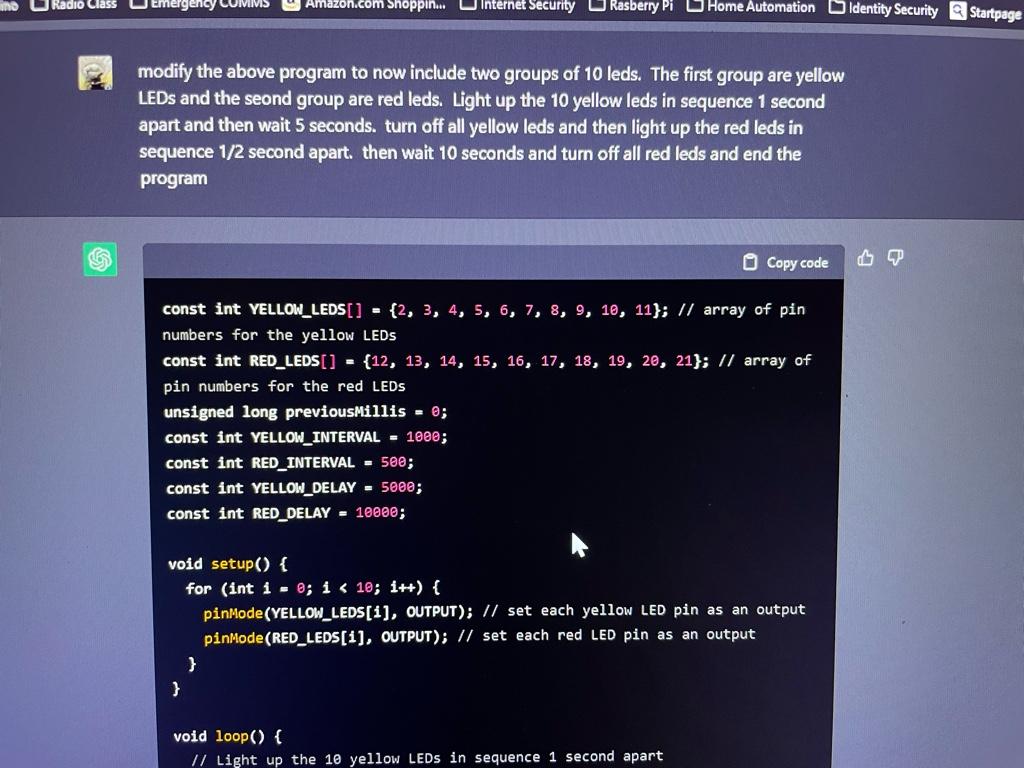
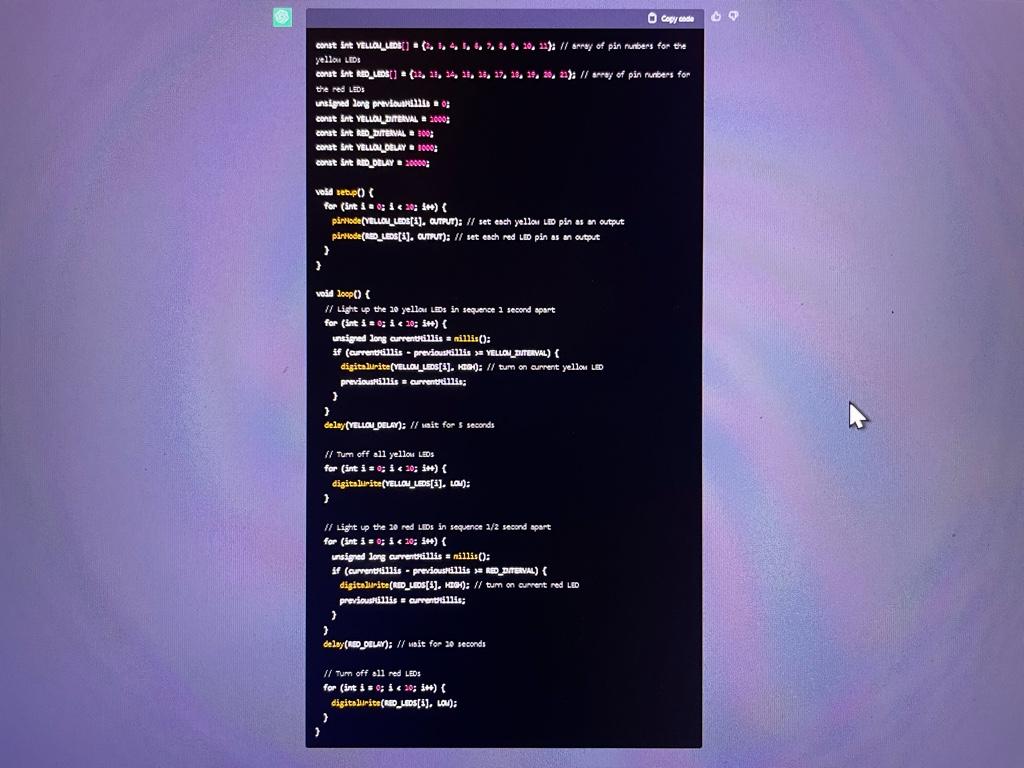
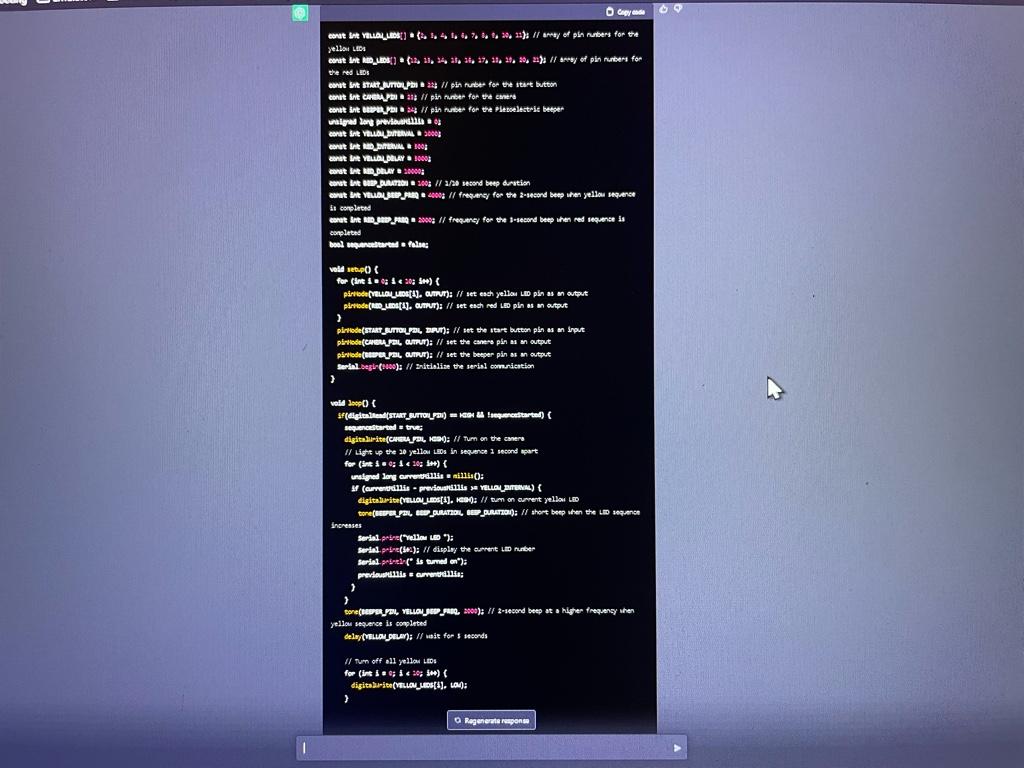
    I'm working on a small automation project and I need to create an Arduino control program. I'm trying to just muscle my way through YouTube videos and other web resources, but I think I would benefit by explaining what I'm trying to do, and have someone with experience, coach me through the process.

    I'm totally flexible in terms of how best to accommodate the teacher. I could meet in person or work on line via Zoom, Google Meet or MS teams. I can plan for a few jam packed 4 hr sessions or spread it out over shorter sessions over a longer time period. I'm not looking for any freebees either.

    If an experienced person, thinks that I would be better off using some other language like Python or MicroPython, I'm open to those options too.


    Oh, one more thing, I won't be a dick student!
     

    smdub

    Ultimate Member
    MDS Supporter
    Nov 14, 2012
    4,661
    MoCo
    I've not done much Arduino but I've done bare metal real time control on uPs my whole life. Im a C guy but the logic process of how to get tasks done is the same in any language. I'd be glad to swing by and do a long whiteboard session if you want.
     

    geda

    Active Member
    Dec 24, 2017
    550
    cowcounty
    Can you hint at what you are trying to automate? Most everything I do in 2022 I want wifi/ble/zigbee control and monitoring. Basic AVR based arduinos, which I assume you are talking about, are dead to me :).
     
    Last edited:

    ToolAA

    Ultimate Member
    MDS Supporter
    Jun 17, 2016
    10,587
    God's Country
    Can you hint at what you are trying to automate? Most everything I do in 2022 I want wifi/ble/zigbee control and monitoring. Basic AVR based arduinos, which I assume you are talking about, are dead to me :).

    Get yourself a C++ book

    What project are you working on trying to program?


    I’m working on a simple automated bullet seating press. It’s got a servo stepper, a pressure transducer and It will have a few micro switches. I’ve got basic motion, but I cannot seem to figure out how to also output the pressure transducer voltage signal to serial in real time. I’ll need to also create some simple homing and limit stop routines along with a method for setting the height to the top of various seating dies.

    Here is a simple video


    Again, I’m sure I can power through this but it will take a lot of time, and I think a few hands on training/tutoring sessions would would be the perfect learning vehicle for me, and help me create a better working solution.


    Sent from my iPhone using Tapatalk
     

    ToolAA

    Ultimate Member
    MDS Supporter
    Jun 17, 2016
    10,587
    God's Country
    I’ve already done some basic programming to make the Z-Axis motor move, and also read the transducer, but creating a multi-tasking code to continuously read, and create serial output of, the transducer voltage and motor step position is where I’m stuck.

    A friend of mine who is a db programmer recommended that I post this project on Fiver.com. I did yesterday after work, and had gotten already 15 responses in a few hours. They were ranging from $50-$250 and some included detailed documentation. It doesn’t solve my desire to learn the code but for $50 if it works, I could then go back and try to learn through their example. I’m looking at some of the examples these engineers are posting and they appear pretty complex, much more than my needs.


    Here is a breakdown of the design and program flow chart that I had to post, to get bids.

    126a56b357eed6efe6ff47f468cd1543.jpg


    a62fb97468be16b14bf3734ec9da80b4.jpg


    Sent from my iPhone using Tapatalk
     

    MigraineMan

    Defenestration Specialist
    Jun 9, 2011
    19,281
    Frederick County
    With Arduino, there's a lot going on behind the scenes. That is advantageous to getting things working in a consistent environment across a multitude of platforms, but it often comes with a cost. In general, the built-in Arduino routines are blocking - in that sending a text string to the serial output console is going to busy-wait at that point until the entire string meanders its way out the port at a pokey 9600 bits per second. Port transactions (I2C, SPI, etc) suffer the same fate.

    For real-time control stuff, you might need to grab AVR Studio and work up from there.
     

    ToolAA

    Ultimate Member
    MDS Supporter
    Jun 17, 2016
    10,587
    God's Country
    OK, I've read a few books and been plugging away at this in my free time, and I think I'm starting to get the hang of things. You can tell I'm a rookie because I've commented everything, just so I remember what the hell is going on. It still nowhere near complete, it's just the startup routine and the cycle routine running with a button press.


    #include <Arduino.h> //Required when writing Arduino via PlatformIO
    #include "ArduinoTimer.h" //Add MeguniLink Timer Function
    #include "MegunoLink.h" //Add MeguniLink library for plotting data
    #include "PString.h" //Add PString Lubray necessary for using variables in MeguanoLink XYPlot
    InterfacePanel MyPanel; //Add MeguniLink access to interface pannel
    const byte startButton = 2; //Cycle Start button is connected to pin2
    const byte enPin = 8; //Servo/Stepper Enable lead is connected to pin5
    const byte stepPin = 10; //Servo/Stepper Pulse lead is connected to pin6
    const byte dirPin = 9; //Servo/Stepper Direction lead is connected to pin7
    const byte homePin = 7; //Home z-Axis Uppper Limit stop is connected to pin8
    const int zMove = 8.0; //Sets the ammount of movement in mm for the Z-Axis
    const int stPmm = 1600; //1600 Steps per 1mm of Z-Axis Movement
    const unsigned long numStep = zMove * stPmm; //formula to calculate number of steps to move Z mm
    unsigned long ldelayD = 50; //sets the pulse between -Z Down steps 1000=1sec
    unsigned long ldelayU = 10; //sets the pulse between +Z Up steps 1000=1sec
    unsigned long mDelayD = 1500; //sets the delay in microsec between direction change at bottom limit
    unsigned long mDelayU = 500; //sets the delay in microsec between direction chang at top limit
    byte buttonState = true; //variable for reading the pushbutton status
    const int pressureInput = A0; //select the analog input pin for the pressure transducer
    const int pressureZero = 128; //analog reading of pressure transducer at 0psi
    const int pressureMax = 921.6; //analog reading of pressure transducer at 100psi
    const int pressuretransducermaxPSI = 100; //psi value of transducer being used
    const long baud = 115200; //constant integer to set the baud rate for serial monitor
    const int sensorreadDelay = 300; //constant integer to set the sensor read delay in milliseconds
    float pressureValue = 0; //variable to store the value coming from the pressure transducer
    ArduinoTimer psiOutTimer; //Sets a variable to output Psi value (This function is part of the MeguniLink library)
    const int serialDelay = 100; //Sets the delay in reporting serial data to 250ms
    const int serialDelayF = 1000; //Sets the delay in reporting serial data to 1sec
    void Zhome(); //Declare Custom Functions before setup()
    void testCycle();
    void precycle();
    void postCycle();

    void setup()
    {
    pinMode(stepPin,OUTPUT); //Set stepPin as output for motor pulses
    pinMode(dirPin,OUTPUT); //Set direction Pin as output LOW=Down HIGH=Up
    pinMode(enPin, OUTPUT); //Set enable Pin as output
    pinMode(startButton, INPUT_PULLUP); //initializ Cycle Start button pin and turn on internal pull up resistors
    pinMode(homePin, INPUT_PULLUP); //initializ Home Limit Stop pin and turn on internal pull up resistors
    digitalWrite(enPin, LOW); //Set enPin to LOW = Board Control is ON
    digitalWrite(startButton, HIGH); //Set buttonPin to HIGH = Button Press pass to ground
    digitalWrite(homePin, HIGH); //Set homePin to HIGH = trigger will pass to ground
    Zhome(); //Run Z-Axis Homing Function
    }

    void Zhome() //Homing Function - Move Z-Axis UP Fast to limit switch, then down slow, back up to limit and down again.
    {
    delay(mDelayU); //Initial Start Movement Delay
    digitalWrite(dirPin, HIGH); //Set dirPin to High = Z-Axis UP move towards z-Axis Home Limit
    for(long x = 0; digitalRead(homePin) == HIGH; x++) //Step Counter function moves Z-Axis up until zMove Limit is reached
    {
    digitalWrite(stepPin,HIGH);
    delayMicroseconds(50);
    digitalWrite(stepPin,LOW);
    delayMicroseconds(50);
    }
    digitalWrite(dirPin, LOW); //Set dirPin to LOW to prepare for Z-Axis DOWN
    for(int x = 0; x < 4800; x++) //Step Counter function moves Z-Axis down for 4800 Steps (3mm)
    {
    digitalWrite(stepPin,HIGH);
    delayMicroseconds(50);
    digitalWrite(stepPin,LOW);
    delayMicroseconds(50);
    }
    digitalWrite(dirPin, HIGH); //Set dirPin to HIGH to prepare for Z-Axis UP

    for(int x = 0; digitalRead(homePin) == HIGH; x++) //Step Counter function moves Z-Axis up until zMove Limit is reached
    {
    digitalWrite(stepPin,HIGH);
    delayMicroseconds(250);
    digitalWrite(stepPin,LOW);
    delayMicroseconds(250);
    }
    digitalWrite(dirPin, LOW); //Set dirPin to LOW to prepare for Z-Axis DOWN
    for(long x = 0; x < 4800; x++) //Step Counter function moves Z-Axis down 3mm
    {
    digitalWrite(stepPin,HIGH);
    delayMicroseconds(250);
    digitalWrite(stepPin,LOW);
    delayMicroseconds(250);
    }
    }

    void preCycle()
    {
    digitalWrite(dirPin, LOW); //Set dirPin to LOW to prepare for Z-Axis DOWN
    for(long x = 0; x < 8000; x++) //Step Counter function moves Z-Axis down 5mm
    {
    digitalWrite(stepPin,HIGH);
    delayMicroseconds(30);
    digitalWrite(stepPin,LOW);
    delayMicroseconds(30);
    }
    }
    void postCycle()
    {
    digitalWrite(dirPin, HIGH); //Set dirPin to HIGH to prepare for Z-Axis UP
    for(long x = 0; x < 8000; x++) //Step Counter function moves Z-Axis down 5mm
    {
    digitalWrite(stepPin,HIGH);
    delayMicroseconds(50);
    digitalWrite(stepPin,LOW);
    delayMicroseconds(50);
    }
    }

    void testCycle()
    {
    Serial.begin(baud);
    for(unsigned long x = 0; x < numStep; x++) //Step Counter function moves Z-Axis down until zMove Limit is reached
    {
    pressureValue=analogRead(pressureInput); //reads value from input pin and assigns to variable
    pressureValue=((pressureValue-pressureZero)*pressuretransducermaxPSI)/(pressureMax-pressureZero); //conversion equation to convert analog reading to psi
    XYPlot psiPlot; //Sets up export of psi data through serial to MeguniLink
    //psiPlot.SetTitle("Projectile Seating Force");
    //psiPlot.SetXlabel("Z-Axis Position .001mm");
    //psiPlot.SetYlabel("Seating Force PSI");

    digitalWrite(stepPin,HIGH);
    delayMicroseconds(ldelayD);

    if (psiOutTimer.TimePassed_Milliseconds(serialDelay))
    {
    psiPlot.SendData(F("Load"), x/64, pressureValue);
    MyPanel.SetNumber(F("Seating Force"),pressureValue);
    }
    if (psiOutTimer.TimePassed_Milliseconds(serialDelay))
    {
    psiPlot.SendData("Load", x/64, pressureValue);
    MyPanel.SetNumber(F("Seating Force"),pressureValue);
    }
    digitalWrite(stepPin,LOW);
    delayMicroseconds(ldelayD);
    }
    delay(mDelayD); //Pause at bottom limit
    digitalWrite(dirPin, HIGH); //Change direction to UP
    MyPanel.SetNumber(F("Seating Force"), 0); //Reset MeguinoLink Gauge to Value 0
    XYPlot psiPlot; //Sets up export of psi data through serial to MeguniLink
    psiPlot.SendData("Load", numStep/64, 0);
    for(unsigned long x = 0; x < numStep; x++) //Step Counter function moves Z-Axis up until zMove=0 is reached
    {
    digitalWrite(stepPin,HIGH);
    delayMicroseconds(ldelayU);
    digitalWrite(stepPin,LOW);
    delayMicroseconds(ldelayU);
    }
    digitalWrite(dirPin, LOW); //Change direction to Down
    buttonState = !buttonState;

    }

    void loop()
    {
    if (digitalRead(startButton) != true) //read the state of the startButton value
    {
    preCycle();
    testCycle();
    postCycle();
    } while(digitalRead(startButton) == true);
    }
     
    Jul 1, 2012
    5,736
    Comments are good :) It's ALMOST impossible to have too many.
    Whitespace is your friend too.

    I made some updates to the code for you (fixed some boo-boos etc), maybe best sent in a PM...
     

    ToolAA

    Ultimate Member
    MDS Supporter
    Jun 17, 2016
    10,587
    God's Country
    Comments are good :) It's ALMOST impossible to have too many.
    Whitespace is your friend too.

    I made some updates to the code for you (fixed some boo-boos etc), maybe best sent in a PM...
    Thanks. I’m also learning to code using VS Studio and PlatformIO. When cut and pasted the text all of the formatting tabs and spaces were gone. i appreciate you looking at it and giving professional feedback.
     

    ToolAA

    Ultimate Member
    MDS Supporter
    Jun 17, 2016
    10,587
    God's Country
    Ok so I’ve actually been making decent progress on learning Arduino programming. I can totally build simple machine controllers with multiple inputs and outputs. It’s pretty cool. Today I decided to see how ChatGPT can code.

    Well holy crap, it’s surprising what it can do with simple prompts.

    Here is what I started with:

    Write an Arduino program that will turn on 10 LED lights in sequence one second apart.

    44dbad613138d2abfcd15b00ad892a9d.jpg


    Then I told it to modify the above program, not to use the delay command, because it’s not really the best option when trying to create efficient, controller programming. Revised the program quickly with no issues.

    Then I asked her to modify the program again to now include two groups of 10 lids. The first group are yellow and the second group a red light up the 10 lives in sequence for one second part then wait five seconds, turn off all the yellow lids and then light up the Redlands in sequence 1/2 a second part, then wait 10 seconds and turn off all the lights and in the program.

    Again no issues.

    8118c9cad9bce6b741afe0f0468b856f.jpg


    I kept modifying the program, making it slightly more complicated with each step, and each time Chad GPT created the code quickly.

    638c3172739ddd4c7fcd120de92132e5.jpg

    f196f342dfe3c4c39f63659107154b85.jpg


    Here’s a short video of the program in action.


    After I was done playing around with our Arduino. I told chat GPT to convert the above program into micro python.

    So I guess what I’m saying is if you’re trying to teach yourself how to code possibly using chat GPT to write simple code will help novices learn.


    Sent from my iPhone using Tapatalk
     

    Users who are viewing this thread

    Forum statistics

    Threads
    275,550
    Messages
    7,286,126
    Members
    33,476
    Latest member
    Spb5205

    Latest threads

    Top Bottom