Would you cut a grove between the shoulder and the threads? Wouldn't that give a margin of error for threading?IMO, do it. Practice on a rod many times until you and more comfortable. You can even practice on an aluminum rod a couple times before moving up to steel rods. Everyone has a 'first time'. It's always still a little nerve wracking doing it on the real deal. Worst case a new replacement barrel is $85 for the cost of education. What is learning to DIY worth to you?
Browning Buck Mark Barrel - Camper 22LR
Check out the deal on Browning Buck Mark Barrel - Camper 22LR at MGWwww.midwestgunworks.com
To do threads properly you really need a way to measure pitch diameter. 'Thread wires' are a cheap way to do it.
If you don't have a really slow spindle speed that you are comfortable threading to a shoulder, there are tricks like putting the threading tool upside down behind the work and running in reverse. That might not be a good idea on a SB9 lathe due to the threaded chuck/spindle nose (which can start to unscrew itself.) Another cheat I've used sometimes is to spin the spindle by hand. That takes a good sharp tool but you can go right up to a shoulder.
You are using an out of date browser. It may not display this or other websites correctly.
You should upgrade or use an alternative browser.
You should upgrade or use an alternative browser.
Lathe for general gunsmithing?
- Thread starter Slackdaddy
- Start date
The #1 community for Gun Owners of the Northeast
Member Benefits:
No ad networks! Discuss all aspects of firearm ownership Discuss anti-gun legislation Buy, sell, and trade in the classified section Chat with Local gun shops, ranges, trainers & other businesses Discover free outdoor shooting areas View up to date on firearm-related events Share photos & video with other members ...and so much more!
Member Benefits:
Yes, that is standard procedure for almost any thread cut to a shoulder. You can't clear the chip at the very end w/o it.Would you cut a grove between the shoulder and the threads? Wouldn't that give a margin of error for threading?
Your suppressor manufacturer may publish other details. For example. AAC used to publish that they also wanted a little flat section at the muzzle end w/o threads for the o-ring to seat and not get torn. Many want a small register behind the threads. Little stuff like that makes it a professional job. If you can't find what you need I might have it saved. I haven't watched this video but this is what I typically think of as a 'pro' threading job. Look at it at at 1:03. You can see the smooth part at the muzzle and a small register behind the threads. The bottom center adapter of the opening screen shows those type of features too.
It's a good thing I practiced first because I really f'd up a brass rod I was practicing on. I don't have a thread counter so I was using the method where you keep the half nuts engaged and stop the lathe as the threading tool just reaches the grove. Back out the cross feed and run the lathe in reverse, reset the cross feed and add a few thousands to the compound rest and take another pass. On the third pass I must have taken too big of a bite because the tool bit into the work and knocked it askew and f'd up the threads. I'll try again later with either a brass or aluminum rod.
LOL. You can get a 3D printed thread dial for $45 delivered. https://www.ebay.com/itm/203192438926
Just part off the end you screwed up and try again.
Just part off the end you screwed up and try again.
I bought one of those thread dials and it didn't work. The gear did not mesh with the lead screw. They are sending me another gear. Hopefully it will work because I'm anxious to get started.LOL. You can get a 3D printed thread dial for $45 delivered. https://www.ebay.com/itm/203192438926
Just part off the end you screwed up and try again.
I've practiced on a couple of pieces of steel. One is a bolt I cut the head off and the other is a random piece of steel rod I had laying around. They both came out a little rough. The blued one is a little better than the bolt but still not acceptable. I went too deep both times which made the fit of a thread protector kind of wobbly when I threaded it onto it. The top of the threads measured .475 instead of .500 or .497 which is what I think I need for a good fit. The threads felt rough too. If I ran a cloth around the threads to clean them off the cloth would catch on the threads. I've seen videos where they take a file to the top of the threads to flatten them and smooth them out a bit. I tried that with some emery cloth instead of a file and it improved them somewhat. I'll try again and see if I can get closer to .500 and file the tops a bit.

Looking good!
The 'tops' of the threads should have no influence on fit. (FWIW, those are called the 'major diameter'.) In fact, you should just start out by turning the thread area to the correct major diameter before you start threading. Using this info (1/2-28 example):
 www.machiningdoctor.com
Your crest should be at least 0.0045" short. So turn to 0.491" before you start threading. If the threads where perfectly pointy, that means the internal threads in the nut would have to have been cut perfectly deep. Taps wear and leave very slightly rounded corners in the troughs they cut. You need to not make pointy external threads to have clearance for that. For the same reason you are allowed to have a very slightly rounded/flat V bit when cutting your external threads leaving a non-perfect root. You get to cut them w/ up to 0.0045" shy of perfectly pointy. The ID of the nut will have its minor diameter toleranced up slightly to account for that (same as you lopped off the points from the major diameter.). Basically, threads are supposed to match pitch diameters (plus some clearance for fit class.) The root/crest should not touch one another.
www.machiningdoctor.com
Your crest should be at least 0.0045" short. So turn to 0.491" before you start threading. If the threads where perfectly pointy, that means the internal threads in the nut would have to have been cut perfectly deep. Taps wear and leave very slightly rounded corners in the troughs they cut. You need to not make pointy external threads to have clearance for that. For the same reason you are allowed to have a very slightly rounded/flat V bit when cutting your external threads leaving a non-perfect root. You get to cut them w/ up to 0.0045" shy of perfectly pointy. The ID of the nut will have its minor diameter toleranced up slightly to account for that (same as you lopped off the points from the major diameter.). Basically, threads are supposed to match pitch diameters (plus some clearance for fit class.) The root/crest should not touch one another.
Your thread protector is wobbly because you undershot the 'pitch diameter'. As I have said before, you really need to get a set of thread wires and learn how to measure pitch diameter. Without them you will undershoot every time (unless you go in tiny increments.) It goes from interference fit (nut won't go on at all) to you've gone too far and the nut is wobbly. When the nut won't go on you don't know if you are 0.020' over or 0.001". Thread wires allow you to measure the pitch diameter and know how far you have left to go. If you measure 0.005" over on diameter after a few passes, you know you have to dial in that much in the next pass or two to come out perfect. Same way you machine any smooth diameter on a lathe. You get close, you mic it out, and then know how much more to dial in to cut. You don't just keep guessing until a ring gauge slips over.
That said, you may want to adjust pitch diameter clearance once you do a test fit. Machine your test piece to the correct size. If the thread protector or suppressor is too loose for your liking, do another one a couple thou larger. Almost all commercial threads are cut w/ clearance. Taps cut too big, dies cut too small. When you buy a tap or die this is listed as part of the spec. You can special order low clearance tap or die if you want a more perfect fit. But they will have to be replaced more often as they wear out of spec. Many dies are split so you can carefully adjust them for fit class (or wear.)
Edit:
Measuring w/ thread wires: https://littlemachineshop.com/images/gallery/instructions/ThreeWireMethod.pdf
Edit2:
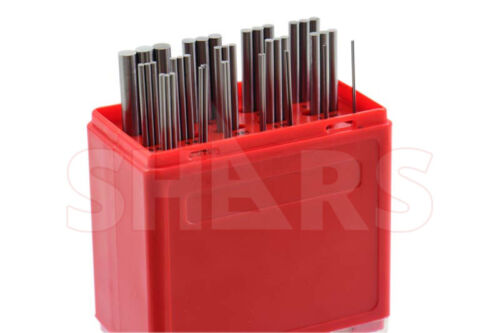
Example of thread wire measuring set (there are others, this is the first that popped up.)
I'll warn you now that using three wires and a mic/dial calipers is fiddly. Either your fingers are too big or you need an extra set of hands. Its a bit of a PITA.
*IF* you were cutting a bunch of the same pitch threads you can buy thread mics. So you buy a 28 pitch mic and it will directly read the pitch diameter on a 1/4-28 or 1/2-28 thread (or any other diameter). But since the little anvils are thread shaped then are unique to each pitch. Faster and more foolproof for production but it gets too costly to buy sets of them - thus the wires are the cheap alternative.
The 'tops' of the threads should have no influence on fit. (FWIW, those are called the 'major diameter'.) In fact, you should just start out by turning the thread area to the correct major diameter before you start threading. Using this info (1/2-28 example):
1/2 - 28 UNEF : Thread Dimensions (Machining Doctor)
1/2 - 28 UNEF : Basic Thread Dimensions (Pitch, minor & major diameters, depth, lead), Tolerance range for all applicable classes and much more
Your thread protector is wobbly because you undershot the 'pitch diameter'. As I have said before, you really need to get a set of thread wires and learn how to measure pitch diameter. Without them you will undershoot every time (unless you go in tiny increments.) It goes from interference fit (nut won't go on at all) to you've gone too far and the nut is wobbly. When the nut won't go on you don't know if you are 0.020' over or 0.001". Thread wires allow you to measure the pitch diameter and know how far you have left to go. If you measure 0.005" over on diameter after a few passes, you know you have to dial in that much in the next pass or two to come out perfect. Same way you machine any smooth diameter on a lathe. You get close, you mic it out, and then know how much more to dial in to cut. You don't just keep guessing until a ring gauge slips over.
That said, you may want to adjust pitch diameter clearance once you do a test fit. Machine your test piece to the correct size. If the thread protector or suppressor is too loose for your liking, do another one a couple thou larger. Almost all commercial threads are cut w/ clearance. Taps cut too big, dies cut too small. When you buy a tap or die this is listed as part of the spec. You can special order low clearance tap or die if you want a more perfect fit. But they will have to be replaced more often as they wear out of spec. Many dies are split so you can carefully adjust them for fit class (or wear.)
Edit:
Measuring w/ thread wires: https://littlemachineshop.com/images/gallery/instructions/ThreeWireMethod.pdf
Edit2:
Example of thread wire measuring set (there are others, this is the first that popped up.)
48-3 Thread Pitch Diameter Measuring Wire !\ | eBay
Find many great new & used options and get the best deals for 48-3 Thread Pitch Diameter Measuring Wire !\ at the best online prices at eBay! Free shipping for many products!
www.ebay.com
I'll warn you now that using three wires and a mic/dial calipers is fiddly. Either your fingers are too big or you need an extra set of hands. Its a bit of a PITA.
*IF* you were cutting a bunch of the same pitch threads you can buy thread mics. So you buy a 28 pitch mic and it will directly read the pitch diameter on a 1/4-28 or 1/2-28 thread (or any other diameter). But since the little anvils are thread shaped then are unique to each pitch. Faster and more foolproof for production but it gets too costly to buy sets of them - thus the wires are the cheap alternative.
Last edited:
I've seen videos of people flipping the threading tool over and running smaller lathes without an automatic carriage stop in reverse to prevent crashing into the shoulder. you just start the tool in the gutter and run the lathe backwards threading away from the shoulder.
Running the lathe backwards will unscrew the chuck on my lathe. I don't have a problem with running it towards the chuck.
I think I've got it somewhat figured out. This is the latest and it turned out nice. The thread protector fits perfectly. Now if I can just duplicate this on a gun barrel. I intentionally left the grove large on this practice piece. I won't have that much on the barrel. I'm going to try to thread the barrel of a Mossberg 715T .22 cal. It's a cheap AR 15-looking carbine that is very easy to remove the barrel and the barrel is just a straight .665" no taper barrel. Very easy to chuck up in the lathe. This little project is making me realize why they charge $150 to thread a barrel! Of course, I'm just learning so the going is slow. Makes me realize how little I know about running a lathe.

Haha. Looks great! Once you get the hang of it, it becomes pretty routine. Can't put a price on the learning.
Commercial entities that do this have to make a living at it (profit, time, tools, matl) plus cover the cost of the occasional barrel they screw up. There are ways to use dies or die heads to make the job easier. The aforementioned thread mics are a huge time saver and reduce human errors too.
As you are moving on to barrels, If not turning between centers make sure you chuck them up aligned with the bore *NOT* the OD of the barrel. They are not always concentric. I use a pin gauge in the bore and indicate off that. Had one recently that I cut down and threaded that was about 0.010" off. You could see the gauge pin visibly wobble when the chuck spun. Not enough to worry about getting the suppressor threads mis-aligned but you have to center it up before you recrown. (If you are just threading, you don't have to worry about a recrown.) Just something to keep in mind for 'next time'.
I bought a couple of those pin gauges but might have bought the wrong thing. I bought a .219+ and a .219- gauge pin. Neither one fits the barrel. What kind of pin gauge do you use?
Went and grabbed my Buckmark out of the safe. This is a M1 MINUS pin set (not that that +/- matters too much when you are dealing with one thou steps.) Hasn't been cleaned but a .218 doesn't even want to try and start. Has a TINY bit of play so I'm guessing mine is more like 0.2175".
PIn gauges are quick and handy but you can turn your own aluminum/brass rod (safer shoving it down the bore than steel) until it just fits. You aren't looking to gauge the size but just have a straight rod you can indicate on.

PIn gauges are quick and handy but you can turn your own aluminum/brass rod (safer shoving it down the bore than steel) until it just fits. You aren't looking to gauge the size but just have a straight rod you can indicate on.
Actually, the .219 does barely go in the bore but not all the way so the barrel is probably flared out at the muzzle a bit which would not help accuracy much. Anyhow, I went ahead and threaded the end of the barrel and it turned out acceptable but not great. The thread protector threads on but not as tight as my last practice piece. I'm going to need a longer thread protector. The one I'm using is off my M9-22. The can threads on fine so hopefully, I can test it out tomorrow. If all is right with my thread job, I shouldn't have a baffle strike. Keeping my fingers crossed.
Also got my Ruger LCP Max back from Ruger today so I need to test it out too. They replaced the trigger because I complained about the well-known "trigger bite". I doubt it will make much difference since it's the same Ruger trigger.


Also got my Ruger LCP Max back from Ruger today so I need to test it out too. They replaced the trigger because I complained about the well-known "trigger bite". I doubt it will make much difference since it's the same Ruger trigger.
Nice!
You know you can sight down through the suppressor and see that its centered? Open the action and shine a light in there (and make sure its unloaded!) Should have 3 concentric circles. Breech, muzzle, suppressor endcap. Pretty easy to verify if its near perfect. If its visually off a little, an alignment rod might be handy.
You know you can sight down through the suppressor and see that its centered? Open the action and shine a light in there (and make sure its unloaded!) Should have 3 concentric circles. Breech, muzzle, suppressor endcap. Pretty easy to verify if its near perfect. If its visually off a little, an alignment rod might be handy.
I put the suppressor on the barrel before I reassembled the gun and sighted from the breech end. Everything looked good. I'll find out tomorrow...
Smdub, did you thread the barrel on that Buckmark yourself?
Smdub, did you thread the barrel on that Buckmark yourself?
Last edited:
No, that was OEM on the Ruger. I've thought about taking the bbl off and cutting the Silencerco spec nub at the end w/o threads. Right now it hits the o-ring on my Sparrow. Hasn't cut it yet but I try to just leave it on.
This is the AR57 I chopped (16"->10.4"). Same length as the P90. They sell a ~12" length one now. Had that been avail when I ordered mine I might not have bothered w/ this. Bbl is nitrided which was HARD to get under the skin. Had to make a deep initial pass w/ carbide to peel it off. The bbl is something like 0.560" OD which leaves scant little for a shoulder for the suppressor so I left it really sharp. I cold blued the threads. The bbl comes almost flush to the end of the upper pic rail - you can just make it out through the Mlok slot. A muzzle device just pokes out a little. A pic w/ RAD22. Also one w/ the stock 16" bbl in about the right position w/ 10.5 and 12" marked trying to decide which one... If Green Mountain ever gets their 5.7 barrel blanks back in stock I might machine up a pistol length bbl that fully tucks the suppressor. RSideOut has one like that and it's super slick.


This is the AR57 I chopped (16"->10.4"). Same length as the P90. They sell a ~12" length one now. Had that been avail when I ordered mine I might not have bothered w/ this. Bbl is nitrided which was HARD to get under the skin. Had to make a deep initial pass w/ carbide to peel it off. The bbl is something like 0.560" OD which leaves scant little for a shoulder for the suppressor so I left it really sharp. I cold blued the threads. The bbl comes almost flush to the end of the upper pic rail - you can just make it out through the Mlok slot. A muzzle device just pokes out a little. A pic w/ RAD22. Also one w/ the stock 16" bbl in about the right position w/ 10.5 and 12" marked trying to decide which one... If Green Mountain ever gets their 5.7 barrel blanks back in stock I might machine up a pistol length bbl that fully tucks the suppressor. RSideOut has one like that and it's super slick.
Took the Mossberg to the range today and the suppressor fit and ran fine. No baffle strikes so I must have gotten the threads on correctly. I may trim the barrel back so that a normal thread protector will fit. That would give me a chance to re-crown the barrel. The cheap sights on this gun were never adjustable to POI so maybe a re-crown would help.
Feels good doesn't it?Took the Mossberg to the range today and the suppressor fit and ran fine. No baffle strikes so I must have gotten the threads on correctly. I may trim the barrel back so that a normal thread protector will fit. That would give me a chance to re-crown the barrel. The cheap sights on this gun were never adjustable to POI so maybe a re-crown would help.
Be very careful w/ barrel length & NFA. Don't end up w/ a <16" bbl. Looks like the Mossberg 715T is advertised as 16.25". Looks like you're in the clear to trim a little but I'd double check their spec by measuring before you trim any.
You could also make a new thread protector or use a muzzle device. (If you make your own thread protector, just go buy a good tap. Toolmax (from Suncoast? on ebay) makes excellent ones.)
Users who are viewing this thread
Total: 2 (members: 0, guests: 2)

Forum statistics
Latest threads
-

-
-

-
What would be the best Maryland compliant rifle I can buy for under $3000? (2 Viewers)
- Started by Tool
- Replies: 13
-

-
-