Entini Rifle

The #1 community for Gun Owners of the Northeast

Member Benefits:

  • No ad networks!
  • Discuss all aspects of firearm ownership
  • Discuss anti-gun legislation
  • Buy, sell, and trade in the classified section
  • Chat with Local gun shops, ranges, trainers & other businesses
  • Discover free outdoor shooting areas
  • View up to date on firearm-related events
  • Share photos & video with other members
  • ...and so much more!
  • Doco Overboard

    Ultimate Member
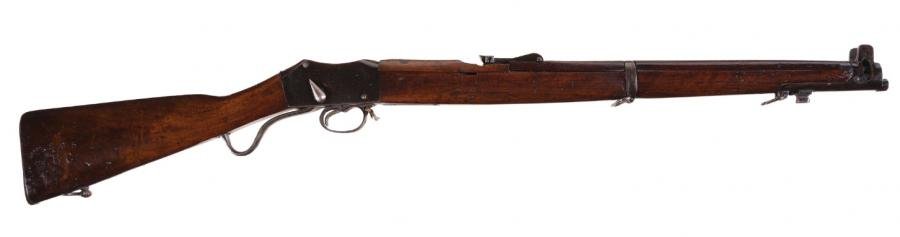
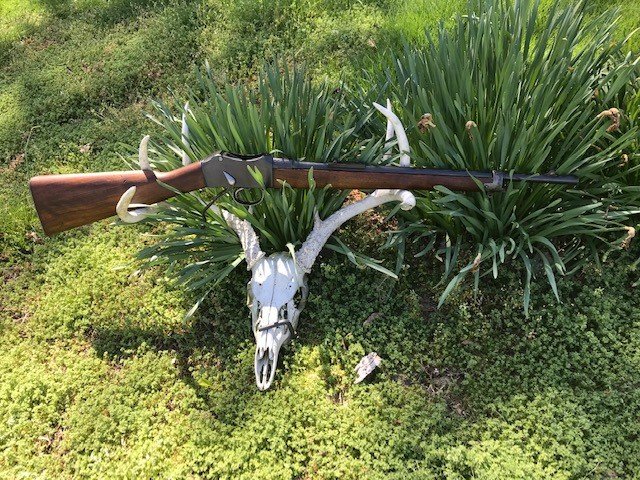
    I'm going to build up a rifle that looks like, or is a close facsimile of this one.

    View attachment 337019

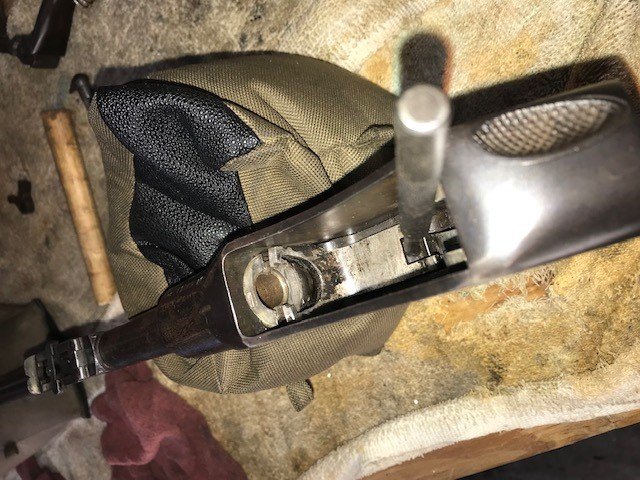
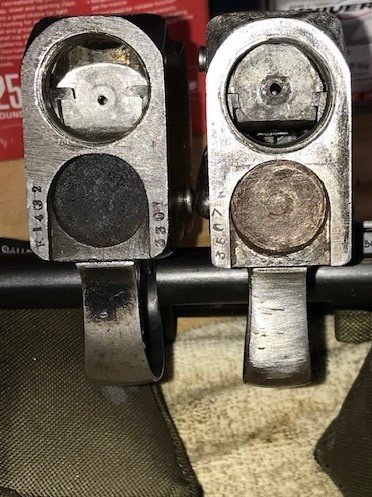
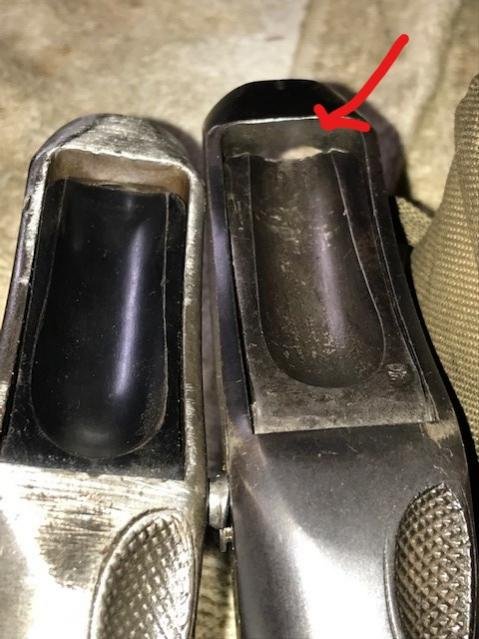
    Need to scrounge up parts from a SMLE- uncut barrel. Front timber,rear sights stock bits etc.
    If you have any Martini spares or stock woods Ill be looking for those parts as well to have a selection to choose from/dress out.
    Hopefully it'll turn out into a decent shooter/curiosity piece once completed.
     

    Attachments

    • Capture.jpg
      Capture.jpg
      12.5 KB · Views: 420

    Threeband

    The M1 Does My Talking
    Dec 30, 2006
    25,315
    Carroll County
    The Brits rebarreled a lot of .455 Martinis with ,303 barrels, and also made them from scratch. They had the long barrels though, not the SMLE style which came later.

    They also made carbines. I've fired a .303 Martini-Enfield carbine which belonged to a friend.
     

    Doco Overboard

    Ultimate Member
    One time I saw one of these that had a P14 barrel on it and front end.
    I thought it looked pretty cool and would be doable.
    But because a SMLE barrel has the same tenon as a Martini I think it would make more sense just to do that.
    Problem is good SMLE barrels are hard to source anymore and I only have one left.
    However, I toyed around with a take off and it turned right up nearly to index hand tight and a Mk II breech block closed tight on a work bench dummy so its real tempting to use the new barrel depending on how it acts.
    I'm still collecting parts and will fit as I go.
    I have 450 barrel and 303 carbine barrel in good shape for trade/sale fodder but would like to keep them just the same.
    Martini parts are sort of expensive anymore, not easy to find either.


    Doco Overboard

    Ultimate Member
    Running into minor snags on this one.
    I have parts lined up but one donor rifle may not be worth ruining/separating components.

    It's built up nearly to a decent standard but somehow I'm not able to convince myself to completely wreck it.
    It has 303 barrel /Breech block but only needs some smithing to make a decent shooter out of.

    Now, the other bit will require more effort, I have a wide trough block and solid unmolested lever/ fire control arrangement but it will need the breech block bushed and firing pin adjusted for primer safety.
    Next, an extractor modified for a 303 case. Ill probably dovetail a FP port instead of threading and tapping a grub screw.


    Otherwise I have some caveats to work through like a no 4 two groove barrel that's had the tenon reworked like a No 1. This will be good learning opportunity and provide some experience for stretching/adjusting tumbler lever components then hand fitting an extractor.
    Because its been shortened, the N01 fore-end will have to wait until action is fitted out and then primer strike adjusted accordingly before moving on.
    Once I cut the tenon face for the extractor horns on a brand new SMLE barrel, its doomed for 303 Valhalla permanently.

    Modified breech-face/internal images.
    View attachment 338310

    View attachment 338311
     

    Attachments

    • Martini 1.jpg
      Martini 1.jpg
      78.5 KB · Views: 171
    • ML.jpg
      ML.jpg
      89.9 KB · Views: 175

    teratos

    My hair is amazing
    MDS Supporter
    Patriot Picket
    Jan 22, 2009
    59,838
    Bel Air
    If you happen to come across a crappy but functional Enfield receiver, please let me know. I’m looking to do a De Lisle knock off.
     

    Doco Overboard

    Ultimate Member
    Okay so here's something you have to work through when fiddling with these old buggers.

    You'll notice the differing heights of the breech blocks below. The action on the right has the horns of the loading lever built up to raise the height of the block to center the firing pin indentation. In this image, the extractor (for a 450 barrel, ) is clearly below the firing pin port. It has shorter extensions or ears to accommodate a much larger diameter cartridge case.

    Also, it's a 450 block and the firing pin port diameter is larger than the one on the left. But.... one must also keep in mind that there is no particular need, at least to my knowledge to have to be equipped with an extractor that is as tall as half the diameter of a 450 case.

    The 303 block on the left, (notice smaller port)which happens to have a loading lever that's not been built up, is below the horns of the extractor. The extractor has had the ears lengthened to lever a case rim out of the smaller diameter chamber. But, there's no way in hell that its going to produce a centered hit on striking the primer cap.

    View attachment 338520

    Second image is exterior view of the top of the block but lower than leading front edge of the action. You can see daylight through that sucker. Unlike the front of the 450 block on the left.

    View attachment 338521

    Last picture is of the breech. Its poorly fit in my opinion becuase the depth of the extractor groove impinges at the front leading edge of the rim. I'm glad I removed the barrel to check it out.
    The only gas control measures measures engineered into these actions is a very small elongated hole at the bottom of the block and the standing vertical portion that supports the rear of the block. And then in this instance, extractor grooves in front of the cartridge case that ordinarily wouldn't be a great concern with a rimmed cartridge.

    View attachment 338522

    So, what Ill do is swap levers and then to make sure everything is fit as well as I can make. One way to ensure block height is centered is to turn a plug the same diameter of the case neck that has firm tension on the neck and extends into the case body.
    Then, drill a hole right through the center the same diameter as the 303 firing pin port. That way I can form a pin that can be pushed through the flash hole to check and spot the face of the breech block before proceeding with barrel fitting.

    The horns of the loading lever can be Tig welded up and adjusted for proper height, contoured to interact with the block ramps properly for smooth operation. Then hardened with Kasenit/Cherry red.
    Kasenit by the way is no longer available more than likely becuase it was found to be non compliant with a California warning label or something.

    Its the same method you would want to use for bushing the front of the breech block with the exception being the firing pin is about 3/8's of an inch in diameter. Turn a bushing that closely fits, drill a hole and use it to keep the drill bit from walking by shortening the bit and driving it by the pin you made from outside the bock to your drill motor.
     

    Attachments

    • Blocks 1.jpg
      Blocks 1.jpg
      58.1 KB · Views: 126
    • InkedBlocks 2_LI.jpg
      InkedBlocks 2_LI.jpg
      48.1 KB · Views: 123
    • InkedBreech-Extractor cuts_LI.jpg
      InkedBreech-Extractor cuts_LI.jpg
      49.1 KB · Views: 126

    Doco Overboard

    Ultimate Member
    If you happen to come across a crappy but functional Enfield receiver, please let me know. I’m looking to do a De Lisle knock off.
    When I run across something Ill grab it. I need more stuff too so Im always on the hunt.

    Anyway, I have a no 4 barrel turned down to fit SMle/Martini action.
    Instead of building up the horns on one of the levers I have, I got lucky and picked one up that will raise the breech block without any fiddling.

    I cleaned up and refit everything on the one action that I can stock up with the timber that came with it and get a nice little shooter carbine.

    In the mean time, Ill fit the turned down No 4 barrel as a spare, then fit it out in case I run into a problem with the old one. Ill shoot the old set up a few times with some Z ammo and try some cast bullets in it to see how it does.
    If it does ok and doesn't blow up in my face, Ill leave it be and practice on the shortened barrel before moving on to a NOS Smle barrel I have that will be used to complete the project.

    It's a god awful mess of parts swapping, trial fitting etc with this old stuff but fun to tinker about with.
    The "horns" on the lever are important to make sure the front face of the breech-block is raised to the correct height, Its not crooked to the breech face and theirs not a ton of slack to the barrel shank so the cartridge is supported properly.

    What I learned is, that if that blocks not right and is angled downward the lever takes a hit upon firing and recoil is distributed to the weaker hinge pin area. And that the higher up it's located, the tighter the block locks up and the less transverse movement occurs. The twin horns and their camming surfaces sort of steer the block left and right when one takes their time during fitting.

    The simplicity of the design is amazing with only about 15 parts or so in that each movement begins the pre-positioning of the others with the exception of the rear block pin and transverse screw that secures the front of the trigger guard and extractor.

    The ball seat of the No4 barrel is .313 and 312 groove diameter which means it's in pretty good shape, the other one has some wear but could be way, way worse for its age hopefully it shoots decently without a lot of fuss.
     

    Attachments

    • No4 Shtle barrel thread.jpg
      No4 Shtle barrel thread.jpg
      77.5 KB · Views: 80
    • Action Drawing.PNG
      Action Drawing.PNG
      37.7 KB · Views: 85

    Doco Overboard

    Ultimate Member
    Capt. Main-Waring says.....
    Make some jam nuts when your tugging on your old kit. You need to be able to see the extractor drop right in it's cut without haveing to reverse your "tighten"
    And if you happen to have 1-1/4" Grover handy, "Let it rip-skip".

    No sense faffing about with that big ass club of an action wrench that's too easy to not see what our doing so well.
    Or that you could drop on your foot or something in between coffee breaks.
    Nice and straight we go now.
    I got about 50 ft lbs of torque here which will do nicely I bet, nice and smooth to the marks in one easy pull.

    Now that I have a handy little truck gun, I can begin to move on to what I originally intended to accomplish in the first place.
     

    Attachments

    • nut -bolts.jpg
      nut -bolts.jpg
      59.5 KB · Views: 102
    • nuts bolts II.jpg
      nuts bolts II.jpg
      46.7 KB · Views: 101
    • Mainwaring 303 - Copy.jpg
      Mainwaring 303 - Copy.jpg
      125.1 KB · Views: 100

    Doco Overboard

    Ultimate Member
    Got a mocked up rifle here. I have an Indian pattern stock I cut down and a real nice Lithgow barrel to use.
    The Knox form is going to need a skim to get final index and then tenon cut for extractor and the same made up before head space is set.
    Take off front hand guards are hard to get and I'm going to have to drum up a Martini butt plate from somewhere if I can locate one.
    The stock at rear is keyed to fit into the recess at front of receiver and theirs a ton of wood that needs to be removed from the sides to blend nicely with the rec body.
    Maybe I ll just turn the sides in at the rear I'm not sure yet. A lug will have to be soldered on to the bottom of the barrel and a pin made to secure the rear of the stock.
    Prestigious wood products out of Canada has duplicated Hg's and stocks for Smle's and Krags in a couple different wood species with shipping to USA.
     

    Attachments

    • mock up.jpg
      mock up.jpg
      70.4 KB · Views: 94

    GunBum

    Active Member
    Feb 21, 2018
    751
    SW Missouri
    I have a set of #1 mk 3 front and rear upper handguards. They are of Middle Eastern origin if you can use them. I can take pics if you are interested.
     

    GunBum

    Active Member
    Feb 21, 2018
    751
    SW Missouri
    Here’s a picture. We’ll have to arrange logistics to get them to you. PM me your address and I’ll mail them. I’ll be in Mexico next week for work, and not sure if I can make it to the post Office before I fly in the morning, so it might be a week or two before you get them.
     

    Attachments

    • DA1CB849-340B-4945-AFC0-88B755A1BC4B.jpeg
      DA1CB849-340B-4945-AFC0-88B755A1BC4B.jpeg
      38.4 KB · Views: 78

    Doco Overboard

    Ultimate Member
    Finally got it all mocked up.
    Extractor made, extractor slots cut in the tenon,barrel indexed and timber roughed out.
    I need to fix the lower handguard extensions by slicing some wood on the sides of the rear site, polish- blue and then finish the wood.
    But before all that, I'll have to get my reamer tool post ground to fit the bore, its oversize for the Lithgow barrel I used. Barrel is near new no wear-tighter than a crabs ass etc.
     

    Attachments

    • Mex2.jpg
      Mex2.jpg
      497.9 KB · Views: 77
    • MEX1.jpg
      MEX1.jpg
      240.5 KB · Views: 74

    Doco Overboard

    Ultimate Member
    Comin' along B...
    I’ve got another barrel for a shot gun/ Martini experiment. 24 gauge.
    This rifle is bad ass cool , a SG for shooting turkeys would be pretty a nifty venture too I think.
    If you ever run across a MH action and feel like making some specialty ammo ,it could be a pretty easy bit.
    I’ll shoot Red Dot 180 ers in this one or just stuff them full of black powder maybe.
     

    Users who are viewing this thread

    Latest posts

    Forum statistics

    Threads
    275,500
    Messages
    7,284,199
    Members
    33,471
    Latest member
    Ababe1120

    Latest threads

    Top Bottom