.22 Ghost Gun

The #1 community for Gun Owners of the Northeast

Member Benefits:

  • No ad networks!
  • Discuss all aspects of firearm ownership
  • Discuss anti-gun legislation
  • Buy, sell, and trade in the classified section
  • Chat with Local gun shops, ranges, trainers & other businesses
  • Discover free outdoor shooting areas
  • View up to date on firearm-related events
  • Share photos & video with other members
  • ...and so much more!
  • GunBum

    Active Member
    Feb 21, 2018
    751
    SW Missouri
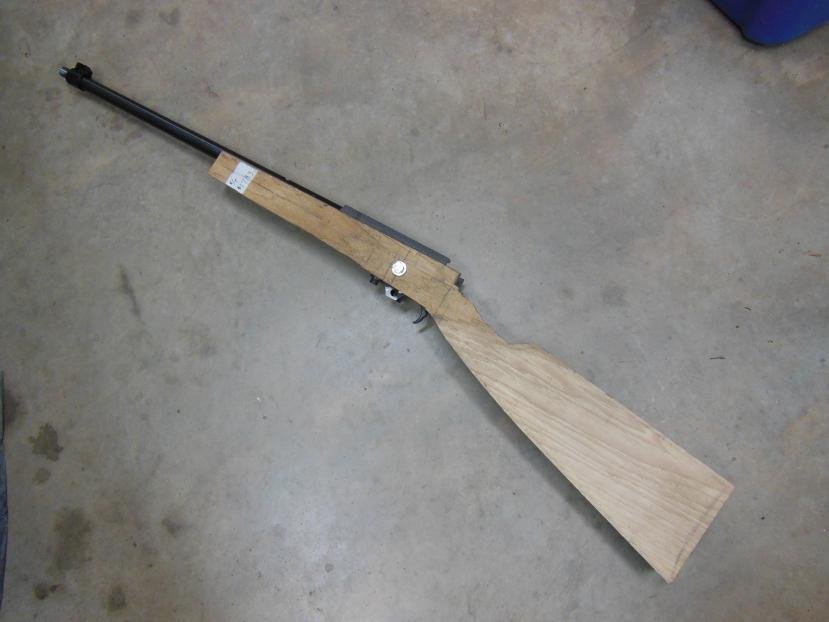
    I posted this build on one of the gun building sites. A couple guys who are members here and there encouraged me to post here too. This is a “scrapyard build.”

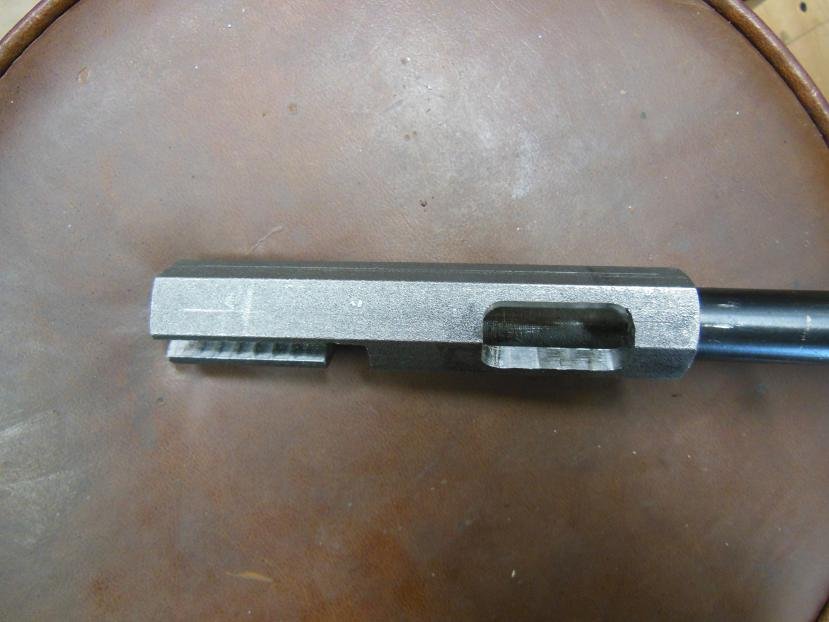
    So, a few months ago I was looking in my box of random gun parts and saw a .22 LR bolt from some random bolt action 22 that I picked up off a gun show table a few years ago. It’s a hammer fired bolt, for what that’s worth. A striker fired one would have been easier to play with, but whatever.

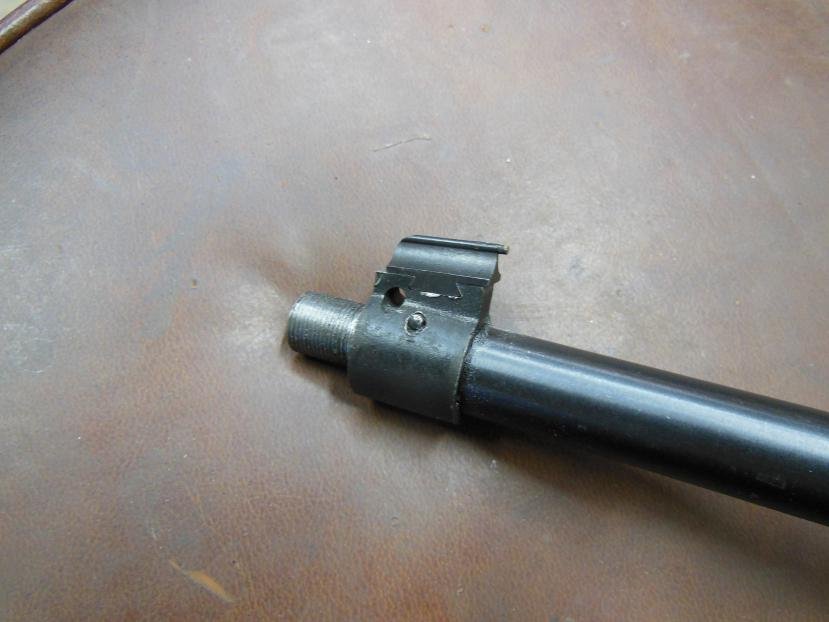
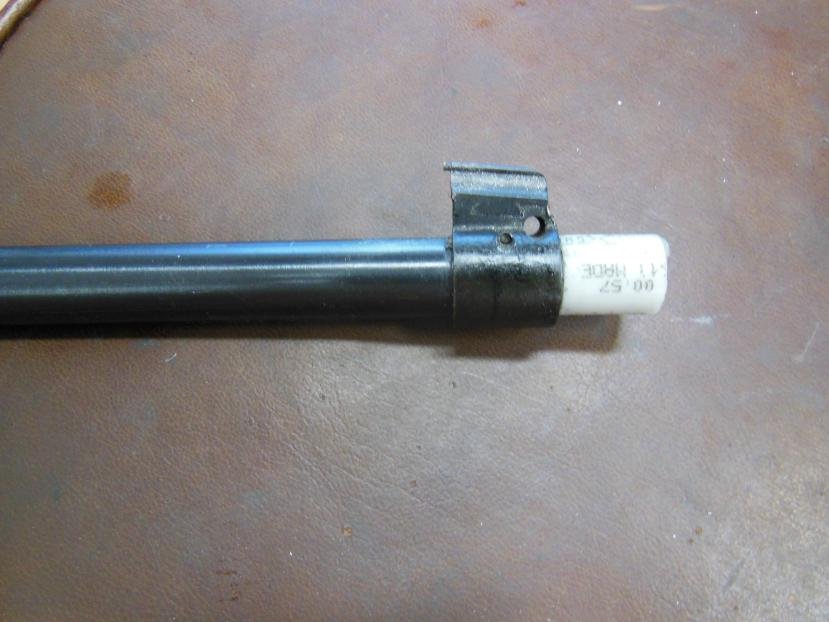
    I also have a variety of .22 barrels from 10/22’s, Marlin 60’s, barrel liners, unknown source, etc...

    For triggers, I had the option of scratch build, AR parts, AK parts, 10/22 parts, 870 parts, etc...

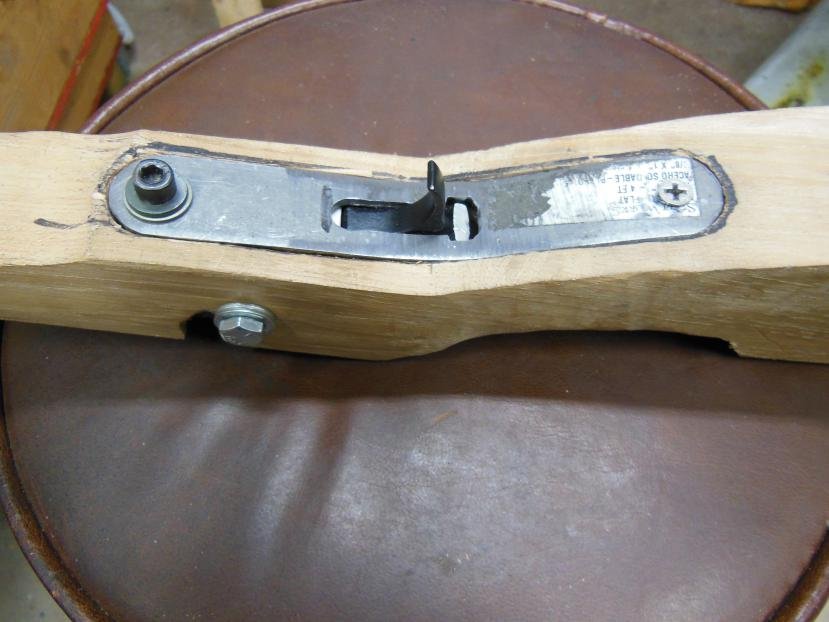
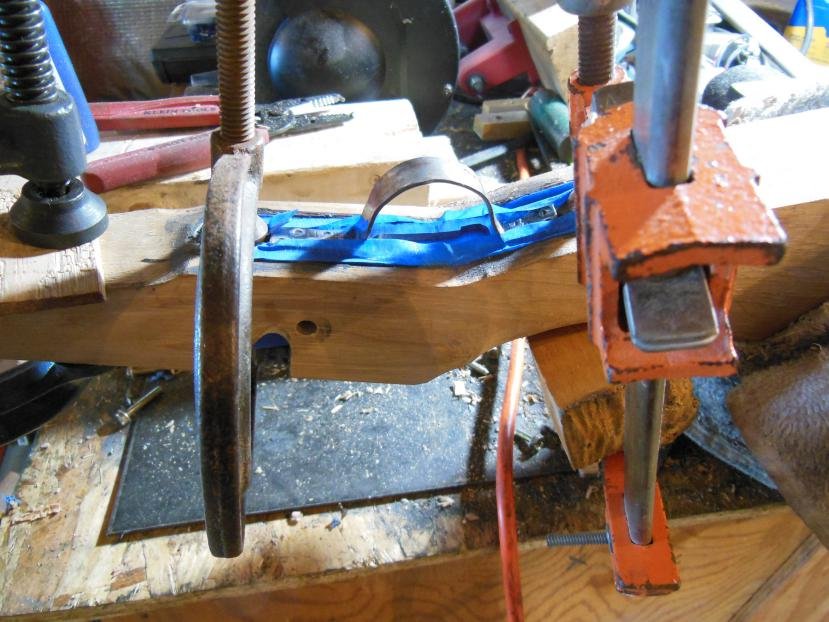
    For the stock, I had a piece of hickory that was the right size. BTW, hickory is terrible to work with. It’s so hard, I’m pretty sure they make hickory welding rods.

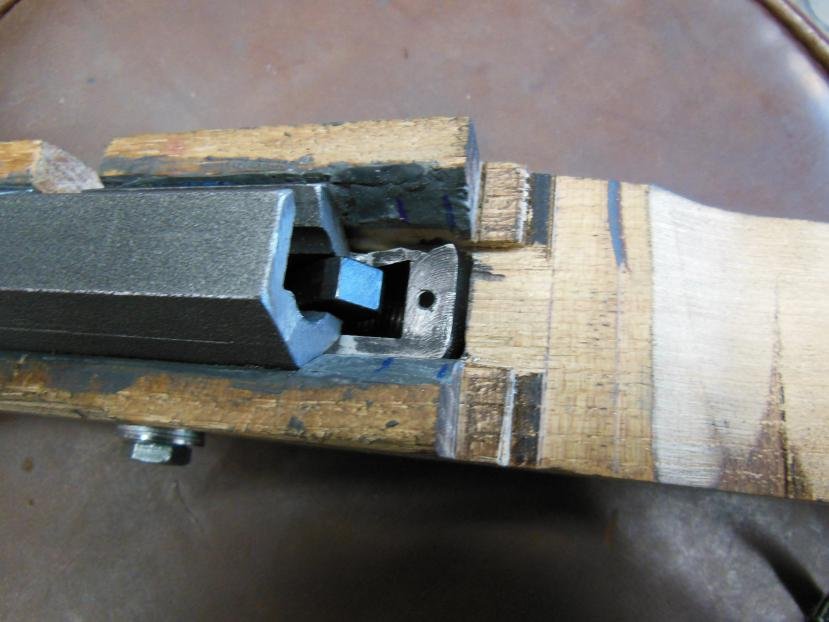
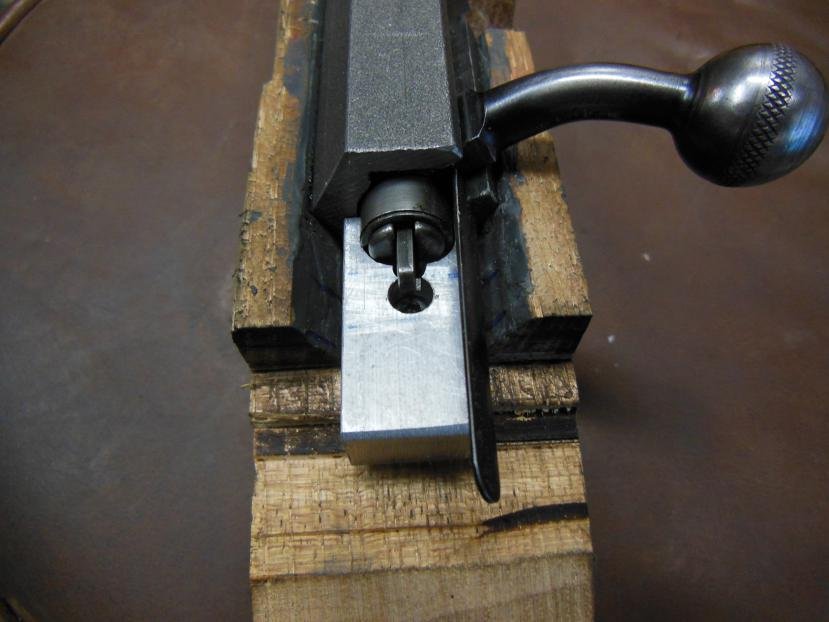
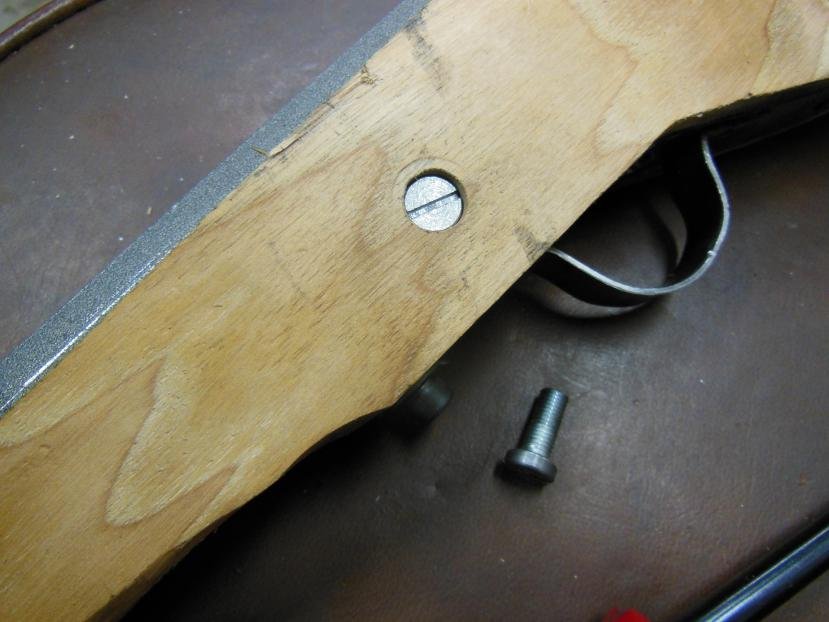
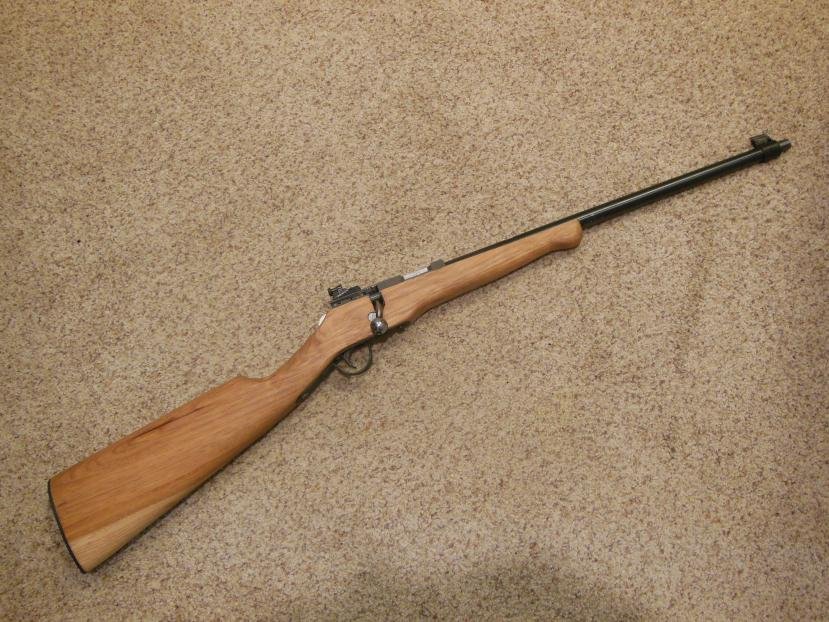
    Here's the Bolt and the 10/22 Trigger group I settled on. The trigger group was a free pickup because someone snapped off the trigger guard. I milled off most of the width, so it is ~3/4" wide. I'll trim the bottom later after I see how it fits in the stock.
     

    Attachments

    • A22E9FE8-0D58-488C-B233-CA9894E0B2AF.jpeg
      A22E9FE8-0D58-488C-B233-CA9894E0B2AF.jpeg
      56.1 KB · Views: 788

    GunBum

    Active Member
    Feb 21, 2018
    751
    SW Missouri
    The receiver is a piece of 1" steel hex. I didn't take any pictures of the progress on this part because I was skeptical that it would work out.

    Here's the order of cuts to get it working...
    1- I drilled through the center up to 5/8" so the bolt fits. Then I milled a slot for the bolt.
    2- I fiddled with the back end of a Marlin 60 barrel, set it to the right spot and pinned it in.
    3- I cut the opening for loading, ejecting, etc.
    4- After it was in the stock, I milled the slot for the hammer.
     

    Attachments

    • 44ECD2E8-04A4-4BA0-9D3F-497167E5F1B6.jpeg
      44ECD2E8-04A4-4BA0-9D3F-497167E5F1B6.jpeg
      49.8 KB · Views: 776
    • 461A9E95-0B33-4A15-B7E2-3D61F2F45218.jpeg
      461A9E95-0B33-4A15-B7E2-3D61F2F45218.jpeg
      57.5 KB · Views: 751
    • 16926362-03BD-4460-8989-3F13BAC1CA9D.jpeg
      16926362-03BD-4460-8989-3F13BAC1CA9D.jpeg
      53.7 KB · Views: 748

    GunBum

    Active Member
    Feb 21, 2018
    751
    SW Missouri
    I whittled the stock out of a piece of Hickory. That stuff is freaking HARD. It wore out a brand new bandsaw blade, and made the house smell like smoked hickory. If you zoom in, you can still see the sticker with the price tag on the piece of wood. Since this is my first scratch built, from a blok of wood stock... Well, I didn't want to **** up a high dollar piece of wood.

    You can see how the trigger is held in by 2 Frankenstein bolts (one on each side). Bear with me on these,they'll be replaced by something better looking later on.
     

    Attachments

    • FCD2D1AD-2495-4F5B-97C9-35B19CE4FCC1.jpeg
      FCD2D1AD-2495-4F5B-97C9-35B19CE4FCC1.jpeg
      39.8 KB · Views: 768
    • FBA43F85-DD16-4EB0-B82C-35859CF2F223.jpeg
      FBA43F85-DD16-4EB0-B82C-35859CF2F223.jpeg
      41.7 KB · Views: 762

    GunBum

    Active Member
    Feb 21, 2018
    751
    SW Missouri
    Here's some up close views of the rear of the action and the stock. The barreled action is set deeper in the wood than necessary, so it'll get cleaned up later when the stock gets shaped.

    you can see the gap at the rear of the receiver. This is semi intentional. I needed a bolt stop, and the piece of hex was bar only that long. So, I made a piece of aluminum to sit at the rear of the action. It covers the unsightly gap, and acts as a bolt stop. It's screwed into the trigger box.

    The back of the receiver and the bolt stop will get profiled when I see how the stock is shaping up.
     

    Attachments

    • 06CAFCCE-2E4D-4CEA-8C71-779F208CD248.jpeg
      06CAFCCE-2E4D-4CEA-8C71-779F208CD248.jpeg
      56.1 KB · Views: 733
    • B8A5C5EF-3844-4695-9C35-2436B14F8048.jpeg
      B8A5C5EF-3844-4695-9C35-2436B14F8048.jpeg
      52.6 KB · Views: 736
    • 7B597355-F62A-4B4B-AB0A-956B6CB214D1.jpeg
      7B597355-F62A-4B4B-AB0A-956B6CB214D1.jpeg
      46.8 KB · Views: 748

    GunBum

    Active Member
    Feb 21, 2018
    751
    SW Missouri
    Somewhere in the course of working on this thing, I started on the front sight. I could have used a Marlin 60 front sight, but it looked too short. The base is off a #4 Enfield, and the sight blade is from a 10/22. I recut the dovetail on the sight base to fit the 10/22 blade, and lowered it at the same time. Still needs some cleanup in the first picture. Last picture is the finished version. The white thing is a piece of shark bite tubing acting as a thread protector.
     

    Attachments

    • 257F7CEB-4FD2-49E4-9815-113DD61AE323.jpeg
      257F7CEB-4FD2-49E4-9815-113DD61AE323.jpeg
      47 KB · Views: 749
    • 02A0D786-BAFC-4F1A-B87E-BF5EB2428471.jpeg
      02A0D786-BAFC-4F1A-B87E-BF5EB2428471.jpeg
      45.3 KB · Views: 739
    • AE8FA185-662B-411B-A2C0-F02C28B69881.jpeg
      AE8FA185-662B-411B-A2C0-F02C28B69881.jpeg
      52.1 KB · Views: 722

    GunBum

    Active Member
    Feb 21, 2018
    751
    SW Missouri
    The last piece I need before I can start removing a lot of wood and profiling the stock is the trigger guard. I started with a piece of flat bar, and spot welded the trigger bow onto that.

    The dark lines around the plate are sharpie marks, not bad inletting shadows.

    The trigger bow is bent out of a piece of flat iron crap from my scrap bin.

    The last picture is everything sitting in place being bedded to the wood. I learned a long time ago that bedding compound solves all the fitting issues. :lol2:
     

    Attachments

    • 50961E8F-58F3-4515-A253-92C11A339D66.jpeg
      50961E8F-58F3-4515-A253-92C11A339D66.jpeg
      57.2 KB · Views: 723
    • E9F5DBC7-8320-4F5E-8DE0-00C24A8B2DAB.jpeg
      E9F5DBC7-8320-4F5E-8DE0-00C24A8B2DAB.jpeg
      67.7 KB · Views: 721
    • 3FF2AC76-D691-4CDD-B5ED-0B224A55878E.jpeg
      3FF2AC76-D691-4CDD-B5ED-0B224A55878E.jpeg
      88.7 KB · Views: 728

    GunBum

    Active Member
    Feb 21, 2018
    751
    SW Missouri
    I turned the heads on the 2 bolts to make them round and cut screw slots in them.

    Then I made a piloted countersink out of a piece of 1/2" aluminum rod. Why aluminum rod? well.... #1, I couldn't find any other suitable stock. Didn't look hard either. And, I have a lot of this 1/2" aluminum rod that used to be glass supports in a chemistry lab. And, since I'm only cutting two holes in a piece of wood, it is good enough.

    Why a piloted countersink, and not just use a drill bit? Well, there were already pilot holes there, and I wanted a close fit so the screws didn’t look sloppy. And, a flat bottomed hole. I could have used a Forstner bit, but it took about the same amount of time to make the countersink and it would to locate the holes and center up the bit. With the homemade tool, I can make them deeper at Will with little effort.
     

    Attachments

    • D1D65BD1-F58D-41FA-B559-BD0F287E8166.jpeg
      D1D65BD1-F58D-41FA-B559-BD0F287E8166.jpeg
      56.3 KB · Views: 721
    • AF63C314-8B5B-4AAD-A577-D1E9A422C303.jpeg
      AF63C314-8B5B-4AAD-A577-D1E9A422C303.jpeg
      61.5 KB · Views: 723

    GunBum

    Active Member
    Feb 21, 2018
    751
    SW Missouri
    The rear sight is a Williams WGRS. I picked that because it mounts to the top of the receiver. This one is for a Remington 700, and I'll never put it on one. I got it cheap. $25 if I remember right.

    Also, in the picture you can see where I cut off the tail thingy on the bolt. It is used to orient the bolt in the bolt handle slot. After I shortened it, I added a piece of keystock to make it thicker, so it won’t bend as easy.

    The butt plate is a piece of aluminum plate that I milked grooves into. Thank God for a power feed on the mill. :lol2:
     

    Attachments

    • 1651405F-5D4F-4173-B250-B6738885E443.jpeg
      1651405F-5D4F-4173-B250-B6738885E443.jpeg
      61.1 KB · Views: 730
    • 795C0508-7C88-4BEC-B613-788841A5D0DA.jpeg
      795C0508-7C88-4BEC-B613-788841A5D0DA.jpeg
      58.5 KB · Views: 706

    GunBum

    Active Member
    Feb 21, 2018
    751
    SW Missouri
    After shaping and oiling the stock, and making some of the metal parts black, that’s it.

    Here are a few glamour shots from various angles.
     

    Attachments

    • 8002F093-D094-4AD0-B202-87B4AC0880F2.jpeg
      8002F093-D094-4AD0-B202-87B4AC0880F2.jpeg
      65.6 KB · Views: 723
    • 55A79CC5-5C4D-40AA-A17D-A56A341ACE94.jpeg
      55A79CC5-5C4D-40AA-A17D-A56A341ACE94.jpeg
      102.5 KB · Views: 724
    • 62C41146-5771-4157-A618-881C3229CF4D.jpeg
      62C41146-5771-4157-A618-881C3229CF4D.jpeg
      101.2 KB · Views: 727
    • 1AB6A383-C7EF-4DED-B9AA-542E4C00FCEC.jpeg
      1AB6A383-C7EF-4DED-B9AA-542E4C00FCEC.jpeg
      110.5 KB · Views: 741

    Users who are viewing this thread

    Latest posts

    Forum statistics

    Threads
    275,393
    Messages
    7,279,824
    Members
    33,445
    Latest member
    ESM07

    Latest threads

    Top Bottom