Stealth Arms 80% 1911 No Mill Needed w/ Promo Code

The #1 community for Gun Owners of the Northeast

Member Benefits:

  • No ad networks!
  • Discuss all aspects of firearm ownership
  • Discuss anti-gun legislation
  • Buy, sell, and trade in the classified section
  • Chat with Local gun shops, ranges, trainers & other businesses
  • Discover free outdoor shooting areas
  • View up to date on firearm-related events
  • Share photos & video with other members
  • ...and so much more!
  • kgpayne86

    Member
    Apr 8, 2015
    21
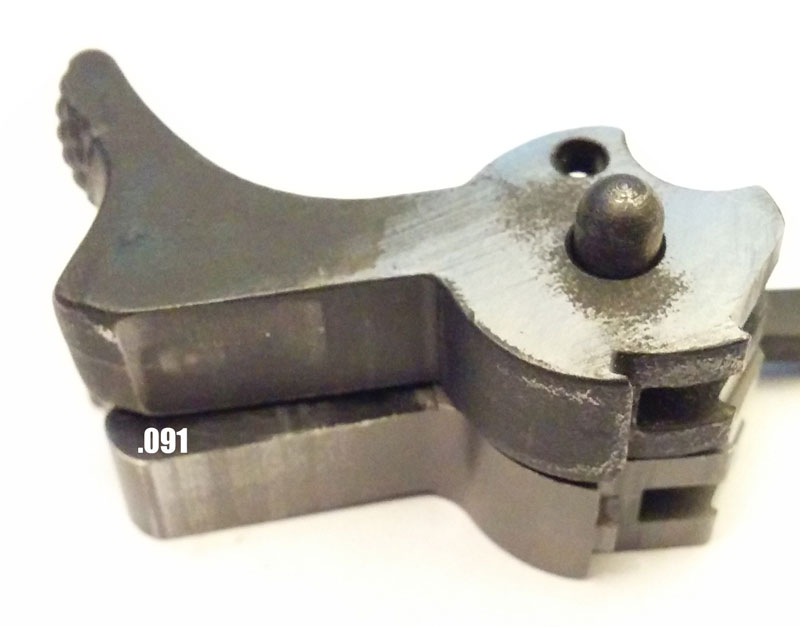
    Probably bullet bump. Put a little divot in the slide stop where the detent would be and that will stop that. My nine was doing the same thing with aluminum case Federal...only that load. The divot eliminated the premature lock back.

    Could you post a picture so I can get a better idea of how much of a divot to put, thanks.
     

    mhemling33

    Active Member
    May 7, 2013
    780
    Forest Hill
    there was a huge difference between the sarco kit and the ria kit when it came to fitting the small parts. Sear, hammer, feed ramp, and barrel all needed fitting. I put the ria kit in and it worked perfectly with no fitting.
     

    Jaybeez

    Ultimate Member
    Industry Partner
    Patriot Picket
    May 30, 2006
    6,393
    Darlington MD
    there was a huge difference between the sarco kit and the ria kit when it came to fitting the small parts. Sear, hammer, feed ramp, and barrel all needed fitting. I put the ria kit in and it worked perfectly with no fitting.

    But you were able to get them fitted?

    where did you get your RIA kit?

    I'm living vicariously through this thread until tuesday.
     

    mhemling33

    Active Member
    May 7, 2013
    780
    Forest Hill
    But you were able to get them fitted?

    where did you get your RIA kit?

    I'm living vicariously through this thread until tuesday.
    I got the ria kit from a guy off of calguns. It was almost double the price of the sarco. The slide I believe is the same, the difference is in the small parts.

    The first issue was the sides of the sear needed filled. Then the hammer would not reach the 2nd stage when the slide was pulled back (ria hammer would). I filled the sear down for the hammer to engage. The barrel wouldn't is as far back as the ria barrel so I tapered the feed ramp to make it work. The ejector needed fitting to the slide.

    I need to disassemble ave give it a good cleaning then try it again but I am pretty confident in it.
     

    Magnumite

    Ultimate Member
    Dec 17, 2007
    6,573
    Harford County, Maryland
    Could you post a picture so I can get a better idea of how much of a divot to put, thanks.
    Check the underside of the slide stop hold open stud. If you see some bullet metal there then there is bullet bump occurring.

    Pic is attached. This is a MIM slide stop...came off my Baer pistol, hence, the seam line. I marked it then wiped out the divot to make it easier to see.

    To locate it, remove the thumb safety and withdraw the plunger assembly a bit. Mark the slide stop face with marker, install it, push in the plunger assembly, reinstall the thumb safety, then swipe the slide stop up and down a couple times. Remove the thumb safety, withdraw the plunger assembly a bit and remove the slide stop.

    You want to center punch the top of the mark in the slide stop face gently then use a small drill bit to just spot the punch mark, just s slight depression, not a hole. File board off the burrs.

    The plunger face of the slide stop is also angled slightly forward going from bottom to top of the face. You may want to check that first.
     

    Attachments

    • slide stop divot.jpg
      slide stop divot.jpg
      32.3 KB · Views: 510

    kgpayne86

    Member
    Apr 8, 2015
    21
    Check the underside of the slide stop hold open stud. If you see some bullet metal there then there is bullet bump occurring.

    Pic is attached. This is a MIM slide stop...came off my Baer pistol, hence, the seam line. I marked it then wiped out the divot to make it easier to see.

    To locate it, remove the thumb safety and withdraw the plunger assembly a bit. Mark the slide stop face with marker, install it, push in the plunger assembly, reinstall the thumb safety, then swipe the slide stop up and down a couple times. Remove the thumb safety, withdraw the plunger assembly a bit and remove the slide stop.

    You want to center punch the top of the mark in the slide stop face gently then use a small drill bit to just spot the punch mark, just s slight depression, not a hole. File board off the burrs.

    The plunger face of the slide stop is also angled slightly forward going from bottom to top of the face. You may want to check that first.

    Ok thanks. That's seems easy enough. I'll give it a shot and report back when I go shooting again. Thanks for the help.
     

    Jaybeez

    Ultimate Member
    Industry Partner
    Patriot Picket
    May 30, 2006
    6,393
    Darlington MD
    Did a bunch of sear measurements on mine and his.
    STI: .460
    Fresh Sarco: .466
    Stoned one sarco down to the min of .450
    Using his stock hammer, none of them would still lock back all the time. The .450 would lock back if you racked hard or from the back with some downward pressure.
    Using any of the sears and the other hammer and there were no issues. here is a pic to illustrate what I mean when I say the sarco hammer is a shallower angle. They are lined up on the hooks. Doing so has the sarco hammer back .091 from the STI face. You can also somewhat see the sarco hammer only receiving slide contact on half of its face.
    hammers.jpg

    i got a skeleton hammer with my sarco commercial kit. it looks more like the angle on the sti hammer than your sarco gi hammer.
     

    mhemling33

    Active Member
    May 7, 2013
    780
    Forest Hill
    Did a bunch of sear measurements on mine and his.
    STI: .460
    Fresh Sarco: .466
    Stoned one sarco down to the min of .450
    Using his stock hammer, none of them would still lock back all the time. The .450 would lock back if you racked hard or from the back with some downward pressure.
    Using any of the sears and the other hammer and there were no issues. here is a pic to illustrate what I mean when I say the sarco hammer is a shallower angle. They are lined up on the hooks. Doing so has the sarco hammer back .091 from the STI face. You can also somewhat see the sarco hammer only receiving slide contact on half of its face.
    hammers.jpg
    This is the issue I had too. I didn't know there was a sear minimum I just kept going until it worked. I'll take it out and measure it tomorrow.
     

    chompers

    Active Member
    Nov 8, 2012
    109
    This is the issue I had too. I didn't know there was a sear minimum I just kept going until it worked. I'll take it out and measure it tomorrow.

    Just make sure with the hammer cocked, thumb safety on, you don't get any movement with a hard trigger pull. After the trigger pull, pull back on the hammer and listen for a click. We found the sarco kits came with 2 different thumb safeties. One was stamped 1A on the back and the other 2A. With the sear shortened to the point of working on person 3s, it wouldn't engage the safety as tightly and had the aforementioned click. We swapped in person 4s 1A and both guns passed their tests. The markings could be a total coincidence and just have been a tolerance thing, who knows. My new sear also has a much more pronounced ledge for the safety to engage, so much so that I had to remove metal to fit the same safety that was insufficient before.
     

    Jaybeez

    Ultimate Member
    Industry Partner
    Patriot Picket
    May 30, 2006
    6,393
    Darlington MD
    It took about an hour and a half to cut the frame, while bs' ing with my friend.

    Using sarco commercial parts, the slide went on really tight, only about an inch at a time at first with hand pressure, but once it was on all the way and with about 30 seconds of cycling it with oil and it was smooth with no wiggle or play. a second sarco commercial slide is still too tight to fit on the rails.

    the barrel bushing required the lug to be filed a little to fit the slot and clear the recoil spring button.

    Everything else dropped in except the grip safety, which needs the leg shaped to clear the trigger bow. i had to stop at that point and will get a chance to adjust it and fit the barrel later.

    here's a link i found that was semi helpful to me
    http://www.ktgunsmith.com/KTGS22.htm#_017
     

    mhemling33

    Active Member
    May 7, 2013
    780
    Forest Hill
    I had a sarco commercial kit come in today. It had the grip safety but was missing the slide and ejector. I guess slides are now backordered. It did come with the skeleton hammer though which I like better.

    I am a little disappointed with sarco about the missing grip safety in my first kit. I was told the backordered part would be shipped out as soon as they come in. Well people (me included) who recently ordered kits are getting grip safety in their kits now and I still haven't received mine or had any notification of shipment. They are filling new orders before completing old ones.
     

    pilotguy299

    Ultimate Member
    Sep 26, 2010
    1,809
    FredNeck County, MD
    I just finished a second build using the same RIA kit that mhemling33 used. Mine wasn't quite as drop in as his though.

    I needed to file flush the hammer strut pin; file and fit the ejector to the slide; polish and fit the grip safety; and an AWFUL LOT of work getting the barrel & slide to unlock properly.

    The slide took a bit more work than the sarco did to fit the frame, as I had to top the frame quite a bit to get it to even fit snug. Once I got the slide to kind of fit, I decided to try and use Mothers Mag Polish as a lapping compound. I had taken the MMP outside with me, so when I opened the jar, the contents were liquified. Never missing a chance to try something half-assed, I dipped my finger in the jar and rubbed some MMP on the slide top, slide rails, and the slide itself. In short...

    It was the best thing I have ever done by accident!

    Within about five minutes the slide was moving freely on the frame, and it felt smooth as glass. I wiped it all off, gave it another dab of clean MMP, and slide it on the frame for about two more minutes. Cleaned it up again, and it feels really good.

    When trying to figure out why the barrel and slide weren't unlocking, I decided to try MMP again, and rubbed some over the barrel lugs, the slide lugs, along the pivot pin, and on the inside of the barrel bushing. Took me about ten minutes of manhandling the slide, but it eventually started to unlock. Wiped it off and repeated four more times, and everything now function checks properly.

    Took the whole thing apart, wiped everything clean and dry, and reassembled FrankenGun2. It still function checks properly, and the only issue I have is getting magazine to lock in consistently.

    I am going to take it to the range tomorrow, and try to put about 100 rounds through it and see what happens :)

    93FABE5D-3372-4172-93AD-01A5F6089CAC_zpsjfifemfg.jpg
     

    kgpayne86

    Member
    Apr 8, 2015
    21
    I just finished a second build using the same RIA kit that mhemling33 used. Mine wasn't quite as drop in as his though.

    I needed to file flush the hammer strut pin; file and fit the ejector to the slide; polish and fit the grip safety; and an AWFUL LOT of work getting the barrel & slide to unlock properly.

    The slide took a bit more work than the sarco did to fit the frame, as I had to top the frame quite a bit to get it to even fit snug. Once I got the slide to kind of fit, I decided to try and use Mothers Mag Polish as a lapping compound. I had taken the MMP outside with me, so when I opened the jar, the contents were liquified. Never missing a chance to try something half-assed, I dipped my finger in the jar and rubbed some MMP on the slide top, slide rails, and the slide itself. In short...

    It was the best thing I have ever done by accident!

    Within about five minutes the slide was moving freely on the frame, and it felt smooth as glass. I wiped it all off, gave it another dab of clean MMP, and slide it on the frame for about two more minutes. Cleaned it up again, and it feels really good.

    When trying to figure out why the barrel and slide weren't unlocking, I decided to try MMP again, and rubbed some over the barrel lugs, the slide lugs, along the pivot pin, and on the inside of the barrel bushing. Took me about ten minutes of manhandling the slide, but it eventually started to unlock. Wiped it off and repeated four more times, and everything now function checks properly.

    Took the whole thing apart, wiped everything clean and dry, and reassembled FrankenGun2. It still function checks properly, and the only issue I have is getting magazine to lock in consistently.

    I am going to take it to the range tomorrow, and try to put about 100 rounds through it and see what happens :)

    93FABE5D-3372-4172-93AD-01A5F6089CAC_zpsjfifemfg.jpg

    Looks good. How did it go at the range?
     

    kgpayne86

    Member
    Apr 8, 2015
    21
    I didn't go yesterday :( I "thought" I was getting over the flu, but woke up yesterday morning coughing up all sorts of gunk. Dr this morning, range next weekend.

    At least it seems to launch pencils across the room pretty well! :D

    Bummer man. I know how that is. Hope you get better soon. I should be frog lubing mine some time this week so I'll test it again hopefully next weekend. Now I'm going to have fun with that pencil idea
     

    smdub

    Ultimate Member
    MDS Supporter
    Nov 14, 2012
    4,660
    MoCo
    Once I got the slide to kind of fit, I decided to try and use Mothers Mag Polish as a lapping compound. I had taken the MMP outside with me, so when I opened the jar, the contents were liquified. Never missing a chance to try something half-assed, I dipped my finger in the jar and rubbed some MMP on the slide top, slide rails, and the slide itself. In short...

    It was the best thing I have ever done by accident!

    Within about five minutes the slide was moving freely on the frame, and it felt smooth as glass. I wiped it all off, gave it another dab of clean MMP, and slide it on the frame for about two more minutes. Cleaned it up again, and it feels really good.

    Errrr, when you use a lapping compound w/ a soft metal such as aluminum or brass it embeds itself in it and then wears the harder of the two materials. This is how all commercial laps work. MMP is aluminum oxide grit (common sandpaper.) Your frame will forever continue to lap your slide unless you coat it with something to cover the grit. Not sure if an anodize or ceracote is thick enough. I wouldn't ever lap an aluminum frame.
     

    hi3cho

    Ultimate Member
    Nov 16, 2012
    1,306
    Edgemere
    Any word on when Stealth Arms will be offering part kits and what the price will be? I am contemplating back ordering a SARCO kit before the APRIL2015 code is expired but if the price is comparable then I would just order the jig bundle and parts kit from them and get the 10% OFF and free shipping.
     

    Users who are viewing this thread

    Latest posts

    Forum statistics

    Threads
    275,419
    Messages
    7,280,858
    Members
    33,451
    Latest member
    SparkyKoT

    Latest threads

    Top Bottom