All of my AR's have a wee bit of side to side movement, but I don't observe any discernible up and down movement. This makes no sense to me as I would expect movement up and down when there is movement side to side. Ugh... Anyway, the movement is just a tiny bit on both my M4A1 LE6920 and my 6721 AR-15A3. The question I have is, how much play is acceptable?
You are using an out of date browser. It may not display this or other websites correctly.
You should upgrade or use an alternative browser.
You should upgrade or use an alternative browser.
Receiver Wobble, what is acceptable?
- Thread starter grimnar15
- Start date
The #1 community for Gun Owners of the Northeast
Member Benefits:
No ad networks! Discuss all aspects of firearm ownership Discuss anti-gun legislation Buy, sell, and trade in the classified section Chat with Local gun shops, ranges, trainers & other businesses Discover free outdoor shooting areas View up to date on firearm-related events Share photos & video with other members ...and so much more!
Member Benefits:
- May 15, 2007
- 24,523
All of my AR's have a wee bit of side to side movement, but I don't observe any discernible up and down movement. This makes no sense to me as I would expect movement up and down when there is movement side to side. Ugh... Anyway, the movement is just a tiny bit on both my M4A1 LE6920 and my 6721 AR-15A3. The question I have is, how much play is acceptable?
I wager when it jams or you have a FTF

.
Dont worry about it. Normal.
Dont worry about it. Normal.
The amount of wobble on my AR's is so little that I have no concerns, but knowing what tolerances (amount of wobble) is acceptable / in spec vs what is not is what has me curious.
- May 15, 2007
- 24,523
The amount of wobble on my AR's is so little that I have no concerns, but knowing what tolerances (amount of wobble) is acceptable / in spec vs what is not is what has me curious.
Ever shake a GI model M1911A1?
They still cycle and shoot.
")
Email the manufacture of your AR's and ask. Maybe they have an answer or don't.
omegared24
Ultimate Member
The amount of wobble on my AR's is so little that I have no concerns, but knowing what tolerances (amount of wobble) is acceptable / in spec vs what is not is what has me curious.
I would bet, as stated before, that if it impacts how it functions or accuracy.
I'm in the same boat as you. Very minor and I leave it as is.
I do know that using any current devices to "fix" the problem are a bad idea.
I would bet, as stated before, that if it impacts how it functions or accuracy.
I'm in the same boat as you. Very minor and I leave it as is.
I do know that using any current devices to "fix" the problem are a bad idea.
100% agree!
Ever shake a GI model M1911A1?
They still cycle and shoot.
Email the manufacture of your AR's and ask. Maybe they have an answer or don't.
Good point!
TheOriginalMexicanBob
Ultimate Member
If the wobble bothers you, get a receiver wedge...cheap and they work.
https://www.midwayusa.com/product/100340833
https://www.midwayusa.com/product/100340833
.02 with a feeler gauge....more than is not acceptable
.02 with a feeler gauge....more than is not acceptable
Thanks!
I am not a fan of receiver wobble.
IMHO, while not needing to be addressed in a AR15 fun gun or combat oriented AR, but in bench gun ( or precision minded AR ) it can be beneficial.
You really want to be wielding the precision minded / I hate the wobble, AR in a consistent, easy manner.
The effect of the no longer available X-Shims helped with the wobble dramatically..
(The effect on an AR is Just like a bolt gun having the action bedded / snug fitting into the stock )
I am attempting to do the same thing the no longer available "X-Shims" did.
Using a resist compression plastic shims at the front pivot pin area and the rear pin areas.... cut to fit like the X-Shim. ( Amazon has the material )
Youtube video showing the X-Shim install ..
https://www.youtube.com/watch?v=0llRZB4q_Dc
The thickness of the X-Shims were ... .002, .003, .004, .005... I have stacked the shims to achieve the desired effect.
You could make the upper to lower fit as tight as you wanted.
The old X-Shims worked great... I wish I had bought a ton of them when available.
X-Shim image... from the internet.
KRC
Active Member
"Modify Everything"
I’m with bfoosh006 on this. If you are (attempting) shooting small groups from a bench, this free play matters. Try dry firing and see how much the sight picture jumps when the tension between the upper and lower is released when there is free play.
I have gone a step further than bfoosh006, and replaced the takedown pin with a bolt. Before I attempted this I carefully measured how much I could safely “bend” (squeeze) the lower in the area of the takedown pin, and it is greater than the amount of free play.
Here’s my method:
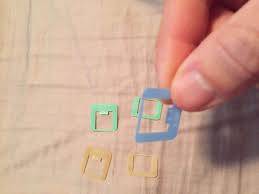
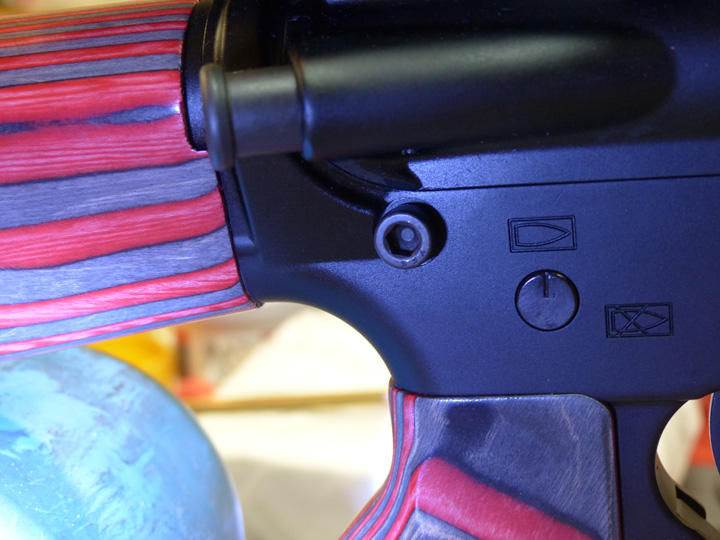
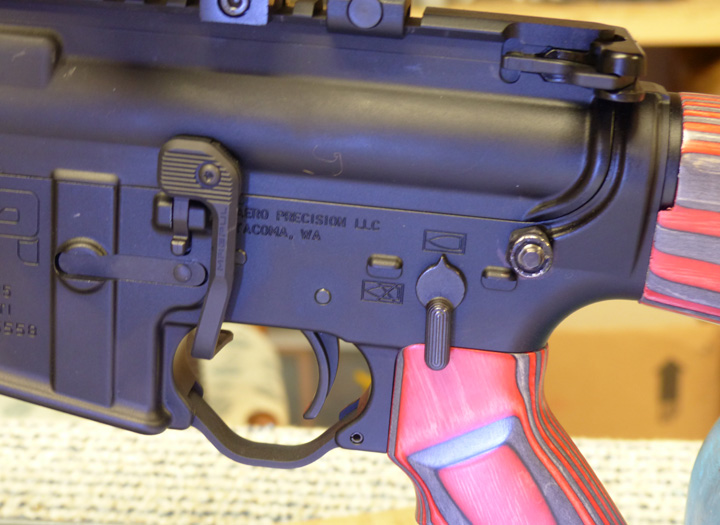
Use a ring binder hole reinforcement (remember these?) to take up some of the slack between the upper and lower. With a slight trim, these work really well, and are self-adhesive. (see image)

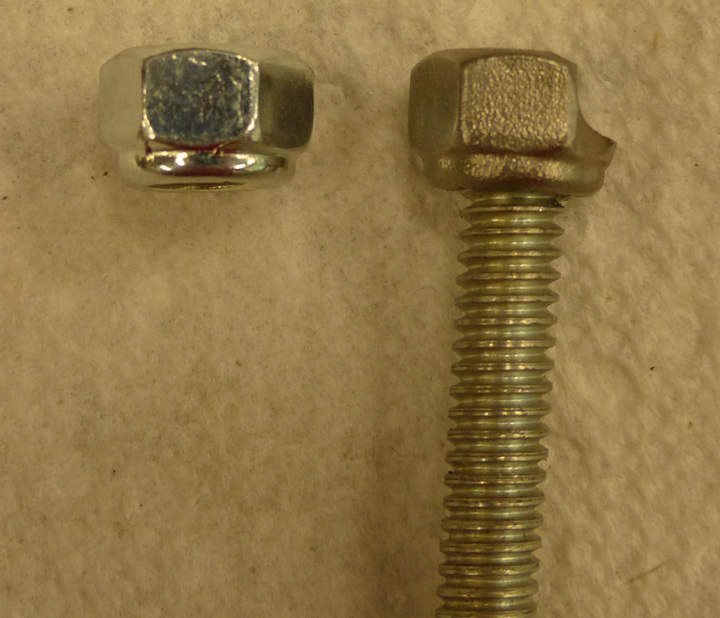
Use a standard ¼” allen head bolt ~1 ¼” length and a ¼” nut. Modify the nut slightly (see image) to fit the contour of the side of your lower. A portion of the nut must be cut away so the remainder of the nut sits flush with the lower, as most (all?) lowers have an elevated contour on one side of the upper in the area of the takedown pin. I have done this modification using three different tools, and all worked - grinding wheel, hand grinder with a cut-off wheel, and a Dremel - the Dremel worked best.
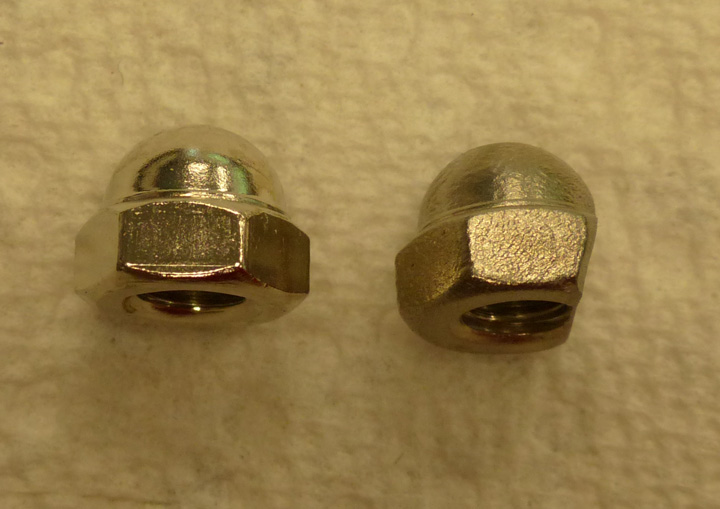
Instead of modifying a standard ¼” nut, you may want to try a ¼” cap nut or lock nut, purely for aesthetics. (Images show a modified cap nut and lock nut.) You can also color or blue the bolt and nut to match your rifle.
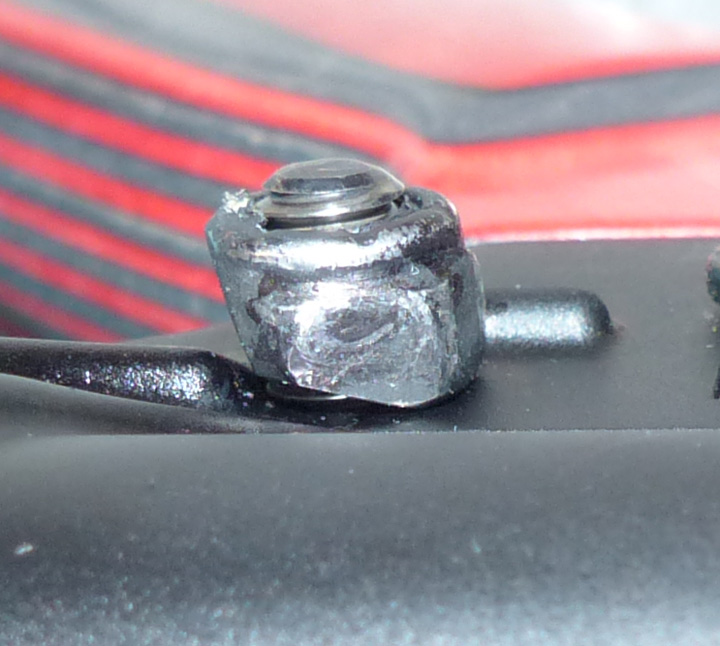
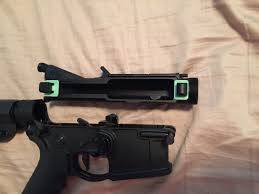
Then, simply fit the upper and lower together, taking care to keep the spacer in place, thread the bolt through the hole (you may have to trim the bolt to length to fit your rifle), and install the nut on the other side. Using a 7/16” wrench to hold the nut in position and an allen wrench on the other, snug the assembly up. You will feel the correct amount of tension, and there will now be ZERO movement/play between the upper and lower at this pin.
Downside is you need an allen wrench and 7/16” wrench to perform a takedown. I take these with me to the range. I’ve done this modification to all three of my AR’s with no downside other than the inconvenience noted above.
I’m with bfoosh006 on this. If you are (attempting) shooting small groups from a bench, this free play matters. Try dry firing and see how much the sight picture jumps when the tension between the upper and lower is released when there is free play.
I have gone a step further than bfoosh006, and replaced the takedown pin with a bolt. Before I attempted this I carefully measured how much I could safely “bend” (squeeze) the lower in the area of the takedown pin, and it is greater than the amount of free play.
Here’s my method:
Use a ring binder hole reinforcement (remember these?) to take up some of the slack between the upper and lower. With a slight trim, these work really well, and are self-adhesive. (see image)
Use a standard ¼” allen head bolt ~1 ¼” length and a ¼” nut. Modify the nut slightly (see image) to fit the contour of the side of your lower. A portion of the nut must be cut away so the remainder of the nut sits flush with the lower, as most (all?) lowers have an elevated contour on one side of the upper in the area of the takedown pin. I have done this modification using three different tools, and all worked - grinding wheel, hand grinder with a cut-off wheel, and a Dremel - the Dremel worked best.
Instead of modifying a standard ¼” nut, you may want to try a ¼” cap nut or lock nut, purely for aesthetics. (Images show a modified cap nut and lock nut.) You can also color or blue the bolt and nut to match your rifle.
Then, simply fit the upper and lower together, taking care to keep the spacer in place, thread the bolt through the hole (you may have to trim the bolt to length to fit your rifle), and install the nut on the other side. Using a 7/16” wrench to hold the nut in position and an allen wrench on the other, snug the assembly up. You will feel the correct amount of tension, and there will now be ZERO movement/play between the upper and lower at this pin.
Downside is you need an allen wrench and 7/16” wrench to perform a takedown. I take these with me to the range. I’ve done this modification to all three of my AR’s with no downside other than the inconvenience noted above.
Magnumite
Ultimate Member
I had a Colt HBAR Target Match and have a RRA Standard A2 hbar. I also have a Colt 20” HBAR cut back to 18”. They all have a little upper/lower receiver clearance. They all shoot moa or less without developed handloads. I agree, for benchrest and long range precision I would want the slop gone with more sophisticated methods or a matched upper/lower receiver set. For anything else the shims would be a cool try and see for increased precision.
One needs to determine the need and commitment to a desired level of precision.
One needs to determine the need and commitment to a desired level of precision.
Assuming your rifle is made to be within spec. To some degree all of these fixes are for a problem that doesn’t exist. From a mechanical engineering standpoint the fit is designed to have play.
I have a built what I would consider a precision AR15. With good hand loaded ammunition turned to the gun I can achieve <1 MOA consistently and 1/2 MOA at 100yds shooting prone from a bipod and rear bags. This rifle has a normal amount of play between the upper and lower.
Assuming you are setup behind the rifle with a consistent hold I don’t think that you will see any measurable improvement in precision shot placement by adding shims or a wedge to a property spec rifle. These devices are designed to satisfy the OCD tendencies of gun owners, and admittedly I have many of these tendencies myself.
In my opinion removing the takedown pin and replacing it with a hex screw and bolt is at best overkill and at worst it adds unnecessary side stress to the sides of the lower receiver.
Last edited:
Doco Overboard
Ultimate Member
You could always bed the two halves together with devcon or acra glass. Use one of those accu wedges to provide enough tension for clearance or you could still wind up with wobble. Make sure you use plenty of release agent on everything you don't want stuck together and the black dye that Brownells sells with their bulk supplies if your rifle is black. Disassemble the rifle for maintenace by removing the two pins and lift straight off for longevity.
KRC
Active Member
"I can achieve <1 MOA"
> Now try achieving consistent 1/2 MOA with that slop.
"by stressing the frame"
> I guess, like I did beforehand, you carefully compressed the frame using a micrometer to determine the amount of flex vs. force. Unlike myself, you have then determined that the minor amount of compression <.002" this modification requires is damaging (in some unspecified manner). I have found, through hundreds of rounds in each of three separate rifles, that this compression has NOT been damaging. Nor has the compression been permanent, as each time my rifles are disassembled the frame springs back when the tension is released.
Please note that I don't tell anyone to do this, and if you don't like it, don't do it. If you are happy with the way your rifle shoots for your application, don't bother trying to improve it.
If I was in a service situation with an AR, and quick and easy field takedown was a requirement (as the rifle was designed), the pin and slop are good engineering.
However, if you are chasing tiny groups from a bench on weekends, you might want to consider doing this.
"I can achieve <1 MOA"
> Now try achieving consistent 1/2 MOA with that slop.
"by stressing the frame"
> I guess, like I did beforehand, you carefully compressed the frame using a micrometer to determine the amount of flex vs. force. Unlike myself, you have then determined that the minor amount of compression <.002" this modification requires is damaging (in some unspecified manner). I have found, through hundreds of rounds in each of three separate rifles, that this compression has NOT been damaging. Nor has the compression been permanent, as each time my rifles are disassembled the frame springs back when the tension is released.
Please note that I don't tell anyone to do this, and if you don't like it, don't do it. If you are happy with the way your rifle shoots for your application, don't bother trying to improve it.
If I was in a service situation with an AR, and quick and easy field takedown was a requirement (as the rifle was designed), the pin and slop are good engineering.
However, if you are chasing tiny groups from a bench on weekends, you might want to consider doing this.
I like trying to improve things too. This wasn’t a personal attack by any means. Sharing experiences ideas and information is necessary to haven informed discussion. My post and any subsequent responses should simply be read in this context.
I get it that excess tolerance creates unpredictable movements when trying to establish a controlled shooting position. I’ve worked to isolate and eliminate these movements on bolt guns because I felt that it did make a noticeable difference. It actually took quite a bit of time and practice before my skill level improved enough for those small details to even matter.
On the AR Platform I guess I just don’t see that the benefit outweighs the effort here. There have been formal testing done where on the 70’s that determined the movement tolerances do not impact accuracy. There have been some discussion that spacers and shims by eliminating movement improve the shooters concentration and therefore can improve accuracy but this would coincide with the point I was trying to make. If your shooting position is one where you inadvertently introduce torque on the lower then you are already doing something wrong on a fundamental level and this can be overcome without modifications to the rifle.
We should both be at the range on a fine day like today. This discussion might inspire me to break out the safe queen and sends some rounds down range.
Sent from my iPad using Tapatalk
I’m with bfoosh006 on this. If you are (attempting) shooting small groups from a bench, this free play matters. Try dry firing and see how much the sight picture jumps when the tension between the upper and lower is released when there is free play.
I have gone a step further than bfoosh006, and replaced the takedown pin with a bolt. Before I attempted this I carefully measured how much I could safely “bend” (squeeze) the lower in the area of the takedown pin, and it is greater than the amount of free play.
Here’s my method:
Use a ring binder hole reinforcement (remember these?) to take up some of the slack between the upper and lower. With a slight trim, these work really well, and are self-adhesive. (see image)
Use a standard ¼” allen head bolt ~1 ¼” length and a ¼” nut. Modify the nut slightly (see image) to fit the contour of the side of your lower. A portion of the nut must be cut away so the remainder of the nut sits flush with the lower, as most (all?) lowers have an elevated contour on one side of the upper in the area of the takedown pin. I have done this modification using three different tools, and all worked - grinding wheel, hand grinder with a cut-off wheel, and a Dremel - the Dremel worked best.
Instead of modifying a standard ¼” nut, you may want to try a ¼” cap nut or lock nut, purely for aesthetics. (Images show a modified cap nut and lock nut.) You can also color or blue the bolt and nut to match your rifle.
Then, simply fit the upper and lower together, taking care to keep the spacer in place, thread the bolt through the hole (you may have to trim the bolt to length to fit your rifle), and install the nut on the other side. Using a 7/16” wrench to hold the nut in position and an allen wrench on the other, snug the assembly up. You will feel the correct amount of tension, and there will now be ZERO movement/play between the upper and lower at this pin.
Downside is you need an allen wrench and 7/16” wrench to perform a takedown. I take these with me to the range. I’ve done this modification to all three of my AR’s with no downside other than the inconvenience noted above.
Geez, I guess you could just alumiweld it together.....
My decision to snug up the fit on my AR's were originally from my OCD about the slop... it only made sense to snug them up.
And I will repeat the comment about precision bolt actions being bedded, and add a few comments about a building tight fitting 1911 vs a looser combat 1911, or a Match Grade M1A.... IMHO, minimizing various mechanical factors does increase your odds of having a more precise AR.
Having thought about this for years.
I have convinced myself the tests from the 70's ( or when ever the test was conducted ) should be done over again.
I suspect the precision of USGI ammo, barrels and parts were pretty "low" quality compared to today. Low enough to be able to not allow the receiver fitment become a factor.
BTW, does anyone have a link to this test ? I have heard it quoted for a long time.. yet have never read it.
I would love to read the actual report.
I have however read numerous articles about a snug fit playing a role in highly precise AR's.
Any how... I have tried the various accuracy minded "tricks" and have been impressed with the results.
Enough so that I now do them all to my AR's, 308, 6.5CM, .223/5.56 and 9x19
For me, and YMMV... the results have been more then satisfying. Producing some very "frameable" 10rd groups.
For those that haven't tried snugging upper to lower fitment, and are interested in possibly increasing precision... I suggest you try it.
Doing some easy tuning items , when all combined together has worked very well for me and my AR's.
I don't think my AR's would be as precise as they are without them.
I am also a very "shade tree mechanic" minded tinkerer... as in I won't know unless I try.
If anyone is interested, I'll post some groups from the tuned AR's.
I,ll post them not as conclusive "proof" ( or such ) of the tuning improvements being the decisive factor... but more of a to good to be true / I just can't be this lucky with my assembled AR's kind of thing.
Using a snug fitting upper and lower, a lapped upper receiver face, a loctited in barrel, an Adj. GB and the usual better trigger etc,... fine tuning flat out works for me.
FWIW, none of the tuning has affected reliability.
The tuning doesn't shoot "everything" better, but with ammo the AR likes, it shoots outstanding to me.
Various tuned rifle results,
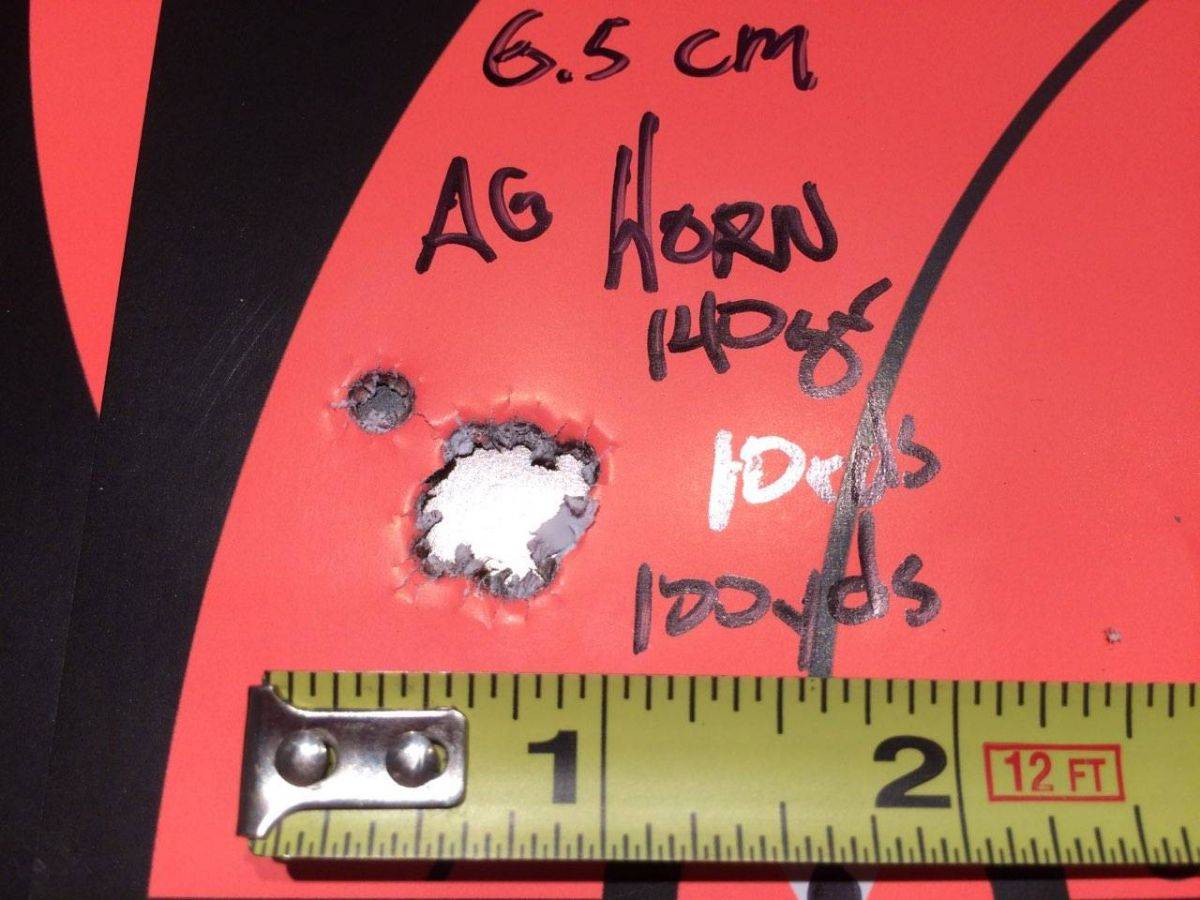
Here is my best ( to date )10rd, 100yd, benched, scoped, and bagged group to date from one of the 6.5CM's ( PSA upper and lower , 22" Criterion barrel, Hornady 140gr AG )
Yes, I flubbed the flier.... I get to giddy.
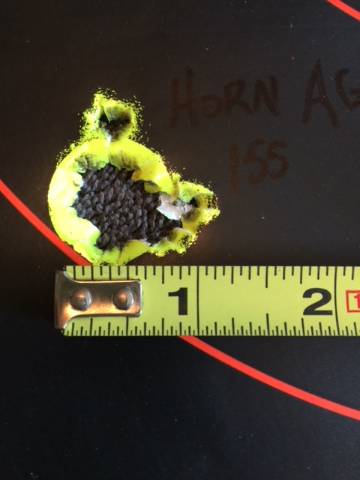
.308 PSA upper and lower, FN CHF CL 20" Hornady 155gr AG.. same 10rds 100yds, .. etc
OEM PSA 18" SS , 20rds Sanitized DAG, 100yds benched scoped.. etc

And I will repeat the comment about precision bolt actions being bedded, and add a few comments about a building tight fitting 1911 vs a looser combat 1911, or a Match Grade M1A.... IMHO, minimizing various mechanical factors does increase your odds of having a more precise AR.
Having thought about this for years.
I have convinced myself the tests from the 70's ( or when ever the test was conducted ) should be done over again.
I suspect the precision of USGI ammo, barrels and parts were pretty "low" quality compared to today. Low enough to be able to not allow the receiver fitment become a factor.
BTW, does anyone have a link to this test ? I have heard it quoted for a long time.. yet have never read it.
I would love to read the actual report.
I have however read numerous articles about a snug fit playing a role in highly precise AR's.
Any how... I have tried the various accuracy minded "tricks" and have been impressed with the results.
Enough so that I now do them all to my AR's, 308, 6.5CM, .223/5.56 and 9x19
For me, and YMMV... the results have been more then satisfying. Producing some very "frameable" 10rd groups.
For those that haven't tried snugging upper to lower fitment, and are interested in possibly increasing precision... I suggest you try it.
Doing some easy tuning items , when all combined together has worked very well for me and my AR's.
I don't think my AR's would be as precise as they are without them.
I am also a very "shade tree mechanic" minded tinkerer... as in I won't know unless I try.
If anyone is interested, I'll post some groups from the tuned AR's.
I,ll post them not as conclusive "proof" ( or such ) of the tuning improvements being the decisive factor... but more of a to good to be true / I just can't be this lucky with my assembled AR's kind of thing.
Using a snug fitting upper and lower, a lapped upper receiver face, a loctited in barrel, an Adj. GB and the usual better trigger etc,... fine tuning flat out works for me.
FWIW, none of the tuning has affected reliability.
The tuning doesn't shoot "everything" better, but with ammo the AR likes, it shoots outstanding to me.
Various tuned rifle results,
Here is my best ( to date )10rd, 100yd, benched, scoped, and bagged group to date from one of the 6.5CM's ( PSA upper and lower , 22" Criterion barrel, Hornady 140gr AG )
Yes, I flubbed the flier.... I get to giddy.
.308 PSA upper and lower, FN CHF CL 20" Hornady 155gr AG.. same 10rds 100yds, .. etc
OEM PSA 18" SS , 20rds Sanitized DAG, 100yds benched scoped.. etc
Users who are viewing this thread
Total: 2 (members: 0, guests: 2)

Forum statistics
Latest threads
-

-

-
 Hair-trigger posting... please include more than just the "headline" (1 Viewer)
- Started by Mr H
- Replies: 11
-

-

-
 (Duplicate - mods please close) MoCo trans student arrested for threatening school
- Started by Lafayette
- Replies: 2
-
