The #1 community for Gun Owners of the Northeast

Member Benefits:

  • No ad networks!
  • Discuss all aspects of firearm ownership
  • Discuss anti-gun legislation
  • Buy, sell, and trade in the classified section
  • Chat with Local gun shops, ranges, trainers & other businesses
  • Discover free outdoor shooting areas
  • View up to date on firearm-related events
  • Share photos & video with other members
  • ...and so much more!
  • martin777

    Member
    Dec 29, 2018
    45
    Oklahoma City
    Will this camera accept 12vdc into the DC5V socket?
    NO.
    I also have 2 841s and one came with a USB charge cable with the 5VDC plug at the other end.
    I use my old 7800mAH Bullseye Target Cam USB/Lipo 5V power pack for the camera.
    I could have used one of these and a battery. I use them in RC models.
    3A UBEC 5V Switching type regulator
    OR this really nice one.

    Martin777 did you replace the lens in the 841 and was it difficult?
    Yes and my first attempt was a PITA.
    Make sure to mark the "halve" sections so it goes back together in the same orientation.
    The video ribbon cable has a fragile latch. Be careful with that latch. Same at both ends.
    I'll post a pic of that latch tomorrow.
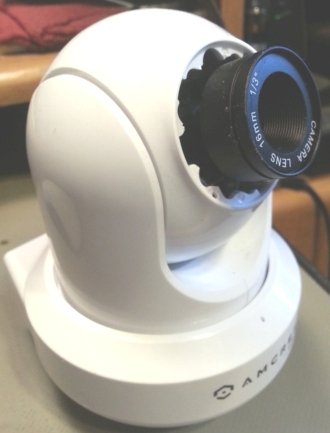
    You have to "open up" a big exit hole for the new lens. Existing lens is very small. You loose the night vision
    LED ring and the clear plastic front lens cover. Small pair of side cutters work well for this.
    They hot glued the heck out of the exisiting lens but it will chip out of there with
    a good pic or jewelers screwdriver.
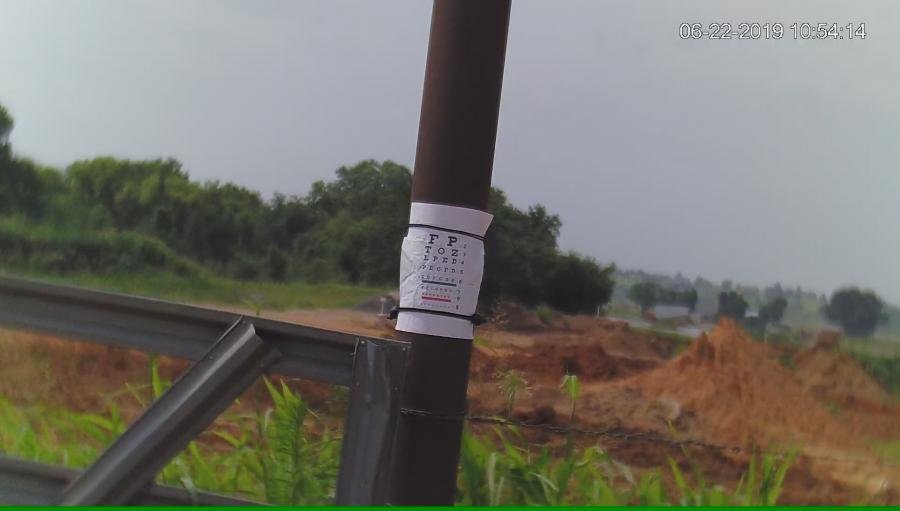
    New lens screws right in and is easy to focus.
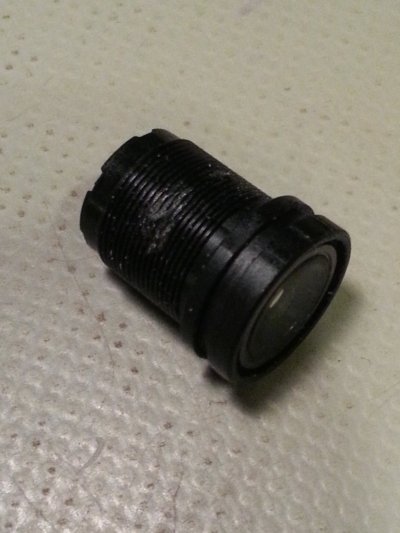
    16mm lens I used
     
    Last edited:

    ICTbee

    Member
    Feb 19, 2019
    4
    Wichita, KS
    martin777, thank you for the heads up, you confirmed my thinking. I will order the 5Vdc regulator, that seems simple enough for the 841. A photo of the lens would be nice. I'm trying to figure out how to open it up..... nut cracker???? lol
     

    ToolAA

    Ultimate Member
    MDS Supporter
    Jun 17, 2016
    10,587
    God's Country
    ToolAA, I have been following your post for about a year now and am finally starting my build so first things first. Really great post and what an effort. Kudo's!

    I do need some clarification and possibly martin777 might have some insight. I am using the same camera as martin777 Amcrest IP2M-841W. Will this camera accept 12vdc into the DC5V socket? I have (2) LOCO M2 antennas, Tripods and (2) 12v 5ah AGM batteries. I would like to keep the build simple and use the battery to power both the M2 and the Camera. Typically i have to break at least one item and rather it not be the camera.

    I was also wanted to know about the Lens. I seen earlier in the post a question about this camera and a link to a lens with no reply. Martin777 did you replace the lens in the 841 and was it difficult?

    BTW I know I wanted to keep this simple..... I do have 2 of the cameras and in the end i would like the option of setting them both up. We can save that for another day so again i appreciate any advice and look forward to getting back out to the range.


    I looked at the Amcrest camera photo and I don’t think you have to dissemble the entire unit. I think you can pry off the dark cover for the IR led’s. Then you should be able to get the tips of a needle nose pliers over the edge of the lens. Then just rotate CCW. The threads are very fine so it may take 20 or so twists to get it out. Also on the Foscam they had a dab of hot glue at the base of the lens. I warmed up the entire camera with a heat gun just to the point of being hot to touch but not melting any plastic. This loosened up the hot glue enough to free the lens.
     

    martin777

    Member
    Dec 29, 2018
    45
    Oklahoma City
    You need to get to the camera board which means a complete dismantle of the thing.
    4 screws under the 4 pads and the bottom cover comes off.
    The main board has 1 small black screw holding it in. Unplug cables and set main board aside.
    There are 4 screws holding the base and they are easy to get to through holes when lined up.
    I just leave the cables running through the middle. They don't get in the way much.
    Might have to remove 1 motor and a couple more screws.
    The pan/tilt "halves" have molded-in small plastic clips that u can release while prying them apart.
    You have to "open up" a big exit hole for the new lens. Existing lens is very small. You loose the night vision
    LED ring and the clear plastic front lens cover. Small pair of side cutters work well for this.
    I un-clipped the camera board to make it easier for me to hold while
    chiping away at the hot glue on the lens threads.
    Not too bad if u have good eyes.
    Take good pics and/or mark everything that moves.:D
     

    ToolAA

    Ultimate Member
    MDS Supporter
    Jun 17, 2016
    10,587
    God's Country
    You need to get to the camera board which means a complete dismantle of the thing.
    4 screws under the 4 pads and the bottom cover comes off.
    The main board has 1 small black screw holding it in. Unplug cables and set main board aside.
    There are 4 screws holding the base and they are easy to get to through holes when lined up.
    I just leave the cables running through the middle. They don't get in the way much.
    Might have to remove 1 motor and a couple more screws.
    The pan/tilt "halves" have molded-in small plastic clips that u can release while prying them apart.
    You have to "open up" a big exit hole for the new lens. Existing lens is very small. You loose the night vision
    LED ring and the clear plastic front lens cover. Small pair of side cutters work well for this.
    I un-clipped the camera board to make it easier for me to hold while
    chiping away at the hot glue on the lens threads.
    Not too bad if u have good eyes.
    Take good pics and/or mark everything that moves.:D


    Does the OEM lens have a wider diameter than housing? It doesn’t look like it in this photo.

    d5fcf5da4cdb122546512d5874c92f6f.jpg


    It looks almost identical to the way the Foscam is built. Unless the lens is larger behind hole cutout then it should just twist out.
     

    martin777

    Member
    Dec 29, 2018
    45
    Oklahoma City
    What ToolAA said would work if you heat it up and get a good firm grip on the lens.

    Certainly worth a try.

    The LED ring has a large hole in the middle and would not have interfered with my new lens.
    The OEM lens had a big blob of glue on the top and bottom.

    My thinking at that time was the new (big) lens would not screw in far enough to focus without
    removing the LED cover/ring and/or enlarging the hole.
    I would have to remove the dark LED cover/ring from the inside.
    And being able to gracefully grip the old lens to unscrew it.
    Does the OEM lens have a wider diameter than housing? It doesn’t look like it in this photo.

    OEM lens--->
    lens1.jpg
    The dark LED cover attaches from the inside with 3 tabs.
    The 'bushing" on the right assures a tight fit for the
    LED ring/lens/cover.
    lens2.jpg
    LED ring
    LED ring.jpg
    P/T Camera--$61 shipped
    16mm Lens--$12
    camera1.jpg
    Time--about a week
    PRICELESS! :)
     
    Last edited:

    ICTbee

    Member
    Feb 19, 2019
    4
    Wichita, KS
    Ok Men cover me. I'm go'in in!

    Will post some photo's in the next few days of what i come up with. At least now i know what I'm getting into. First i'm going to try removing the led cover.
     

    martin777

    Member
    Dec 29, 2018
    45
    Oklahoma City
    In the next few days I'll post results of range testing my single M2 wifi setup.
    IP Camera--->M2
    M2--->Laptop USB wifi adaptor with a 15dB Yagi antenna.


    Sorry for the delay.:o
     

    Tungsten

    Ultimate Member
    Jan 1, 2012
    7,292
    Elkridge, Leftistan
    If I only wanted a 200yd camera would there be anything wrong with using a baby monitor set up to work with a battery? It seems many of them advertise 700ft range line of sight. Batteries are cheap and my basic calculations tell me a 6V 5AH battery can last about 4.5 hours. Is there anything I'm missing for trying this? Has anyone ever replaced the antenna for a directional one? I have a DXR-8 laying around and was thinking about tinkering with it.
     

    ToolAA

    Ultimate Member
    MDS Supporter
    Jun 17, 2016
    10,587
    God's Country
    If I only wanted a 200yd camera would there be anything wrong with using a baby monitor set up to work with a battery? It seems many of them advertise 700ft range line of sight. Batteries are cheap and my basic calculations tell me a 6V 5AH battery can last about 4.5 hours. Is there anything I'm missing for trying this? Has anyone ever replaced the antenna for a directional one? I have a DXR-8 laying around and was thinking about tinkering with it.


    With the zoom lens I would say as long as the sensor is at least 1MP then the image should be good enough. Test it out before investing in a battery pack. I would think you could plug it in your home somewhere near a window and test the signal as far as you can go.


    Sent from my iPad using Tapatalk
     

    martin777

    Member
    Dec 29, 2018
    45
    Oklahoma City
    FINALLY found a flat, clear, dry enough place to test my range cam.
    2.4Ghz Wi-Fi IP camera--->M2 access point = 1yds
    M2--->25dbi Yagi/Laptop USB adaptor = 747yds
    Camera settings----
    1080P@30fps
    H.264H encoding
    rtsp streaming
    CBR = 2048Kbs
    Signal strength was still 56% and I need to figure out what that actual signal is in db or RSSI.
    I think I could get another 150yds+ by separating the M2 from the camera. Camera literature says it's good for up to 700'.
    I think my chances are good for a 1000yd rig
    but I'm pretty sure I'll need to lower the frame rate. Nothing wrong with 4fps in this application.
    Well aimed $15 Yagi antenna really payed off. :D

    Cheers


    Last edited:

    ToolAA

    Ultimate Member
    MDS Supporter
    Jun 17, 2016
    10,587
    God's Country
    FINALLY found a flat, clear, dry enough place to test my range cam.
    2.4Ghz Wi-Fi IP camera--->M2 access point = 1yds
    M2--->15db Yagi/Laptop USB adaptor = 747yds
    Camera settings----
    1080P@30fps
    H.264H encoding
    rtsp streaming
    CBR = 2048Kbs
    Signal strength was still 56% and I need to figure out what that actual signal is in db or RSSI.
    I think I could get another 150yds+ by separating the M2 from the camera. Camera literature says it's good for up to 700'.
    I think my chances are good for a 1000yd rig
    but I'm pretty sure I'll need to lower the frame rate. Nothing wrong with 4fps in this application.
    Well aimed $15 Yagi antenna really payed off. :D

    p.s.---5.8Ghz might double+ this range.

    Cheers


    747yds with only 1 M2 unit at the target position and the antenna connected directly to your laptop? Wow thats quite impressive. I guess having 2 M2’s setup could easily go a mile as advertised.

    I agree with lowering the frame rate. I think I keep mine at 10fps. It’s more than fast enough for tracking shots.

    Post a pic or video of your setup.
     

    Chuckmaurice

    Member
    Jun 30, 2019
    7
    yes, you can. I use a linksys router and a foscam camera.

    their software looks for two things: 1)the SSID of the wifi router (must be "bullseyecamxxxxxx" where xxxxxx is a number to differentiate you from another system. i.e. ssid of wifi router is bullseyecam100000 or something similar. No encryption. Camera device name should be BullseyeCamera but I am not sure if that matters and 2)IP address of camera should be static and 19.168.1.252. Client can be DHCP, it doesn't care about that.

    so basic setup is:
    router ssid bullseyecam0123456 (whatever number you want)
    no wifi encryption
    router set to DHCP server for clients and IP address 192.168.1.1
    camera device name BullseyeCamera
    camera IP static 192.168.1.252
    camera set to connect to router ssid in infrastructure mode via wifi (or cable if you want)
    client PC or smartphone DHCP set to connect to wifi

    range is iffy sometimes at 600 yards (as with any such system) and I have used a wifi repeater router with two antenna ports with a yagi pointed each way at about 300 yards to make the signal bulletproof (pun intended) on the firing line.

    in the interest of not hijacking this thread further PM me if you want any more info

    Hello everyone
    I am new to your forum, I look at your subject for some time.
    I started to mount a camera to make it work with the Bullseyecam application.
    I'm using a camera bought on Aliexpress:https://fr.aliexpress.com/item/32876934874.html?spm=a2g0s.9042311.0.0.1aab6c37iIfv4Z
    And a Comfast wifi bridge:https://fr.aliexpress.com/item/32812276161.html?spm=a2g0s.9042311.0.0.1aab6c37iIfv4Z
    For the moment it works perfectly well with the original application of the camera XMeye.
    But I can not make it work with Bullseyecam, I can connect the Bullseye application on the Comfast wifi network, but I have no picture, I have an error message "unable to capture image ".
    Can you help me ?
     

    Chuckmaurice

    Member
    Jun 30, 2019
    7
    Hello everyone
    I am new to your forum, I look at your subject for some time.
    I started to mount a camera to make it work with the Bullseyecam application.
    I'm using a camera bought on Aliexpress:https://fr.aliexpress.com/item/32876934874.html?spm=a2g0s.9042311.0.0.1aab6c37iIfv4Z
    And a Comfast wifi bridge:https://fr.aliexpress.com/item/32812276161.html?spm=a2g0s.9042311.0.0.1aab6c37iIfv4Z
    For the moment it works perfectly well with the original application of the camera XMeye.
    But I can not make it work with Bullseyecam, I can connect the Bullseye application on the Comfast wifi network, but I have no picture, I have an error message "unable to capture image ".
    Can you help me ?

    Here is my configuration:
    SSID WIFI: BullseyeCam123456
    Adesse IP SSID WIFI: 192.168.1.1 with DHPC SERVER
    IP Camera Address: 192.168.1.252 STATIC
    CAMERA ACCOUNT: bullseye / PASSWORD: bullseye2015
    Video format: H264
     

    mac1_131

    MSI Executive Member
    MDS Supporter
    Jan 31, 2009
    3,285
    I think the app requires a specific codec to be used, so not just any camera will work.

    That's probably your problem, the camera you have may be using a different codec so it's not going to work.
     

    Users who are viewing this thread

    Latest posts

    Forum statistics

    Threads
    275,544
    Messages
    7,285,890
    Members
    33,476
    Latest member
    Spb5205

    Latest threads

    Top Bottom