Hooligan Traditions Kentucky Rifle DIY Project

The #1 community for Gun Owners of the Northeast

Member Benefits:

  • No ad networks!
  • Discuss all aspects of firearm ownership
  • Discuss anti-gun legislation
  • Buy, sell, and trade in the classified section
  • Chat with Local gun shops, ranges, trainers & other businesses
  • Discover free outdoor shooting areas
  • View up to date on firearm-related events
  • Share photos & video with other members
  • ...and so much more!
  • j8064

    Garrett Co Hooligan #1
    Feb 23, 2008
    11,635
    Deep Creek
    Nice progress. For a couple years, I eyeballed the flint version, then I think they stopped selling it cause I could not find one anymore.
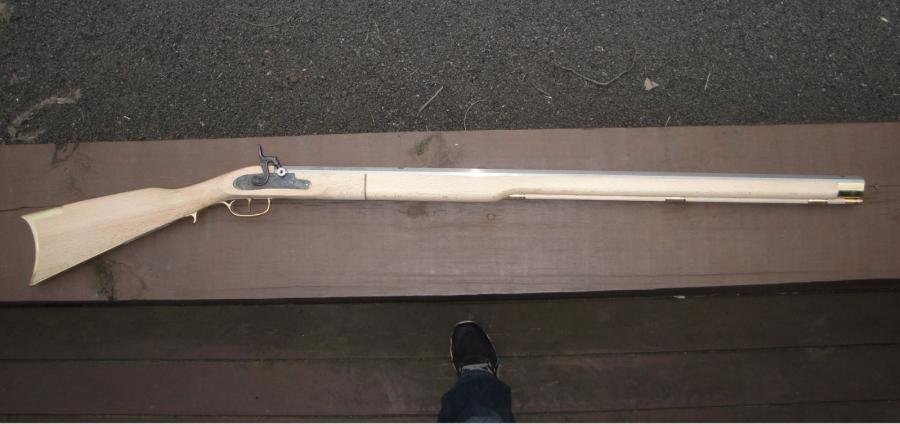
    Traditions still makes flintlock kits, Melnic. Here's the flintlock version of the same kit I'm working on: https://www.muzzle-loaders.com/traditions-kentucky-rifle-kit-flintlock.html

    There are other kits: https://www.traditionsfirearms.com/category/Rifle-Kits

    One project at a time on my bench, but ya never know what could be next... ;)
     
    Last edited:

    Melnic

    Ultimate Member
    MDS Supporter
    Dec 27, 2012
    15,370
    HoCo
    Man, I swear I looked last fall for this and could not find one. I did build a 36 cal kit I got at a gun shop for I think $200. This might be my project next fall


    Sent from my iPhone using Tapatalk
     

    j8064

    Garrett Co Hooligan #1
    Feb 23, 2008
    11,635
    Deep Creek
    Man, I swear I looked last fall for this and could not find one. I did build a 36 cal kit I got at a gun shop for I think $200. This might be my project next fall

    When Hooligans are involved be careful what you wish for... :innocent0

    :lol2:
     

    buellsfurn

    Ultimate Member
    Dec 1, 2015
    5,951
    southern end of Maryland
    my 2 cents use a palm sander to knock down most of the extra material then finish by hand to get rid of the sander swirls marks. you've come this far no short cuts for you. I like tung oil it has a amber tint to it so keep that in mind. If it gets to shinny for ya take oooo steel with the grain lightly to knock down some of the shine.
     

    4570inMD

    Western MD Hooligan #007
    Jan 26, 2011
    1,340
    West Virginia
    As you can see in the pics the forestock is way bigger at that junction. It needs fitting. Some options:

    - Hardest: Taper the forestock sides from the walnut shim to the nose cap. That could be done, but that's a helluva lot of sanding for about 28" on both sides. Then there's blending the taper to the bottom so it looks good near the ramrod channel.
    - Easier: Taper the last few inches of the forestock so it blends with the nose cap.
    - Easiest: Bevel about 3/8" at the end of the forestock toward the nose cap and call it a day.

    Another option is to taper from the ram rod hole to the nose cap, as was done on my 1759 JP Beck. It leaves plenty of stock to grip and reduces the weight out to the muzzle.

    Stock taper point.jpg

    4570inMD
     

    j8064

    Garrett Co Hooligan #1
    Feb 23, 2008
    11,635
    Deep Creek
    Another option is to taper from the ram rod hole to the nose cap, as was done on my 1759 JP Beck. It leaves plenty of stock to grip and reduces the weight out to the muzzle.

    4570inMD

    If I went that route it's about 20" of tapering. After considering options and looking at some online pics of factory finished Traditions Kentucky rifles I think I'll go with Plan C: Bevel/Round the end of the forestock to the muzzle cap. It's easier than trying to keep a long line of taper straight and even plus blend it to the ram rod channel. This rifle ain't gonna be "museum quality" like yours are... ;)

    More sanding and fitting done today: I got most of the excess wood off the tang area. The stock needs to be flush and square with the tang. I removed about 1/8" of wood. Still more to do there, but it's getting close. And I'm not concerned about scuffing the tang screw head. I'll re-blue that when I do the barrel...

    One day closer to making the Hooligan Traditions Kentucky Rifle go bang.

    :)
     

    Attachments

    • Nose Cap on Finished Traditions Rifle Sample Capture 02.JPG
      Nose Cap on Finished Traditions Rifle Sample Capture 02.JPG
      26.5 KB · Views: 178
    • DSC09903 SNIP Tang Area Sanded.jpg
      DSC09903 SNIP Tang Area Sanded.jpg
      42.4 KB · Views: 156
    • DSC09902 SNIP.jpg
      DSC09902 SNIP.jpg
      28.4 KB · Views: 156
    Last edited:

    j8064

    Garrett Co Hooligan #1
    Feb 23, 2008
    11,635
    Deep Creek
    I am watching this thread like a hawk!:ninja:

    My goal is to have this project done and off my bench before Memorial Day. :thumbsup:

    After this project is finished I need to get my Garand back on my bench. A refresher on disassembly and reassembly will be a good thing to focus on. 4570 & I will be checking into a hotel in Anniston, Alabama in late August to attend CMP Garand classes. And that's less than 4 months away...

    :party29:

    ;)
     

    CombatAK

    Hooligan #12
    Sep 1, 2015
    1,161
    Cresaptown
    My goal is to have this project done and off my bench before Memorial Day. :thumbsup:

    After this project is finished I need to get my Garand back on my bench. A refresher on disassembly and reassembly will be a good thing to focus on. 4570 & I will be checking into a hotel in Anniston, Alabama in late August to attend CMP Garand classes. And that's less than 4 months away...

    :party29:

    ;)

    You just know that I want to shoot both of them!!!!:D
     

    j8064

    Garrett Co Hooligan #1
    Feb 23, 2008
    11,635
    Deep Creek
    A Little More Progress...

    Since I've decided to taper the end of the forestock to blend with the nose cap like in the factory pics I found, fitting the ramrod rings made sense. The bevel on the forestock needs to align with the front ring so I need a reference point before I start shaping there.

    I will say there ain't nothing just GTG with this kit. Almost everything needs fitting. But that's why they call it a DIY project. ;)

    Example:

    • The ram rod rings are attached with short brass screws through the barrel channel. The holes are pre-drilled and counter sunk. But...they don't line up perfectly.
    • First issue is the counter-sunk holes are too deep. With the screw tight enough to hold the ring, the tip of the screw interferes with the ram rod insertion. The solution? Either shorten some very small screws or add material to take up the slack.
    • I can deal with the front and middle rings by adding material. But the rear ring is way off... There's a good 3/16" gap between the factory drilled hole and the connecting point on that ring. In the pic below I marked the relative positions of the mis-alignment. The arrow on the left is the factory hole - the right is where the ring hole is. Two options: Ease the channel and seat the ring deeper into the stock to align the ring (which would look bad)... Or, drill a new hole in the correct spot. Since I'll need to shim the two other rings anyway I think I'll go with Plan B here.

    Like I keep saying: "This ain't a weekend project" and "It won't be perfect, but it will be awesome!"

    More to come - stay tuned...

    :)
     

    Attachments

    • DSC09909 SNIP.jpg
      DSC09909 SNIP.jpg
      43.3 KB · Views: 176
    • DSC09910 SNIP Arrows.jpg
      DSC09910 SNIP Arrows.jpg
      39.2 KB · Views: 177
    Last edited:

    Blacksmith101

    Grumpy Old Man
    Jun 22, 2012
    22,288
    I can deal with the front and middle rings by adding material. But the rear ring is way off... There's a good 3/16" gap between the factory drilled hole and the connecting point on that ring. In the pic below I marked the relative positions of the mis-alignment. The arrow on the left is the factory hole - the right is where the ring hole is.

    Obviously that is because you chose not to use the factory supplied stock spacer the difference in thickness will randomly change the screw hole spacing so any other misalignment's you discover are not the factory's fault.:innocent0:D

    Nice job.:thumbsup:
     

    j8064

    Garrett Co Hooligan #1
    Feb 23, 2008
    11,635
    Deep Creek
    Obviously that is because you chose not to use the factory supplied stock spacer the difference in thickness will randomly change the screw hole spacing so any other misalignment's you discover are not the factory's fault.:innocent0:D

    Nice job.:thumbsup:

    Nah, not really. The spacer simply joins the butt and forestock. The ram rod rings attach to the forestock. I think it's crappy factory QC...

    ;)
     

    j8064

    Garrett Co Hooligan #1
    Feb 23, 2008
    11,635
    Deep Creek
    Ram Rod Ring Alignment Resolved

    Well, one small detail is now dealt with. Rather than start plugging holes and drilling others I decided to try easing the ram rod channel so the rear ring could seat a little further back and maybe align with the pre-drilled hole. Some 220 grit sandpaper wrapped around a dowel worked well.

    But I still have another issue with the rings: When the small brass mounting screws are seated enough to firmly attach the rings, the screw tips extend a few thou's into the rings and interfere with the rod's travel. Options:
    • Add some material inside the screw holes to take up slack. The more I thought about it, that sounded like a big PITA...
    • Add a thin shim between the rings and stock that takes up the space. Tried to make a couple out of an old 45-70 case. Another PITA idea that didn't work well.
    So I'm down to these options:
    • Bed the rings in the channel with a tiny bit of resin. It wouldn't be difficult or noticeable. Just need to get release agent on the screws and rings, bed them and clean up the excess resin after it sets.
    • Or (after all the barrel bluing and stock finish are done) when the rings are installed for the final time, file down the screw tips that extend into the rings and ease them to accept the rod. By then I don't expect I'll ever need to remove them, so not a big deal...right?

    Building these kits takes lots of patience and attention to detail. None of the work is hard. You just need to think through each step first, consider all options and consequences and have a solid plan.

    ;)
     

    Attachments

    • DSC09940.jpg
      DSC09940.jpg
      28.1 KB · Views: 148
    • DSC09943.jpg
      DSC09943.jpg
      25.4 KB · Views: 139

    Users who are viewing this thread

    Forum statistics

    Threads
    275,552
    Messages
    7,286,145
    Members
    33,476
    Latest member
    Spb5205

    Latest threads

    Top Bottom