XDM 9/40 trigger Job

The #1 community for Gun Owners of the Northeast

Member Benefits:

  • No ad networks!
  • Discuss all aspects of firearm ownership
  • Discuss anti-gun legislation
  • Buy, sell, and trade in the classified section
  • Chat with Local gun shops, ranges, trainers & other businesses
  • Discover free outdoor shooting areas
  • View up to date on firearm-related events
  • Share photos & video with other members
  • ...and so much more!
  • alucard0822

    For great Justice
    Oct 29, 2007
    17,702
    PA
    I finally got my Powder River performance kit for my XDM 40 today, and have finished the trigger job. It took about an hour, and the results are impressive, once finished, it is by far the best trigger I have ever felt on a poly frame pistol, stock or modified, and should help tighten up groups, and speed up shots. I got the "basic" trigger kit instead of the "match", because I wanted to keep a reliable and safe combat trigger around 5lbs, and make it as crisp and short as I could without compromising feel or making it too light. I didn't want a 6oz on-off switch with .001 travel I wanted to feel the break, and feel a little bit of takeup while making it smooth and eliminating most of the overtravel, my only real complaint with the XDM itself.

    The kit came from PDP, they can also do the install if you don't feel confident about doing it yourself
    http://www.powderriverprecision.com/index.php?p=3&c=XDM+Trigger+Kit

    It should be said that I do have some armorers training and a little experience in some light gunsmithing, and for the home gunsmith I would call this job "intermediate", it encompasses most of a detail strip of a relatively complex pistol, and minor fitting and polishing work, and if you take your XDM apart, it is on you to get it back together correctly, and on you to verify safe operation and function, I cannot be held responsible if you end up with a pile of parts that used to be a gun, although if anyone has questions, or needs help, I will try to do what I can.


    The parts arrived in a small pouch, and took about a week, for $90 you get a new safety lever and a PDP plastic trigger stop, expensive for what it is, but there are few other kits that can get these results with almost no fitting, and most of the rest cost more, you can also speak to Dan, the owner if you have any problems, and he is a great guy to deal with(I ordered from him) so all in all the results, tech assist and customer service are well worth the $90, even if the parts themselves don't look like much by themselves.

    S7300386.jpg

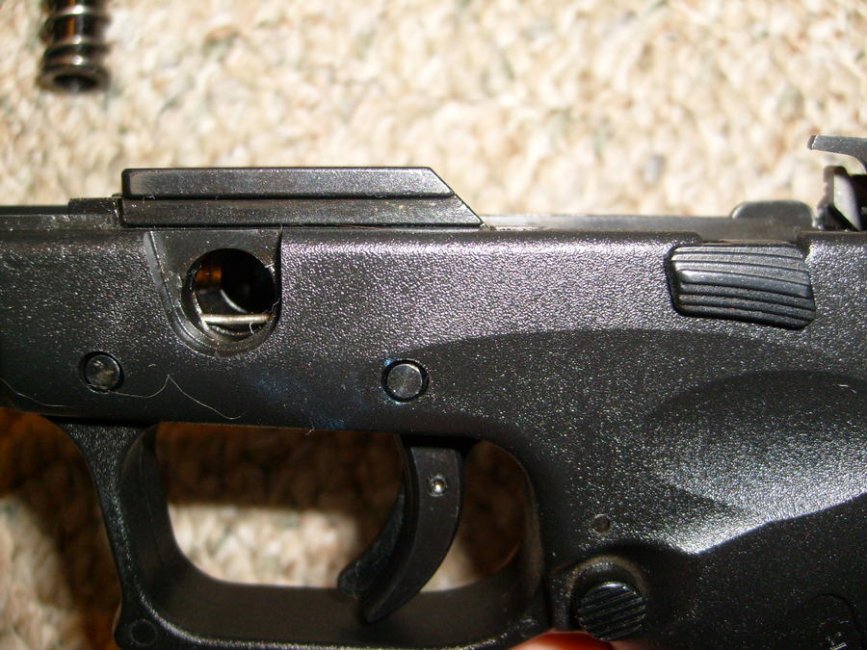
    Step 1 is fairly simple, field strip the pistol, and then turn the takedown lever to the left at about 10:00 until the sear catch releases, you should hear a click. Right around this spot, you can gently pull the lever out about 1/8", gently turn it as you pull, to get it past the spring that holds it in place, and the lever will come out.

    S7300388.jpg

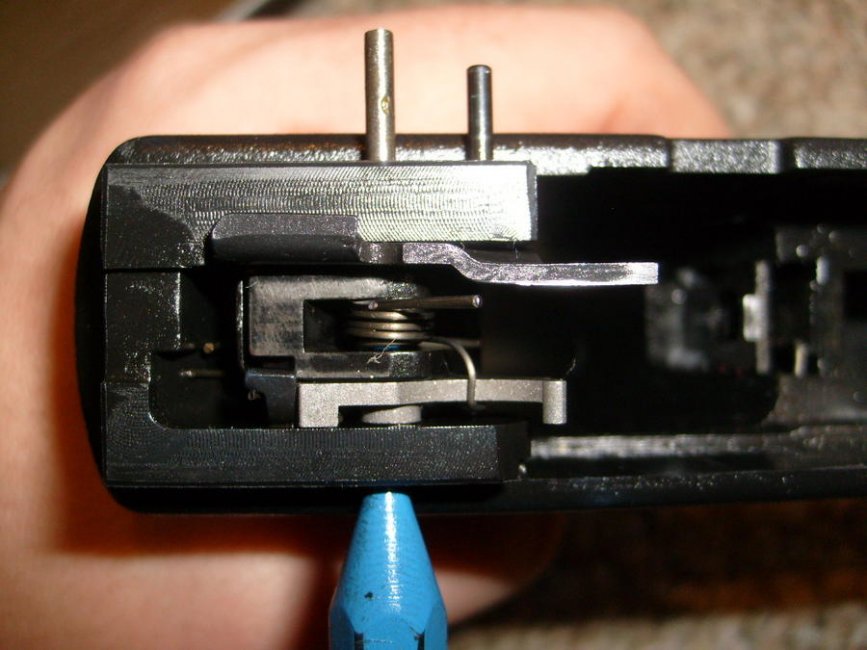
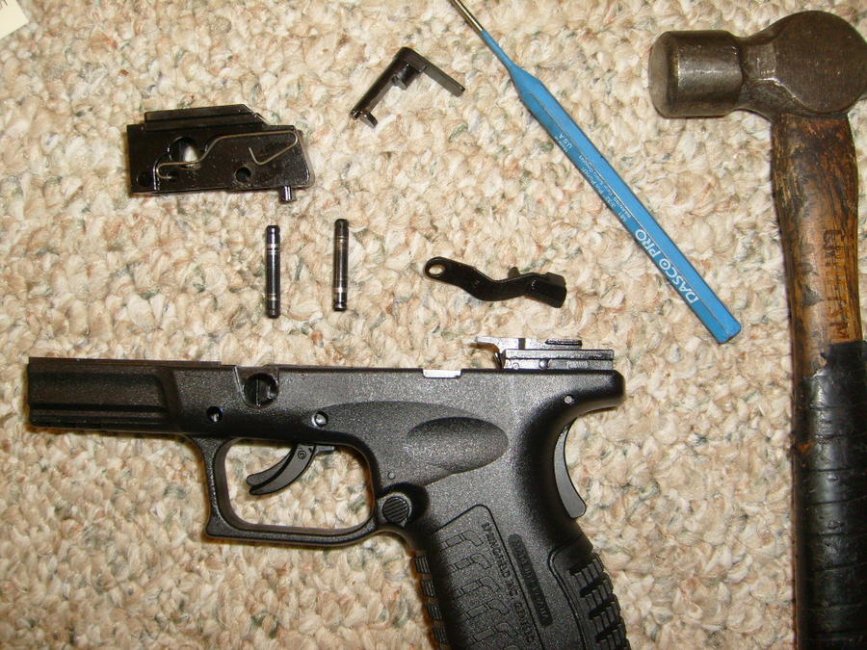
    Next, with a punch and hammer, drive the two pins holding the locking block and trigger out, the front simply holds the block in place, the rear pin holds in, the slide stop, the trigger, and the rear of the locking block, it will also hold the trigger stop once the kit is installed. Gently pull out the block first noting the position of the slide stop/takedown spring
    S7300389.jpg

    Once the block is out, you can simply pull the takedown bar out and forward, noting the cavity in the rear where it holds the sear lock rearward under normal operation, then comes the trigger and bar, there is nothing holding the trigger and spring onto the pin it rides in, so be careful not to let the trigger fall off of it's pin without noting how it goes, also look at the position in the rear where it mates with the safety lever and sear, gently pull it forward slightly, then lift up as you pull the trigger to the rear to clear the housing, and remove it.

    S7300391.jpg
     
    Last edited:

    alucard0822

    For great Justice
    Oct 29, 2007
    17,702
    PA
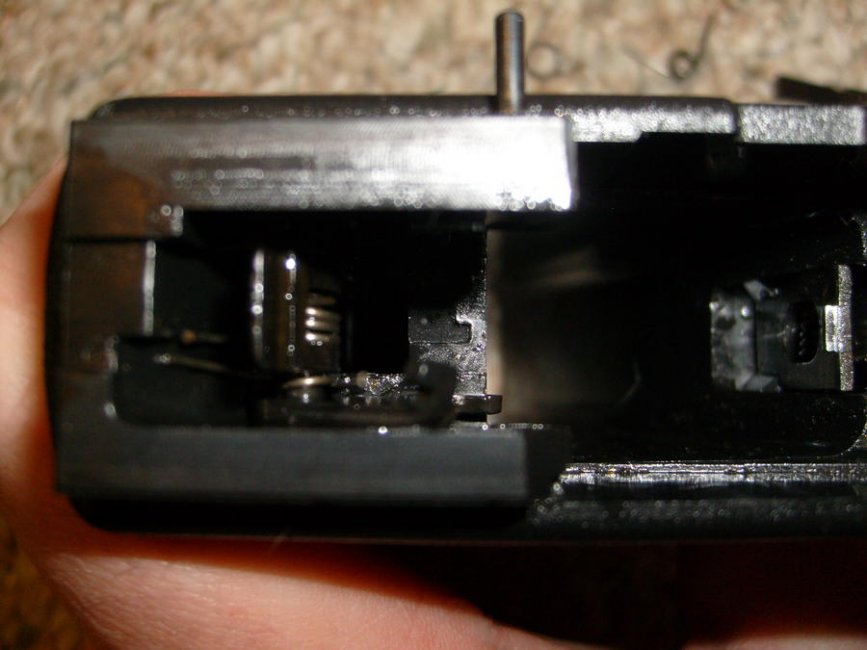
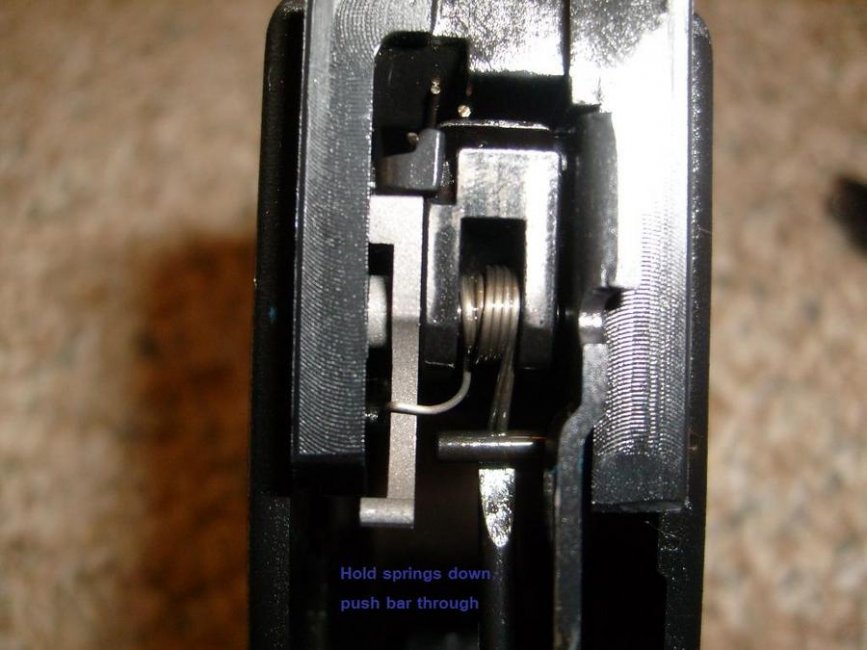
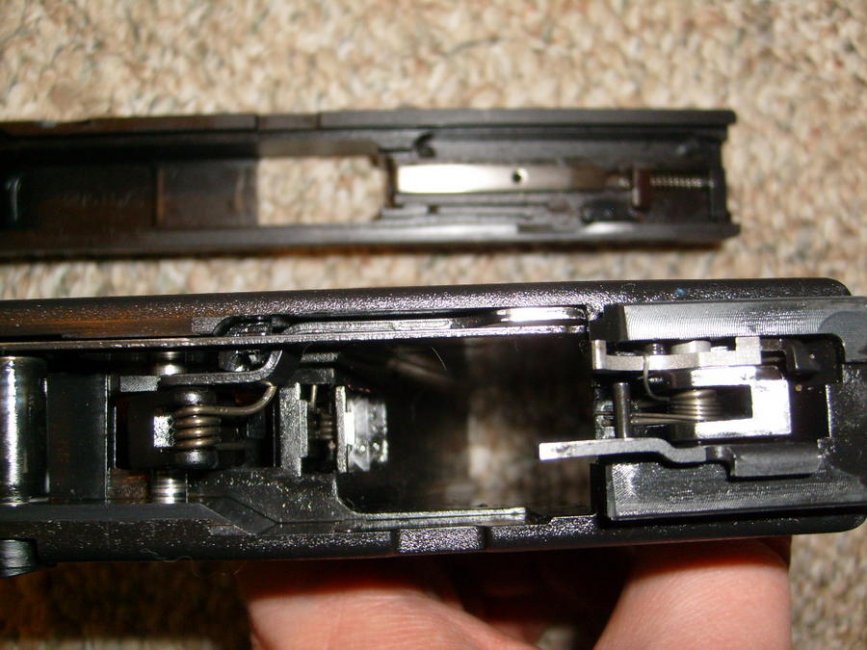
    Now that you have the locking block, front rails, trigger out, it it time to take apart the sear assembly, first push the large pin that is in the center of the rail out, following it with your punch to keep the springs from flying out, best to do this part in a plastic bin, or somewhere where parts that fly out can easily be found. Leave the punch in place to hold it together, and gently push the small spring perch bar out with a small flat screwdriver, you cannot push it out from the end, and have to pry aggainst the safety lever, but the pin is not held by much tension, and moves easily out of the way to take tension off of the springs, I didn't push it completely out, there is no need. Now hold your thumb over the sear, and as you pull the punch out, pull the sear and springs out, the springs wrap around one another, and you want to pay attention to where the small hook is positioned that goes over the safety lever, you may have to push the grip safety in to get the sear lock to release it, then take out the safety lever and ejector.

    This pic is actually of reassembly, and the new safety lever is shown as the light grey part.

    S7300394.jpg

    These are the sear group parts, I polished the top and rear face of the sear with a fine stone while it was out, along with the top "hump" on the trigger bar, and anywhere else that the bluing was worn indicating metal to etal contact. Do not polish too deeply, you do not want to change the shape or angles, you are simply smoothing out the surface, and making the edges of the sear sharper to help make the break crisper.

    S7300392.jpg

    this is the grip frame with the parts out, there is another pin that holds the sear lock and grip safety in, for the purposes of installing the kit, leave them alone, they are a M-fer to get back in.

    S7300393.jpg

    Now, in the same way you took the sear, ejector and safety lever out, coat them in a good oil, and put them in place in the opposite order they came out in, ejector first(you can tap the small front pin in a little to hold it in place), new PDP safety lever second(start the punch from this side to hold this in place), then push the sear into position, pushing on the grip safety to line it up, and start the punch in on one side, then last the springs, with the thin safety lever spring wrapped around the thick sear spring. You then chase the punch out with the pin, making sure it is centered below the bottom of the frame rails on both sides. You can then hook the safety lever spring on, and tension the springs with a small flat blade screwdriver, hold it in place, and push the small pin back into place. The hard part is now done.

    S7300395.jpg
     
    Last edited:

    alucard0822

    For great Justice
    Oct 29, 2007
    17,702
    PA
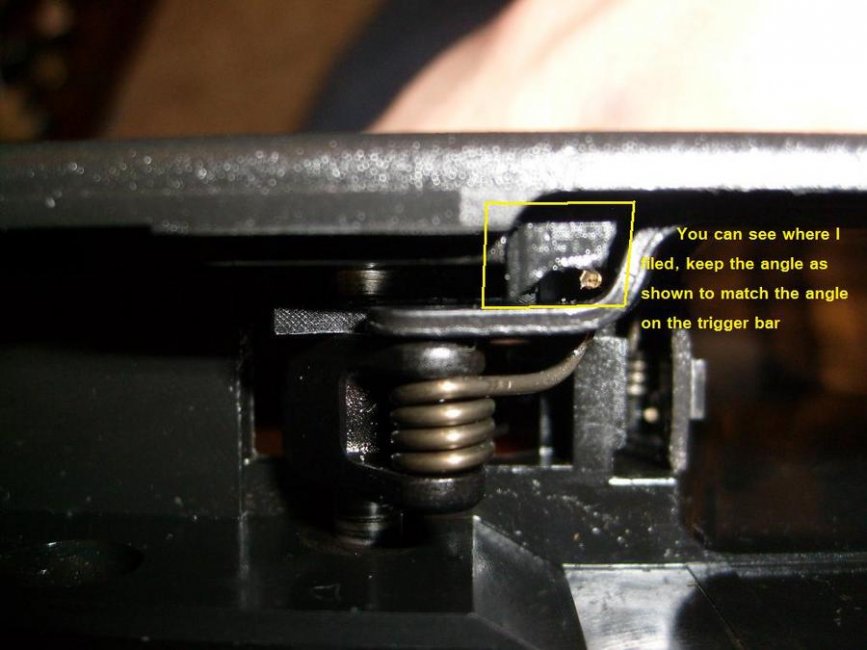
    now it is time to fit and install the trigger stop. it sits in the frame as shown, between the trigger and locking block, held in place by the rear pin.

    S7300396.jpg

    You must file it, trying to keep the angle as shown to match with the trigger bar, and limit it's forward travel, and the triggers rearwar overtravel. It is much easier to take more material off than to put it back on, so after you take a little off, stop, and put the trigger, sear lock bar, takedown lever and rear pin in, leave the locking block out, and put the stripped slide on (no barrel or recoil spring). Cock the striker, and hold the slide flush with the rear of the frame as it would normally be, push in the grip safety, and pull the trigger, if it drops the striker, you are good, if it doesn't release the striker, pull it back apart, and take a little more off of the stigger bar stop.

    S7300398.jpg
    S7300397.jpg

    Once fitted make sure the trigger bar stop is in place, and contacts the side of the trigger, it also acts as a shim to keep the trigger from flexing left or right, reinstall the trigger/bar, takedown bar, and locking block, sliding it in from about 11:00, you may have to use a small flat screwdriver to push the slide stop twards the trigger to get the block in, and to top it off, make sure the takedown lever/slide stop spring is in place. Once it is lined up, drive the front pin through to keep the block in place, and push the rear pin through from the right, using the punch to line up all the components, and once the pin is about half way through the trigger, push the takedown spring up through the hole, and slip the slide stop lever in, line it up, and push the pin completely through, keeping both pins countersunk evenly on both sides of the frame.

    S7300400.jpg
     
    Last edited:

    alucard0822

    For great Justice
    Oct 29, 2007
    17,702
    PA
    Now that the locking block/trigger is in place, push the takedown lever back in, there is a small pin offset, use that to push the spring down, as you turn it, keep turening, and pushing untill it is back in the 10:00 position that you took it out, and then click it in place, the bottom end is done, and the kit is installed, now the rest is optional, but makes for a crisper break, and smoother trigger.

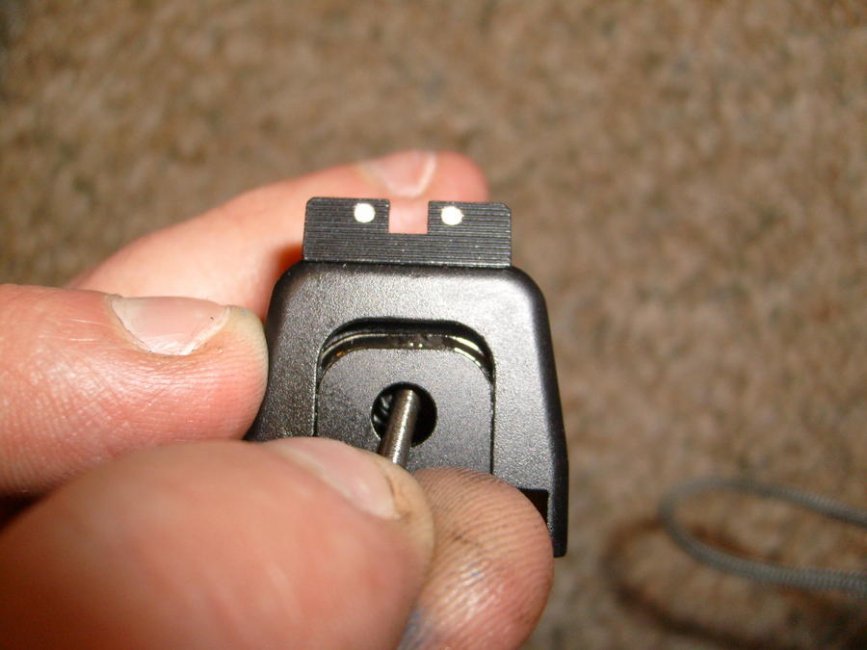
    The striker comes out easily, first push the small plastic peice that surrounds the striker indicator in, as you slide the cover plate dowm, be careful, the striker spring will fly if you slip, so once the cover is slid down enough that the striker spring cap will not fall back in the hole, cover it with your thumb, point it down, and slide the cover off the rest of the way

    S7300401.jpg

    Now pull the spring, cap and indicator out, and set them aside. There is a roll pin that holds the striker in place, drive it most of the way out from the small hole under the slide.

    S7300402.jpg

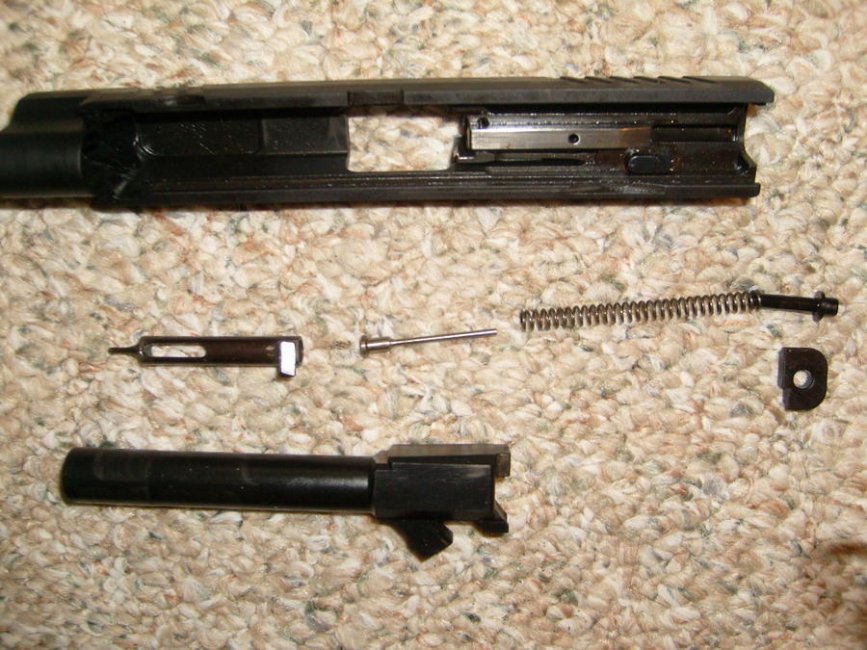
    Now, remove the pin from the rear, and polish the face of the tab that the striker mates with, this will clean up the trigger break even more

    S7300403.jpg

    Once polished, reassemble the striker , with the striker roll pin just under the exterior surface of the slide, and then ut the indicator in, then the spring, then the cap, hold in place with a punch, and slide the cover back in place.

    S7300404.jpg

    Now reassemble from the field stripped parts and test it, cock and dry fire 3 times, then cock, and fire while holding the trigger to the rear, cock again, the indicater should protrude with the trigger held, then release the trigger to reset it, and try it 2 more times to be sure. Next cock the pistol, and try pulling the trigger without holding in the grip safety to verify function, and try again holding in the grip safety, but pulling the trigger from the side, leaving the safety paddle out, if it does not fire, the safeties are working, now put a pencil in the barrel, eraser side down, and point the pistol straight up as you pull the trigger, the pencil should launch out of the barrel, this verifies the striker is functioning, if it passes, next step is to take it to the range.

    Before the kit was installed, I had a relatively smooth 6.5lb trigger with a 2.75lb takeup that had a mushy break, and a lot of overtravel with an unimpressive reset length. Now it has a 1lb takeup, crisp and short 5.2lb break, and very little overtravel, and a shorter reset and glass smooth arc. This trigger is perfect, and exceeds my expectations quite a bit, I cant wait to take it to the range and try it out.

    I also measured the parameters an compared them with my Kimber 1911 Custom with some extra trigger tuning, and GLOCK 30 with 5lb fitted Ghost tactical connector, polishing work, and overtravel stop. The XDM is now everything I could want in a combat handgun. The measurements below show the distance of travel from one stage of trigger pull to the next, I unfortunately didn't measure the lengths before I did the work, but it is night and day. All below measurements were taken from the center of the trigger to the shortest distance to the grip.

    Kimber 1911
    Length of pull 2.750
    takeup 2.725/.025 1.2lbs
    break 2.700/.025 4.1lbs
    overtravel 2.670/.030
    reset 2.730/.060

    GLOCK 30
    Length of pull 2.950
    takeup 2.730/.220 3.1lbs
    break 2.640/.090 5.5lbs
    overtravel 2.600/.040
    reset 2.730/.130

    XDM 40
    Length of pull 2.570
    takeup 2.525/.045 1.2lbs
    break 2.450/.075 5.2lbs
    overtravel 2.410/.040
    reset 2.540/.130
     
    Last edited:

    Crxflippr

    Foolish Mortal
    Oct 23, 2008
    1,749
    Frederick
    :thumbsup:
    You make me think I can do this... that's not good. In spite of your warning I'm going to curse you when I can't get my XD back together again.
     

    zenigma

    Member
    Mar 15, 2009
    1
    I just did mine following the these great instructions, now my trigger is respectable. It still is not as short and crisp as my Sig 226Elite trigger but definitely better than factory. I just got to take it to the range and time my shot splits.
     

    alucard0822

    For great Justice
    Oct 29, 2007
    17,702
    PA
    I just did mine following the these great instructions, now my trigger is respectable. It still is not as short and crisp as my Sig 226Elite trigger but definitely better than factory. I just got to take it to the range and time my shot splits.

    glad it helped:thumbsup:

    It is definitely not as good as a high end sig or 1911 trigger, but it about the best trigger that you can get on a plastic striker fired pistol.
     

    Todd v.

    Ultimate Member
    Nov 30, 2008
    7,921
    South Carolina
    Just ordered the kit the other night then was pointed to this thread. I went with the basic kit that requires drilling but I'm okay with that. Mine is an XD but looks pretty much the saem as far as operation with a few minor differences. Awesome writeup thanks a million for the time you put into this, Should make the job easier. I'll post back my thoughts once I'm done.
     

    smokey

    2A TEACHER
    Jan 31, 2008
    31,522
    ya know what? i'm proud of ol' alucard on this one and many other people have bought an xdm since this was posted...bumpskers
     

    jmira

    VA Rocks.
    Mar 25, 2009
    2,106
    Alexandria, VA
    I got my XDm back from powder precision and it had a few trigger reset failures. I had to manually push it back forward for it to 'click' and was usable again. I cleaned the XDm and had only 1 'close' trigger failure, it clicked but hesitated. I am going to work with these guys to get it resolved instead of spending $40-50 each way to ship the thing.

    this thread ( and 3rdRCN telling me my trigger (finger) sucked ) is what made me send it off in the first place. the trigger ( when it works properly ) is so much better than the stock trigger.

    -j
     

    alucard0822

    For great Justice
    Oct 29, 2007
    17,702
    PA
    I got my XDm back from powder precision and it had a few trigger reset failures. I had to manually push it back forward for it to 'click' and was usable again. I cleaned the XDm and had only 1 'close' trigger failure, it clicked but hesitated. I am going to work with these guys to get it resolved instead of spending $40-50 each way to ship the thing.

    this thread ( and 3rdRCN telling me my trigger (finger) sucked ) is what made me send it off in the first place. the trigger ( when it works properly ) is so much better than the stock trigger.

    -j

    Keep us posted in how it works out, hope the info in the PM helped shed a little light on it.
     

    Gi14

    Member
    Jun 30, 2009
    1
    I'm not a regular here, I signed up so I could see the images in this post. (Googled XDm trigger kits). But I still wanted to thank you for this write-up with images. I got my kit yesterday and installed it last night. I had my laptop next to me while I was doing it and referenced this tutorial OFTEN. Huge thanks!

    The dry-fire trigger feels perfect. As good as, (or dare I say, better) than my worked Glock trigger. I'll be at a local range in the next day or two to put it through its paces.

    I bought the Match trigger set, and also picked up the titanium striker indicator kit (to test with the springs, really). I love doing gun projects like this, but am very much an amateur. No question, without this post, I would have struggled to install this kit.

    Again, thank you very much.
    -Giovanni
     

    alucard0822

    For great Justice
    Oct 29, 2007
    17,702
    PA
    glad it helped, and now that you are here, might as well join in the discussions, there are a lot of othe FAQs and "how-to" threads that are very useful

    welcome to MD shooters:thumbsup:
     

    smokey

    2A TEACHER
    Jan 31, 2008
    31,522
    I'm not a regular here, I signed up so I could see the images in this post. (Googled XDm trigger kits). But I still wanted to thank you for this write-up with images. I got my kit yesterday and installed it last night. I had my laptop next to me while I was doing it and referenced this tutorial OFTEN. Huge thanks!

    The dry-fire trigger feels perfect. As good as, (or dare I say, better) than my worked Glock trigger. I'll be at a local range in the next day or two to put it through its paces.

    I bought the Match trigger set, and also picked up the titanium striker indicator kit (to test with the springs, really). I love doing gun projects like this, but am very much an amateur. No question, without this post, I would have struggled to install this kit.

    Again, thank you very much.
    -Giovanni

    sounds like u need to start a "howdy, new to forum" thread. do you have your c&r yet?
     

    Todd v.

    Ultimate Member
    Nov 30, 2008
    7,921
    South Carolina
    I will work on mine tonight... I had a good shoot this past weekend and at the end I was thinking about how much I need to get this thing in there... Will reveiw my thgouhts after it's done. Mine is and XD (.40) not an XDM though, and I went with the basic kit that you need to drill the frame and install the set screw to adjust overtravel....
     
    Oct 21, 2008
    9,273
    St Mary's
    I'm going to see if I can find a kit at the Chantilly show..if not, I'm ordering one. Great writeup. Thanks for the effort putting it together. You probably spent more time doing the post than the actual mod.
     

    Todd v.

    Ultimate Member
    Nov 30, 2008
    7,921
    South Carolina
    Just got done with it.... No big deal... Awesome improvement for the $60 and 45 minutes or so of time... I got the overtravel adjusted up just right and smoothed things up while it was apart.... Like a whole different gun. :)

    Thanks for the write up, made it much easier.... There are a few suttle differences between the XD and XDM, mainly a spring that's not there in the back of the XD but it's pretty much the same other than that.
     

    jmira

    VA Rocks.
    Mar 25, 2009
    2,106
    Alexandria, VA
    well I decided to detail strip my XDm today to figure out what was wrong with it.. the trigger reset was acting up again. I found in the parts back he returned the spring the spring that holds down the safety lever. It was not re-installed. not sure if that is the culprit but I re-installed it.

    side note... when Alucard0822 says "they are a M-fer to get back in." in regards to the grip safety spring, LISTEN...

    I took everything apart including the safety and mag release and the grip safety spring was a M*****F***ING B***H to get back in, maybe 2 hours of my life wasted =)


    will take the XDm for a few hundred rounds this week and see if its better.
     
    Last edited:

    Users who are viewing this thread

    Latest posts

    Forum statistics

    Threads
    275,514
    Messages
    7,284,797
    Members
    33,473
    Latest member
    Sarca

    Latest threads

    Top Bottom