The Trijicon, Inc. IR Hunter Snipe-IR Clip-On now known as the Trijicon IRCO-35 universal thermal Weapon sight does what its more expensive and more complicated competition does for half the cost. The L3 LWTS and FLIR T-70, T75 run around $18,000.00 v $9,900.00 for the Snipe-IR.
The Snipe-IR is now know as the Trijicon IRCO-35 since Trijicon bought IR Defense.
In the interest of full disclosure, This is a demo unit loaned to me by Third Coast Thermal.
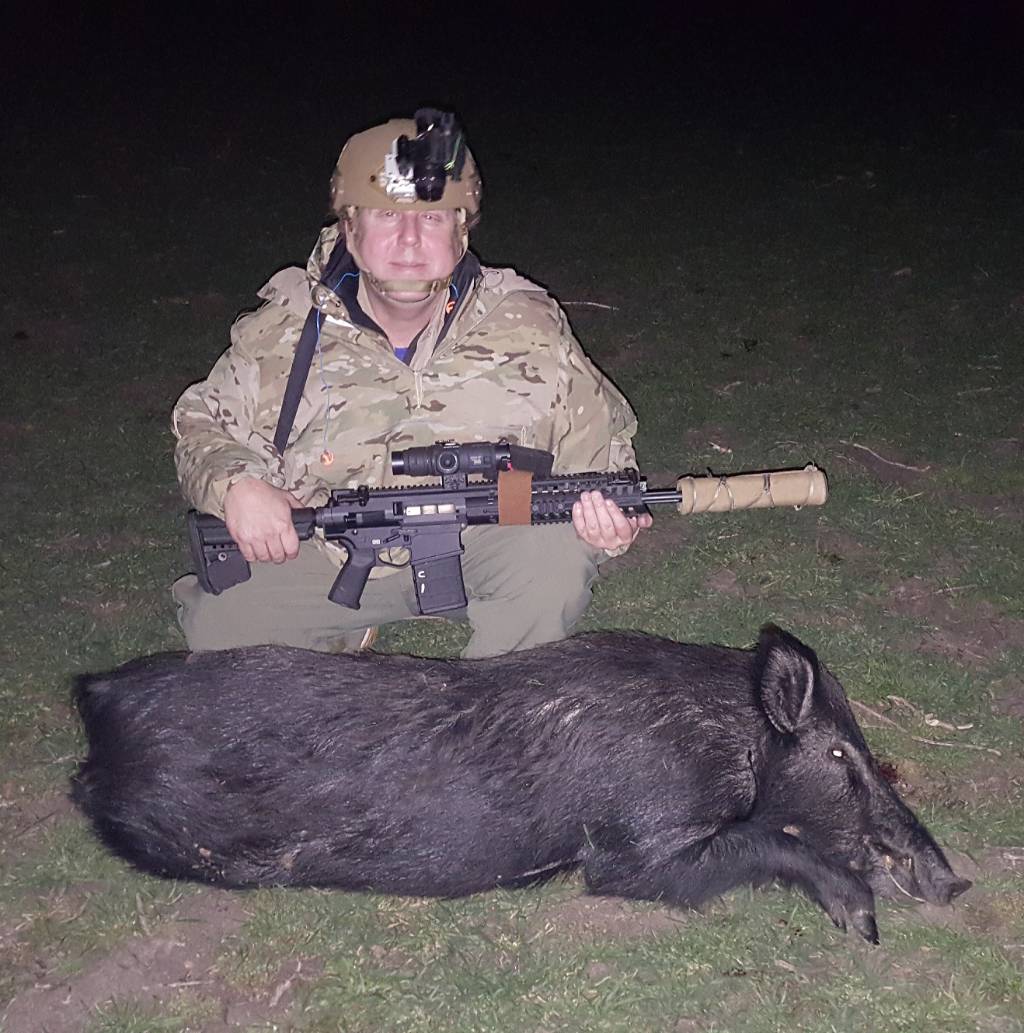
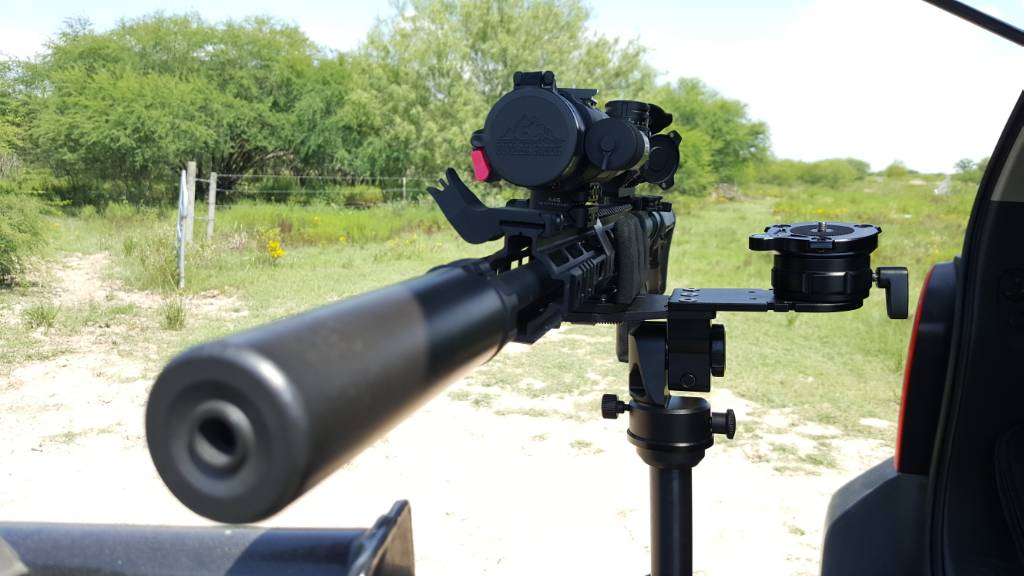
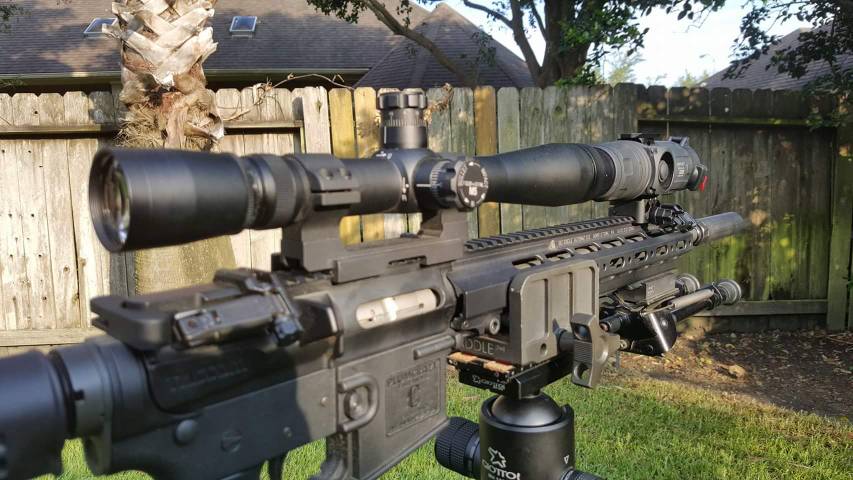
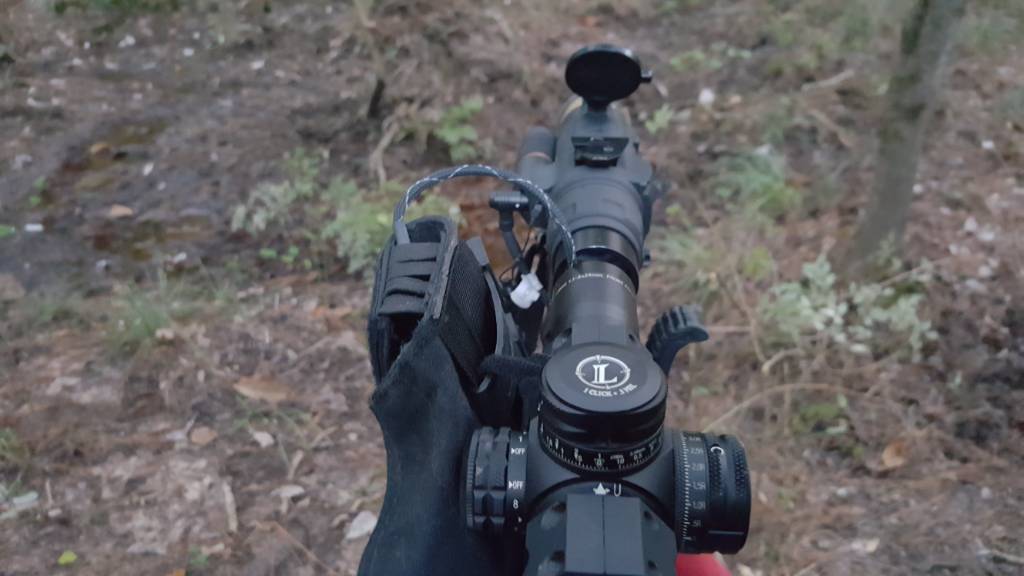
The SNIPE-IR is relatively light weight. It's very compact and once you get used to using the joystick to navigate the menu, that’s easy enough to successfully accomplish. The core is the BAE 640x480 12micron 60hz used in the other or Hunter units. The SNIPE-IR allows the user to give his day optic a 1/4" up/down/left/right mounting position and still shoot POA/POI. The other systems a change in the diopter settings change the pixels, which will change your POA/POI.
The instructions need improvement. The instructions are in the form of flip cards on a ring. They are good enough to get you most of the way there, but they leave out a lot of the details and you have to figure that out on your own. Of course, if you've just bought one of these thermal weapon sights, then you probably can figure out what the manual isn't telling you.
It's taken me several months to warm up to this device. I'm used to an IR Hunter Mark II and a FLIR RS 60. I resist change. This demo unit was Pressed into service because I needed an extra unit for a multi-person hunt.
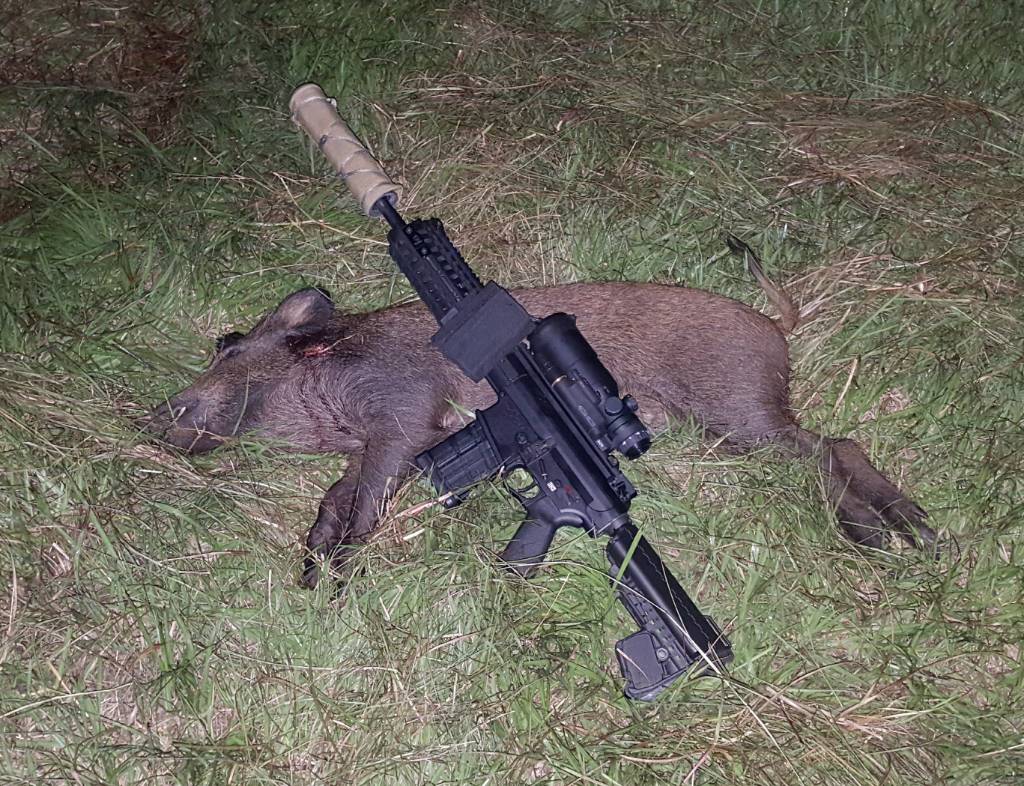
This forced me to figure out the collimation-zero procedure. Of course, it's September and I am in Houston, TX so I had to go out early in the morning in order to be able to see the heated steel targets. It was a race against the sun and building heat. What happens in the Texas sun is that the berms heat up to the same temperature as the targets and the targets are washed out by the heat behind them.
I placed the rifle in Reaper grip on a tripod. That made it easy to use the joystick to navigate the menus and get into the collimation zero mode. Once I had the proper mode selected I was able to get the impact on the steel and then move the impact to the aiming point. The odd thing is the first round was about a foot low and a foot right. This emphasized the need for properly collimating the Snipe-IR
Once in the field, I had 6 hours to figure out the menu items and how to navigate the submenus using the joystick.
Refresh Rate: You can select 60 hertz or 30 Hertz depending on the battery life that you need or the conditions that you are hunting in. One item that the instructions do not discuss is the requirement that you shut the sight off and turn it back on to lock in the refresh rate that you have selected in the menu. If you want to switch from 30 to 60hz, you select 60hz in the menu and power the weapon sight down and turn it back on. At that point it will switch to the 60 hertz refresh rate.
Video out: one of my hobbies, outside of being a gun trust lawyer, is making videos. One of issues that needs improvement across the IR Hunter product range is the video out in.
Every time you turn the sight on, you have to go into the menu and activate the video out/enable the video out. When you power the weapon sight down, it deletes your selection. The next time the user energizes the weapon sight, the video out is not enabled. The user must go back into the menu and re-enable/activate the video out again. You would think that this menu item would be locked in a similar manner to the reticle lock.
Video Connections: the video out is relatively simple. You enable it in the menu each time you cycle the power on and off and then connect an ultimate night vision DVR using the supplied cable. Then you can make movies. If you use the Ultimate night vision DVR, be sure and enable the audio recording otherwise you'll be making silent movies. I don't know what format the video output is in, it's not super high-def. But it's good enough for making YouTube movies. I use a piece of Velcro to attach the DVR and its pouch to the day optic. Then I run the cable through a ranger band, made from a slice of bicycle inner tube, on the rail back to the DVR. This puts the DVR in easy reach of my left thumb to start the recording. I can see the blinking red light and know that put the selection button in the right position.
Weight and size: as far as universal weapon sights go, this weapon sight does not weigh much. In fact you will notice weight on the front of your rifle but it's not like putting a PVS 27 on the end of it.
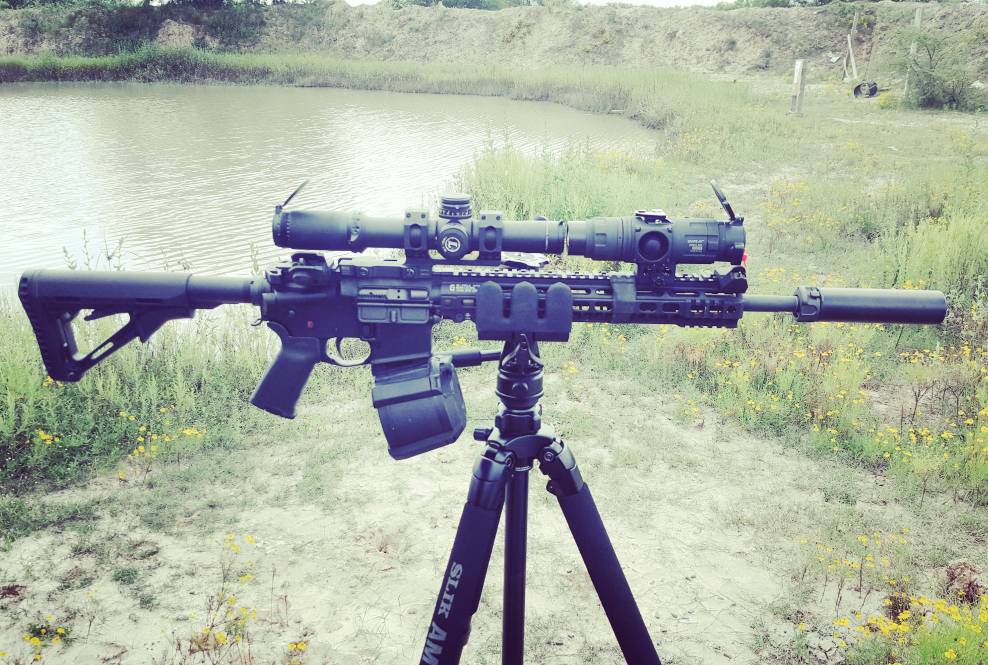
The SNIPE-IR is a relatively compact thermal weapon sight. It does not take up much rail space. The Snipe-IR weighs 16oz. Compare to a PVS-22 that weighs 31oz, or a PVS-27 that weighs 3lbs, 2oz. A FLIR T70 weighs 24oz (1.5lbs) and a T75 approximately 29oz or 1.75lbs. Physical size is important because you have to have space to mount the sight in front of your day optic. The physical size of the SNIPE-IR is significantly smaller that the I2 options. Comparing the Snipe-IR to its thermal competitors, the Snipe-IR’s physical dimensions are 6.50”(L) x 2.95”(W) x 3.0”(H). Compare to the FLIR T50 is 6.8”(L) x 2.8”(W) x 3.5”(H) and the T75 is 7.3”(L) x 2.8”(W) x 3.5”(H) That said, you must have to have enough rail space in front of your day optic to mount the site.
One issue I've run into on one of my rifles that does not have a continuous top rail is that you cannot Mount the snipe IR in the correct place due to spacing issues. If you have a bolt action rifle, you will need a clip on Mount in the right spot.
Battery Life. The weapon sight has a battery power indicator that appears to read the voltage of the batteries. The snipe IR has a dual battery extension. In other words, it uses two cr123 lithium batteries. They usually start on it 5.3 and the side shuts off when it reads three point two. That was good for approximately 6 hours of use at the 60 hertz refresh rate setting.
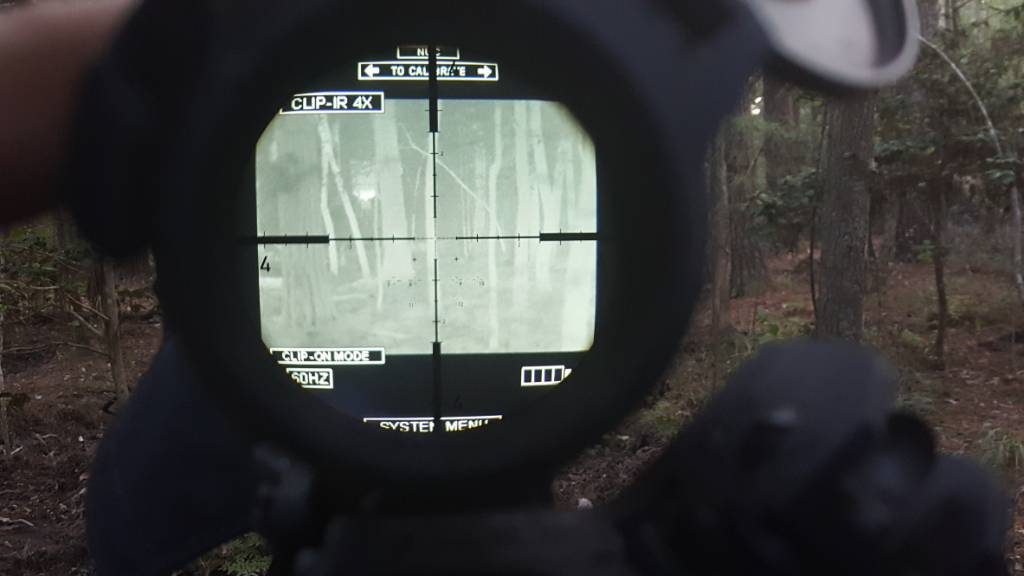
Controls: Joystick. It does everything. Push to turn it on. Push and hold to turn it off. If you want to change from clip-on mode to hybrid mode, push it and let off without holding. I want to go back to clip on mode push it quickly and release. To calibrate, click the door stick upward and cycle through the top menu selections from brightness Etc until you reach calibrate. And close the lens cover and push it forward or back and it calibrates. Navigation through the menu and sub menus for through the for half up and down and clicking movements of the joystick. The flipcard instruction manual does it really walk you through all the different submenus. Have to figure that out on your own. Focus, contrast, brightness, various reticle settings, Zoom, Etc. I had hoped that Trijicon would have an online manual, but I checked their website and there is no downloadable in depth manual available. That is something that they should consider
The user needs a magnified optic of at least 3 power to effectively use the snipe IR. Any less and it's very hard to read the menu items and select them and cycle through them. Using a one-day power Leupold 1-8x CQBSS, I found the I was able to see all of the menu selections at 3 to 4 power. When I zoom the scope in to over 4 power, I could not see the menu selections. I was able to effectively use the optic Saturday night up to 6x. I have been told it is useable to 10x. I'll get some more data in the coming weeks.
Digital Zoom: it appears to be 1/2, 2x, 4x and 8x. I used to one half setting most of the night. The 2X appeared to be very usable. 4X and 8x as would be expected, we're very fuzzy and almost unusable. The overall size of the image displayed changes when you select between 1/2 and 2x. I believe that the 1/2 is the clip-on mode and you use the zoom in the day optic to zoom in. If you select 2x you get a much larger image presented to the day optic with a smaller field of view. Therefore that leads me to believe that the difference in modes are probably to be used in the hybrid mode when it's being used as a standalone weapon sight or a handheld.
Image Quality: I was impressed with the image quality compared to my mark 2. I expect clip on weapon sights to have images that are not as good as their dedicated standalone analogs. In this case I found the image to be very usable even though it was going through extra glass to get to my eye. I had no problem identifying raccoons, flying squirrels, the feeder and trees at the distances I was hunting at which were relatively short. Sometimes I felt focus wasn't as sharp as the standalone site. But then my I would refocus my eye and everything would be sharp again. So I do not know if that was myself or a natural limitation.
Pros and cons? In my opinion, clip-on thermal weapon sights are mission specific items. I may change my mind but I prefer dedicated stand alone thermal weapon sights to the clip-ons in this day and age of quick attach optic mounts such as the ones from LaRue Tactical that I use on most of my weapons.
PROs
1. The best aspect of the Snipe-IR Clip-on is that you can put it in front of any permanently mounted day optic and with a few minutes of time and effort, have it collimated to that day optic/zeroed, and turn your day site into a thermal night sight.
2. From an ergonomics standpoint once you get used to the joystick and the menus/submenus, the Snipe IR is easy to set up and adjust for your particular mission.
3. The battery life is impressive at 60 hertz. I have the two battery extension installed and I was able to run the thermal weapon sight continuously for approximately 5-6 hours on two batteries. When it was time to change the batteries, I was able to change them in the dark without using white light.
4. With a good day optic you can use it up to 6 power or more. At least that's what I found I was able to do.
5. The quality of this unit is outstanding. It feels good in the hand. It does not feel cheap. The joystick works and has a great tactile response. The general feel is that this is a mil-spec quality unit. I know these are intangible prescriptions but that's the way it feels to me.
6. The batteries are very easy to change in the dark without resorting to a white light. It's easy to unscrew the cap and insert two new batteries and put the cap back on in the dark by feel.
Con:
1. Cost v. The dedicated TWS. The Snipe-IR is almost $10,000 versus $6,000.00 for a dedicated Thermal weapon site. Only the customer can determine if the additional cost is worth it.
2. Complicated Collimation. The fact is, if you can zero a dedicated thermal weapon sight, you can collimate the Snipe-IR to your rifle. The process is not intuitive and easy to figure it out with the instructions. It is important to have the instructions available.
3. Rail Space. I know it appears I'm contradicting my statement above about rail space, but the fact is this takes up more than double the rail space of a dedicated thermal weapon sight when combined with the day optic. You must have enough rail space in front of your day off that to use this.
4. I think this is going to be hard to use off the weapon in a handheld mode. I'll get back with y'all on this issue. I have been told that I am wrong about this so I will use it in this handheld spotting mode next week and update my opinion.
Now that I have learned to cycle between hybrid and clip-on mode, this may change my opinion. If you can use it as a handheld or a standalone weapon sight, that would make this a much more versatile clip-on weapon sight.
Hybrid, handheld? I will be using these modes in the near future. The first couple of times I looked at this weapon sight, I was not able to read the menus with the sight without it being mounted and in hybrid mode unless it was in front of a magnified optic. That greatly limits the usefulness of the clip IR outside of a clip on role. Again, I am going to revisit this this week. I am hopeful that it can be used like a Patrol IR.
5. Moving from weapon to weapon: I'm curious to see how much it would change in point of impact shift I'll see when I move this from weapon to weapon without adjusting the collimation and zero. I'll be testing this in the next two weeks.
Sean Cody
TexasGunTrust
I am www.TexasGunTrust.com


I'll update with more of my thoughts next week.


Sent from my SM-N920V using Tapatalk
The Snipe-IR is now know as the Trijicon IRCO-35 since Trijicon bought IR Defense.
In the interest of full disclosure, This is a demo unit loaned to me by Third Coast Thermal.
The SNIPE-IR is relatively light weight. It's very compact and once you get used to using the joystick to navigate the menu, that’s easy enough to successfully accomplish. The core is the BAE 640x480 12micron 60hz used in the other or Hunter units. The SNIPE-IR allows the user to give his day optic a 1/4" up/down/left/right mounting position and still shoot POA/POI. The other systems a change in the diopter settings change the pixels, which will change your POA/POI.
The instructions need improvement. The instructions are in the form of flip cards on a ring. They are good enough to get you most of the way there, but they leave out a lot of the details and you have to figure that out on your own. Of course, if you've just bought one of these thermal weapon sights, then you probably can figure out what the manual isn't telling you.
It's taken me several months to warm up to this device. I'm used to an IR Hunter Mark II and a FLIR RS 60. I resist change. This demo unit was Pressed into service because I needed an extra unit for a multi-person hunt.
This forced me to figure out the collimation-zero procedure. Of course, it's September and I am in Houston, TX so I had to go out early in the morning in order to be able to see the heated steel targets. It was a race against the sun and building heat. What happens in the Texas sun is that the berms heat up to the same temperature as the targets and the targets are washed out by the heat behind them.
I placed the rifle in Reaper grip on a tripod. That made it easy to use the joystick to navigate the menus and get into the collimation zero mode. Once I had the proper mode selected I was able to get the impact on the steel and then move the impact to the aiming point. The odd thing is the first round was about a foot low and a foot right. This emphasized the need for properly collimating the Snipe-IR
Once in the field, I had 6 hours to figure out the menu items and how to navigate the submenus using the joystick.
Refresh Rate: You can select 60 hertz or 30 Hertz depending on the battery life that you need or the conditions that you are hunting in. One item that the instructions do not discuss is the requirement that you shut the sight off and turn it back on to lock in the refresh rate that you have selected in the menu. If you want to switch from 30 to 60hz, you select 60hz in the menu and power the weapon sight down and turn it back on. At that point it will switch to the 60 hertz refresh rate.
Video out: one of my hobbies, outside of being a gun trust lawyer, is making videos. One of issues that needs improvement across the IR Hunter product range is the video out in.
Every time you turn the sight on, you have to go into the menu and activate the video out/enable the video out. When you power the weapon sight down, it deletes your selection. The next time the user energizes the weapon sight, the video out is not enabled. The user must go back into the menu and re-enable/activate the video out again. You would think that this menu item would be locked in a similar manner to the reticle lock.
Video Connections: the video out is relatively simple. You enable it in the menu each time you cycle the power on and off and then connect an ultimate night vision DVR using the supplied cable. Then you can make movies. If you use the Ultimate night vision DVR, be sure and enable the audio recording otherwise you'll be making silent movies. I don't know what format the video output is in, it's not super high-def. But it's good enough for making YouTube movies. I use a piece of Velcro to attach the DVR and its pouch to the day optic. Then I run the cable through a ranger band, made from a slice of bicycle inner tube, on the rail back to the DVR. This puts the DVR in easy reach of my left thumb to start the recording. I can see the blinking red light and know that put the selection button in the right position.
Weight and size: as far as universal weapon sights go, this weapon sight does not weigh much. In fact you will notice weight on the front of your rifle but it's not like putting a PVS 27 on the end of it.
The SNIPE-IR is a relatively compact thermal weapon sight. It does not take up much rail space. The Snipe-IR weighs 16oz. Compare to a PVS-22 that weighs 31oz, or a PVS-27 that weighs 3lbs, 2oz. A FLIR T70 weighs 24oz (1.5lbs) and a T75 approximately 29oz or 1.75lbs. Physical size is important because you have to have space to mount the sight in front of your day optic. The physical size of the SNIPE-IR is significantly smaller that the I2 options. Comparing the Snipe-IR to its thermal competitors, the Snipe-IR’s physical dimensions are 6.50”(L) x 2.95”(W) x 3.0”(H). Compare to the FLIR T50 is 6.8”(L) x 2.8”(W) x 3.5”(H) and the T75 is 7.3”(L) x 2.8”(W) x 3.5”(H) That said, you must have to have enough rail space in front of your day optic to mount the site.
One issue I've run into on one of my rifles that does not have a continuous top rail is that you cannot Mount the snipe IR in the correct place due to spacing issues. If you have a bolt action rifle, you will need a clip on Mount in the right spot.
Battery Life. The weapon sight has a battery power indicator that appears to read the voltage of the batteries. The snipe IR has a dual battery extension. In other words, it uses two cr123 lithium batteries. They usually start on it 5.3 and the side shuts off when it reads three point two. That was good for approximately 6 hours of use at the 60 hertz refresh rate setting.
Controls: Joystick. It does everything. Push to turn it on. Push and hold to turn it off. If you want to change from clip-on mode to hybrid mode, push it and let off without holding. I want to go back to clip on mode push it quickly and release. To calibrate, click the door stick upward and cycle through the top menu selections from brightness Etc until you reach calibrate. And close the lens cover and push it forward or back and it calibrates. Navigation through the menu and sub menus for through the for half up and down and clicking movements of the joystick. The flipcard instruction manual does it really walk you through all the different submenus. Have to figure that out on your own. Focus, contrast, brightness, various reticle settings, Zoom, Etc. I had hoped that Trijicon would have an online manual, but I checked their website and there is no downloadable in depth manual available. That is something that they should consider
The user needs a magnified optic of at least 3 power to effectively use the snipe IR. Any less and it's very hard to read the menu items and select them and cycle through them. Using a one-day power Leupold 1-8x CQBSS, I found the I was able to see all of the menu selections at 3 to 4 power. When I zoom the scope in to over 4 power, I could not see the menu selections. I was able to effectively use the optic Saturday night up to 6x. I have been told it is useable to 10x. I'll get some more data in the coming weeks.
Digital Zoom: it appears to be 1/2, 2x, 4x and 8x. I used to one half setting most of the night. The 2X appeared to be very usable. 4X and 8x as would be expected, we're very fuzzy and almost unusable. The overall size of the image displayed changes when you select between 1/2 and 2x. I believe that the 1/2 is the clip-on mode and you use the zoom in the day optic to zoom in. If you select 2x you get a much larger image presented to the day optic with a smaller field of view. Therefore that leads me to believe that the difference in modes are probably to be used in the hybrid mode when it's being used as a standalone weapon sight or a handheld.
Image Quality: I was impressed with the image quality compared to my mark 2. I expect clip on weapon sights to have images that are not as good as their dedicated standalone analogs. In this case I found the image to be very usable even though it was going through extra glass to get to my eye. I had no problem identifying raccoons, flying squirrels, the feeder and trees at the distances I was hunting at which were relatively short. Sometimes I felt focus wasn't as sharp as the standalone site. But then my I would refocus my eye and everything would be sharp again. So I do not know if that was myself or a natural limitation.
Pros and cons? In my opinion, clip-on thermal weapon sights are mission specific items. I may change my mind but I prefer dedicated stand alone thermal weapon sights to the clip-ons in this day and age of quick attach optic mounts such as the ones from LaRue Tactical that I use on most of my weapons.
PROs
1. The best aspect of the Snipe-IR Clip-on is that you can put it in front of any permanently mounted day optic and with a few minutes of time and effort, have it collimated to that day optic/zeroed, and turn your day site into a thermal night sight.
2. From an ergonomics standpoint once you get used to the joystick and the menus/submenus, the Snipe IR is easy to set up and adjust for your particular mission.
3. The battery life is impressive at 60 hertz. I have the two battery extension installed and I was able to run the thermal weapon sight continuously for approximately 5-6 hours on two batteries. When it was time to change the batteries, I was able to change them in the dark without using white light.
4. With a good day optic you can use it up to 6 power or more. At least that's what I found I was able to do.
5. The quality of this unit is outstanding. It feels good in the hand. It does not feel cheap. The joystick works and has a great tactile response. The general feel is that this is a mil-spec quality unit. I know these are intangible prescriptions but that's the way it feels to me.
6. The batteries are very easy to change in the dark without resorting to a white light. It's easy to unscrew the cap and insert two new batteries and put the cap back on in the dark by feel.
Con:
1. Cost v. The dedicated TWS. The Snipe-IR is almost $10,000 versus $6,000.00 for a dedicated Thermal weapon site. Only the customer can determine if the additional cost is worth it.
2. Complicated Collimation. The fact is, if you can zero a dedicated thermal weapon sight, you can collimate the Snipe-IR to your rifle. The process is not intuitive and easy to figure it out with the instructions. It is important to have the instructions available.
3. Rail Space. I know it appears I'm contradicting my statement above about rail space, but the fact is this takes up more than double the rail space of a dedicated thermal weapon sight when combined with the day optic. You must have enough rail space in front of your day off that to use this.
4. I think this is going to be hard to use off the weapon in a handheld mode. I'll get back with y'all on this issue. I have been told that I am wrong about this so I will use it in this handheld spotting mode next week and update my opinion.
Now that I have learned to cycle between hybrid and clip-on mode, this may change my opinion. If you can use it as a handheld or a standalone weapon sight, that would make this a much more versatile clip-on weapon sight.
Hybrid, handheld? I will be using these modes in the near future. The first couple of times I looked at this weapon sight, I was not able to read the menus with the sight without it being mounted and in hybrid mode unless it was in front of a magnified optic. That greatly limits the usefulness of the clip IR outside of a clip on role. Again, I am going to revisit this this week. I am hopeful that it can be used like a Patrol IR.
5. Moving from weapon to weapon: I'm curious to see how much it would change in point of impact shift I'll see when I move this from weapon to weapon without adjusting the collimation and zero. I'll be testing this in the next two weeks.
Sean Cody
TexasGunTrust
I am www.TexasGunTrust.com
I'll update with more of my thoughts next week.
Sent from my SM-N920V using Tapatalk