Jealous.
You are using an out of date browser. It may not display this or other websites correctly.
You should upgrade or use an alternative browser.
You should upgrade or use an alternative browser.
New FN Seemingly Made To Anger Liberals
- Thread starter Combloc
- Start date
The #1 community for Gun Owners of the Northeast
Member Benefits:
No ad networks! Discuss all aspects of firearm ownership Discuss anti-gun legislation Buy, sell, and trade in the classified section Chat with Local gun shops, ranges, trainers & other businesses Discover free outdoor shooting areas View up to date on firearm-related events Share photos & video with other members ...and so much more!
Member Benefits:
Great buy! Wish it were mine!
TheGunnyRet
Ultimate Member
Better lift weights for that Trigger finger...Nice though...
W2D
Ultimate Member
GoFundMe!
d33rhunt3r
Pro Pizza Eater
I thought I saw someone shooting one of these at AGC on Monday, but I could be wrong since I only saw it at a distance. Whatever it was, was FA, and word was it was a trooper.
W2D
Ultimate Member
I saw that one shoot too. They ran out of ammo fast.  . It wasn't an m249.
The one discussed here is semi auto (but Full Cool). Can these even be had FA? I didn't think it possible.
 . It wasn't an m249.
 The one discussed here is semi auto (but Full Cool). Can these even be had FA? I didn't think it possible.
I saw that one shoot too. They ran out of ammo fast.
The one discussed here is semi auto (but Full Cool). Can these even be had FA? I didn't think it possible.
There were a few transferable 1s made , But most Pre 86 guns were pre dealer samples. There was a different version being produced ( not by FN) with used parts that took a HK lower and registered sear. But the 1 I have seen was less than reliable .
ericoak
don't drop Aboma on me
There were a few transferable 1s made , But most Pre 86 guns were pre dealer samples. There was a different version being produced ( not by FN) with used parts that took a HK lower and registered sear. But the 1 I have seen was less than reliable .
Also been ruled illegal to use an HK pack on those FN guns unless you have an SOT.
Comblock needs 1 of these for that FN !! https://www.youtube.com/watch?v=TdWppJU-9cQ Also I gave $10.00 to his ammo fund on gofundme !!!! LOL
Combloc
Stop Negassing me!!!!!
I'll be posting a range report soon. I had it out once already and was quite pleased.
Combloc
Stop Negassing me!!!!!
I'm at 240 rounds now in two range trips of 120 each. I'm mainly interested in function at this point and, while I did sight it in (elevation was fine but I had to adjust windage just a bit), I was not shooting for accuracy so I did not take pictures of the target. In fact, many of the shots were fired at objects laying in the berm and not at an actual paper
target. I will say this.....put a 3 to 4 inch object out at 100 yards and you can hit it every single shot. That's the accuracy I've seen so far with open sights. In the first range trip, I fired 60 rounds using the belt and 60 using an IMI polymer magazine. The belted rounds worked perfectly as expected and the magazine fed rounds gave a few jams as expected . The first 30 from the magazine gave me two jams with both being in the last six rounds. Clearing the jams was very easy and accomplished in just a few seconds. The second 30 from the magazine gave me one jam early on (within 5 rounds) with the bullet being pushed into the case. It also gave me two jams again within the last six rounds. It REALLY chews them up when it jams. Below are all six jams shown from different angles:


The feed lip on the magazine gets some heavy use too. This was a new unused magazine and I took a picture using flash to make the marks show up. Notice that all of the wear is on the feed lip farthest from the lens and also note the scrapings hanging off the from of the feed lip:

When they say that the magazine feed should only be used as a last resort, they aren't kidding.
With belts though, it's worked 100% so far. Here are a few typical casings:


This rifle ejects downward at a roughly 45 degree angle and slightly to the rear from the right side and it is so forceful that the ejected casings literally chewed chunks out of the wood table I was shooting off of. My brother was shooting it left handed in a short sleeve shirt and his arm was bleeding (as in blood running down his arm in multiple spots) after just thirty rounds. It was fun!!
The second range trip was also 120 rounds fired using only the belt. Function was 100%. All pictures that follow in the next few posts are of the rifle after 120 rounds prior to cleaning. It's not a particularly dirty rifle but it does make LOTS of brass shavings and it spreads them everywhere.
Combloc
Stop Negassing me!!!!!
As stated in the previous post, these pictures were taken with the rifle greased and dirty after 120 rounds. I'll point out carbon, brass shavings, general design features, details and whatever else might be interesting.
Lets start with the gas block where it plugs into the gas tube. That is where the vast majority of carbon seems like it is going to be. Even assembled, you can see the carbon working its way around the sealing ring:

Remove the barrel and you can see that this area is going to need the most cleaning attention. The manual says that you can use a bronze bristle brush if you don't have a scraper but the scraper is going to make the job much easier and efficient. I'll be investing in a scraper....

With the barrel removed, we can get a good look into the trunnion. Dig all those shavings!

You can also see stamped markings on the top of the gas tube. This rifle is absolutely covered in markings. More on that in a bit.
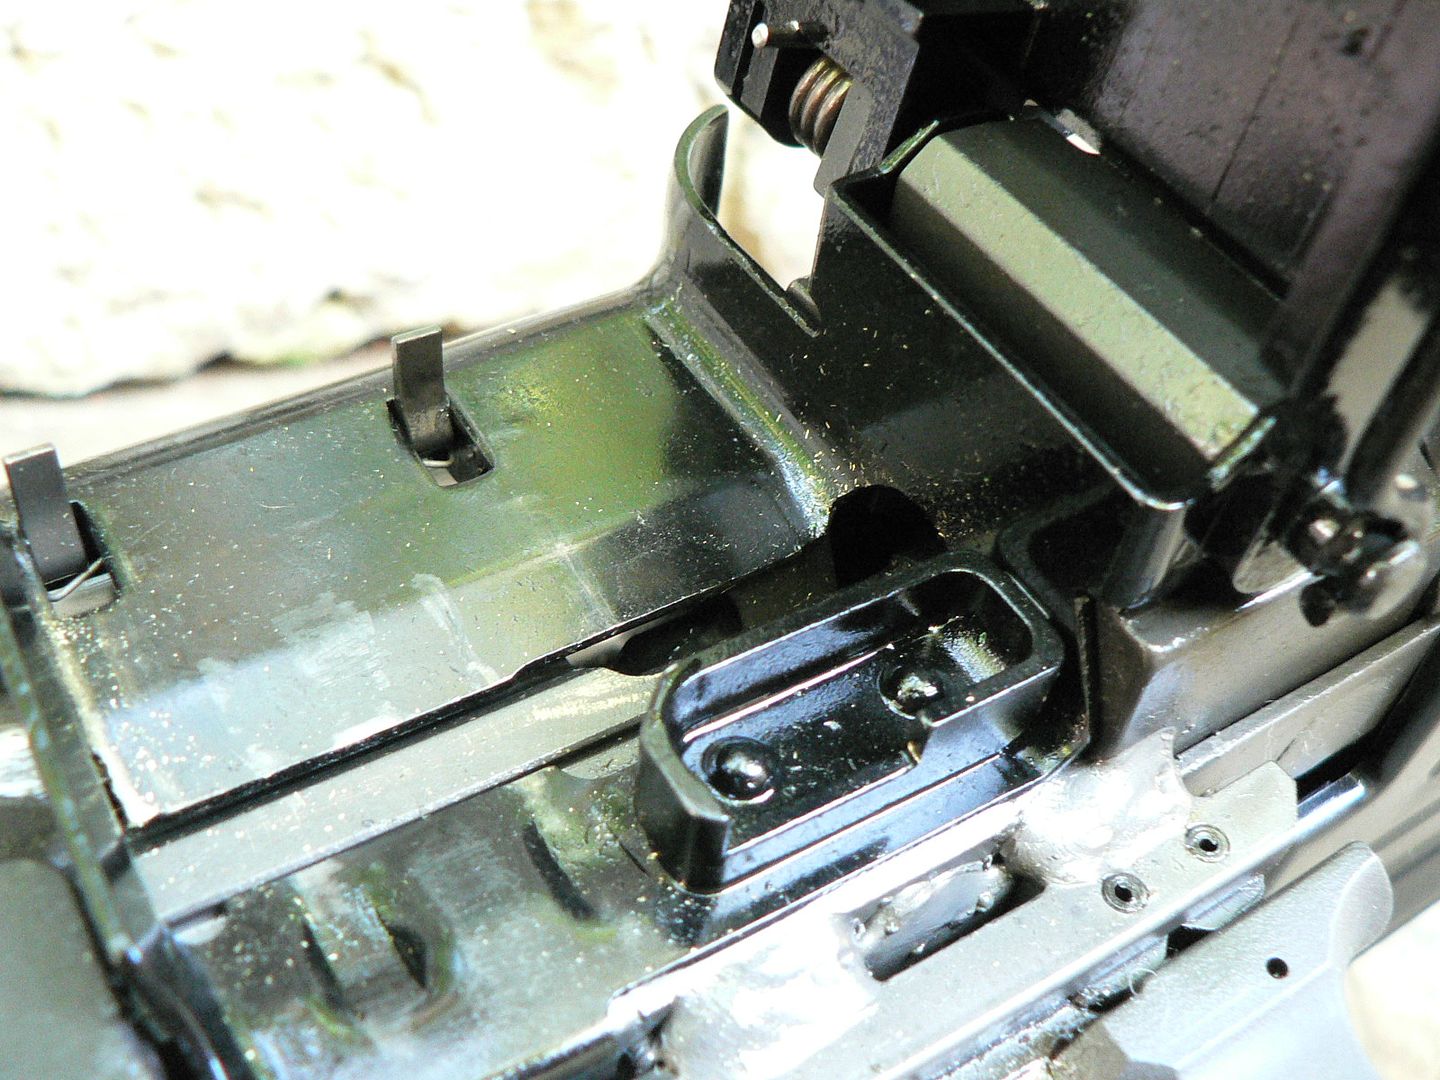
Let's look at the barrel extension too while we have the barrel removed. Again we will see lots of shavings and general gunk. This first picture is looking down at the breach from above through a hole in the extension that the locking latch engages to hold the barrel in place. You can see that there is a hole in the bottom of the barrel extension too. That same hole is why we have all the shaving laying in the trunnion and my guess is that's it's purpose; to provide a place for them to go without accumulating in the locking lug recesses causing problems:

Rear of the barrel extension showing all of the accumulated funk. Again, note the many brass shavings:

There are also all kinds of funky cutouts in the rear of the extension. I'm still learning this thing so forgive me if I'm wrong about any of these. At the top is the feed ramp for belted ammunition; remember that this feeds from above when using belts. Moving clockwise, the next one at roughly the 3 o'clock position is for one of the locking lugs on the bolt. At 5 o'clock is where a lobe on the bolt fits. Think of that lobe as a guide to keep the front of the bolt supported and straight as it rotates and locks into the barrel extension. At 7 o'clock is a dual purpose hole. It serves as both the feed ramp for magazine fed cartridges and the cutout for the second locking lug on the bolt. Last is the cutout at the 10 o'clock position. This is the pass through for a lug on the bolt that rides on one of the guide rails in the receiver. Lots of cutouts.....it's complicated man!
A last shot of this area showing some of the gunk more clearly:

Here is the bottom of the barrel extension showing the lug that engages with the trunnion to hold the barrel in place:

Lets start with the gas block where it plugs into the gas tube. That is where the vast majority of carbon seems like it is going to be. Even assembled, you can see the carbon working its way around the sealing ring:

Remove the barrel and you can see that this area is going to need the most cleaning attention. The manual says that you can use a bronze bristle brush if you don't have a scraper but the scraper is going to make the job much easier and efficient. I'll be investing in a scraper....

With the barrel removed, we can get a good look into the trunnion. Dig all those shavings!

You can also see stamped markings on the top of the gas tube. This rifle is absolutely covered in markings. More on that in a bit.
Let's look at the barrel extension too while we have the barrel removed. Again we will see lots of shavings and general gunk. This first picture is looking down at the breach from above through a hole in the extension that the locking latch engages to hold the barrel in place. You can see that there is a hole in the bottom of the barrel extension too. That same hole is why we have all the shaving laying in the trunnion and my guess is that's it's purpose; to provide a place for them to go without accumulating in the locking lug recesses causing problems:

Rear of the barrel extension showing all of the accumulated funk. Again, note the many brass shavings:

There are also all kinds of funky cutouts in the rear of the extension. I'm still learning this thing so forgive me if I'm wrong about any of these. At the top is the feed ramp for belted ammunition; remember that this feeds from above when using belts. Moving clockwise, the next one at roughly the 3 o'clock position is for one of the locking lugs on the bolt. At 5 o'clock is where a lobe on the bolt fits. Think of that lobe as a guide to keep the front of the bolt supported and straight as it rotates and locks into the barrel extension. At 7 o'clock is a dual purpose hole. It serves as both the feed ramp for magazine fed cartridges and the cutout for the second locking lug on the bolt. Last is the cutout at the 10 o'clock position. This is the pass through for a lug on the bolt that rides on one of the guide rails in the receiver. Lots of cutouts.....it's complicated man!
A last shot of this area showing some of the gunk more clearly:

Here is the bottom of the barrel extension showing the lug that engages with the trunnion to hold the barrel in place:

Combloc
Stop Negassing me!!!!!
Front of feed tray. In person, you can see lots of shiny dust.....like gold dust only it isn't. Some of it shows up in the picture:
Rear of feed tray. Behind it is the round bearing on the bolt carrier that moves along the track in the feed cover thus making the whole feed mechanism work. Sandwiched between the bolt carrier and the feed tray is the arm on the charging handle ready to pull the carrier to the rear.

This is a shot looking down into the extreme rear of the receiver with the feed cover lifted away. You can easily see that it throws brass bits all the way back here too!

Here we see the guts of the machine:

At the bottom of the picture is the recoil spring. The larger single coil spring above it is the drive spring for the linear hammer. in front of that spring is the linear hammer. This is the bit that flies forward to hit the firing pin when you pull the trigger. Then, in front of that, we have the bolt carrier/op rod with the bolt still attached.
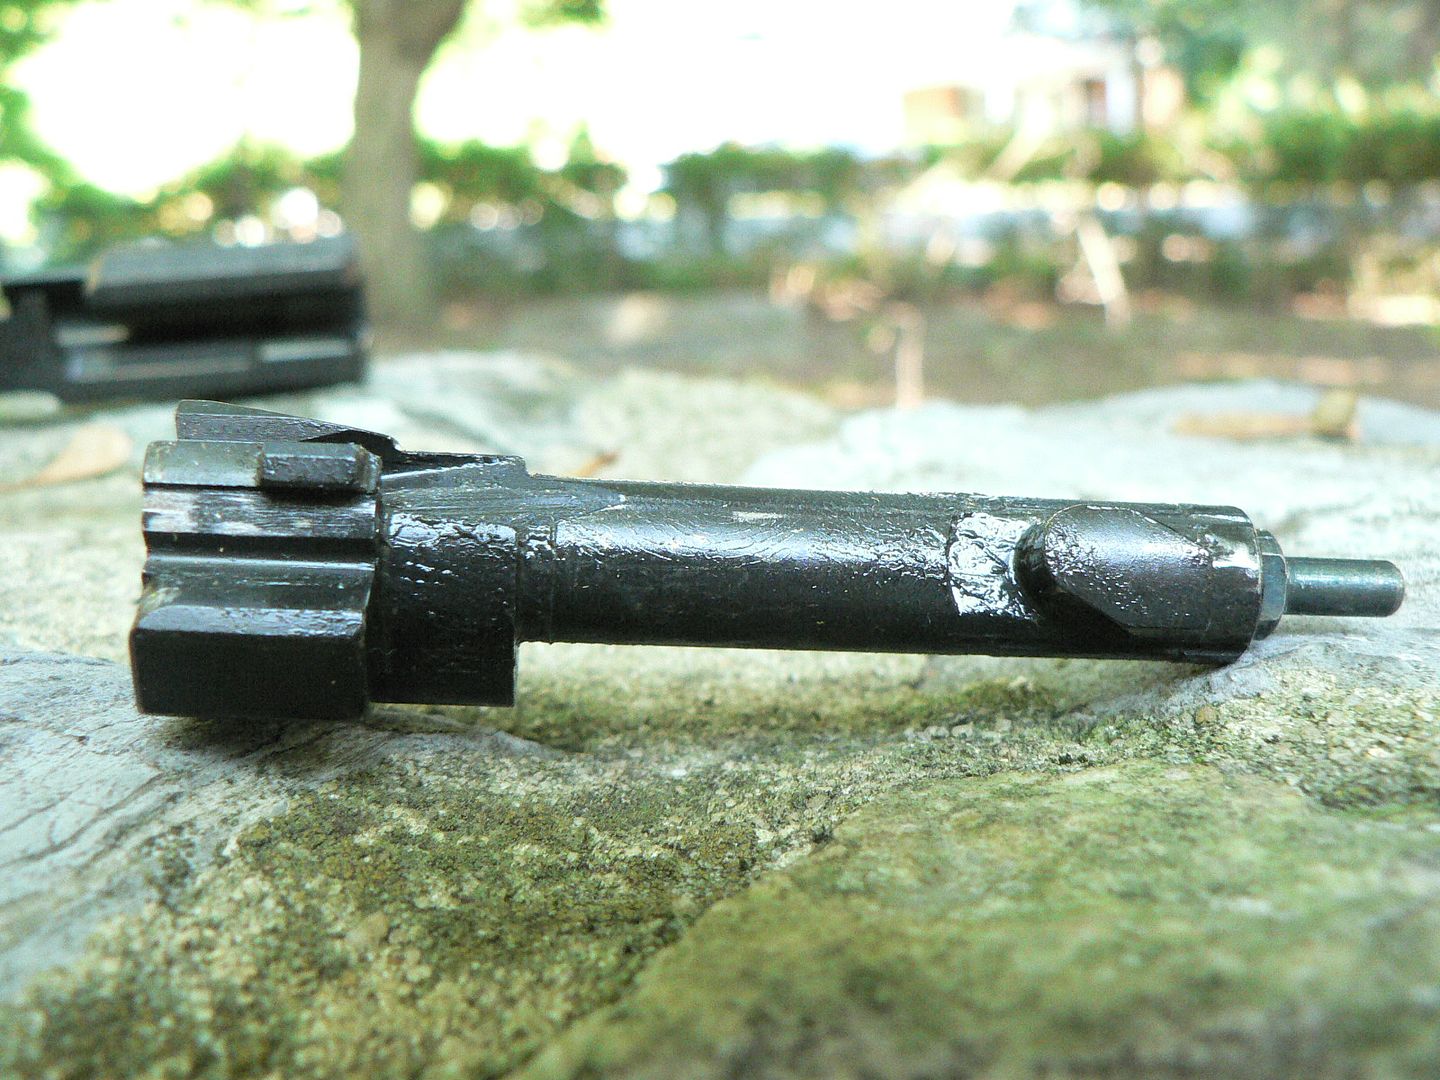
Let's look a little closer at the linear hammer. First is a front three quarter view. The fin sticking up at the rear hits the firing pin. You can see a mark where it hits. The hole in the front of the linear hammer is where the recoil spring/guide rod assembly passes through. You can also see a slot cut into this part along the bottom. There is one on the other side too and this is where it rides on guide rails welded into the receiver.

The rear of the linear hammer:

The hole is larger in the rear because its drive spring fits up inside.
A view of the bottom:

The step at the rear is where the sear grabs the hammer, holding it to the rear until the trigger is pulled. I have no idea what the purpose is of the rectangular hole. I can only guess that it for debris to exit instead instead of lodging inside between the hammer and the springs.

Rear of feed tray. Behind it is the round bearing on the bolt carrier that moves along the track in the feed cover thus making the whole feed mechanism work. Sandwiched between the bolt carrier and the feed tray is the arm on the charging handle ready to pull the carrier to the rear.

This is a shot looking down into the extreme rear of the receiver with the feed cover lifted away. You can easily see that it throws brass bits all the way back here too!

Here we see the guts of the machine:

At the bottom of the picture is the recoil spring. The larger single coil spring above it is the drive spring for the linear hammer. in front of that spring is the linear hammer. This is the bit that flies forward to hit the firing pin when you pull the trigger. Then, in front of that, we have the bolt carrier/op rod with the bolt still attached.
Let's look a little closer at the linear hammer. First is a front three quarter view. The fin sticking up at the rear hits the firing pin. You can see a mark where it hits. The hole in the front of the linear hammer is where the recoil spring/guide rod assembly passes through. You can also see a slot cut into this part along the bottom. There is one on the other side too and this is where it rides on guide rails welded into the receiver.

The rear of the linear hammer:

The hole is larger in the rear because its drive spring fits up inside.
A view of the bottom:

The step at the rear is where the sear grabs the hammer, holding it to the rear until the trigger is pulled. I have no idea what the purpose is of the rectangular hole. I can only guess that it for debris to exit instead instead of lodging inside between the hammer and the springs.
Combloc
Stop Negassing me!!!!!
Moving on to the bolt/carrier/op rod assembly:

Gas piston all nice and dirty:
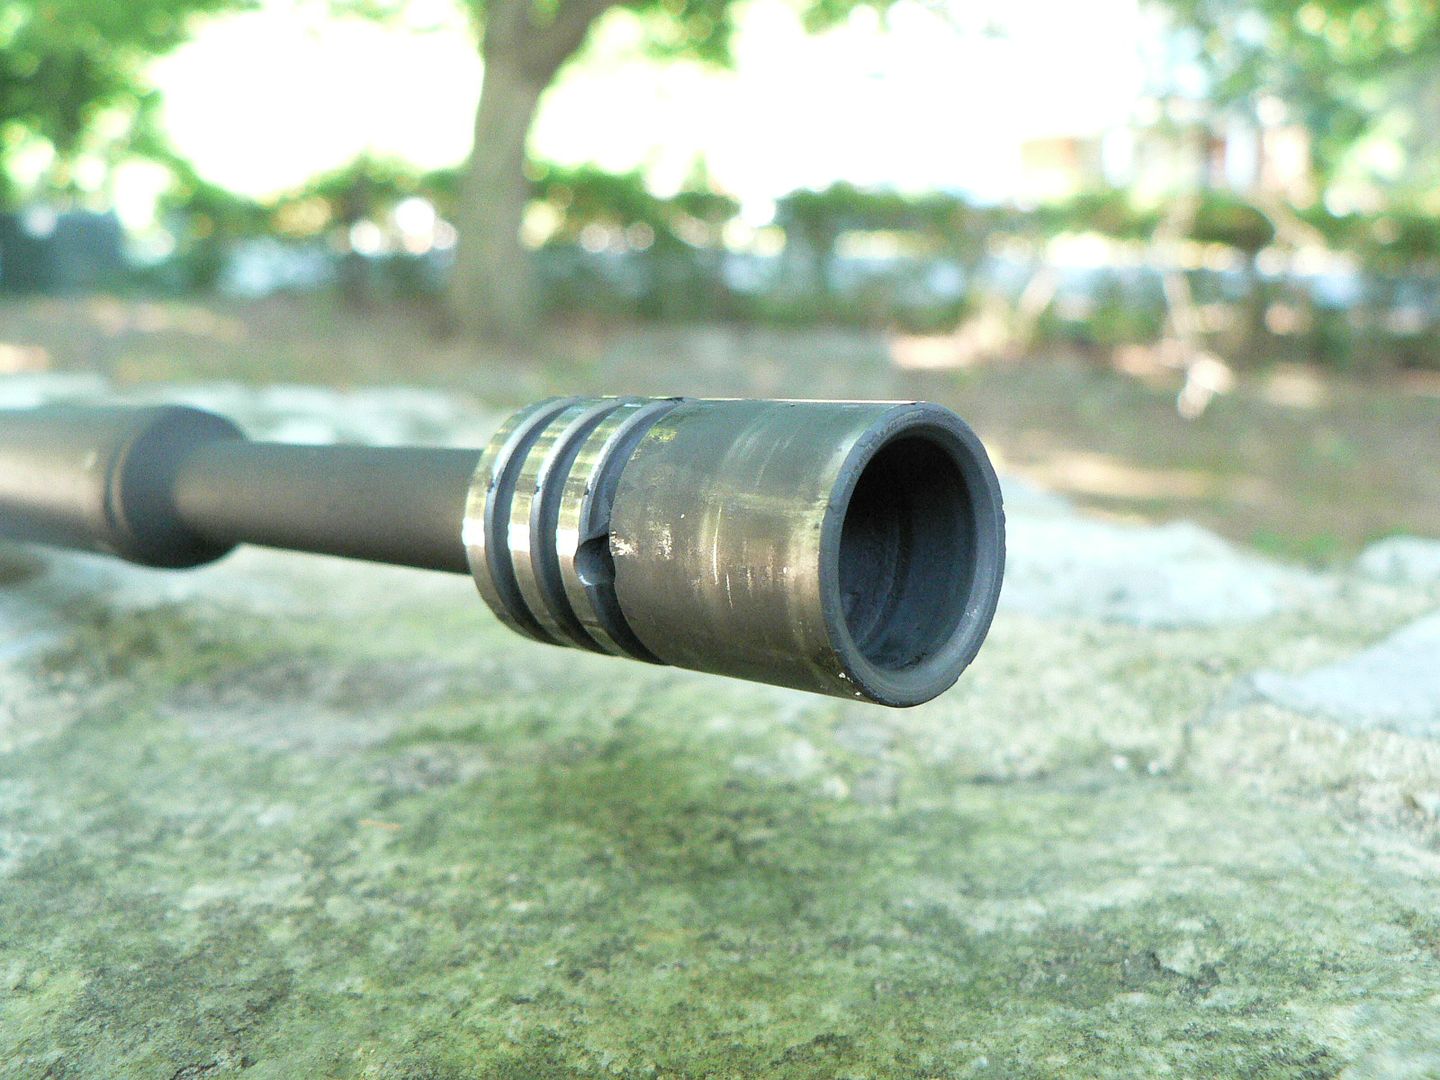
It's threaded onto the op rod and pinned in place:

The rear of the op rod is screwed and pinned into the carrier in a similar way:

Right side of bolt carrier showing the slots that ride on the guide rails welded into the receiver:

Top of carrier showing brass marks at the front and the bearing at the rear (I call it the drive bearing. I don't know what its real name is):

Right side showing the cam slot to rotate the bolt and more guide rail slots:

Bolt in locked position ready to fire:

At the instant of firing with the linear hammer driven home to hit the firing pin:

And in the unlocked position:

Combloc
Stop Negassing me!!!!!
The bolt. I greased it up pretty good because everything I've read says that these guns work best when wet. if I wes in combat, I guess I'd just spray the hell out of it with CLP as the manual suggests but Swiss grease is better for range use I think.
This is the top of the bolt showing brass marks from feeding:

At the rear, you can see the cam lug. You can also see the pin which holds the firing pin in place. To remove the firing pin, you simple push it into the bolt. The pin will easily fall out and the firing pin pops out the back aided by its spring. I didn't take pictures of it removed. Sorry about that.
Right side of bolt. You can see a notch at the front cut just blow the locking lug. This rides on the same guide rail as the bolt carrier:

Bottom:

And left side showing cam lug at rear, locking lug at front and another notch cut for the receiver guide rail:
A couple close-ups of the cam lug:


And the bolt face oriented as it would be in the unlocked position:

This is the top of the bolt showing brass marks from feeding:

At the rear, you can see the cam lug. You can also see the pin which holds the firing pin in place. To remove the firing pin, you simple push it into the bolt. The pin will easily fall out and the firing pin pops out the back aided by its spring. I didn't take pictures of it removed. Sorry about that.
Right side of bolt. You can see a notch at the front cut just blow the locking lug. This rides on the same guide rail as the bolt carrier:

Bottom:

And left side showing cam lug at rear, locking lug at front and another notch cut for the receiver guide rail:

A couple close-ups of the cam lug:


And the bolt face oriented as it would be in the unlocked position:

Combloc
Stop Negassing me!!!!!
Let's look at some of the receiver. Maybe I'll go into more detail at a later date but this will suffice for now. Here we have a view of the empty receiver from the rear with the feed cover in place. Notice the ejector way up in there coming down from the top right at a 45 degree angle:

Although it's a bit blurry, you can also see the aluminum track in the top cover.
Same shot with the feed cover flipped up:

Again, although it's a bit blurry, you can see the four guide rails welded into the receiver. The upper two are for the bolt and bolt carrier while the lower two are for the linear hammer.
Here's a better shot showing the rear of the upper guide rails:

And a better shot of the lower guide rails:

One last shot of this area showing the entire rear a little less blurry. In the background is the bottom of the feed cover:

Here, we see the left side of the receiver showing the welds for the guide rails:

To the left is the magazine well and one of it's welds.
Notice the discoloration of the right upper guide rail at the spots where it is welded to the right side of the receiver:
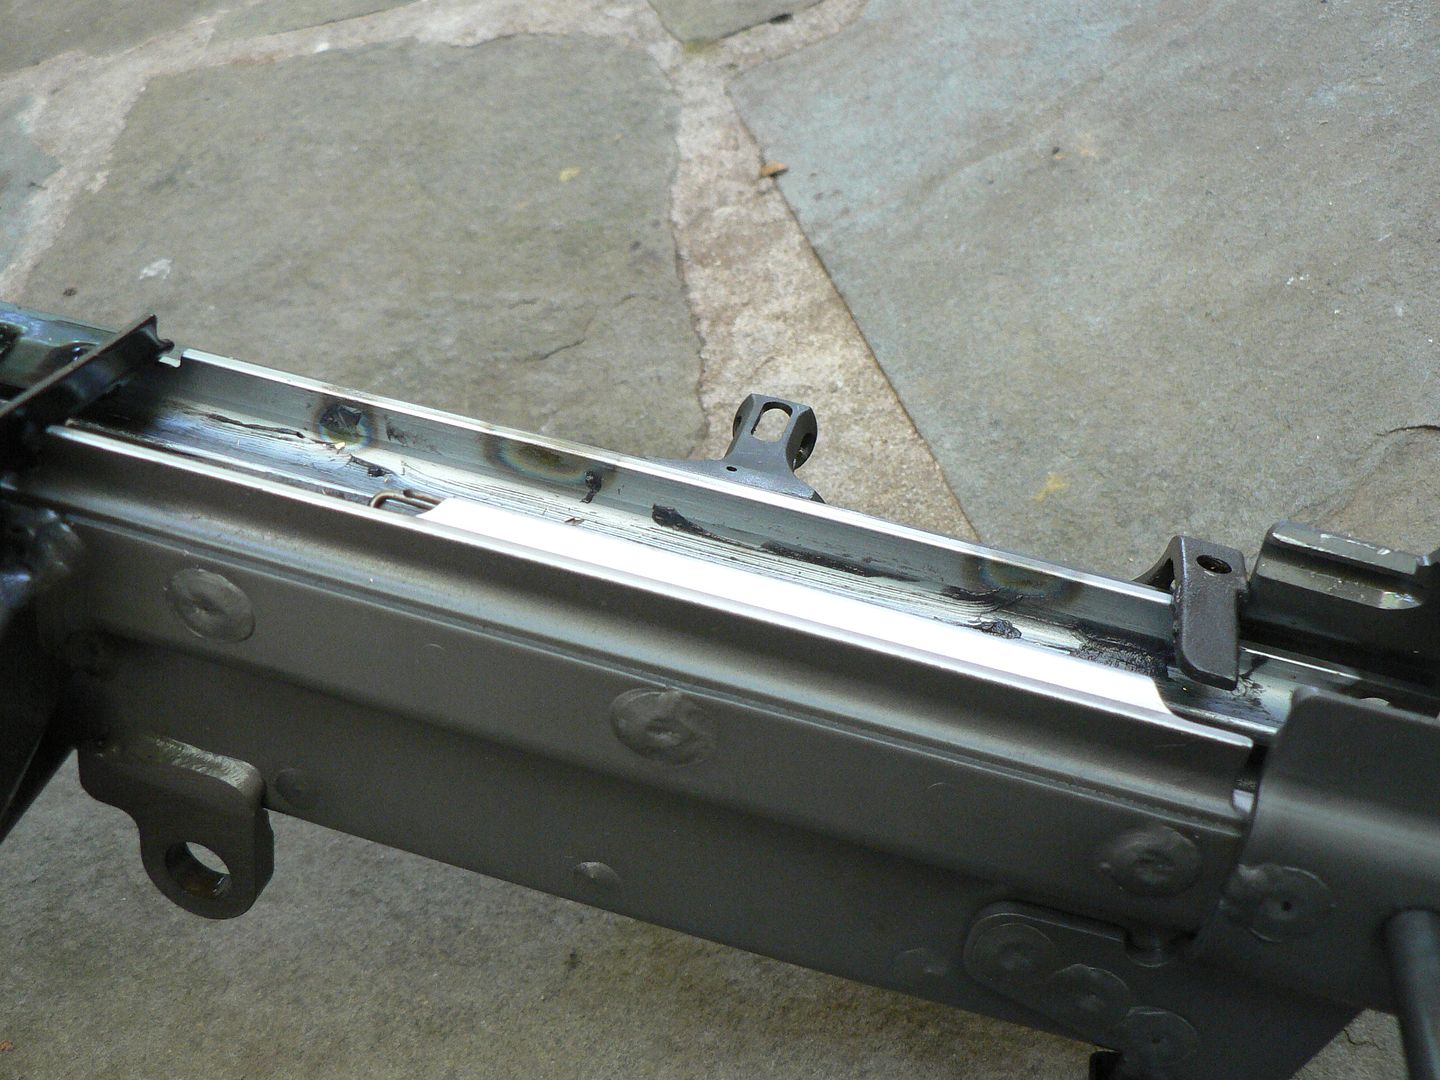
Here is the right side of the receiver showing the welds that caused that discoloration. Notice that two of the welds help hole the charging handle track in place:

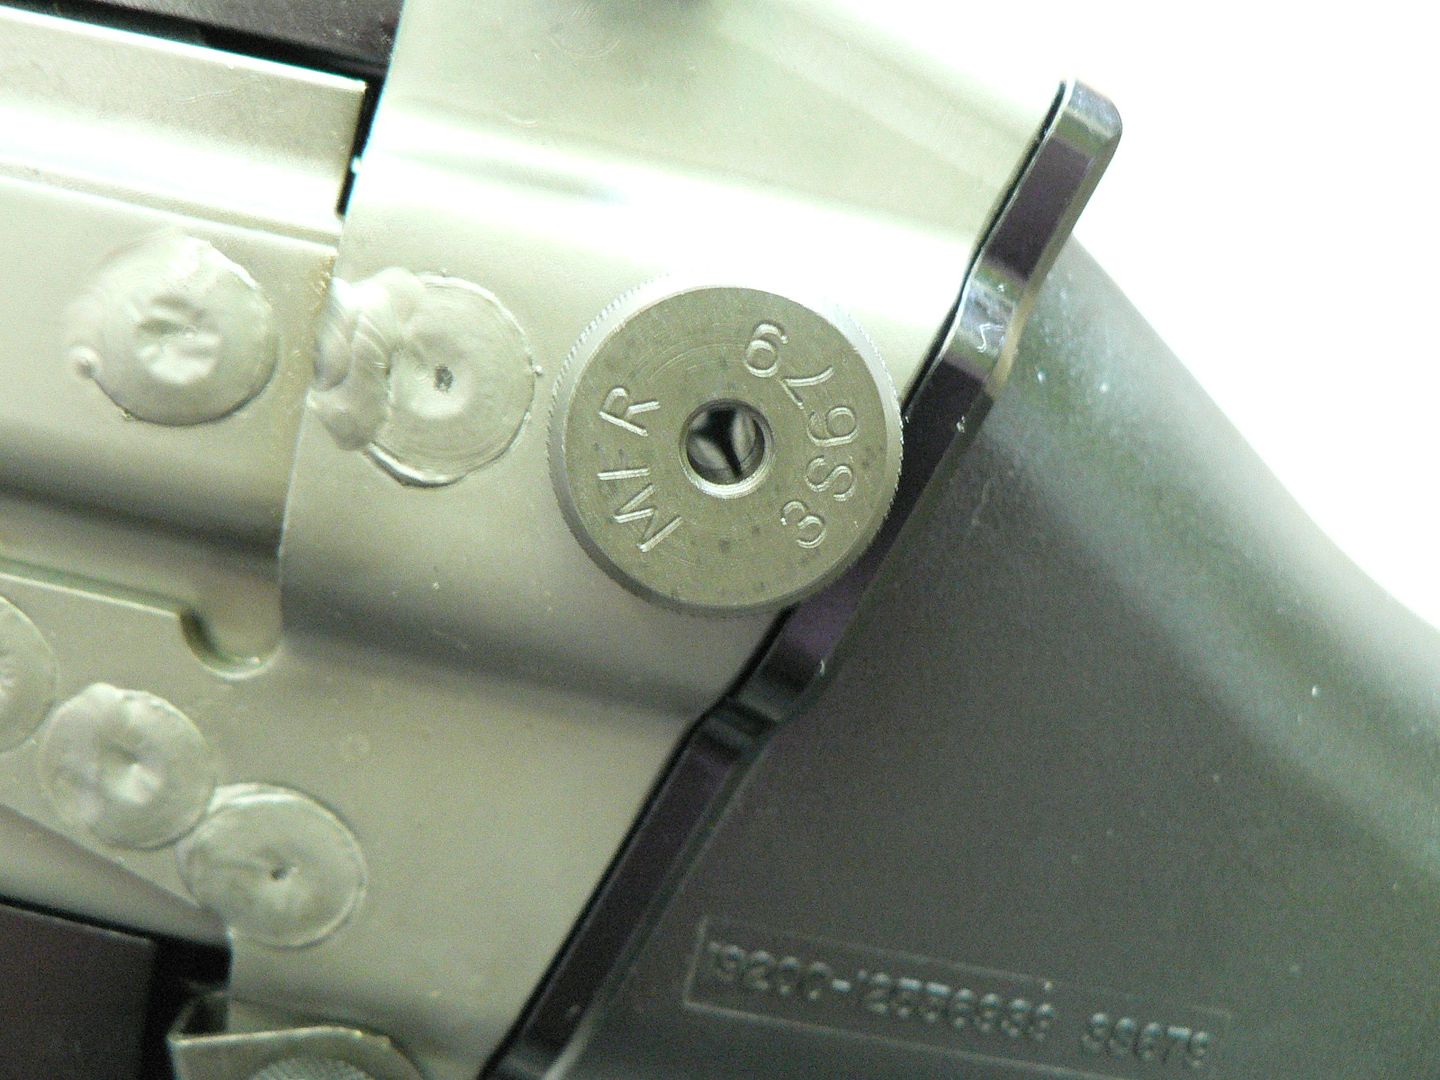
Also clearly visible mounted to the left receiver side is the ejector and its spring. It's marked "MFR 3S679. Almost every part of the rifle is marked this way. I can only assume that is the government code for Manufacturer FN. Many parts also have assembly numbers and what I think are part numbers. A little more on that a bit later.
Welds at the front of the charging handle slot. They aren't meant to be pretty!:


Although it's a bit blurry, you can also see the aluminum track in the top cover.
Same shot with the feed cover flipped up:

Again, although it's a bit blurry, you can see the four guide rails welded into the receiver. The upper two are for the bolt and bolt carrier while the lower two are for the linear hammer.
Here's a better shot showing the rear of the upper guide rails:

And a better shot of the lower guide rails:

One last shot of this area showing the entire rear a little less blurry. In the background is the bottom of the feed cover:

Here, we see the left side of the receiver showing the welds for the guide rails:

To the left is the magazine well and one of it's welds.
Notice the discoloration of the right upper guide rail at the spots where it is welded to the right side of the receiver:

Here is the right side of the receiver showing the welds that caused that discoloration. Notice that two of the welds help hole the charging handle track in place:

Also clearly visible mounted to the left receiver side is the ejector and its spring. It's marked "MFR 3S679. Almost every part of the rifle is marked this way. I can only assume that is the government code for Manufacturer FN. Many parts also have assembly numbers and what I think are part numbers. A little more on that a bit later.
Welds at the front of the charging handle slot. They aren't meant to be pretty!:

Combloc
Stop Negassing me!!!!!
Here is the ejection port on the lower right side of the receiver shown with its dust cover closed:
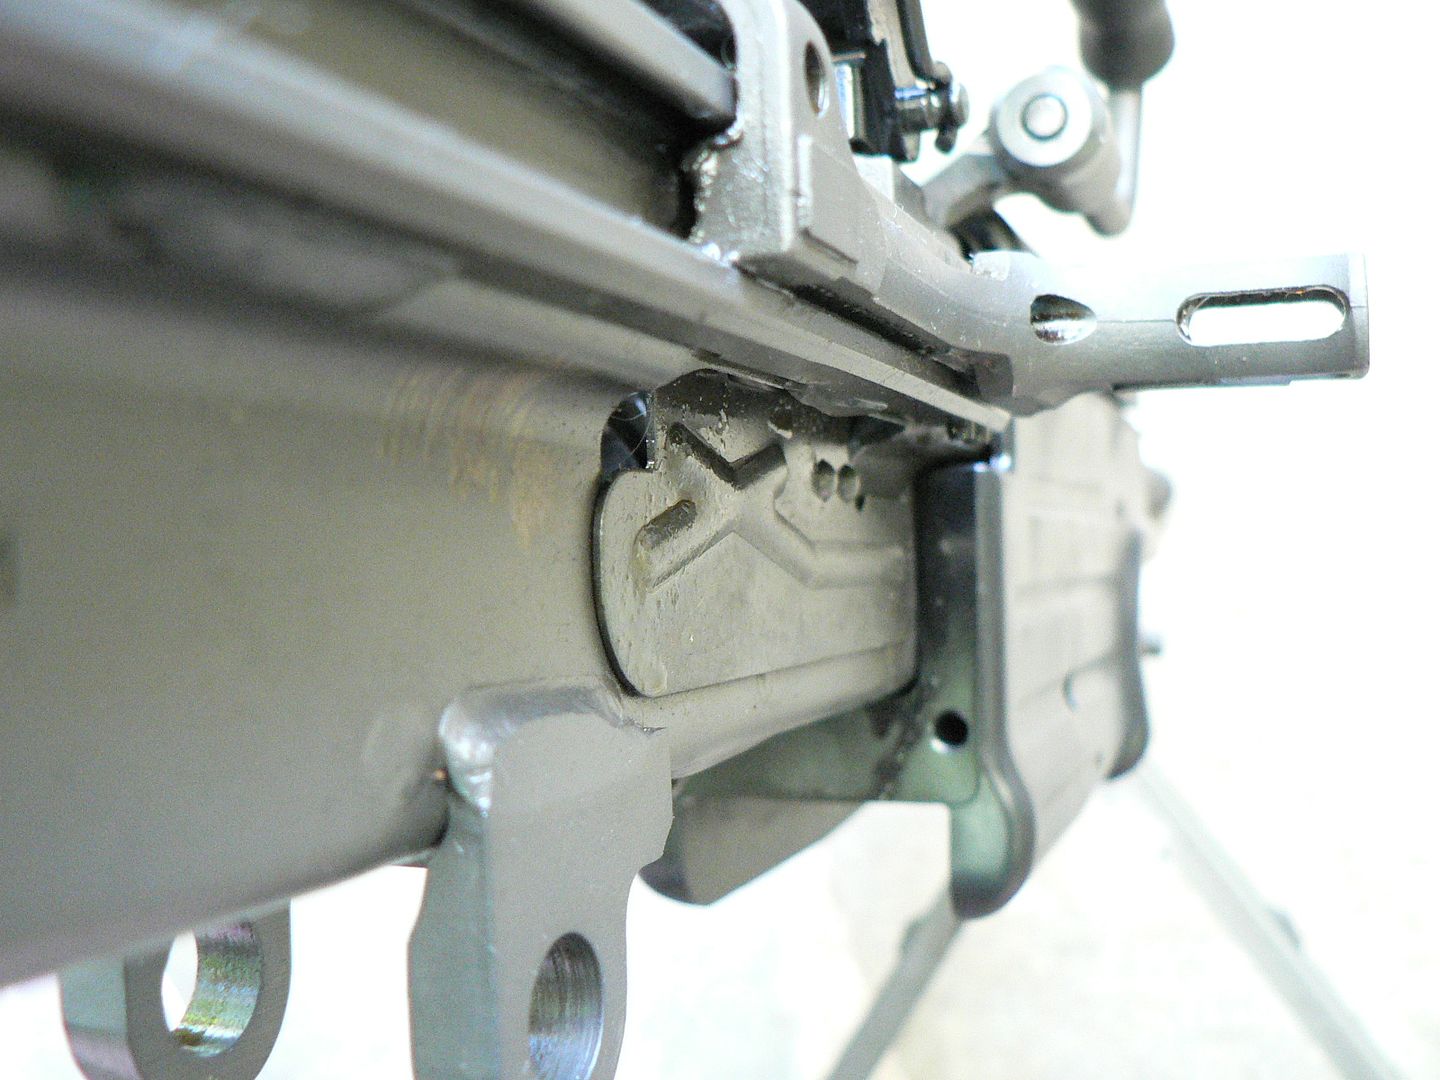
This is closed manually when the weapon is cocked on the full auto model and it automatically opens as the bolt flies home. On the semi-auto version it has no purpose because it can only be closed when the bolt is to the rear which it never is on this model unless the action is in recoil. Don't get me wrong; I want it on there because it's supposed to be on there. I just like the fact that FN left it there even though it now serves no purpose. The manual comes up with a goofy reason for its use on this model but it's hooey.
Here we see the dust cover open and the breach revealed:

Brass kisses. It needs alot more:

Magazine well with its dust cover closed:

It swings up as you insert a magazine. The rectangle to the rear of the markings is the magazine catch.
Looking up into the magazine well with the dust cover opened:

The bracket underneath the magazine well is where the ammunition box fits when you are using belts. I haven't even attached it yet as I don't really see the point. I only link up 20 to thirty rounds at a time. I'm not Rambo nor do I wish to pose as him......I'm also not an "operator".......I'm just a guy who likes collecting and shooting military firearms.
DaemonAssassin
Why should we Free BSD?
So how much did she cost???????
Combloc
Stop Negassing me!!!!!
Last post for tonight. Markings. This thing is covered in markings. Manufacturer codes, assembly numbers, part numbers, unknown numbers, etc., etc., etc.. I like markings lets look at just a few (there are many more) shall we?
Manufacturer mark with serial number:

Rear of recoil spring assembly:

Side of butt stock:

Front of butt stock where it attaches to the receiver:

Left side of feed cover assembly:

Upper disassembly pin:
Lower disassembly pin:

Pistol grip:

Front sight base:

The list goes on.....but that's enough for now. Next time out, we'll rip the front end apart and look at some of that stuff!
Manufacturer mark with serial number:

Rear of recoil spring assembly:

Side of butt stock:

Front of butt stock where it attaches to the receiver:

Left side of feed cover assembly:

Upper disassembly pin:

Lower disassembly pin:

Pistol grip:

Front sight base:

The list goes on.....but that's enough for now. Next time out, we'll rip the front end apart and look at some of that stuff!
Combloc
Stop Negassing me!!!!!
So how much did she cost???????
More than my last car but way less than my house.
")
Users who are viewing this thread
Total: 2 (members: 0, guests: 2)

Forum statistics
Latest threads
-

-

-
-
 ‘Why is nothing being done?’: Concerns grow about drug use, fighting in Montgomery Co. school bathrooms (6 Viewers)
- Started by RFBfromDE
- Replies: 10
-

-

-
