I've been asked to post a description of how I built my foam cutter, so I'm making a dedicate thread.
There is no "right" way to do this. Feel free to deviate.
Items you'll need:
A cutting surface. I used a 2'x2' sheet of sanded plywood.
1 25v transformer ($15 at radio shack)
NiChrome Wire - Easily found for under 8 bucks on ebay.
1 Rotary dimmer switch - under $10
A support arm to hold the wire. I used a 1" x 1/4" piece of straight steel, approximately 18 inches in length.
16 Gauge Wire
A couple bolts/nuts.
A power supply - I tore the power supply out of an old PC. You can use anything that has a grounded plugin.
Screw a couple 2x4's to either end of your cutting platform to form a base.
Cut a center hole (1 inch dia works).
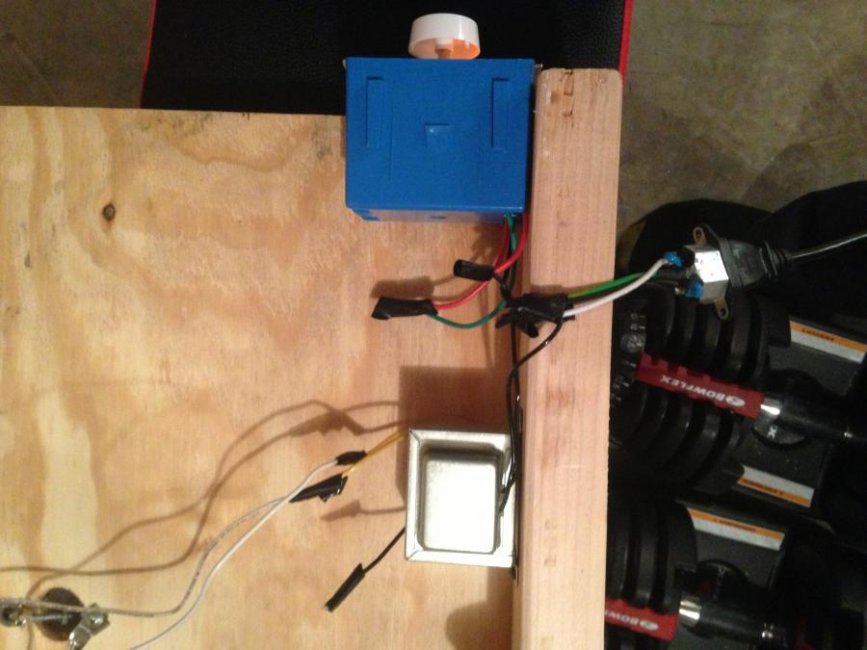
Mount your dimmer and transformer.
Wire them.
Wiring Diagram:


Attach the end of the steel to the base. Make sure to align it with the center hole you cut earlier.

Bend the steel, but DON'T BEND IT TOO FAR! You want tension on the wire!!! The wire tension will pull the bar down 4+ inches when you attach it.
After bending the bar for shape, lightly pull down on the bar as if the wire was placing tension on it.
Look directly down on the bar toward the center hole you cut earlier. Mark the bar.
Your mark should be directly above the hole (if you want your cuts to be straight).
Drill at your mark. Put a bolt through the hole and mount with a nut.

Now, run one of the hot wires of your loop up to the bolt you just placed and secure it.
Run the other hot wire to the underside of the center hole.
Mount a bolt in whatever fashion you choose and connect the hot wire.

At this point, the only thing missing is your NiChrome Wire.
I put a second nut on each of the bolts in order to secure the wire.
Only one end needs to be secure and the top one is easier to remove.
So, tightly secure a length of NiChrome wire to the bottom bolt located below the center hole.

If you like, you can connect the other end of the NiChrome wire to the top bracket bolt,
plug in your power supply and hit the switch on your dimmer.
If you turn the dimmer on too high, the wire will glow red and easily break.
However, this should be a good indication that the cutter is working.
You are done.

STEP TWO
Templates.
This can be done in all manner of ways.
For my pistol case, I used graph paper so that I could make the template as symmetrical as possible.
I then cut out the pistol shapes of the template and placed it on a piece of cardboard.
Trace the template, cut out the pieces.
- Some folks use the actual cutouts as the template on the foam. I don't.
I take the negative... think about the sticker sheets from when you were little. Some people use the stickers,
I used the extra crap surrounding the stickers. That way, I'm cutting inside of the lines and my mistakes will be covered by the firearm.
If you use the other method and go outside of the lines, you are f'd.
- Another option is to trace the firearm with a piece of chalk. I did this for my rifle case and it worked GREAT. A lot less work.
Place that template on your foam and secure it (pins, tape, whatever).
Now, cut a small pilot hole at the edge of your template (or on the inside edge of your chalk line) using a razor or knife.
Now feed the NiChrome wire through this hole and attach it to the steel bracket.
Turn it on. Start cutting. Aways stay on the "Tight" side of cutting.
You can always come back and cut more off, you can't add it.
You want it hot, but not too hot!
If it is too hot, it will cut too easily and it will be very hard to keep a straight line.
Go SLOW. When you've made it all the way around to your starting point, flip the cutter off and unsecure your wire from the top bolt.
Pull the wire out of the foam.
** if you are cutting multiple pieces out of the same foam, LEAVE the cut out in it!
If you remove it, the foam will lose its rigidity and it will make your next cuts very, very hard.***
repeat for any remaining cutouts.
When finished, I like to take the cut out and shave it for depth.
Just match it up with the firearm and see what you need to do.
For my 1911 case, I cut the foam cutouts in half so they would sit at the proper depth.

For my rifle case, I didn't need to cut for depth on my ar or optics.
The 870 was different though. I have a mesa side saddle on it, so I only shaved about 1/2 inch off of the cutout.
Then I went back and notched out the space for the saddle.
Here are the pics of what I've been able to make on my first couple tries.
Hope this helps!!!
There is no "right" way to do this. Feel free to deviate.
Items you'll need:
A cutting surface. I used a 2'x2' sheet of sanded plywood.
1 25v transformer ($15 at radio shack)
NiChrome Wire - Easily found for under 8 bucks on ebay.
1 Rotary dimmer switch - under $10
A support arm to hold the wire. I used a 1" x 1/4" piece of straight steel, approximately 18 inches in length.
16 Gauge Wire
A couple bolts/nuts.
A power supply - I tore the power supply out of an old PC. You can use anything that has a grounded plugin.
Screw a couple 2x4's to either end of your cutting platform to form a base.
Cut a center hole (1 inch dia works).
Mount your dimmer and transformer.
Wire them.
Wiring Diagram:
Attach the end of the steel to the base. Make sure to align it with the center hole you cut earlier.
Bend the steel, but DON'T BEND IT TOO FAR! You want tension on the wire!!! The wire tension will pull the bar down 4+ inches when you attach it.
After bending the bar for shape, lightly pull down on the bar as if the wire was placing tension on it.
Look directly down on the bar toward the center hole you cut earlier. Mark the bar.
Your mark should be directly above the hole (if you want your cuts to be straight).
Drill at your mark. Put a bolt through the hole and mount with a nut.
Now, run one of the hot wires of your loop up to the bolt you just placed and secure it.
Run the other hot wire to the underside of the center hole.
Mount a bolt in whatever fashion you choose and connect the hot wire.
At this point, the only thing missing is your NiChrome Wire.
I put a second nut on each of the bolts in order to secure the wire.
Only one end needs to be secure and the top one is easier to remove.
So, tightly secure a length of NiChrome wire to the bottom bolt located below the center hole.
If you like, you can connect the other end of the NiChrome wire to the top bracket bolt,
plug in your power supply and hit the switch on your dimmer.
If you turn the dimmer on too high, the wire will glow red and easily break.
However, this should be a good indication that the cutter is working.
You are done.
STEP TWO
Templates.
This can be done in all manner of ways.
For my pistol case, I used graph paper so that I could make the template as symmetrical as possible.
I then cut out the pistol shapes of the template and placed it on a piece of cardboard.
Trace the template, cut out the pieces.
- Some folks use the actual cutouts as the template on the foam. I don't.
I take the negative... think about the sticker sheets from when you were little. Some people use the stickers,
I used the extra crap surrounding the stickers. That way, I'm cutting inside of the lines and my mistakes will be covered by the firearm.
If you use the other method and go outside of the lines, you are f'd.
- Another option is to trace the firearm with a piece of chalk. I did this for my rifle case and it worked GREAT. A lot less work.
Place that template on your foam and secure it (pins, tape, whatever).
Now, cut a small pilot hole at the edge of your template (or on the inside edge of your chalk line) using a razor or knife.
Now feed the NiChrome wire through this hole and attach it to the steel bracket.
Turn it on. Start cutting. Aways stay on the "Tight" side of cutting.
You can always come back and cut more off, you can't add it.
You want it hot, but not too hot!
If it is too hot, it will cut too easily and it will be very hard to keep a straight line.
Go SLOW. When you've made it all the way around to your starting point, flip the cutter off and unsecure your wire from the top bolt.
Pull the wire out of the foam.
** if you are cutting multiple pieces out of the same foam, LEAVE the cut out in it!
If you remove it, the foam will lose its rigidity and it will make your next cuts very, very hard.***
repeat for any remaining cutouts.
When finished, I like to take the cut out and shave it for depth.
Just match it up with the firearm and see what you need to do.
For my 1911 case, I cut the foam cutouts in half so they would sit at the proper depth.
For my rifle case, I didn't need to cut for depth on my ar or optics.
The 870 was different though. I have a mesa side saddle on it, so I only shaved about 1/2 inch off of the cutout.
Then I went back and notched out the space for the saddle.
Here are the pics of what I've been able to make on my first couple tries.
Hope this helps!!!