Decided to take care of some stocks that were in less than stellar condition this past week and used Tru-Oil to excellent results. Now I'm at the final phase where I'm letting the oil finish cure for about a week before buffing them out for a final even finish. My concern is that the directions call for steel wool (000 or 0000 IIRC) which, while it'll do the trick, isn't floating my boat. I've got several linen buffing wheels and white diamond compound which is what most wood turners use for oil finishes and was wondering if anyone here had used similar on refinishing jobs they had done in the past. Also, anyone know how long to let the Tru Oil cure prior to a machine buffing vs the steel wool?
You are using an out of date browser. It may not display this or other websites correctly.
You should upgrade or use an alternative browser.
You should upgrade or use an alternative browser.
Final buffing for Tru-Oil?
- Thread starter tallen702
- Start date
The #1 community for Gun Owners of the Northeast
Member Benefits:
No ad networks! Discuss all aspects of firearm ownership Discuss anti-gun legislation Buy, sell, and trade in the classified section Chat with Local gun shops, ranges, trainers & other businesses Discover free outdoor shooting areas View up to date on firearm-related events Share photos & video with other members ...and so much more!
Member Benefits:
clandestine
AR-15 Savant
Decided to take care of some stocks that were in less than stellar condition this past week and used Tru-Oil to excellent results. Now I'm at the final phase where I'm letting the oil finish cure for about a week before buffing them out for a final even finish. My concern is that the directions call for steel wool (000 or 0000 IIRC) which, while it'll do the trick, isn't floating my boat. I've got several linen buffing wheels and white diamond compound which is what most wood turners use for oil finishes and was wondering if anyone here had used similar on refinishing jobs they had done in the past. Also, anyone know how long to let the Tru Oil cure prior to a machine buffing vs the steel wool?
I used to buff my poly and oil work. I used to wait a month before buffing, this all depends on how thick the coats were. If you dont let it harden completely it will smear and ruin the work.
I used 555 polish on a soft and WIDE cloth wheel.
I used to buff my poly and oil work. I used to wait a month before buffing, this all depends on how thick the coats were. If you dont let it harden completely it will smear and ruin the work.
I used 555 polish on a soft and WIDE cloth wheel.
Yeah, most of the wood working forums state anywhere between 2 weeks to a month or more depending on what kind of oil finish is used. Nobody spoke to tru-oil specifically though.
It was interesting, I found a couple of people that swore Tru-Oil wasn't oil based (it is) and that it was actually a urethane. The MSDS sheet proves otherwise.
I will say that the near-finished products look fantastic. I think once they cure enough and get that final buff, they'll be gorgeous.
Thanks for the info!
Doco Overboard
Ultimate Member
Once you get sufficient coverage and complete drying has taken place, wet sand using the tru oil cut back with a few drops of mineral spirits. Once dry reapply as necessary wet sand and then buff with a hard felt pad and pumice or rotten stone. It takes a while but you can get a deep glass like finish that has a smooth even coat without waves. The less you apply on application the less sanding buffing you will do while lessening the chance of congealment. Buff with lambs wool pad and furniture paste wax after a few coats.
Once you get sufficient coverage and complete drying has taken place, wet sand using the tru oil cut back with a few drops of mineral spirits. Once dry reapply as necessary wet sand and then buff with a hard felt pad and pumice or rotten stone. It takes a while but you can get a deep glass like finish that has a smooth even coat without waves. The less you apply on application the less sanding buffing you will do while lessening the chance of congealment. Buff with lambs wool pad and furniture paste wax after a few coats.
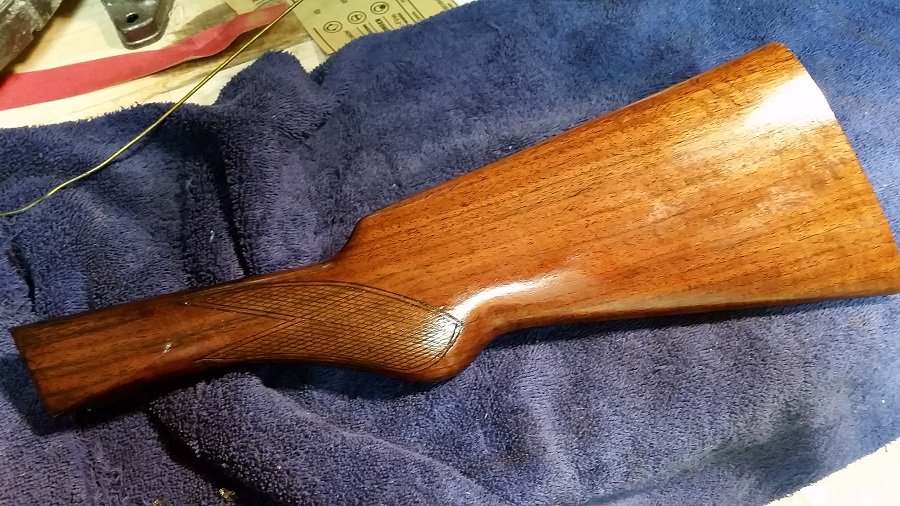
I wet sanded with tru-oil multiple times to fill in the grain. Started with 320 and moved progressively to 400 and 600 for the next two application. Once the grain was sufficiently filled, I applied 3 more very thin coats. It's at the point now where minimal buffing is all that's needed along with final hard waxing for protection. I'm going to use carnuba wax (sparingly and lightly) for that step. I'm considering doing a rotten-stone finish for my next stock refinishing project, but this particular stock is going on a firearm I'll need in a shorter time-frame.
Here's where it stands at the moment. Drying time since final coat is 24 hours at this point:
Attachments

Doco Overboard
Ultimate Member
Warmed Beeswax and turpentine all buffed out on that one. I use a piece of flannel by hand shoe shine style or a lambs wool wheel from a auto detail supplier at low rpm. Metal and all unless it's color case hardened. Spin it fast and dress to make sure it's clean.
That looks like a Nitro Special stock.....it also looks like you don't have enough on there. There are two ways I have used successfully with Tru-Oil. I am guessing that you want this stock to look like glass??? First way is to build up the finish with the bottled stuff. Then ultra fine steel wool it down real good. You will know if you have enough because you wont go down thru the Tru-Oil and get into bare wood. You will know if you do this because it will look like a dull spot when you wipe more on. Once you have it wooled down good use the spray can of Tru-Oil to finish, but...there's a trick. You have to heat up the stock until it is nice and warm with a hair dryer/heat gun. You just want it warm. Next you have to heat up the spray can of Tru-Oil with hot water. Run the hot water at a sink as hot as it will get. Hold the spray can under it for a minute and shake the can. Hold it back under the water until you can feel that the liquid inside is nice and warm. You don't need/want the can of spray or the stock hot, just nice and warm. Go ahead and spray it. It will go on and look a little lumpy at first, but it will "lay down" in a few minutes and look just like a sheet of glass.
Second method is to use rubbing compound instead of steel wool and rub the stock out by hand until it is the finish you want. No need to wait...at least I never did. You are not using a power buffer. That will make too much heat and "bruise" the finish. This leaves a nice almost matte surface and Brownell's sells little felt pads to help get it buffed out in the corners or valleys. Also, you can always matte or dull down the glass like finish you get with the spray this same way. You can do this with a rag and rubbing compound if you want to, you don't need the felt pads. You can also shine it up more to look like the glass finish of the spray with polishing compound. I definitely do not suggest or recommend ever doing any kind of stock work with a power buffer. Anyone that lazy should find another hobby.
One more thing...I recommend that you chase and restore the checkering before you do the final finish then, once the final finish is done and you like the way the stock looks you just rub on some liquid Tru-Oil with a tooth brush into the checkering. Good luck and fire away with any questions you might have.
rub on some liquid Tru-Oil with a tooth brush into the checkering. Good luck and fire away with any questions you might have.
I like your advise.
I use a toothbrush to apply oil and also thin it a bit so it doesn't build up in the grooves.
A toothbrush is also good if you're stripping or doing a very serious cleaning. It's surprising how easy it makes it.
Doco Overboard
Ultimate Member
Little late for pointing up the checkering now with a pointing file. You need a veiner to straighten it out. The checkering is home done and amateurish at best with a crudely done border to hide the overruns and the excessively deep initial layout lines. The border panels at the wrist are also poorly shaped and rounded at the wrist. I can hide any palm sanding marks or thumb depressions with a can of spray on goo. To suggest that buffing out a thin film of paste wax with a professional quality bonnet is Horse-feathers, whats he got there a bespoke shotgun? You get the glass like finish by lightly polishing the surface. Not by loading the wood up with unnecessary product. Its already on too thick in some areas and needs to be cut back.
Little late for pointing up the checkering now with a pointing file. You need a veiner to straighten it out. The checkering is home done and amateurish at best with a crudely done border to hide the overruns and the excessively deep initial layout lines. The border panels at the wrist are also poorly shaped and rounded at the wrist. I can hide any palm sanding marks or thumb depressions with a can of spray on goo. To suggest that buffing out a thin film of paste wax with a professional quality bonnet is Horse-feathers, whats he got there a bespoke shotgun? You get the glass like finish by lightly polishing the surface. Not by loading the wood up with unnecessary product. Its already on too thick in some areas and needs to be cut back.
Yep, checkering was like that when I picked up the gun. It is indeed a Nitro Special. It's been messed with in the past. The butt plate was cheap crappy plastic that wasn't true to the gun and tacked in place with a finishing nail to prevent it from pulling over the screws (it was that cheap of a plastic). At least they doweled the old screw holes prior to the hack job that was done in the past. My guess is that the previous owner sanded over the checkering and then tried to re-chase it and screwed up. I was tempted to pick up a veiner set from Midway (I already have a guide from another project) but stopped short when I reminded myself that this is going to be a field gun so looks aren't that important at the moment. If I fall in love with it and decide to do a re-stock in the future, I'll get a 90% from Gunstocks Inc and shape and checker myself, but for this project, I'm just replacing what was a worn finish. Not sure if it was varnish or shellac, but it was pretty gone.
I concur that it is a little thick in some areas. I did my best to apply sparingly, but up by the girth, it built up more quickly. My thought was to fully cure an cut back a little.
Doco Overboard
Ultimate Member
Your on the right track and it looks good keep going. You mess around develop a process and make changes as necessary to that process until it suits you and that's what's important.
I just advised for what works for me when using tru oil linspeed or g96. It's a classic American finish for working guns that has been used for years and gives good results. Have fun and don't worry about the grip panels or checkering, I bet that was done by someone who treasured that gun and now it's been extended to your care.
I just advised for what works for me when using tru oil linspeed or g96. It's a classic American finish for working guns that has been used for years and gives good results. Have fun and don't worry about the grip panels or checkering, I bet that was done by someone who treasured that gun and now it's been extended to your care.
Little late for pointing up the checkering now with a pointing file. You need a veiner to straighten it out. The checkering is home done and amateurish at best with a crudely done border to hide the overruns and the excessively deep initial layout lines. The border panels at the wrist are also poorly shaped and rounded at the wrist. I can hide any palm sanding marks or thumb depressions with a can of spray on goo. To suggest that buffing out a thin film of paste wax with a professional quality bonnet is Horse-feathers, whats he got there a bespoke shotgun? You get the glass like finish by lightly polishing the surface. Not by loading the wood up with unnecessary product. Its already on too thick in some areas and needs to be cut back.
Nope, not true...why is it too late??? Who mentioned a "pointing file" I have never used one. I have restored many old doubles and this is exactly the point at which I clean out the checkering. I use a carbide single point tool. The vernier cuts a new line, it does not follow anything. All you will accomplish with the V tool is to gunch the checkering up. That sir is an absolute joke and you just told everyone how little you know. There is already a line there.
You almost sound like you are really trying hard to fool someone into thinking you know a little bit about what you are doing. Bespoke gun or not, it's his and he can finish it the way he wants to. "Thin film of paste wax"??? You surely don't expect us to believe you finish stocks with that???? "Too much on there already"??? B.S., I can still see unfilled grain.
To the OP, I will answer any questions you may have, just send me a PM...follow this cats advice and you will end up with a mess. Outta here.
Doco Overboard
Ultimate Member
Nobody mentioned using a pointer but how else would you do it, with a screw driver after you loaded the pattern up with hardened tru-oil? that sounds like the real BS right there to me and a lack of understanding in the general use of tools. A veiner is used to straighten out lines that have gone astray and have run amiss of the pattern. He missed that on his initial start up but no big deal he's looking for a nice finish and may look into the matter on his next project. I never point up checkering with a cutter just a file becuase more than likely the angle of the original cutter would be hard to meet. Mainly becuase you dont know if a 60 75 or 90 degree tool has been used. Not to mention its possible to break off the point and wind up with a blank spot. Pointing with a long file has always brought the entire pattern to fruition and the best appearance when done especially on the American pattern which has pointed diamonds at the top. In this instance the English pattern has been used because the tops of the diamonds are flat or have been left undone. Furthermore and as far as Im concerned, the original pointing up is done once the old stock finish has been removed and prior to the refinishing process with any additional sanding obviously left out of the existing pattern.
A lot of stockers will use single line tools to recut old checkering instead of using a bent three square file but never use a spacing tool when re-cutting. Even being as careful as you can be variations will occur in spacing width regardless of how certain you might be that the spacer is the same as the original and will never be the same as the original pattern after a few rows have been cut. Apply finish once the old pattern has been cut and cleaned.
John Traister, stockmaker Second edition 1996
Users who are viewing this thread
Total: 2 (members: 0, guests: 2)

Latest posts
Forum statistics
Latest threads
-
 Just want to thank the extremely awesome folks at Tyler Firearms (2 Viewers)
- Started by GenoBluzGtr
- Replies: 4
-
-
 Clearance Liqui Moly Motorbike 4T SAE 15W-50 Street | Full Synthetic Motor Oil | 4 Liter (1 Viewer)
- Started by mpollan1
- Replies: 3
-
-

-

-
