MarColMar CETME LC (Carbine) In Detail

The #1 community for Gun Owners of the Northeast

Member Benefits:

  • No ad networks!
  • Discuss all aspects of firearm ownership
  • Discuss anti-gun legislation
  • Buy, sell, and trade in the classified section
  • Chat with Local gun shops, ranges, trainers & other businesses
  • Discover free outdoor shooting areas
  • View up to date on firearm-related events
  • Share photos & video with other members
  • ...and so much more!
  • Combloc

    Stop Negassing me!!!!!
    Nov 10, 2010
    7,245
    In a House
    In this post, we'll be taking an up close and personal look at MarColMar's recently released CETME LC in 5.56/.223. For those of you not familiar with the CETME Model L, it was made in Spain and served as their standard 5.56mm infantry rifle from about the mid 1980's through the mid 1990's until being replaced by the German manufactured G36 rifle. BUT, this is not a History lesson so I'll leave it at that.

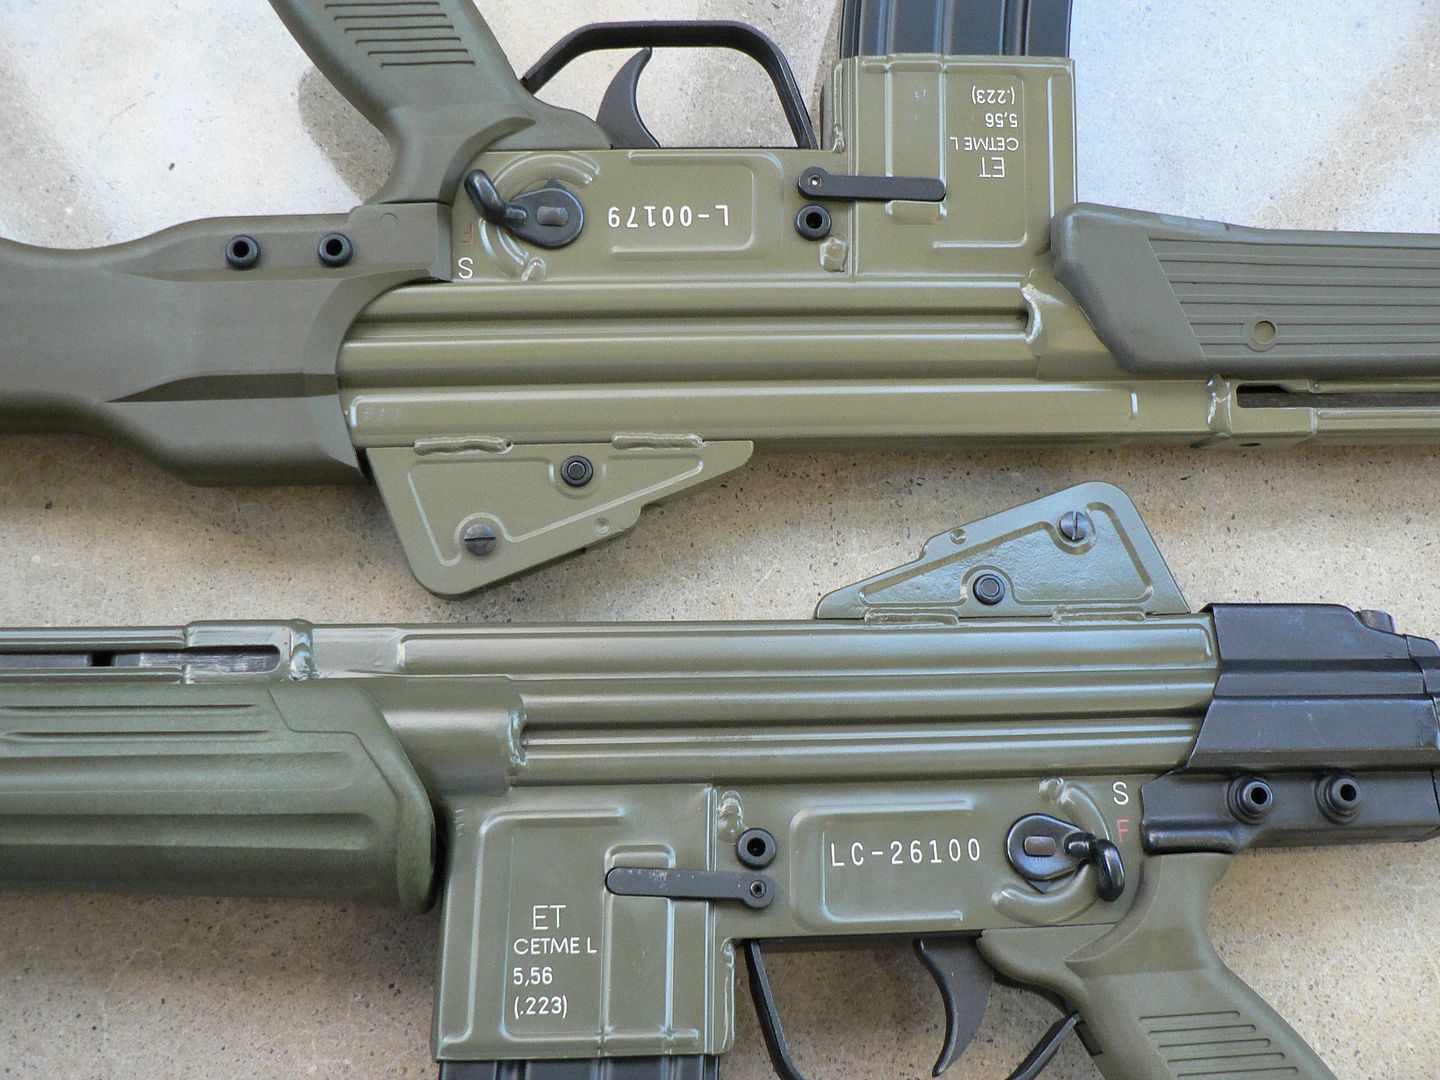
    Fast forward until a few years ago when a little north of 10,000 5.56mm CETME rifles were removed from storage in Spain, scrapped and sold to the US market as parts kits. Of these, MarColMar ended up with approximately 10,000 kits in three versions. They are, from top to bottom, the LV, L and LC:
    P1180852_zpsrgjzpu9d.jpg

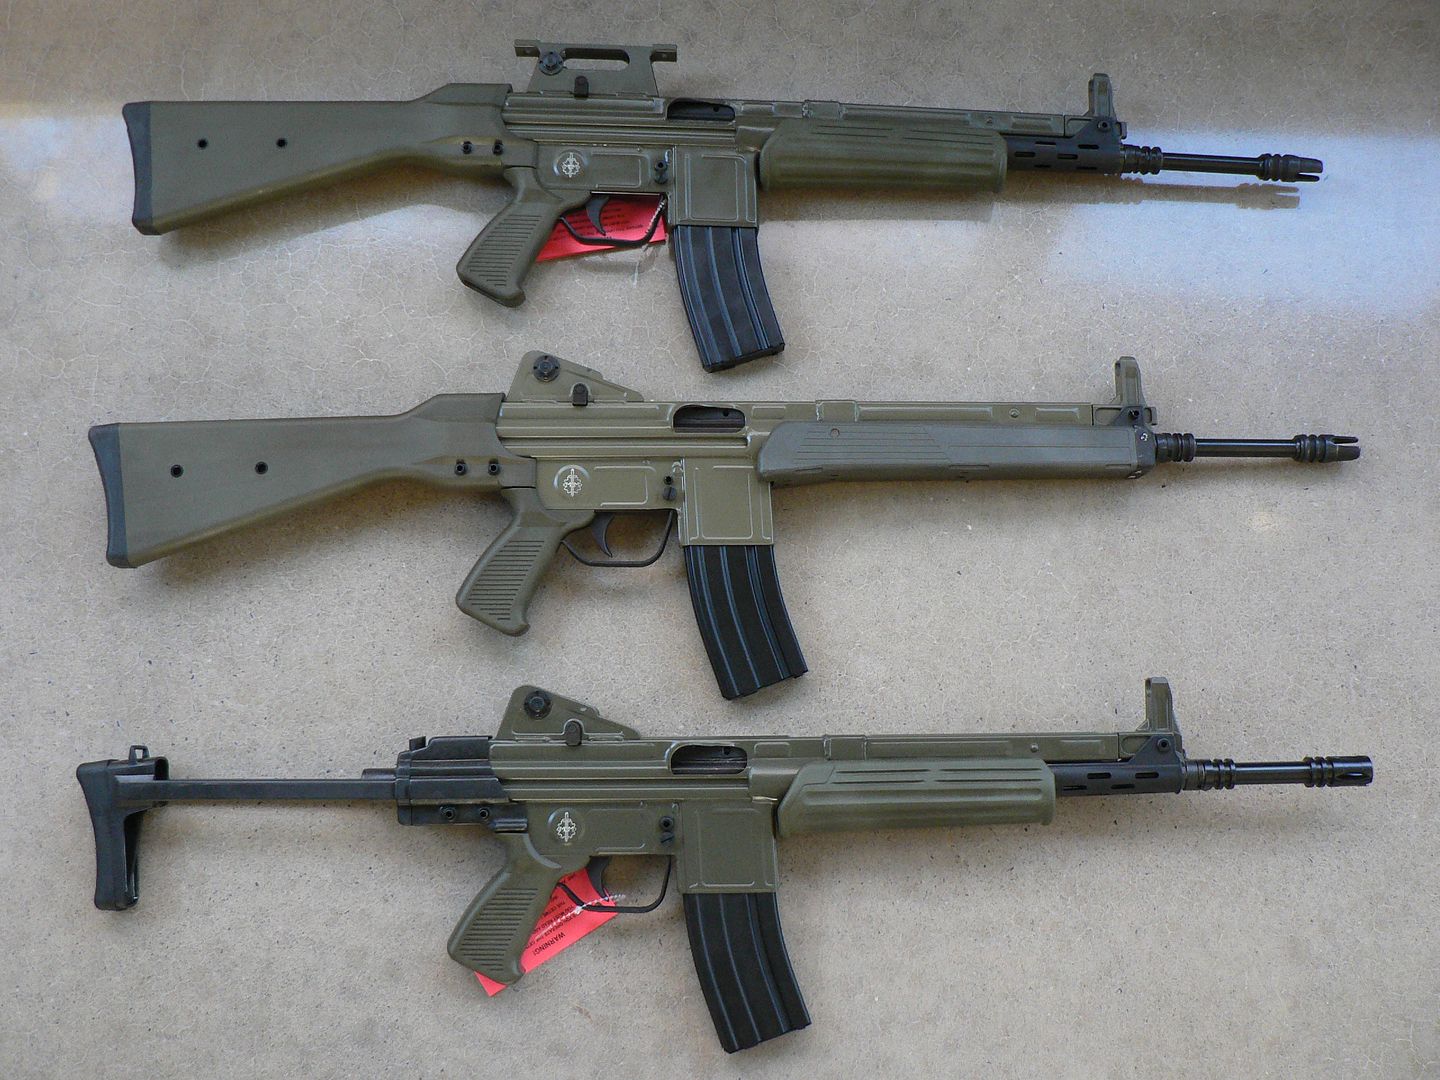
    The vast majority of the kits were the standard fixed stock "L" version designed to be used primarily with iron sights and although many (but not all) did have a rear sight tower capable of having a scope mount attached, the optic mount seems to be vanishingly rare at this point. If you have one, please let me know as I'd LOVE to document it. If you are interested in the standard "L" version rebuilt by MarColMar, I wrote about one of those in-depth earlier this year and compared it to both a Hill and Mac kit rebuild and an original intact Spanish specimen. Just type the following into your favorite search engine and you'll immediately find links to it on multiple sites:
    MarColMar and HMG Cetme L a Detailed Comparison


    Also acquired by were a very few (145) of the "LV" version. The CETME LV was intended to be used as a marksman's rifle and had a STANAG scope mount permanently welded to the receiver. I'll be looking at one of those shortly.

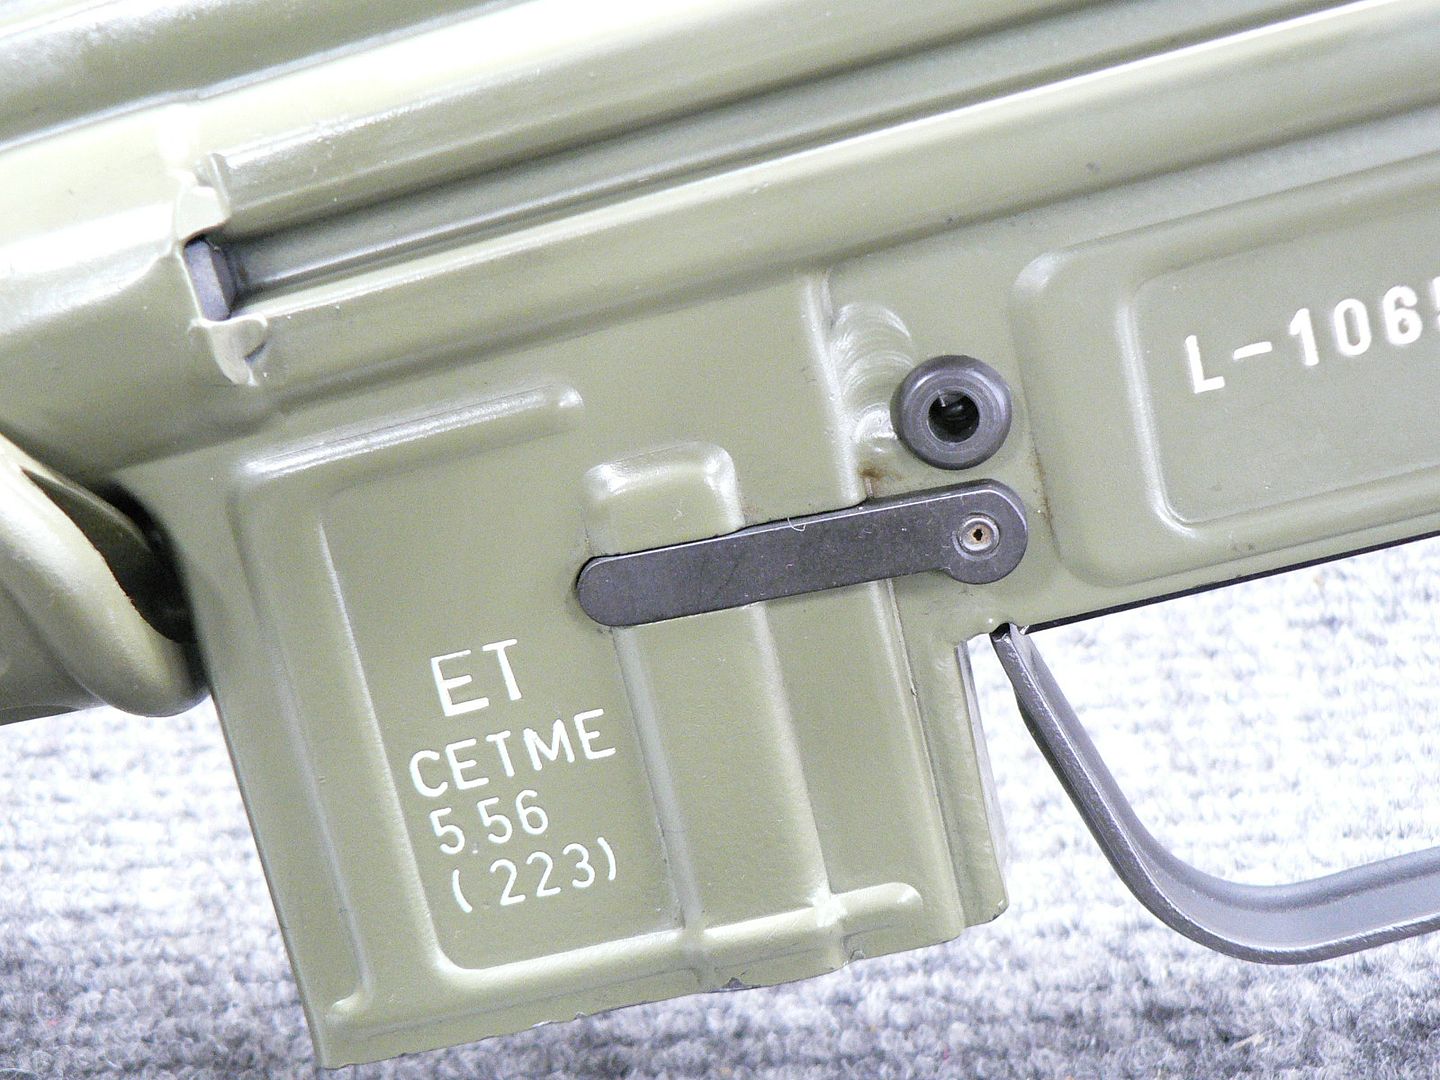
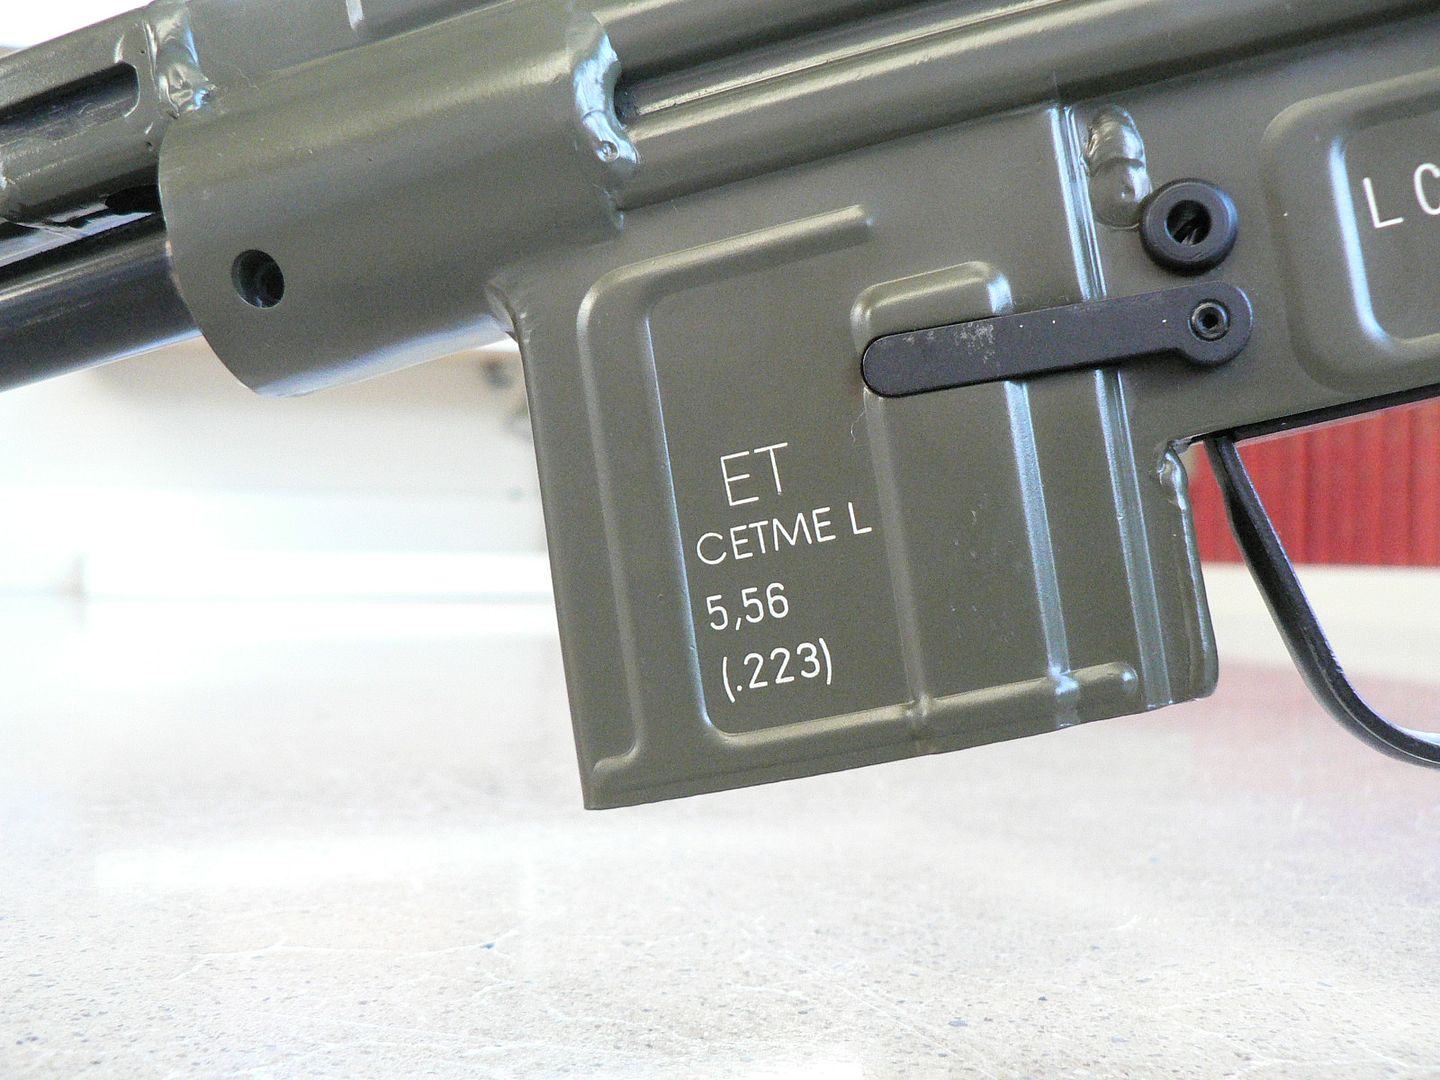
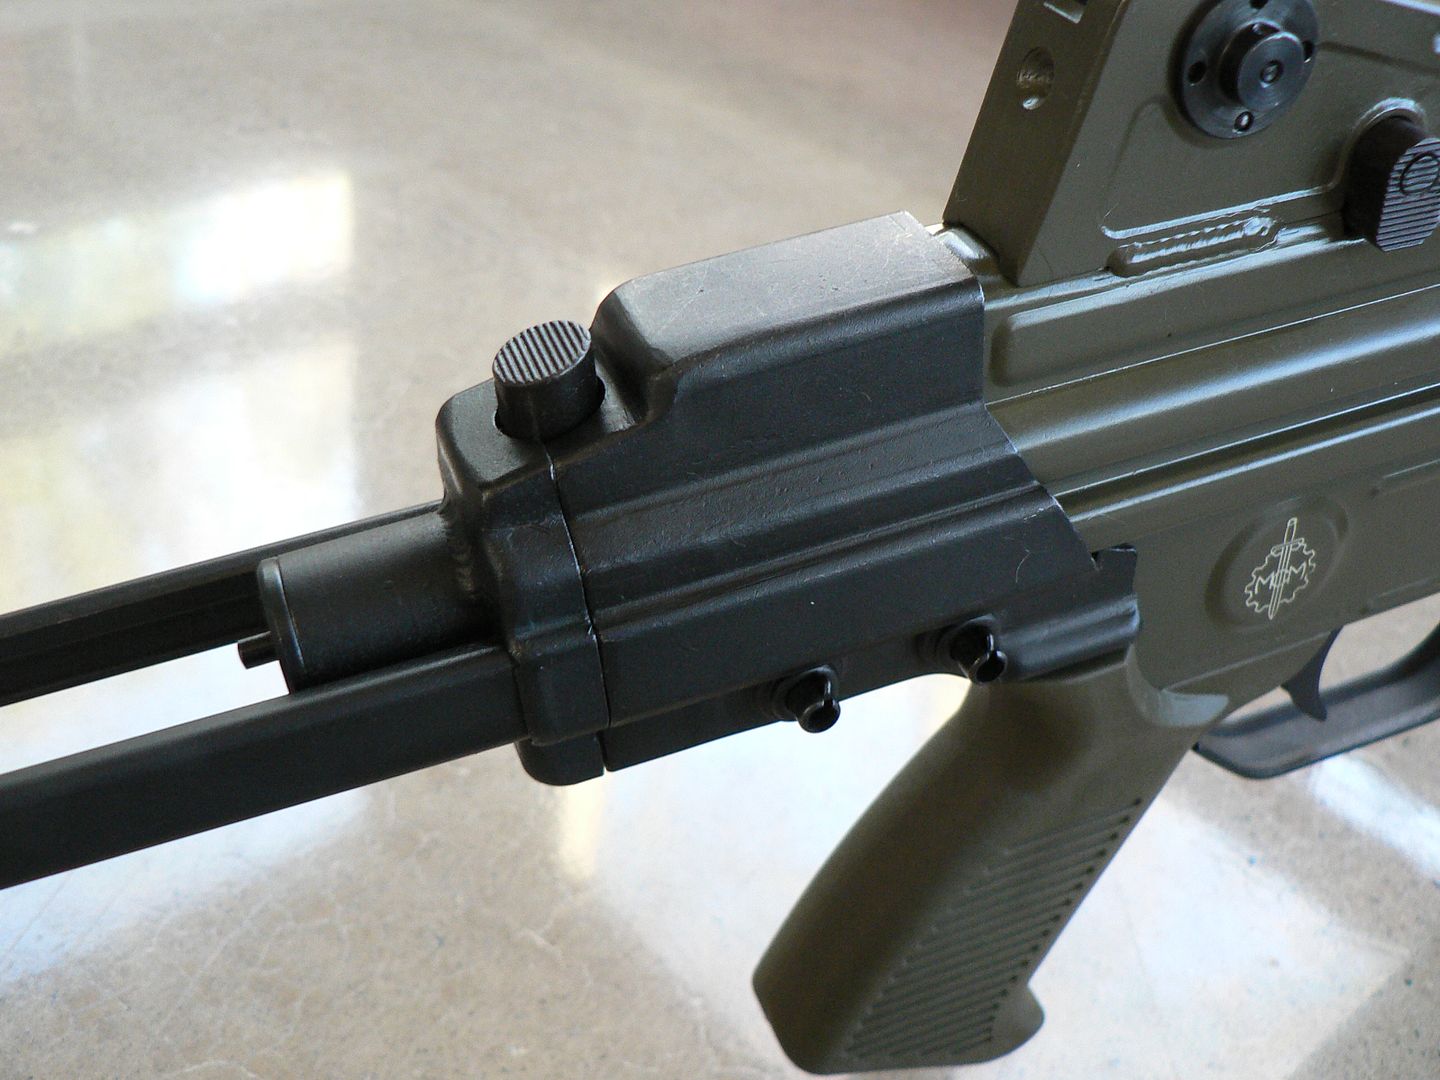
    The third version, known as the "CETME LC", is what we will be looking at here. The primary difference of this version compared to the standard "L" model is a collapsible butt stock intended make it more compact for movement or stowage. Of the approximately 10,000 kits acquired by MarColMar, only 645 were of this variety.

    SO...who is MarColMar? Well, rather than get it wrong, I'll just quote their website:
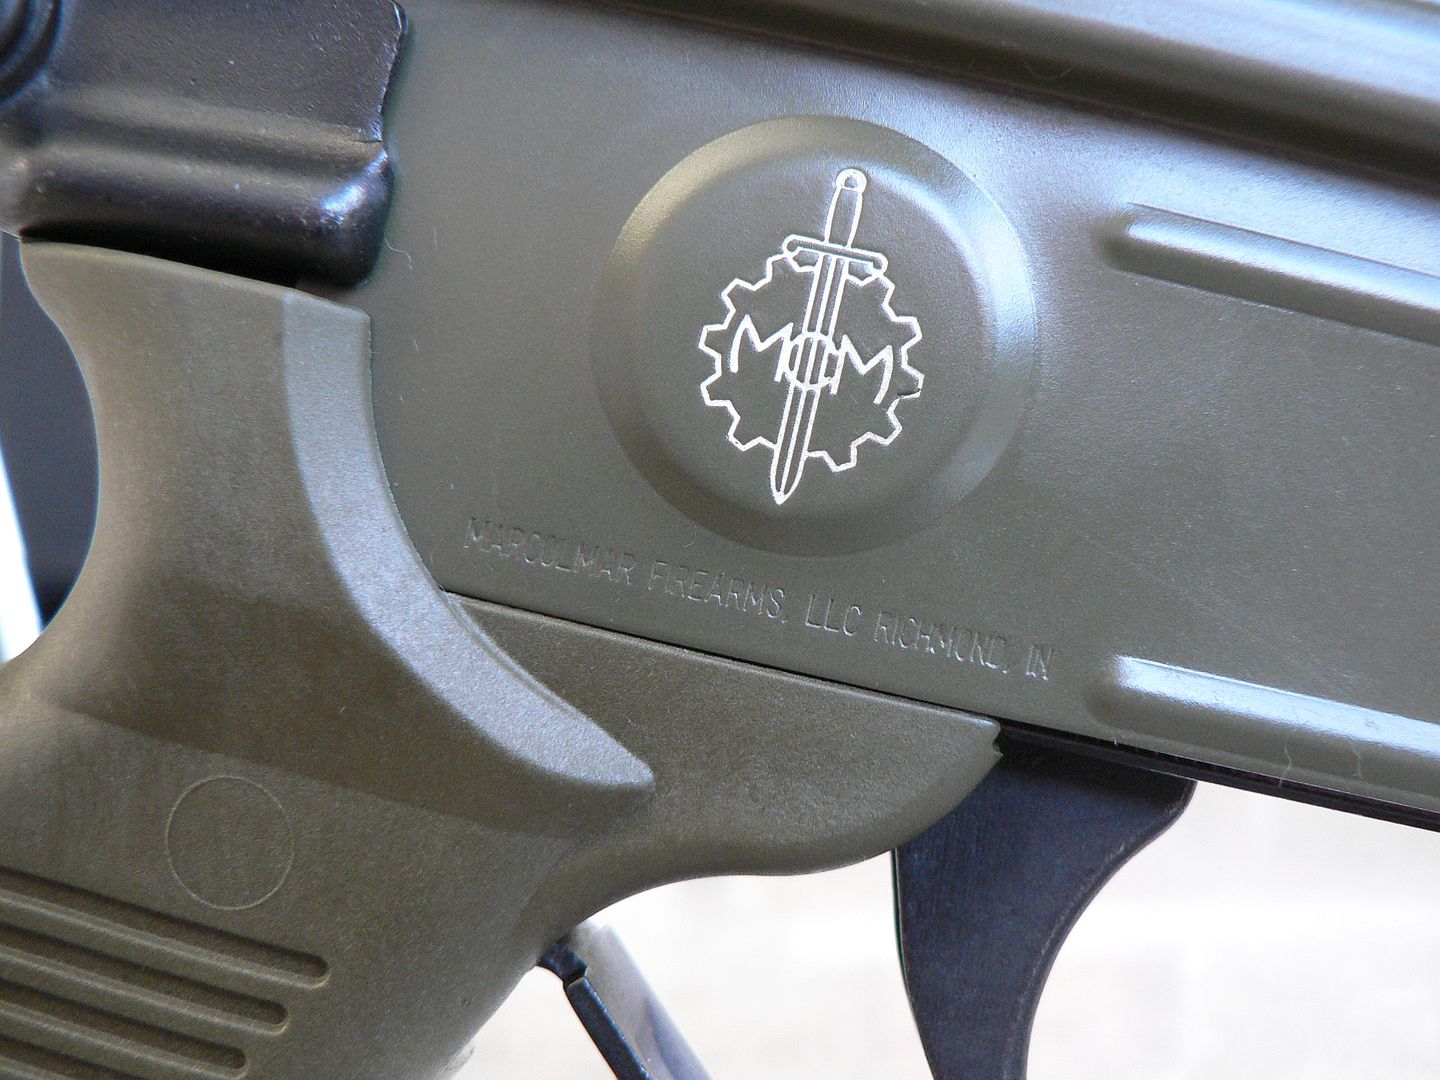
    "MarColMar Firearms is an FFL / SOT / and Class II Manufacturer that specializes in bringing important historical military firearms back to life - for both collectors and shooters. Founded by Dave Bane in Richmond Indiana in 2007, MarColMar has been committed to merging modern manufacturing methods and materials, with surplus military parts, to recreate the most accurate, high quality, and reliable firearms available to the consumer market.
    Our past projects and collaborations with other fine industry leaders, has resulted in some of the finest semi-auto firearm shooters and collectables, all of which have rapidly increased in demand and value – such as the Semi PKM, the Bulgarian AK-74, our milled Uk vz 59, and the UKM. Our latest project, the CETME L, will now expand our limited production – high quality philosophy - to a broader market, allowing many other enthusiasts to access our products and designs, and enjoy them for generations."

    And here is a link to their site:
    https://www.marcolmarfirearms.com/

    Now, if it sounds to you like I'm advertising for MarColMar (I often use MCM for brevity) that's because I absolutely am. BUT I'm not advertising because they asked me to or because they are paying me to or because they are giving me free stuff. NOPE. I'm doing this of my own accord because I bought one of their CETME L's and was so absolutely Impressed with the Quality of their product, the Quality of their customer service and the Quality of who they are as people and a company that I feel compelled to get the word out about what kind of feast they are bringing to the firearm hobby's table. If you want to learn more about that, I again invite you to read the article I did earlier about the standard CETME L by typing the following into your favorite search engine:
    MarColMar and HMG Cetme L a Detailed Comparison

    Have you read so much at this point that you're ready to go to sleep? Well wake up because it time to start looking at pictures. We'll start at the beginning.....the box:
    P1160489_zpsrx0csxsg.jpg

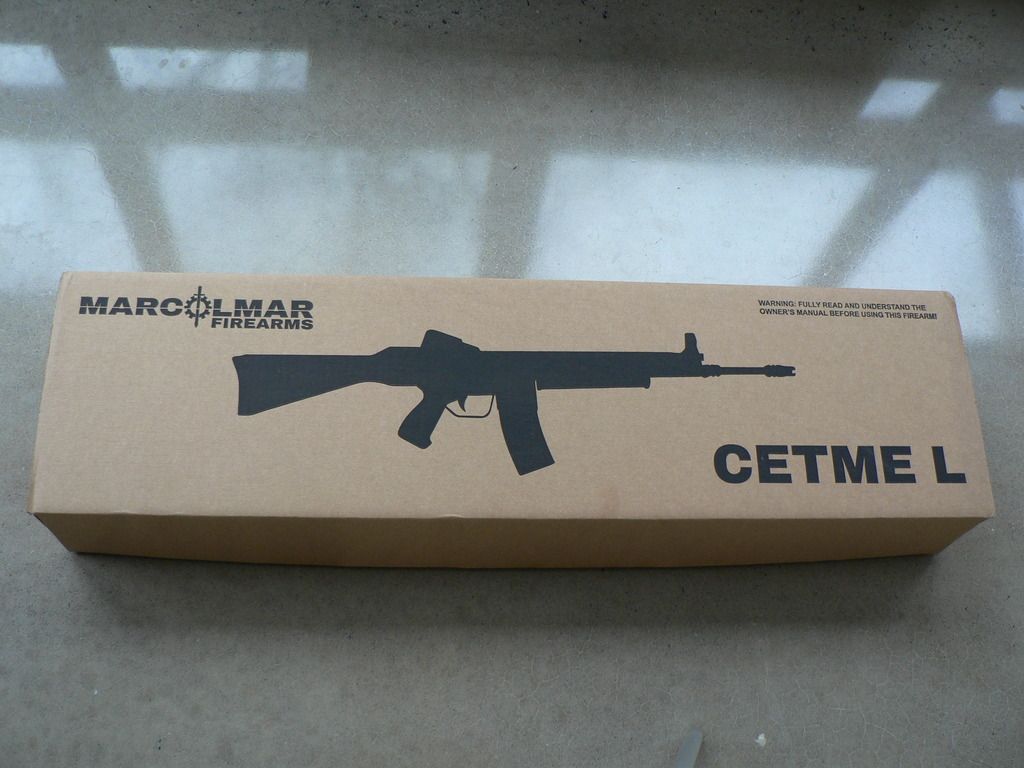
    When your new rifle arrives, this is the first thing you'll see. There isn't much to say....it's a cardboard box. But it's a nice sturdy one.


    On the end of the box, you'll find a sticker letting you know what's inside:
    P1180853_zpsm8dwszsz.jpg

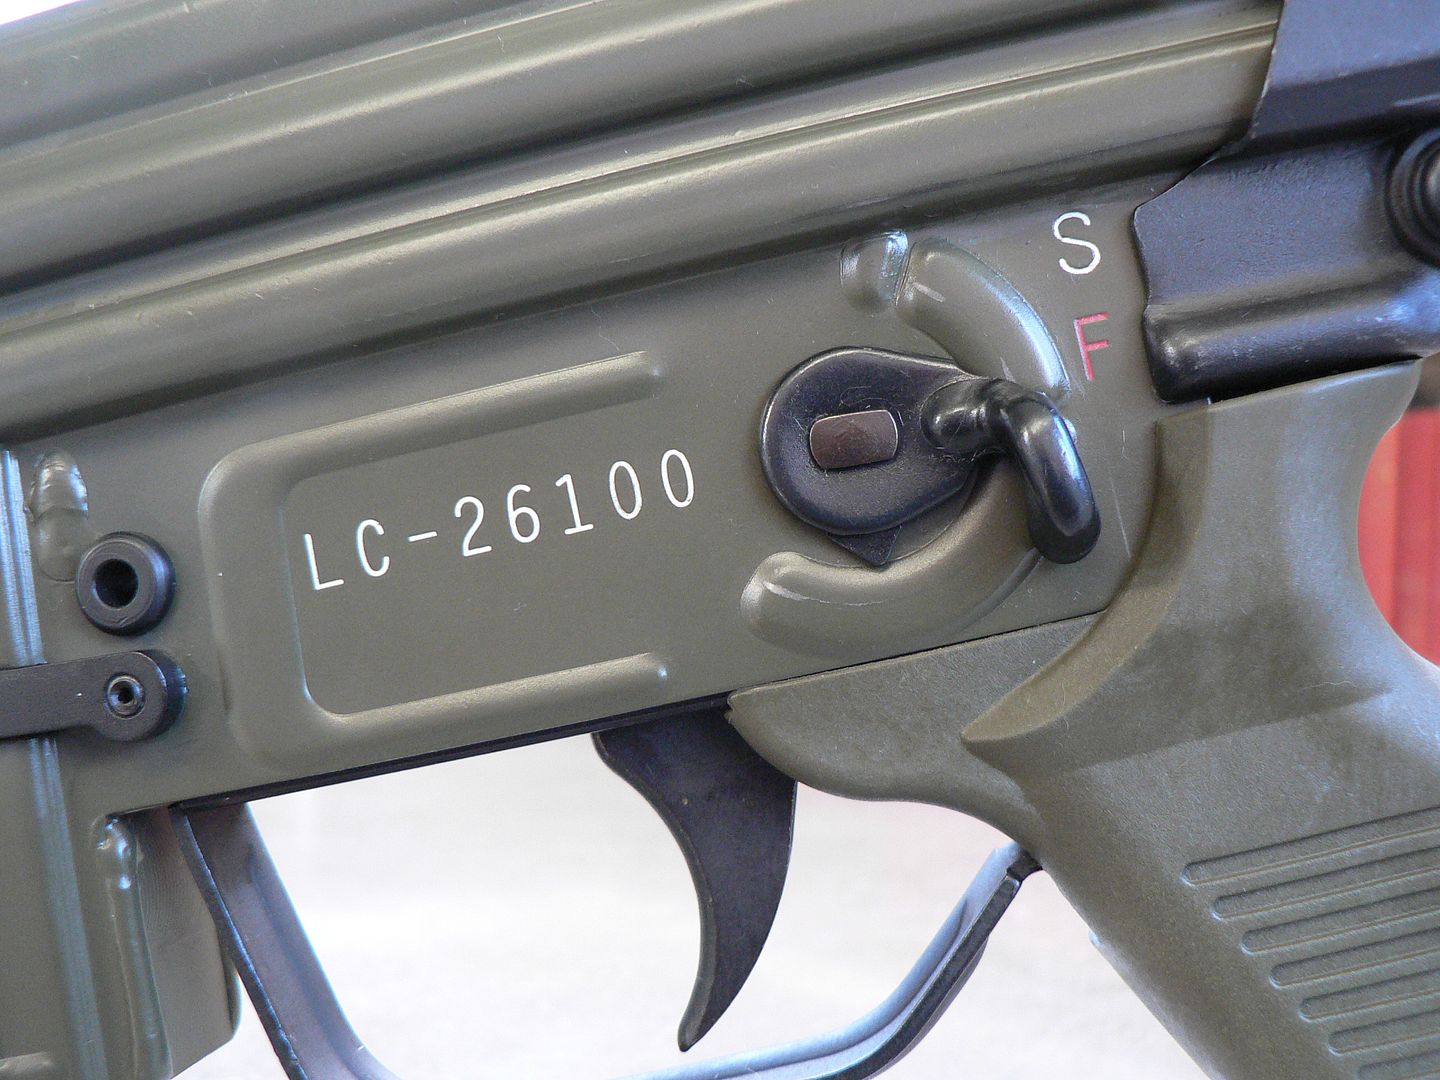
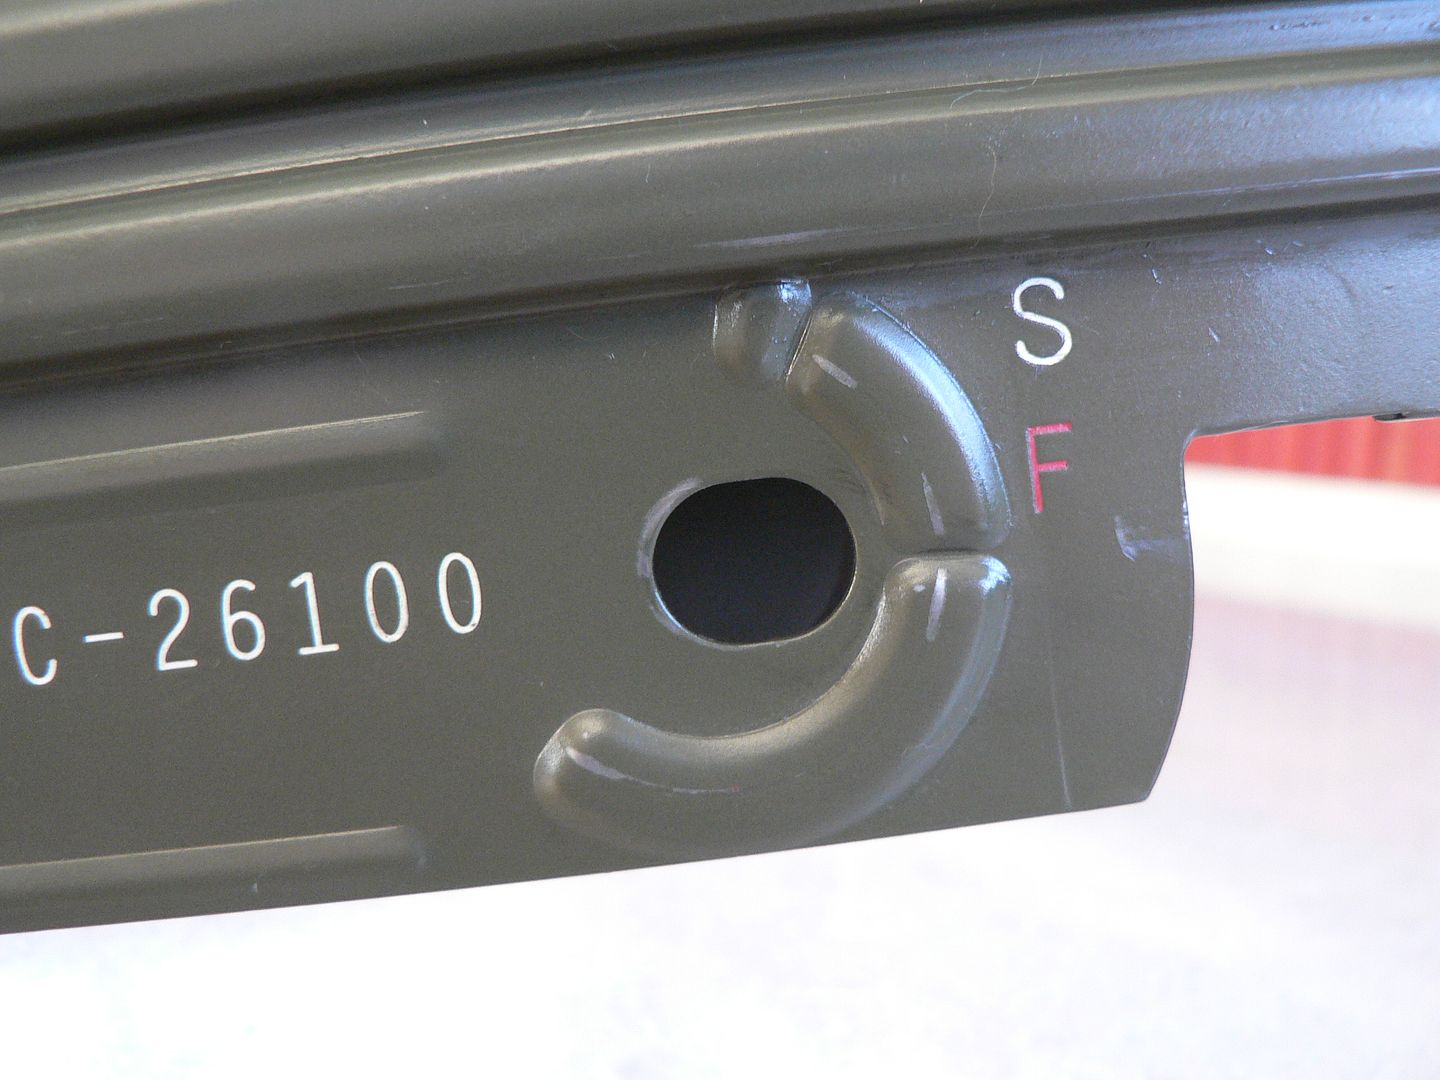
    The Serial # line should be pretty obvious as to what it is. MCM started the serial numbers in the 26000 range on this model because all of the LC kits were in that range. I think that's kind of nifty!
    The next line is the model. Notice that there is a fourth one (TAC) I haven't mentioned. That's because it isn't available yet. I'm pretty sure we all know what a "TAC" version will be though. Just know that such an animal, while I'm sure it will be the bomb, didn't originally exist. Tacticool is as American as apple pie!
    Next is color. I chose green because that's the color they all were originally. But you can also order your rifle in Black, Grey or Flat Dark Earth.
    Next is furniture. Again, I chose green because it's what would have originally been used in Spanish service. You can also order black or Flat Dark Earth.
    The next line is marked "Rail". I chose no rail because....you guessed it....that's how an original rifle would be. But if you choose to have one, MCM will ship your rifle with a perfectly aligned picatinny rail mounted on top the top of the receiver running from the front of the rear sight all the way to the front of the receiver.
    The last line is marked "HB". You can specify either an original style pencil barrel or a larger circumference heavy barrel.


    Upon opening the box, you'll find your new buddy well packed in form fitting high density foam:
    P1180854_zps6fzruoue.jpg

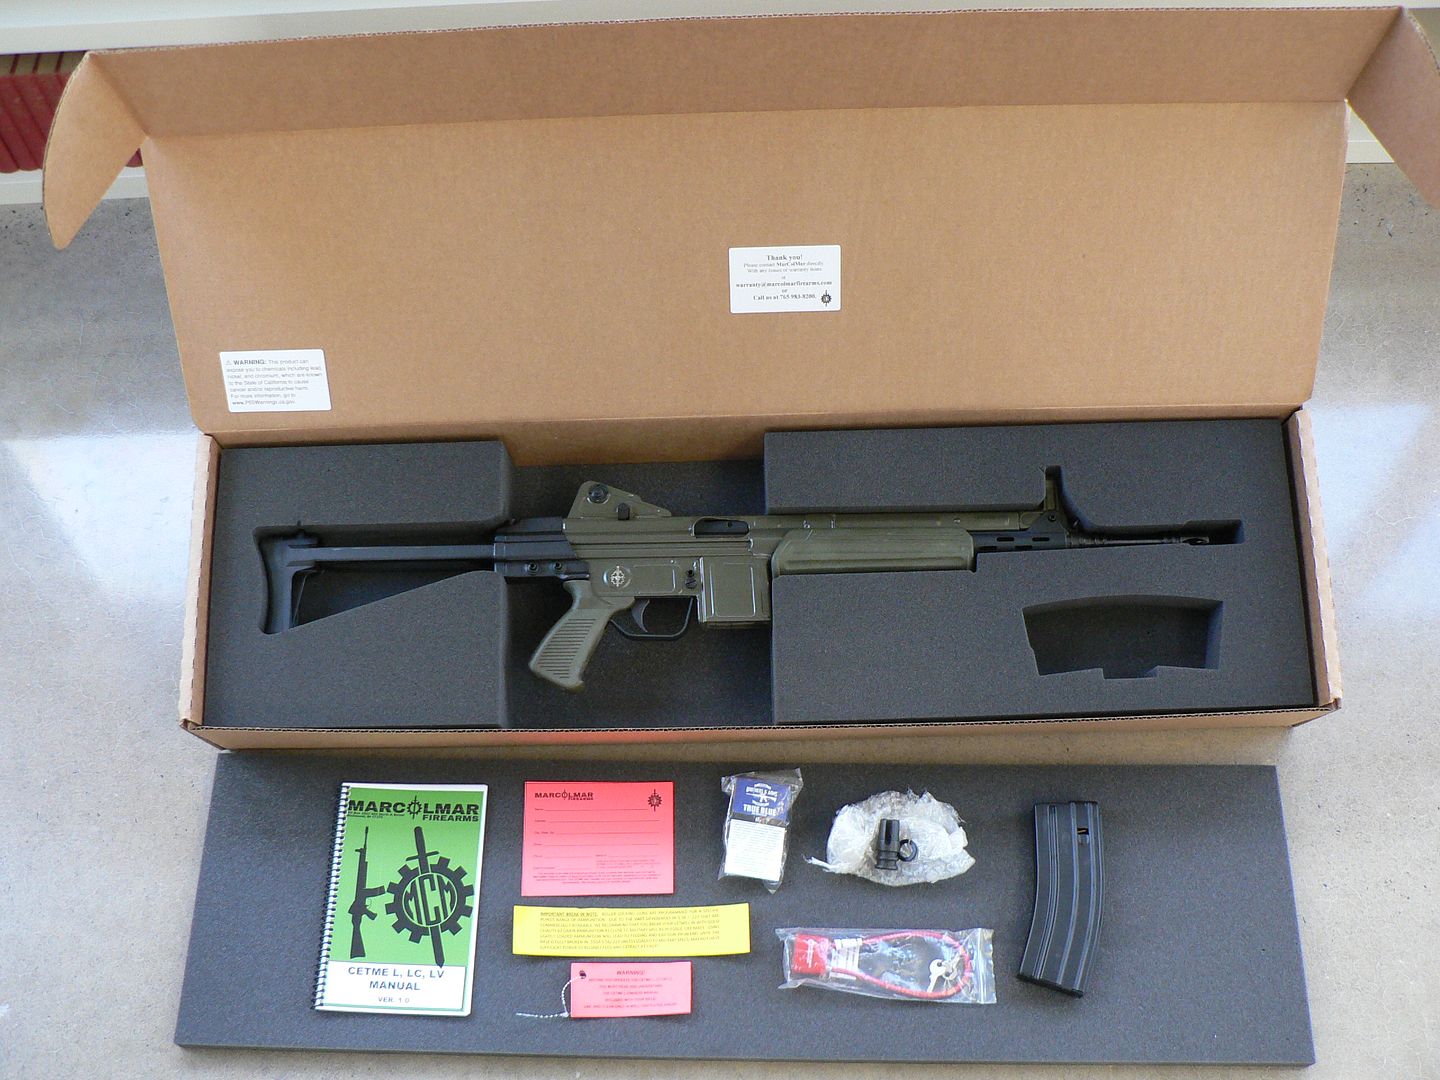
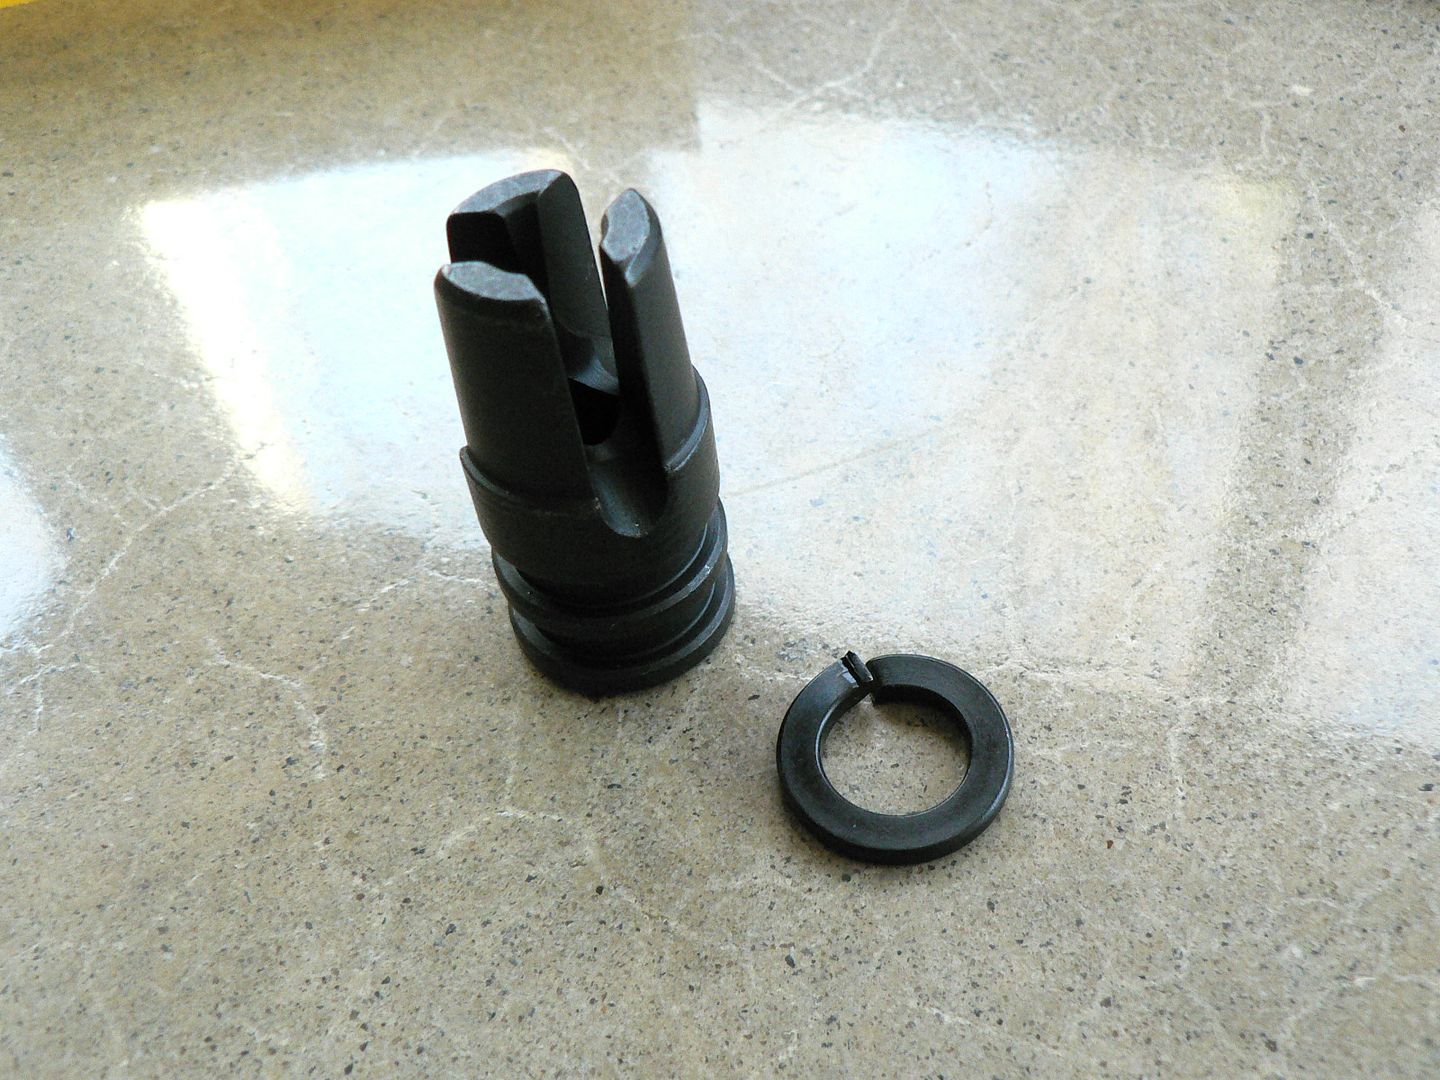
    In addition to the rifle, you also find some other stuff which I have laid out for the picture. At the extreme left is the manual. We'll get a closer look at that in just a bit. In the column next to the manual and starting at the top we have a warranty card, break-in directions and a tag that was attached to the trigger guard informing you that you might shoot your eye out if you aren't careful. Continuing right, we have a small bottle of lube, an action lock, a flash hider and lock washer (more about that later) and, finally, a standard US GI aluminum magazine made by Okay Industries.
    The stickers inside the box top are contact information for MCM and another warning label. You can never have enough warning labels.


    Here's a detail shot of the break-in information:
    P1180855_zpsvrfl30ak.jpg

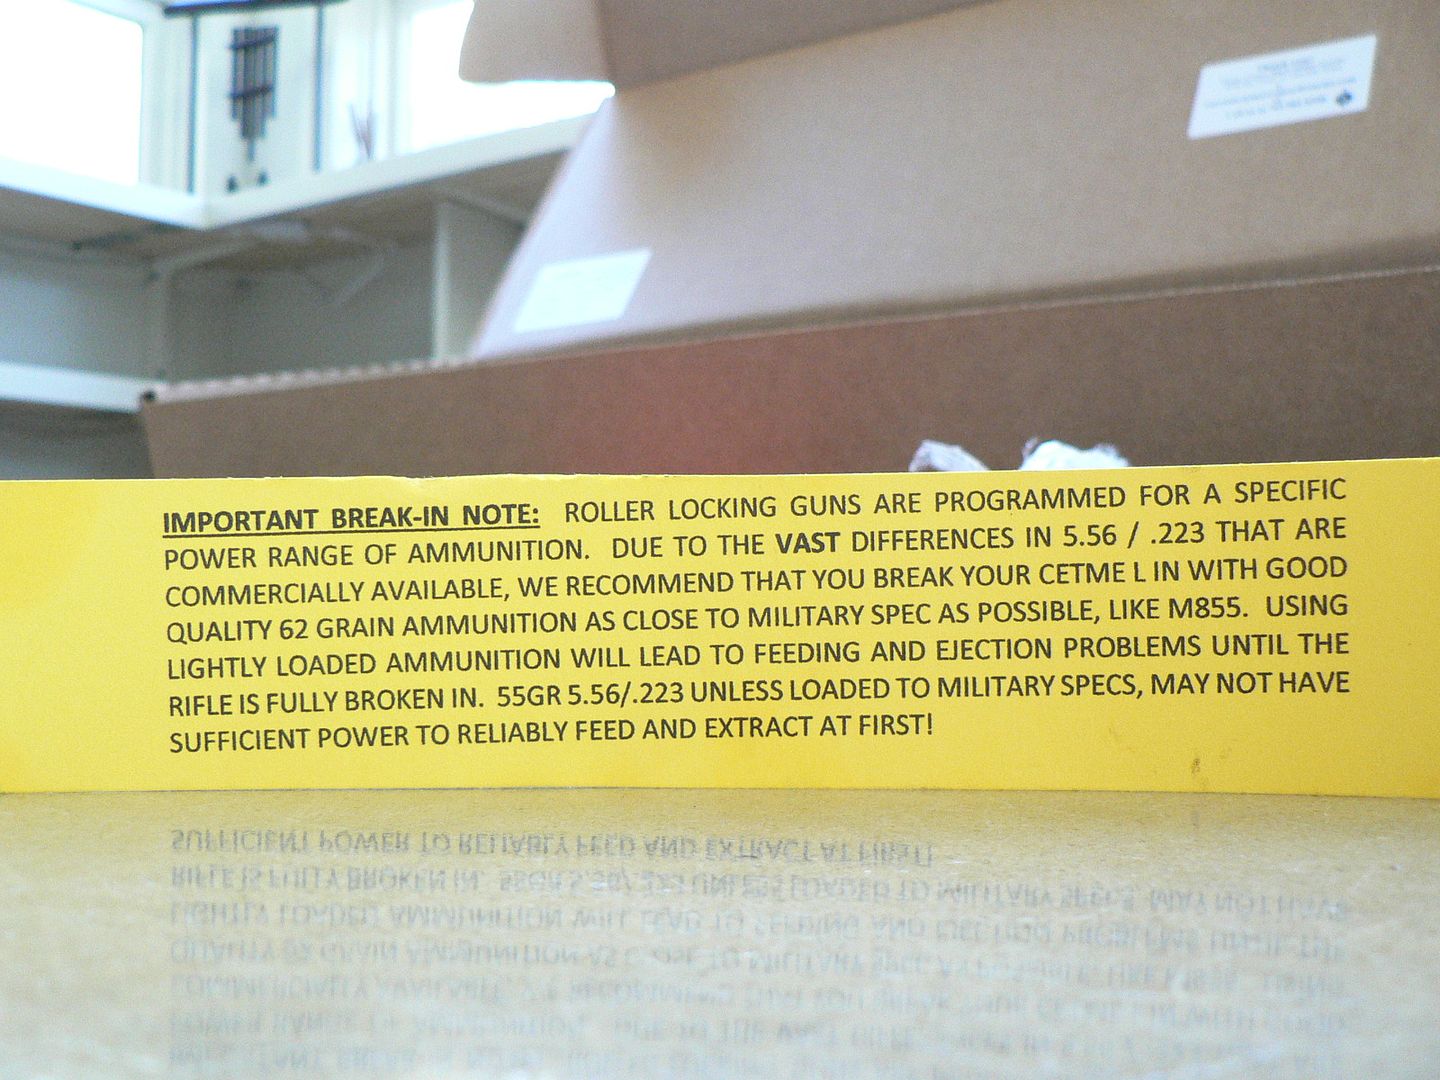
    While I haven't shot this rifle yet, I have shot my L model quite a bit since purchasing it in early 2019 and it has yet to give me any problems. It's run like a Singer sewing machine since day one.


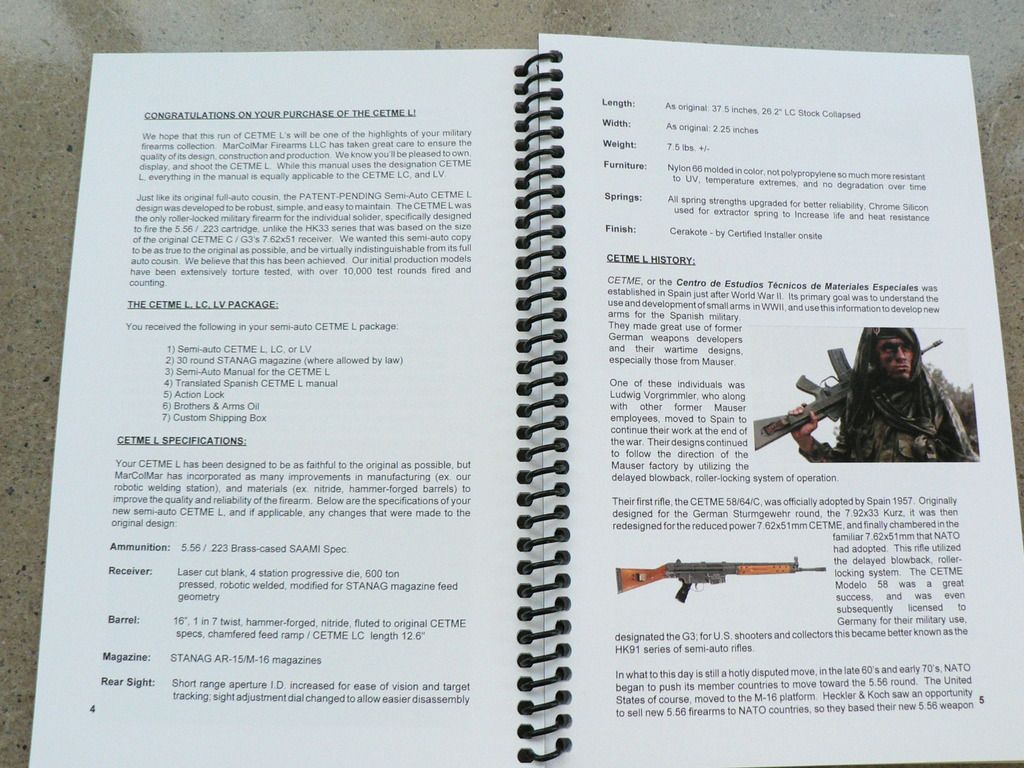
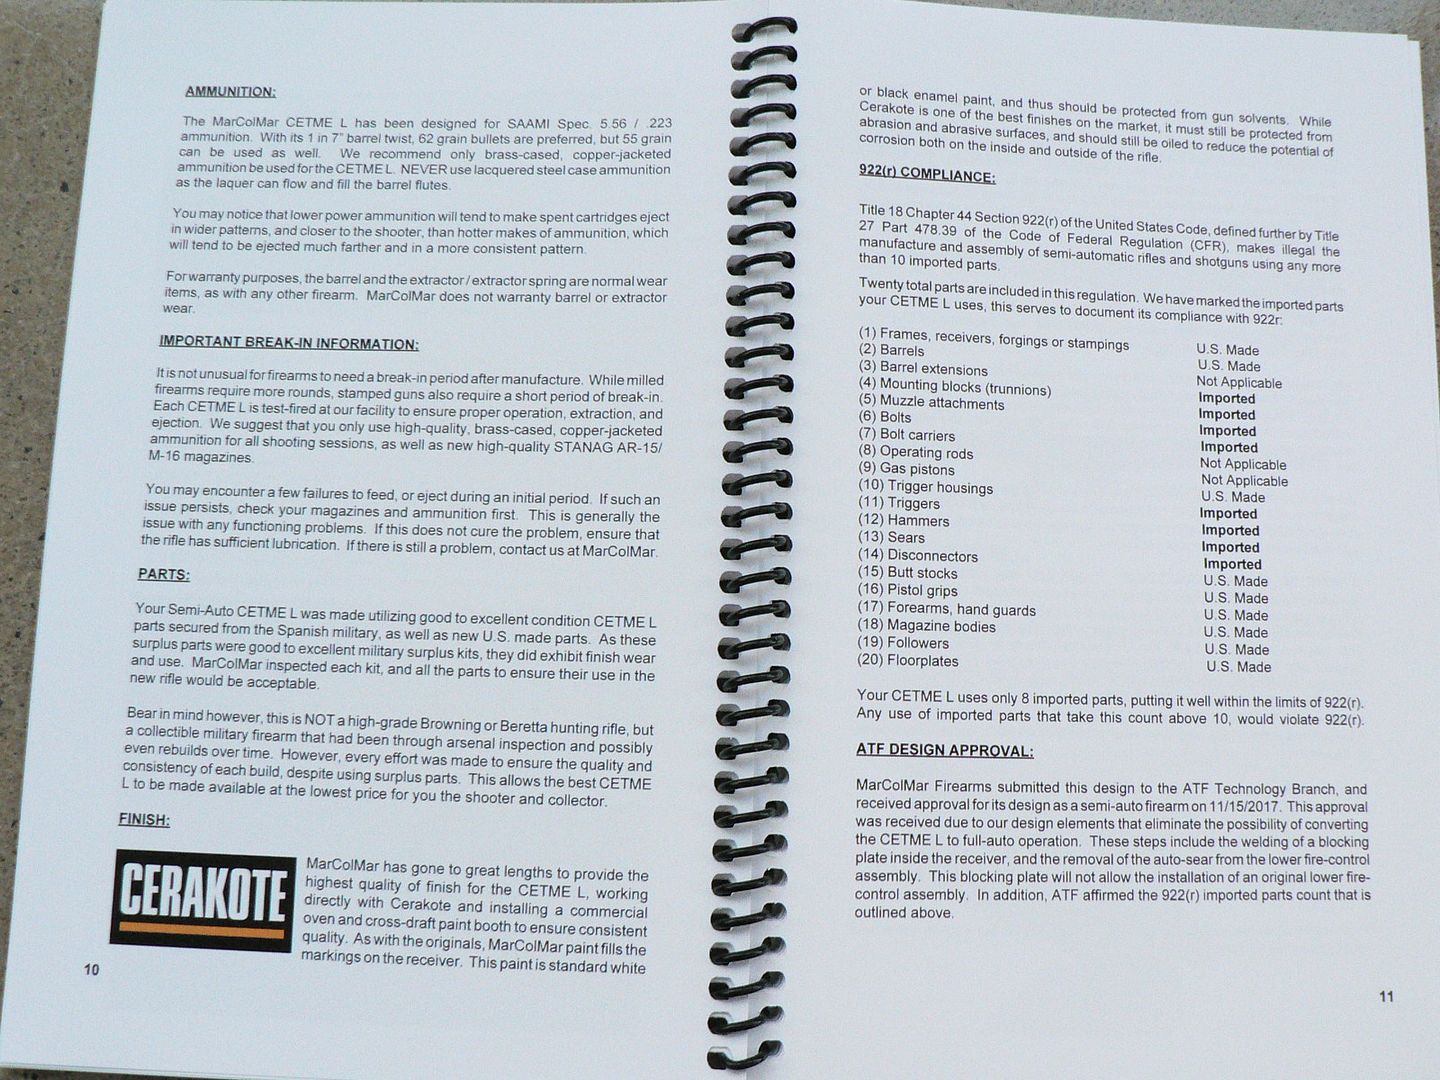
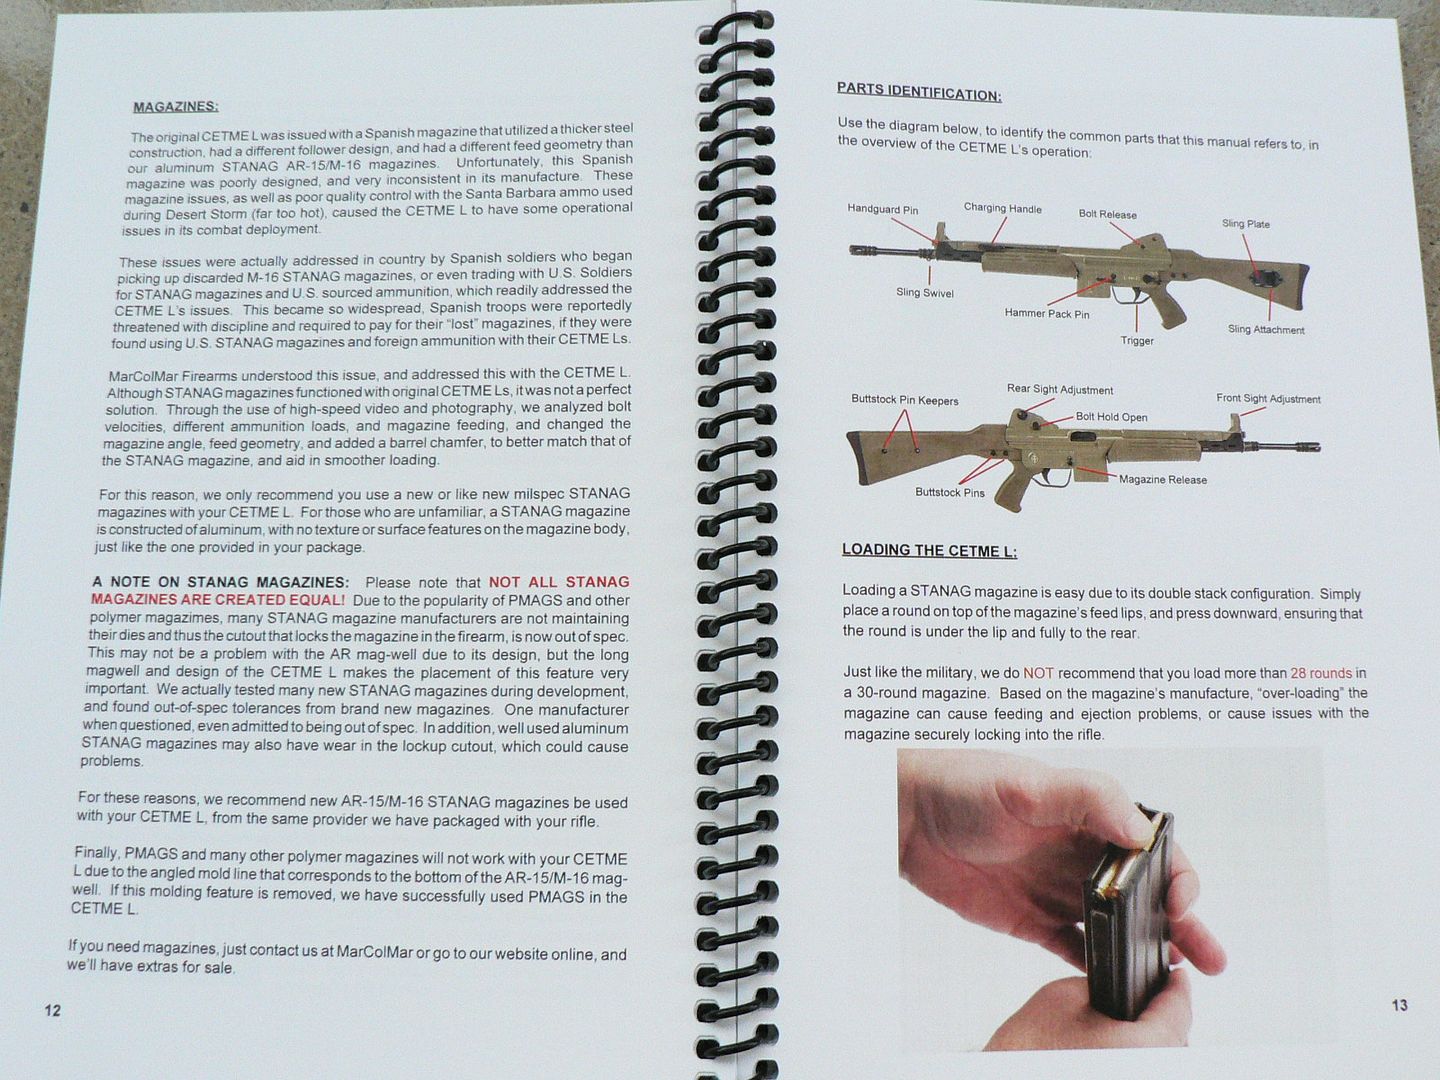
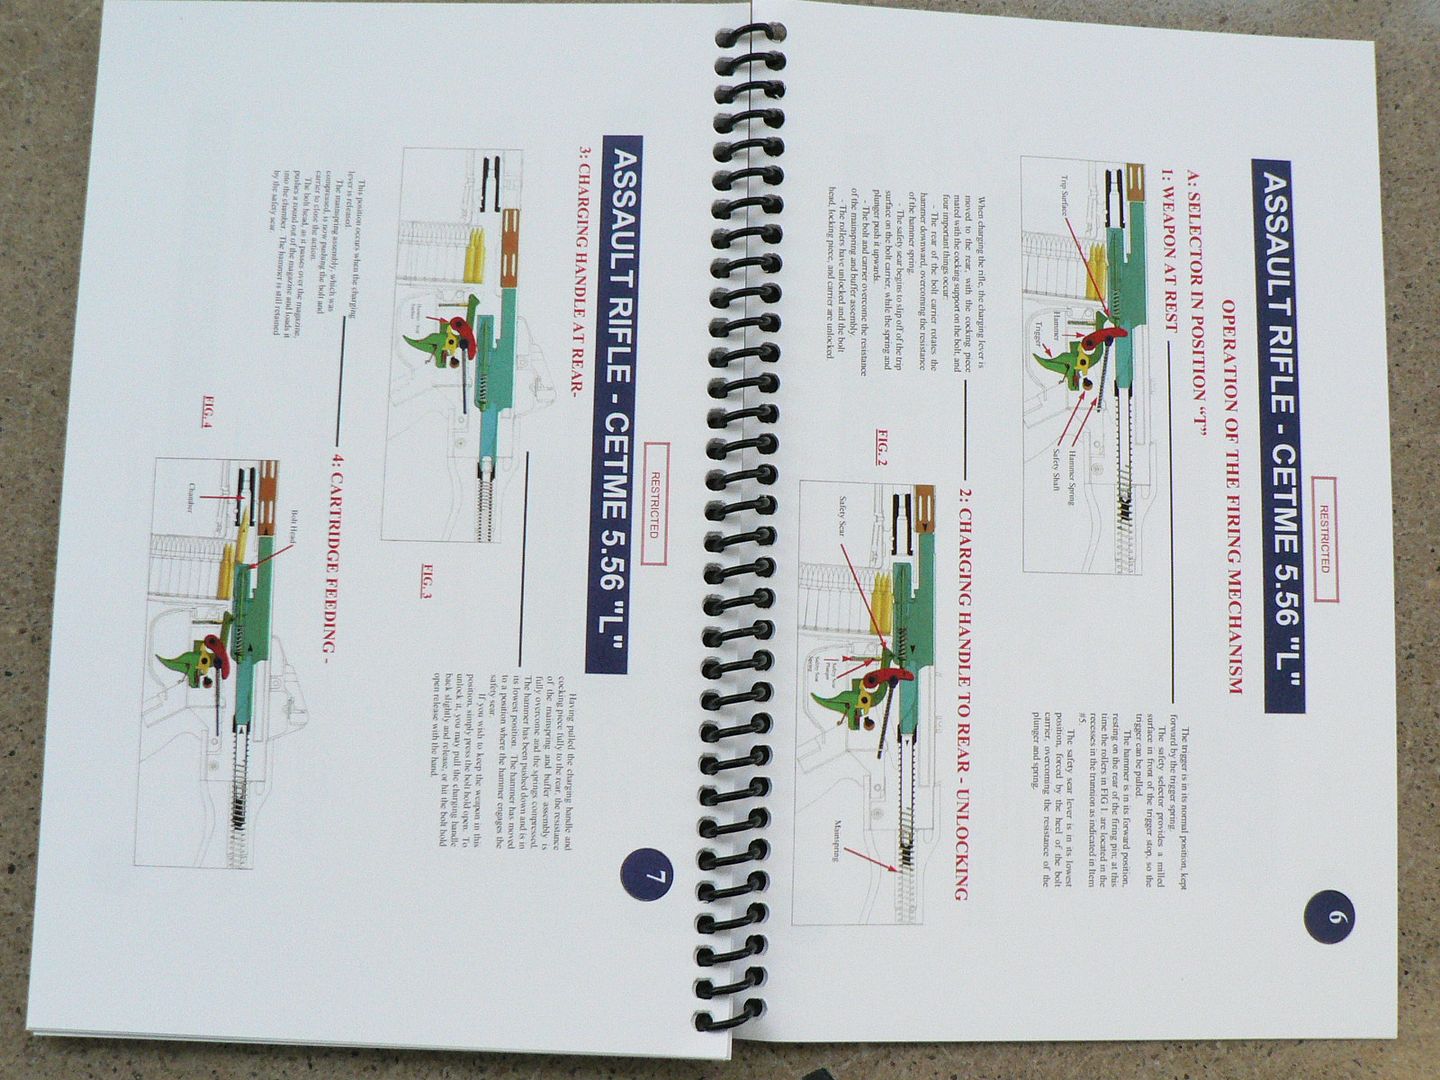
    Let's take a closer look at the manual. I'm not going to post every page but trust me, it's well done. It's actually two manuals in one. The first half was done by MCM and covers some really interesting stuff. Besides the usual how to disassemble and how to clean sections, there is one on the History of the original rifle and some really informative text about the production of this new AMG including which parts are new US made. The second half is an English translation of an original Spanish manual complete with lots of pretty color pictures.

    Some examples of the MCM half:


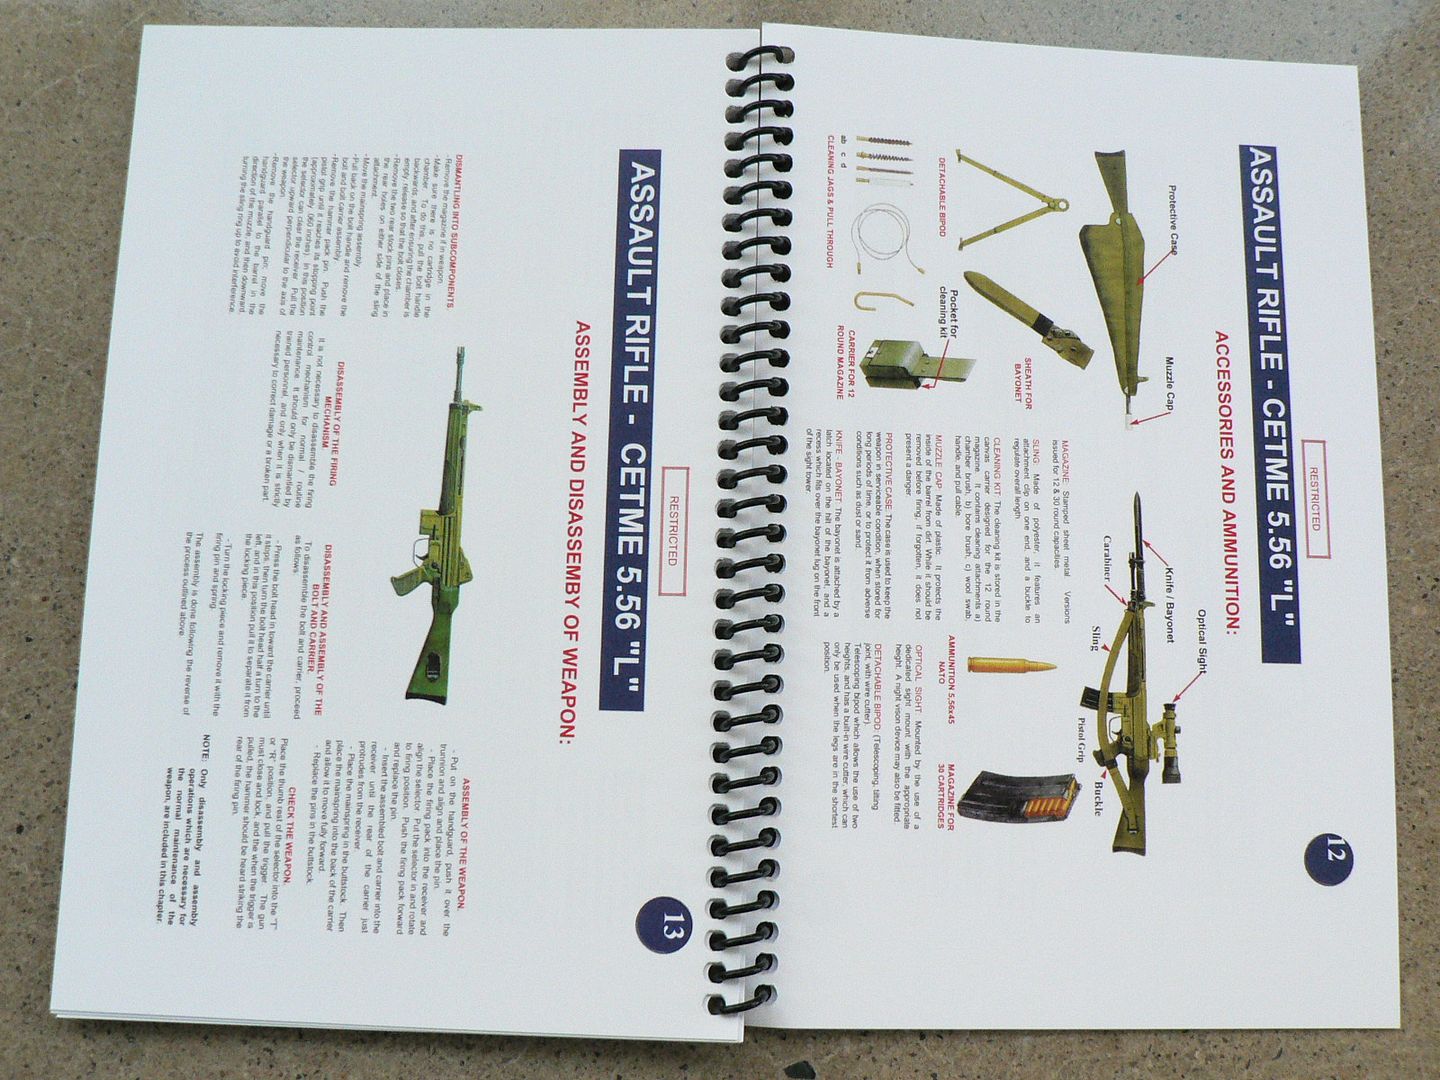
    Some examples of the translated Spanish half:


    After checking out the extra stuff, it's time to take a look at the rifle. we'll start with a right side view, stock extended:
    P1190016_zps0dy75rwi.jpg


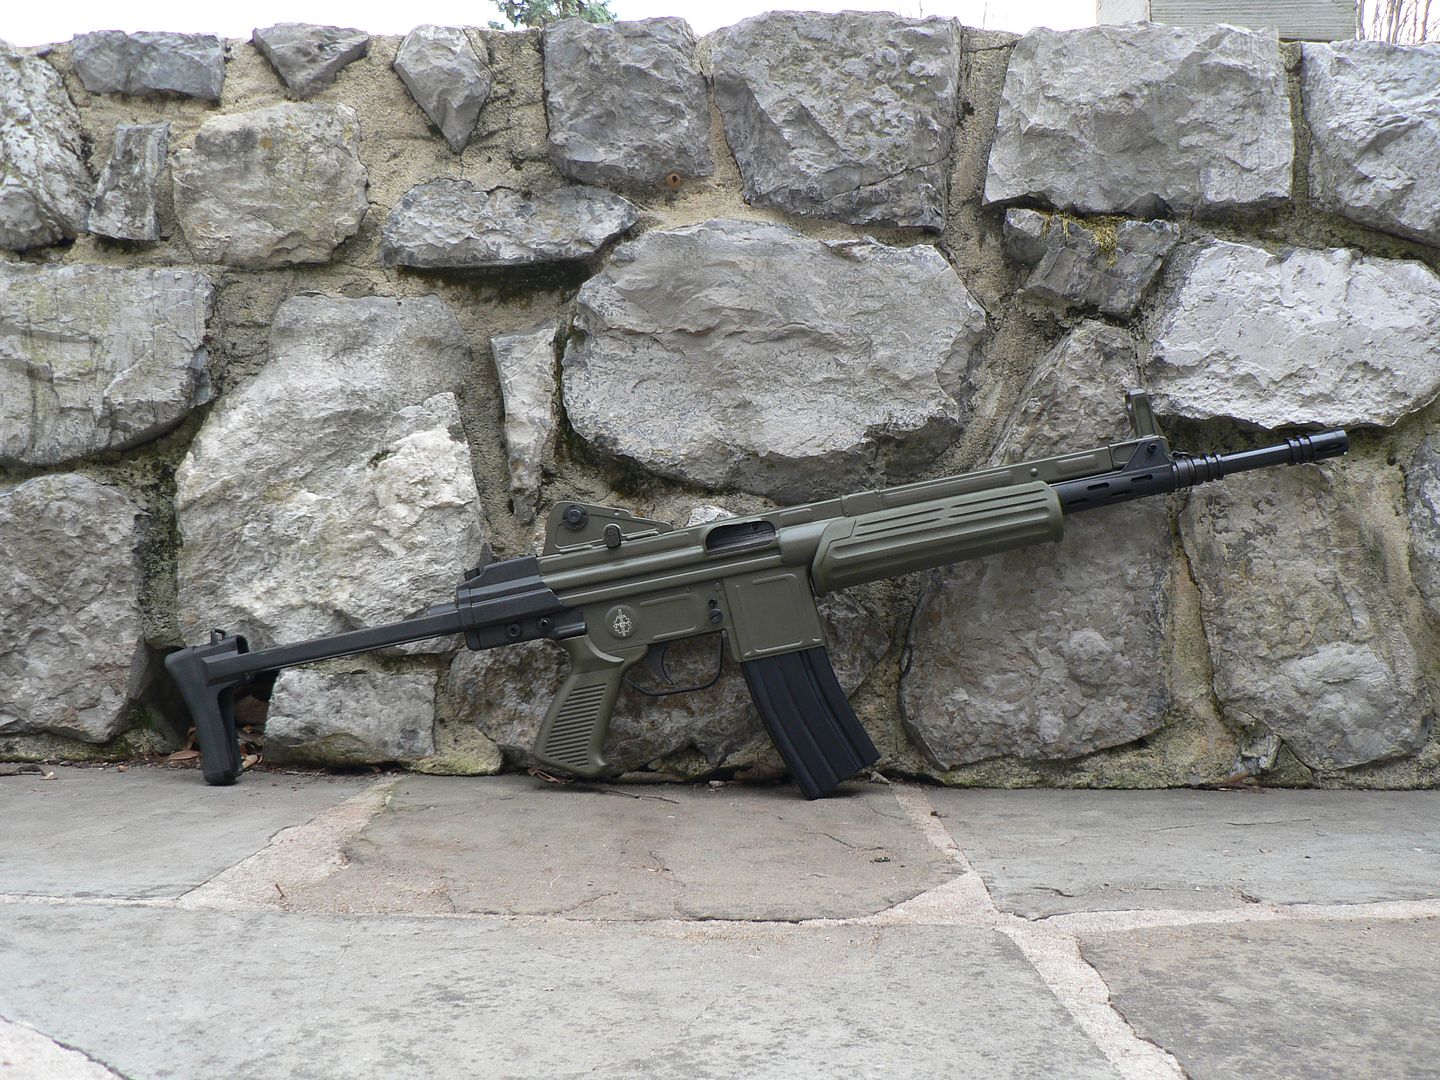
    It's playing coy and trying to blend into the stone wall so here it is in the living room where it has a harder time blending in:
    P1180858_zpsgr2pbcly.jpg

    Please ignore the embarrassing unfinished shelves in the background. They'll be prettier when finished.


    And the left side shown with the stock retracted:
    P1190017_zpsqf6sthdm.jpg

    At this point we need to address what you are looking at. I mean, is this a kit build or a new made reproduction. Well, it's both really. If you refer to the pictures of the manual above, you'll see on page 11 just which parts are original Spanish and which are new made in the US. To paraphrase my earlier piece on the standard model:

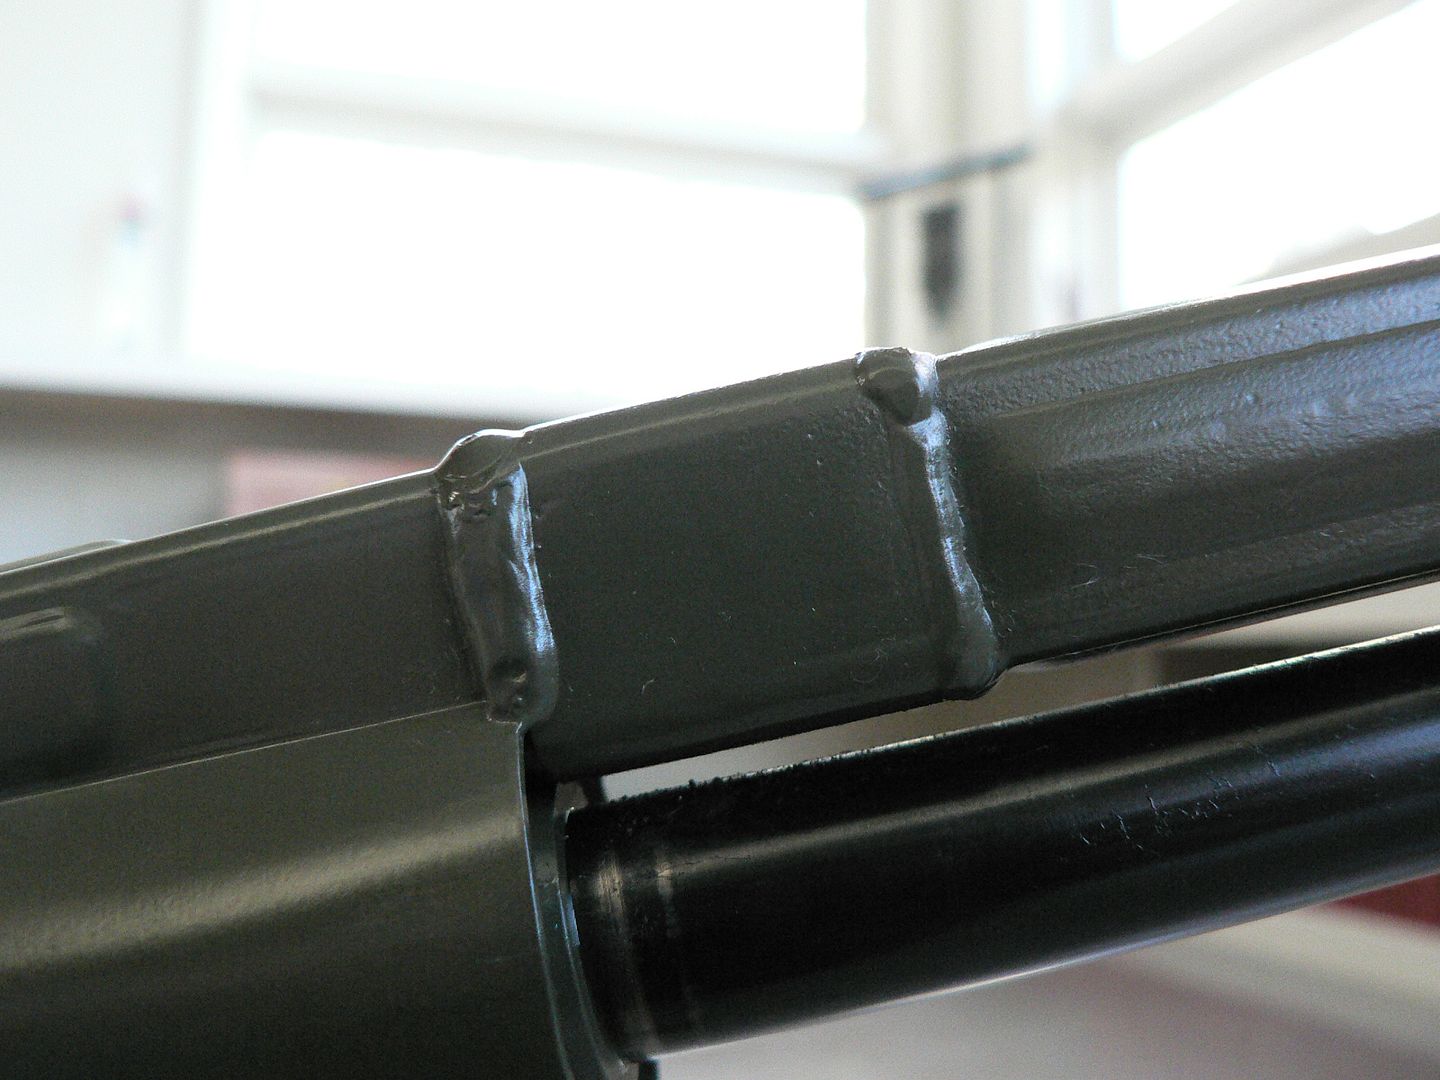
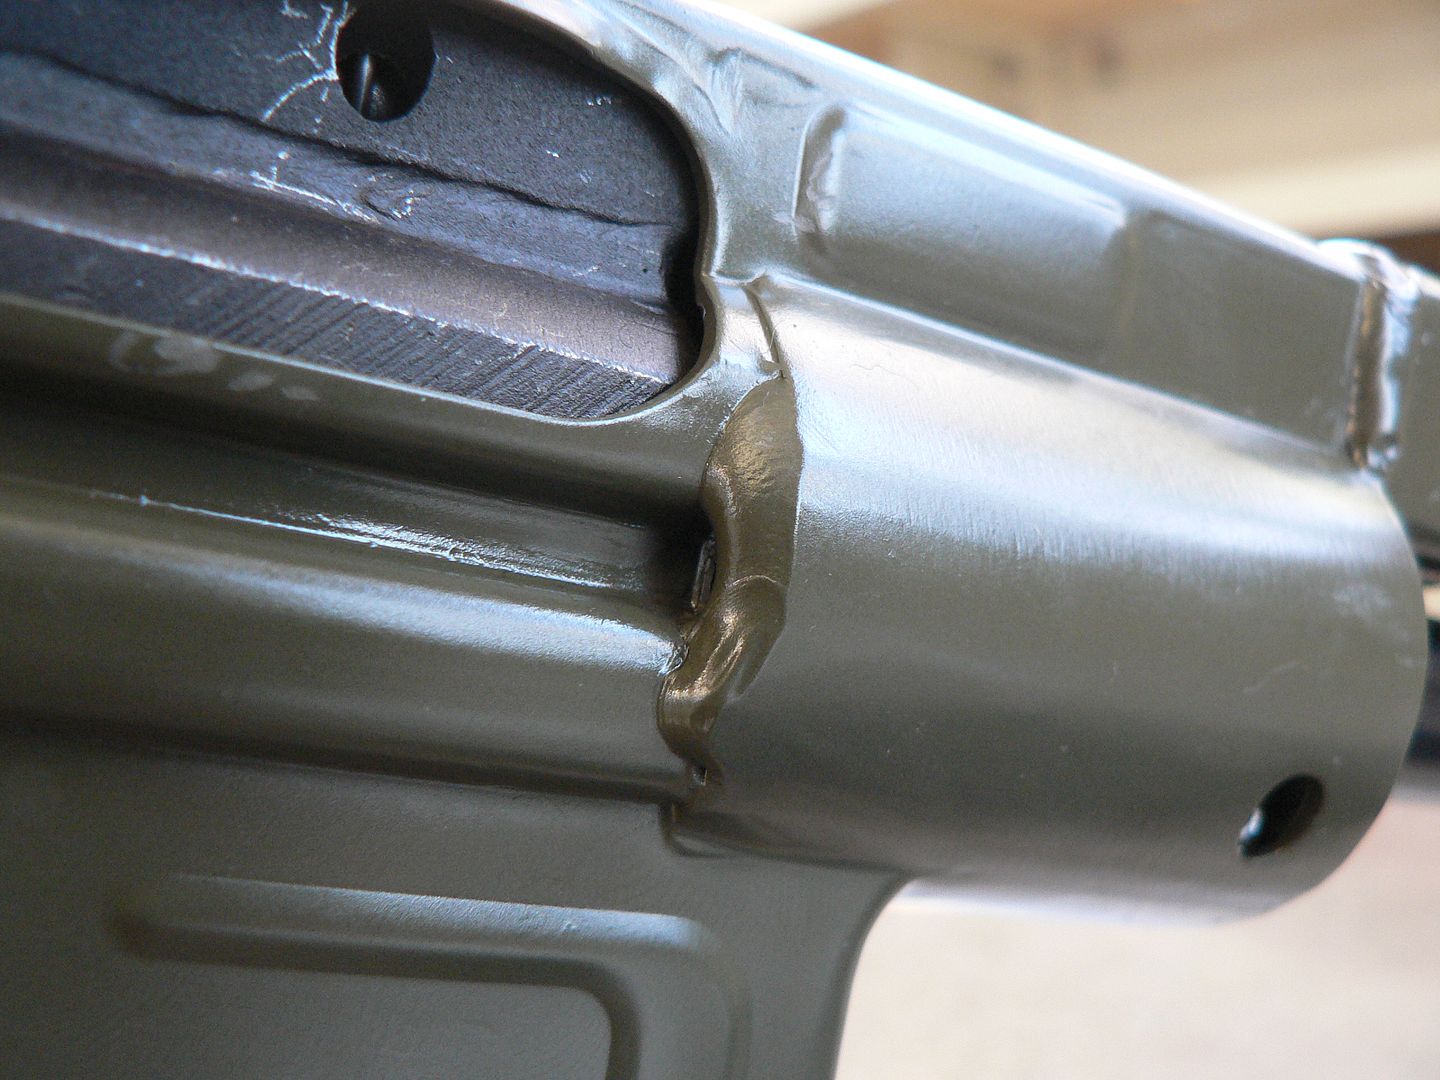
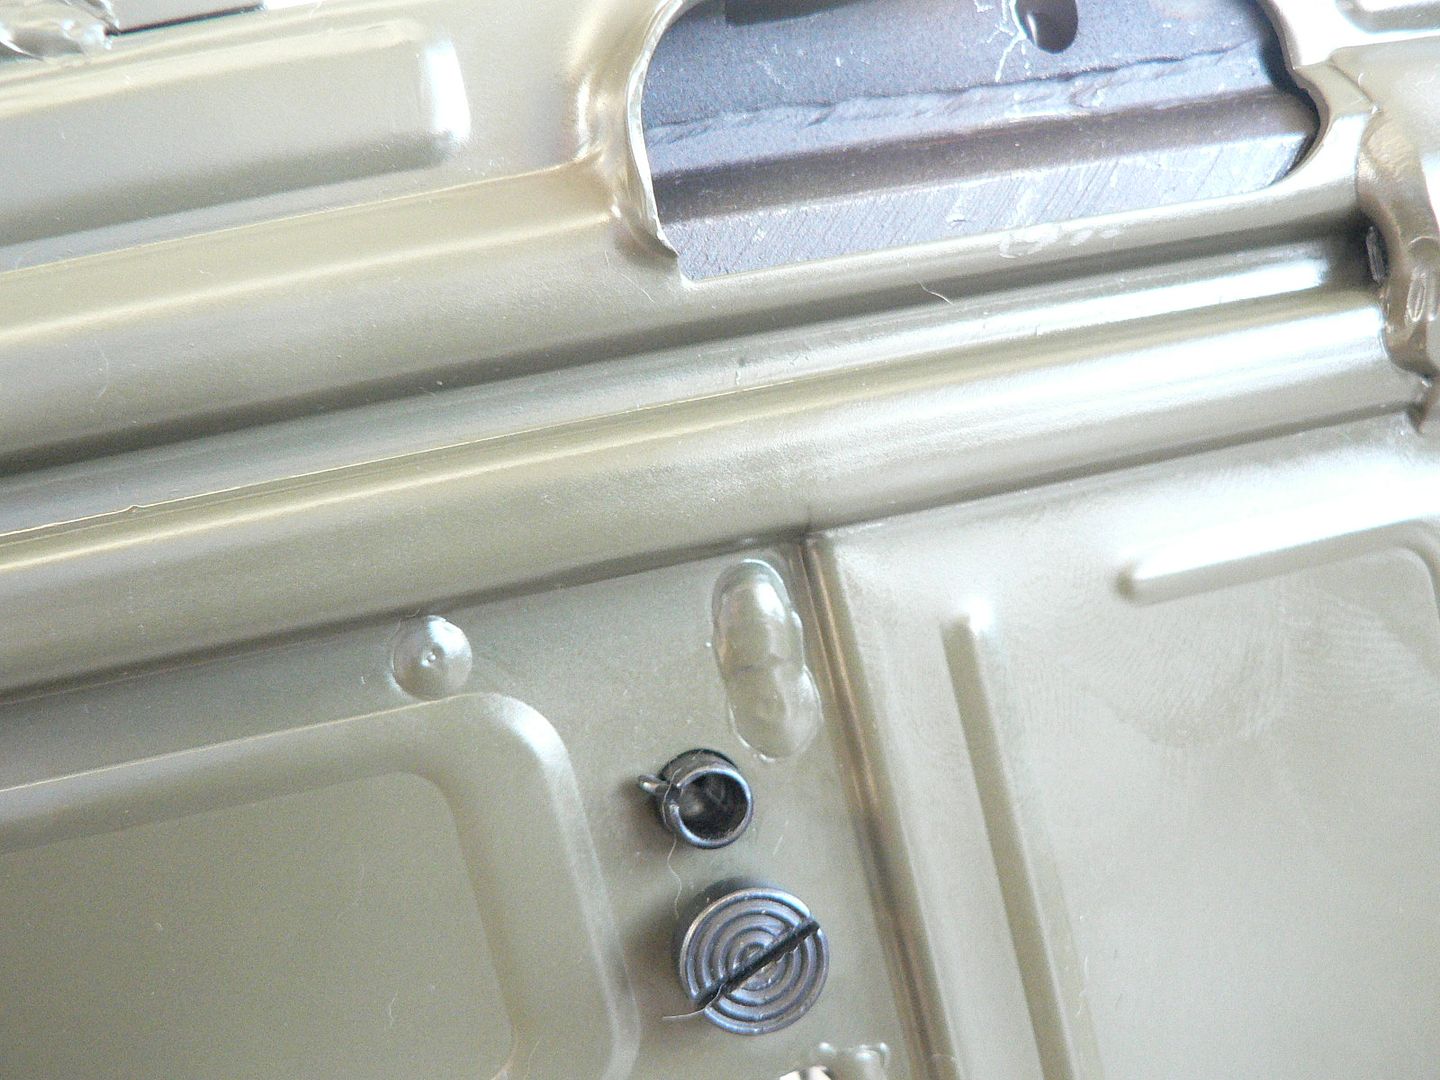
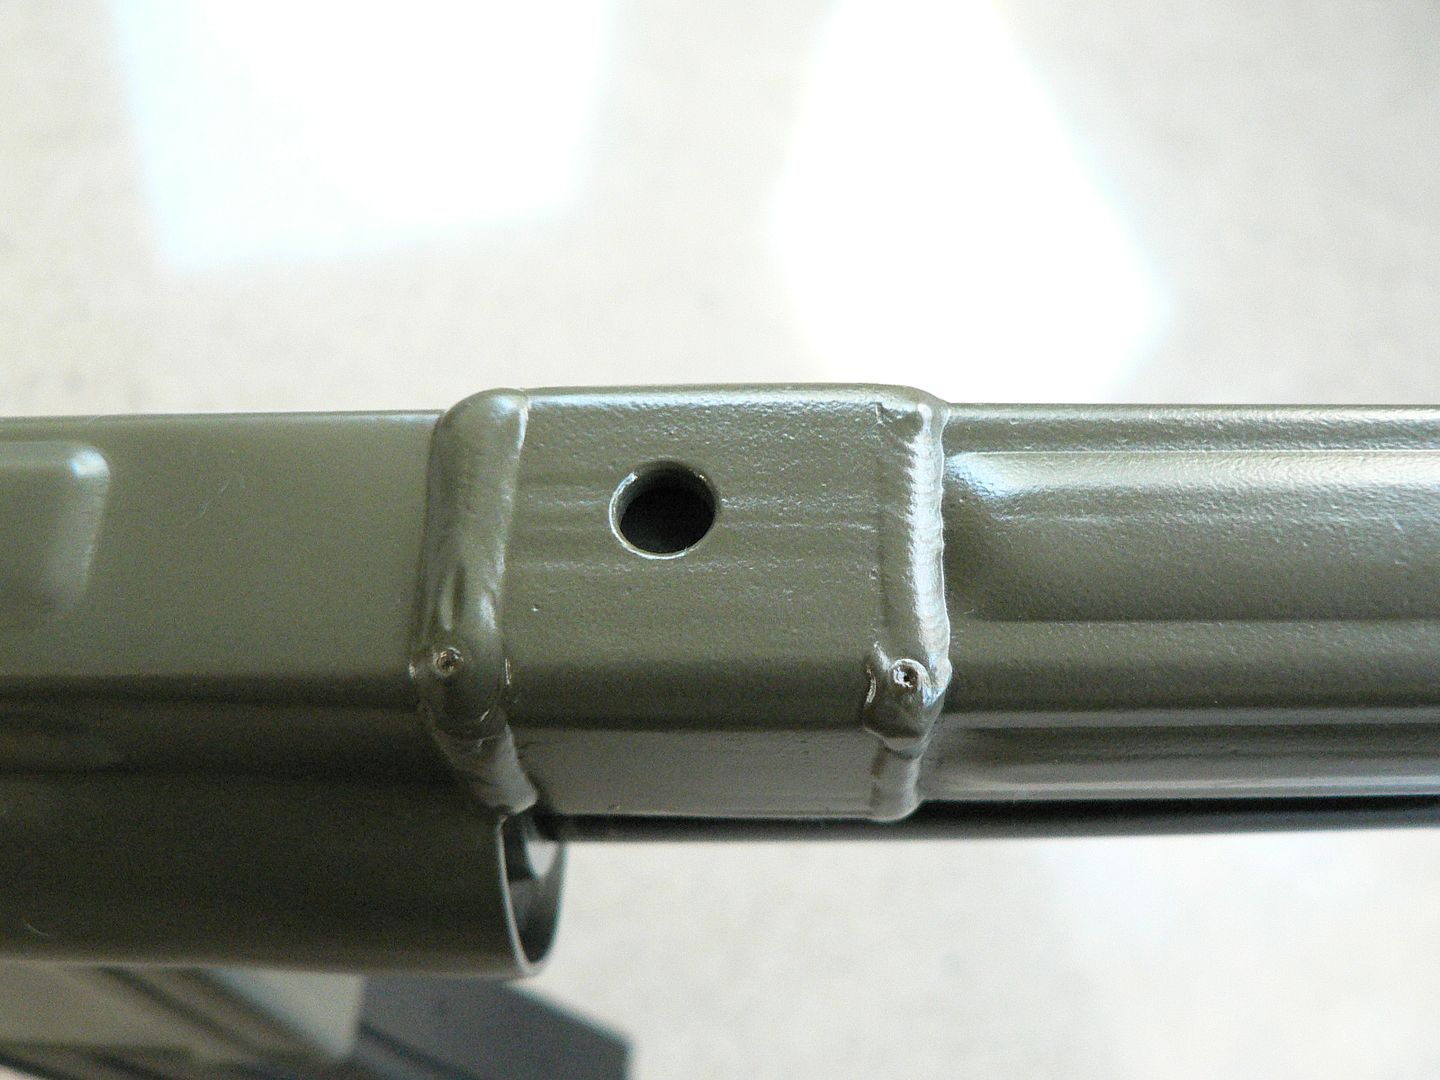
    "Simply putting a parts kit back together to make a legal functioning rifle was not good enough for MarColMar. They have built a reputation over the years for crafting what could essentially pass for a new firearm out of a decades old retired and torch cut pile of surplus parts. They only select the best parts kits to begin with. Then they carefully modify the design to make it an ATF compliant semi-auto while preserving the look and feel of the original. This includes in-depth testing and ongoing development until they are satisfied that the end product will look, feel and function at least as well as the original was intended to. While sorting through the kits and developing the prototypes, any components which do not meet their aesthetic or functional standards are reproduced using the best possible materials so that they are as good or better than original factory parts. Only once they have everything finalized and sourced do they move on to production. MCM feels it's far better to delay a release date in order to work all the bugs out of design and logistics than it is to release a flawed product on time. Production itself is done using the most modern methods (including a welding robot on the Cetme L, LC and LV) and materials. The end result is a firearm that looks and functions as good or better than the originals did decades ago. According to Dave Bane, that's always been their standard way of doing things and that's the standard they've held their new Cetme L/LC/LV's to as well."

    The only caveat I would apply to the above quote is that the MCM rifle actually exceeds the original rifle in Quality of both build and function. When I originally wrote that, I hadn't actually held or fired an original example. That is no longer the case.


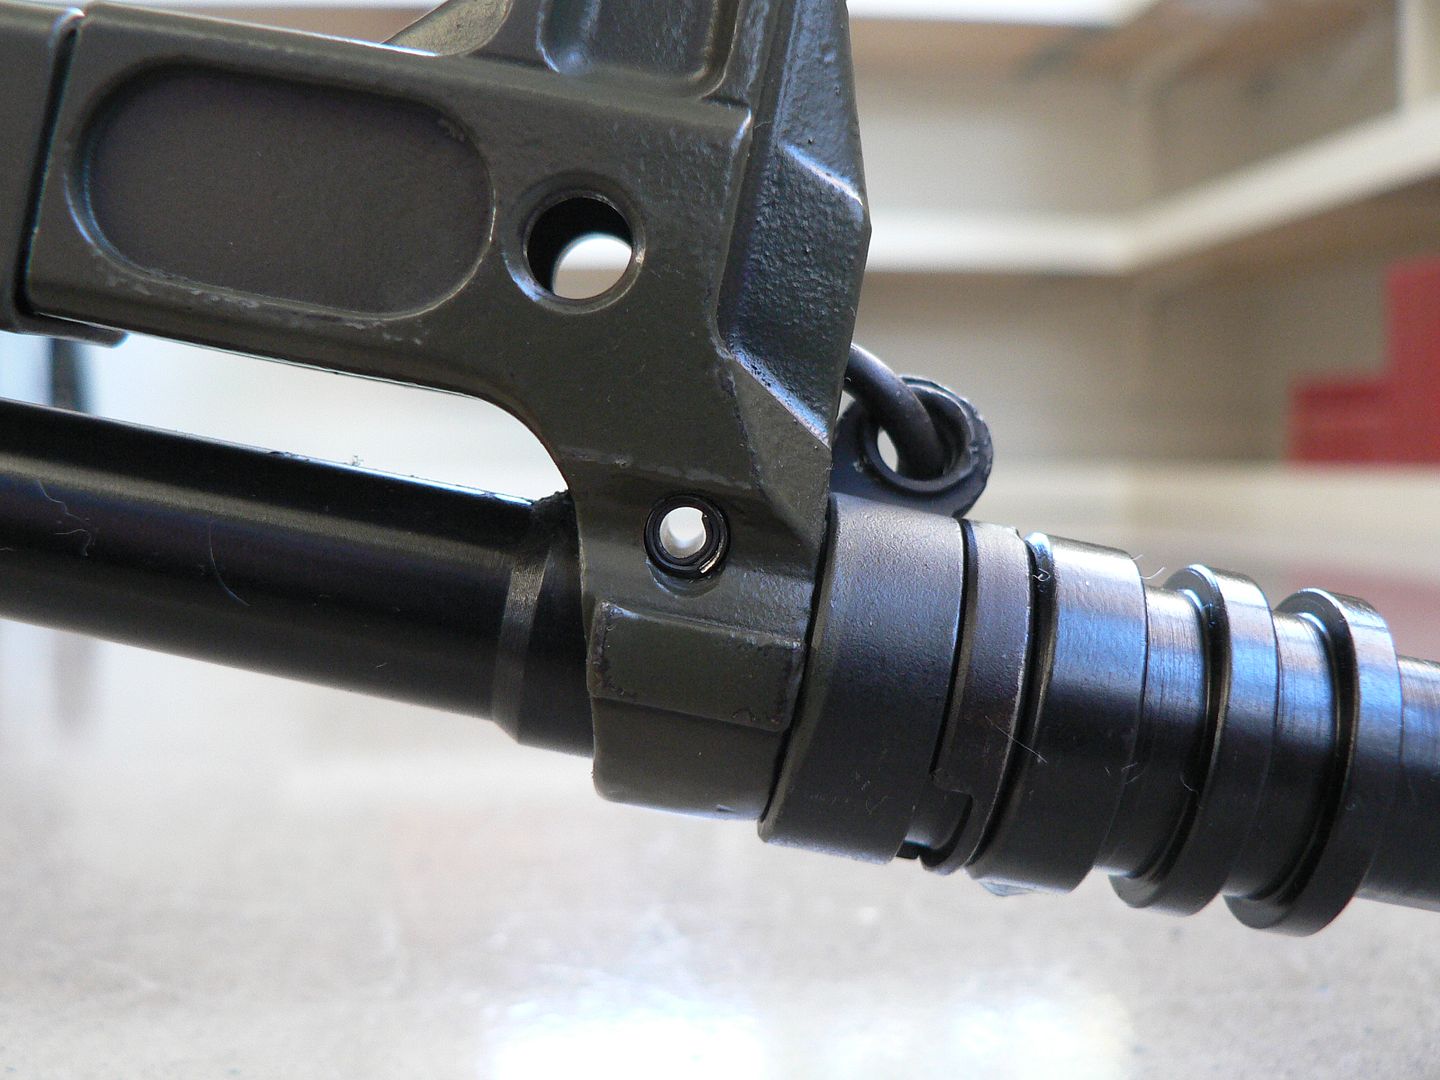
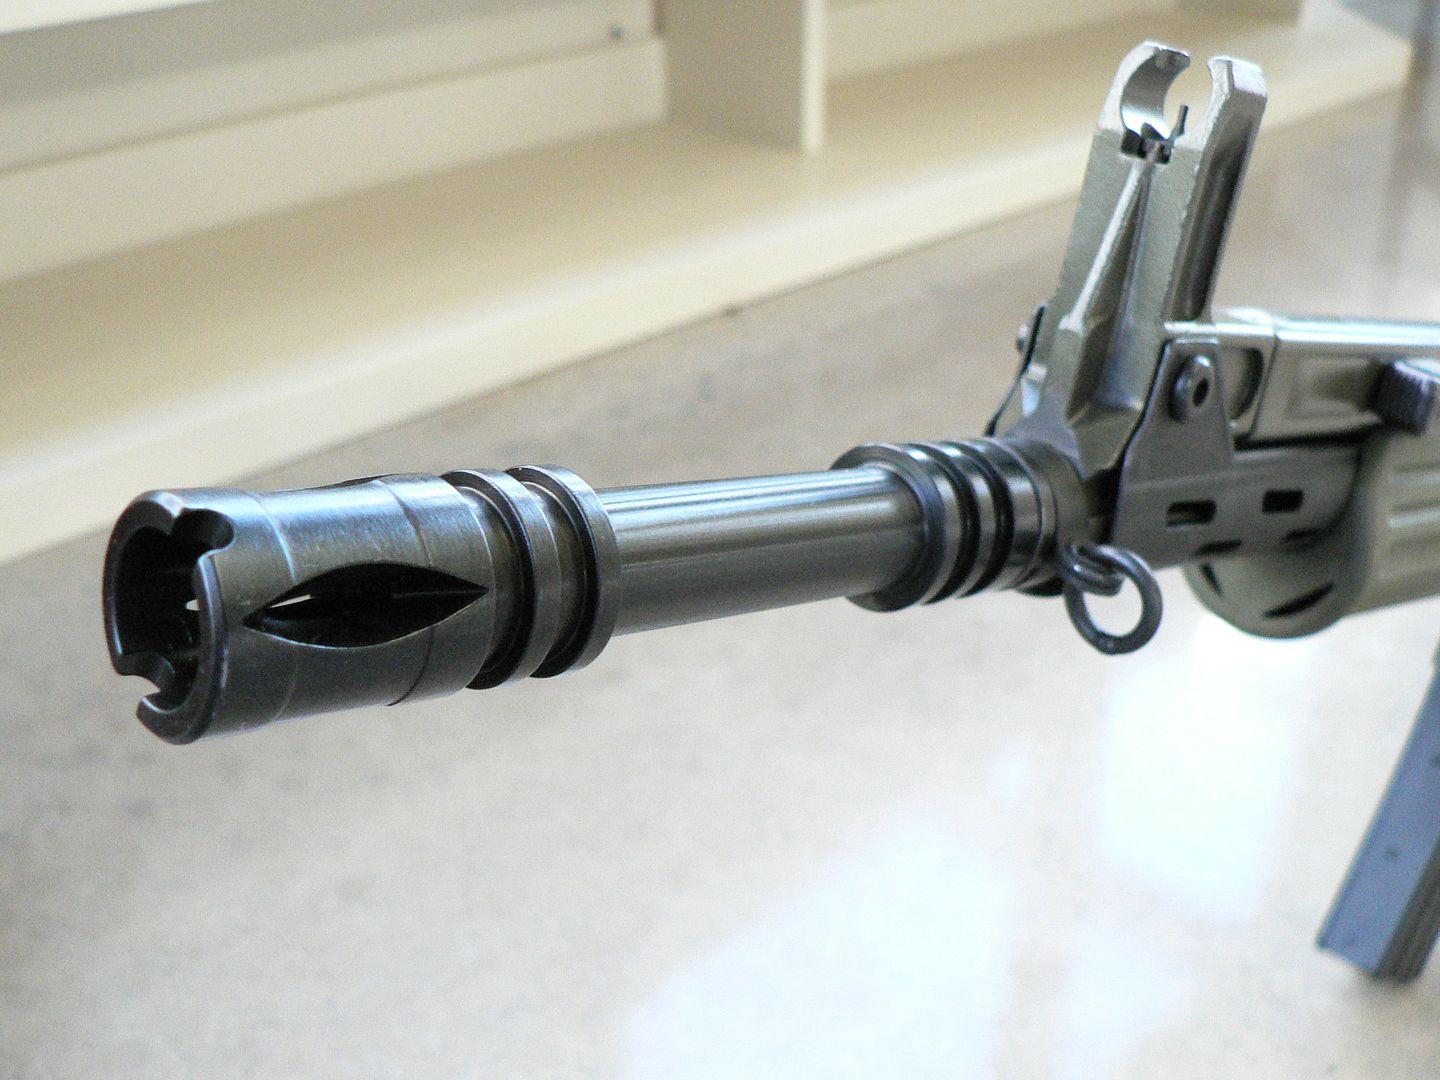
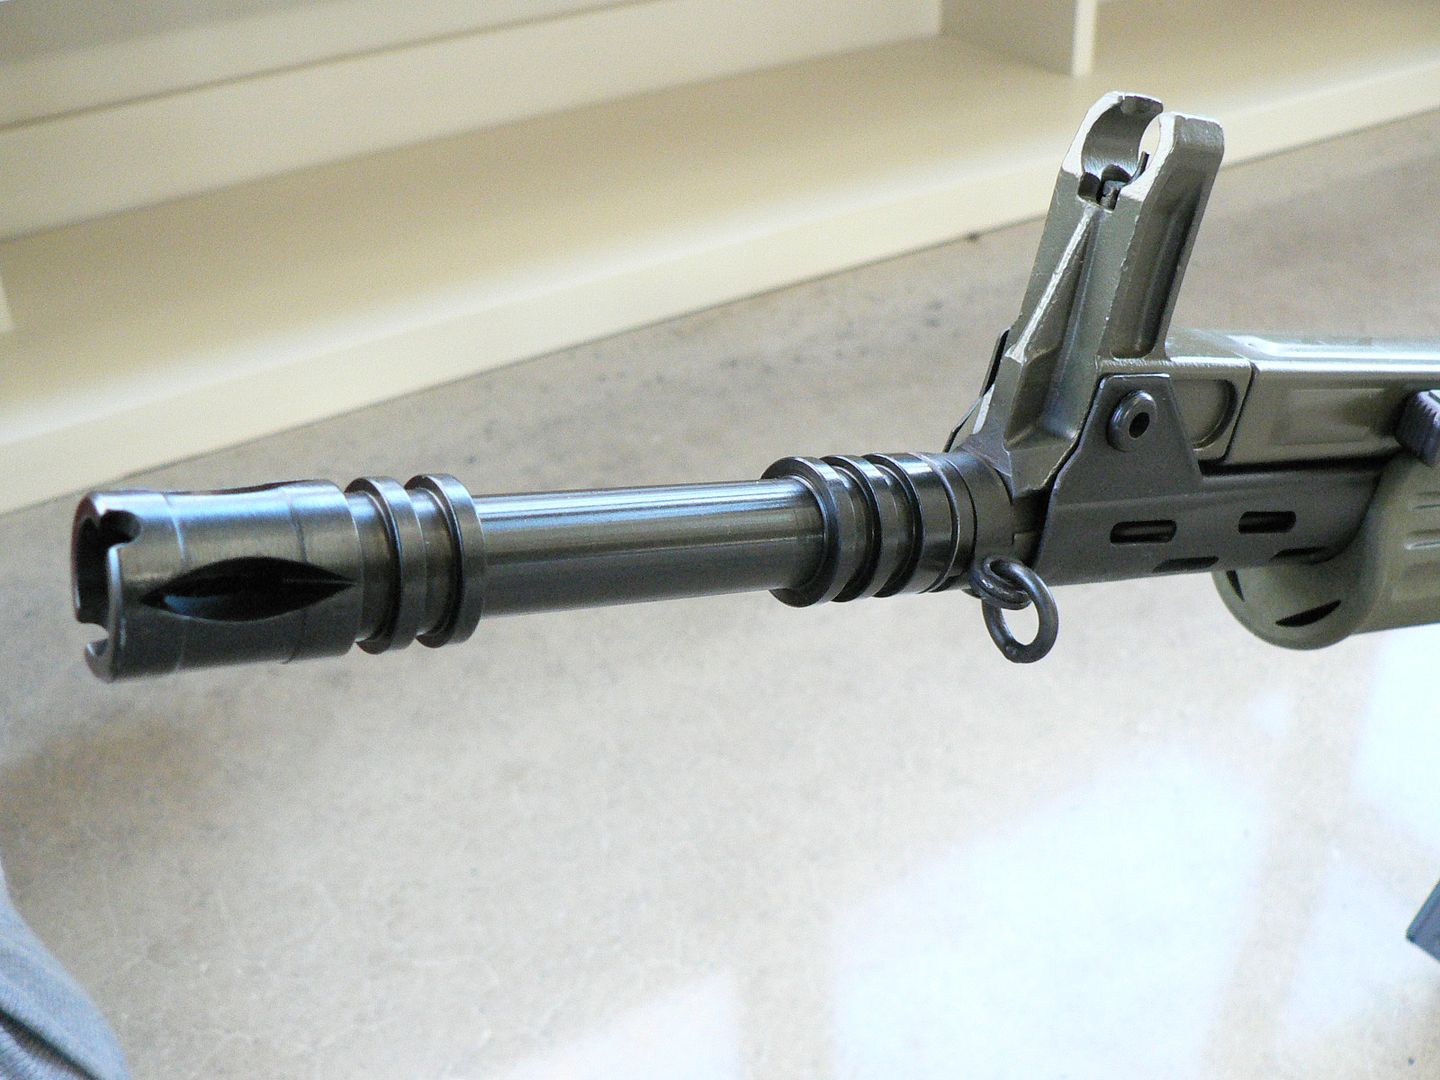
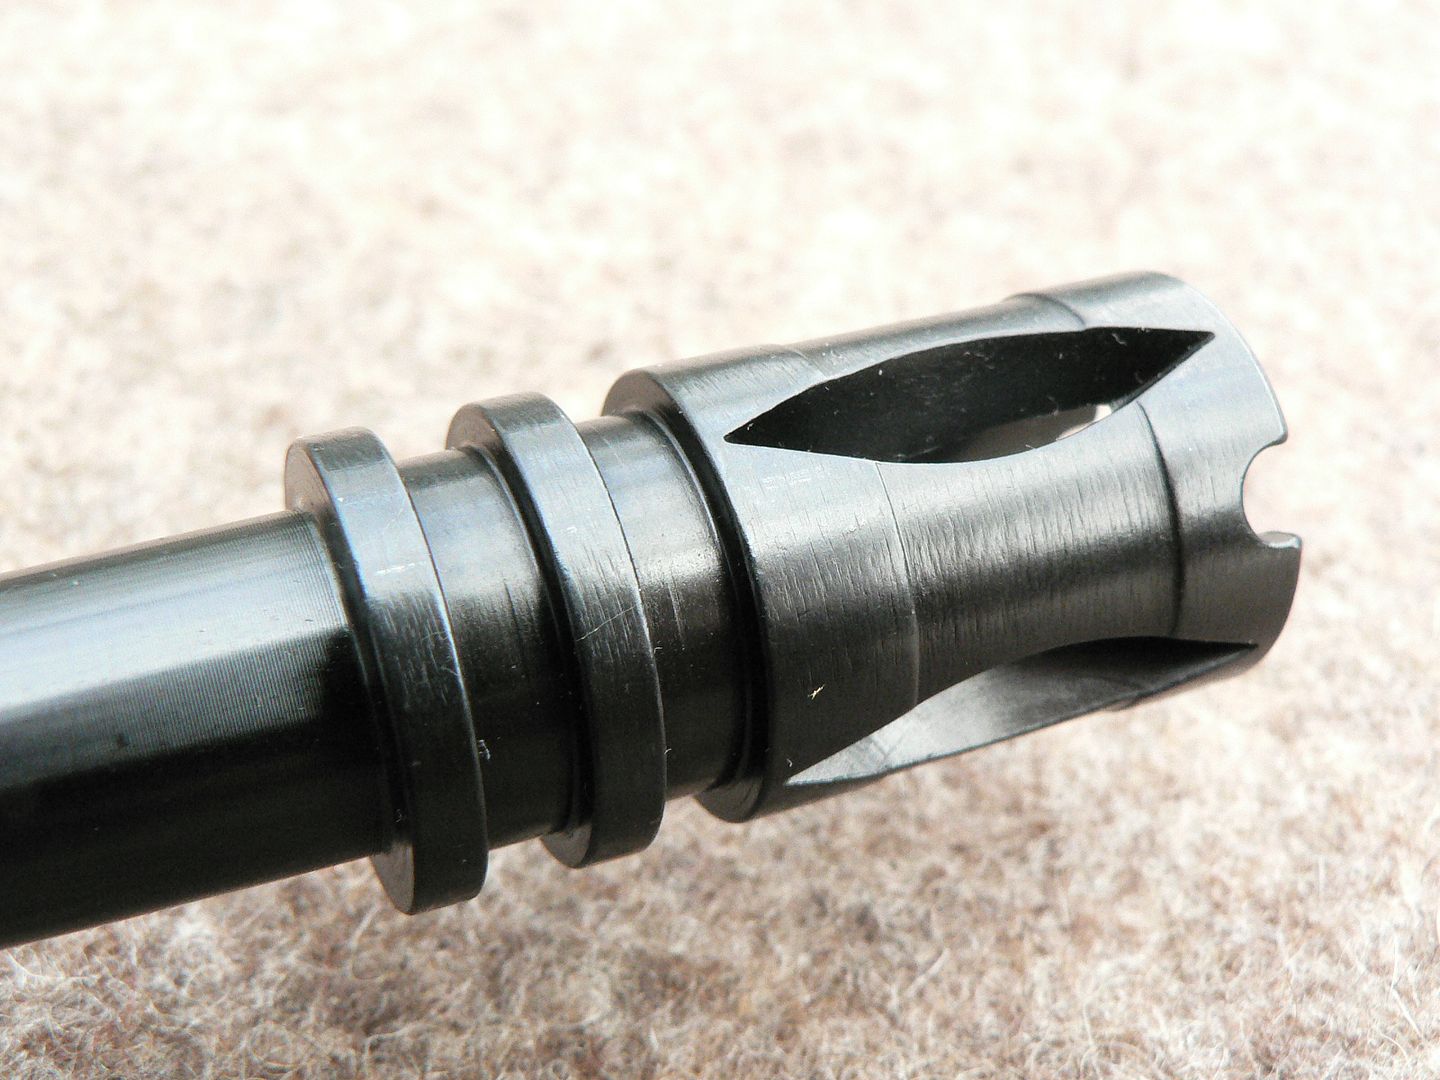
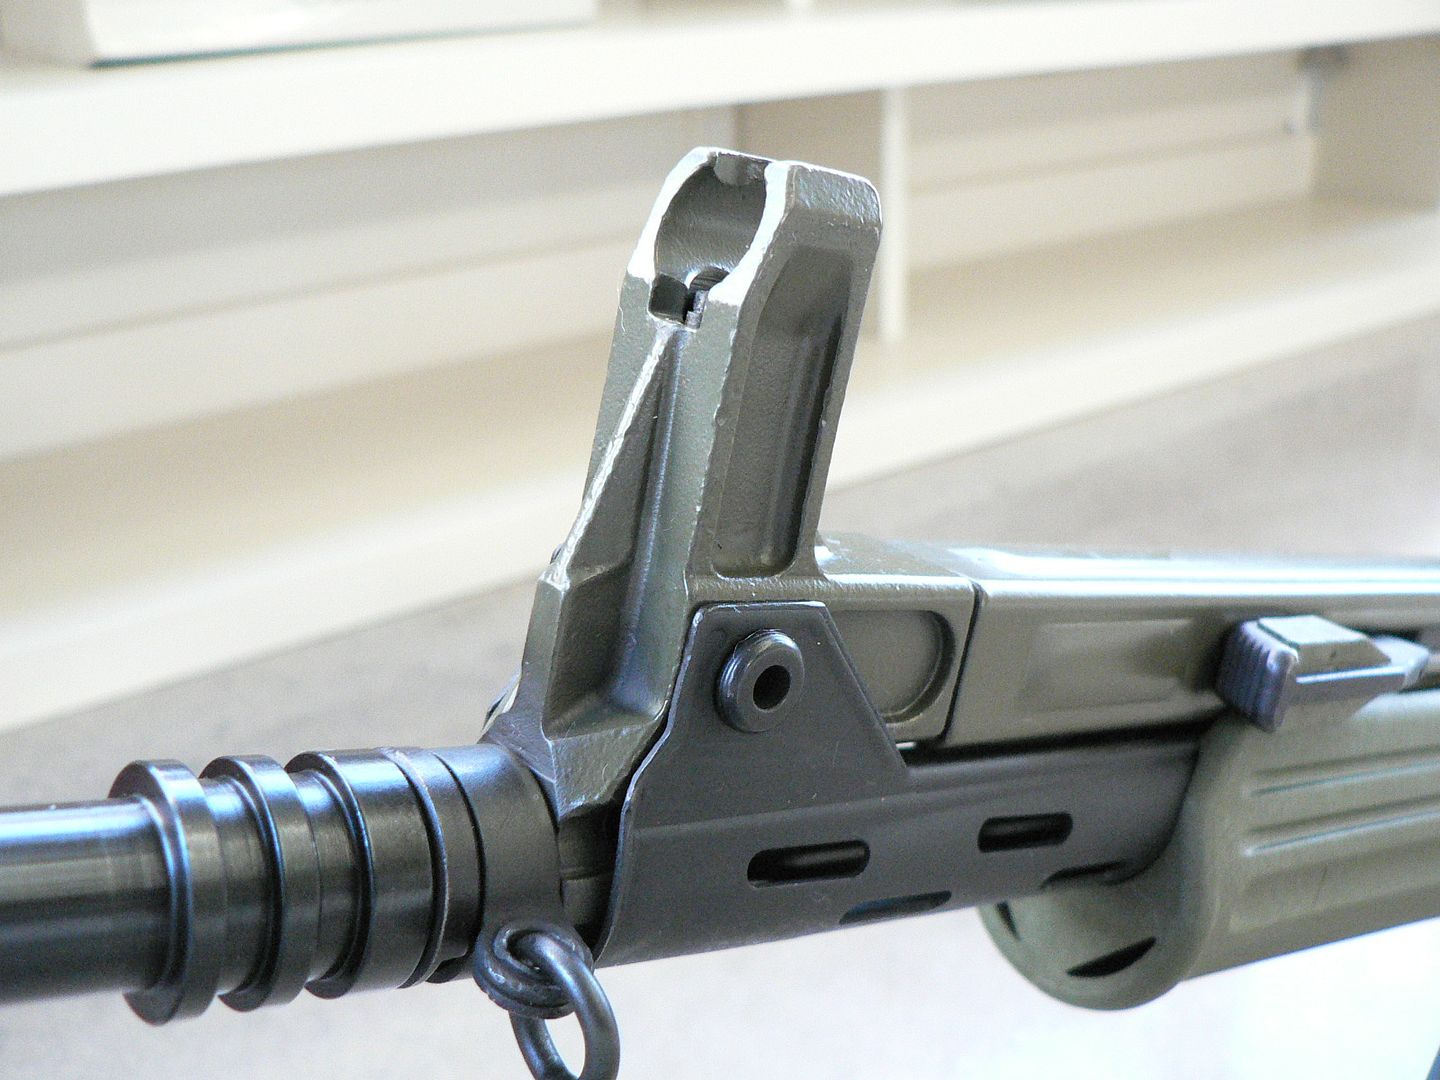
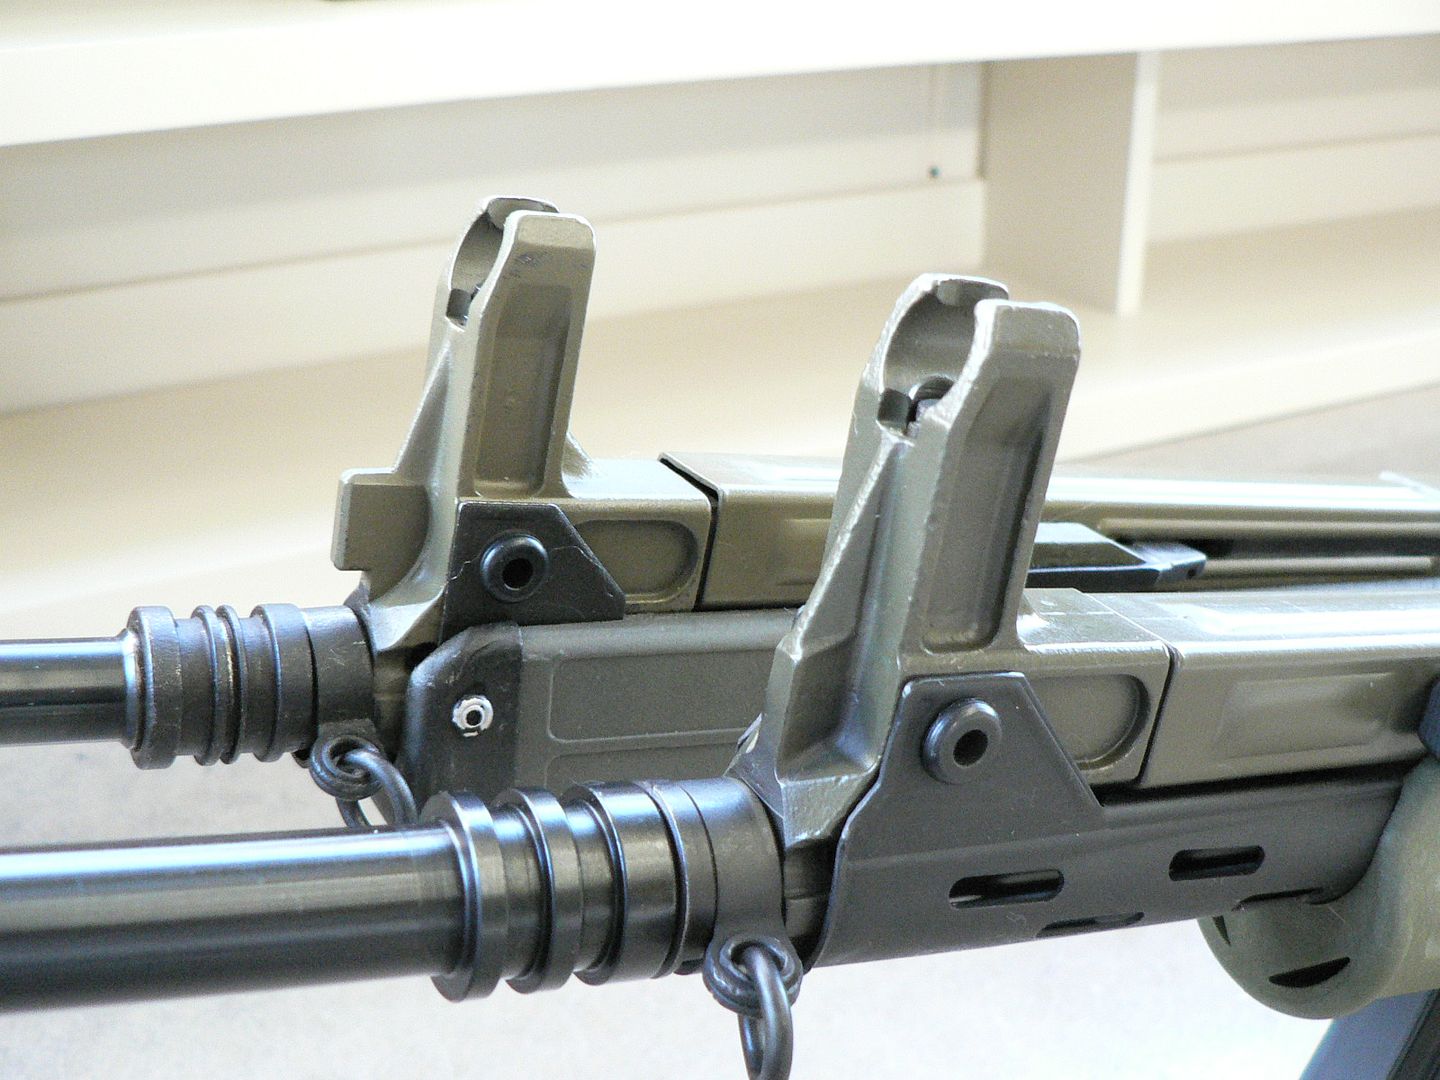
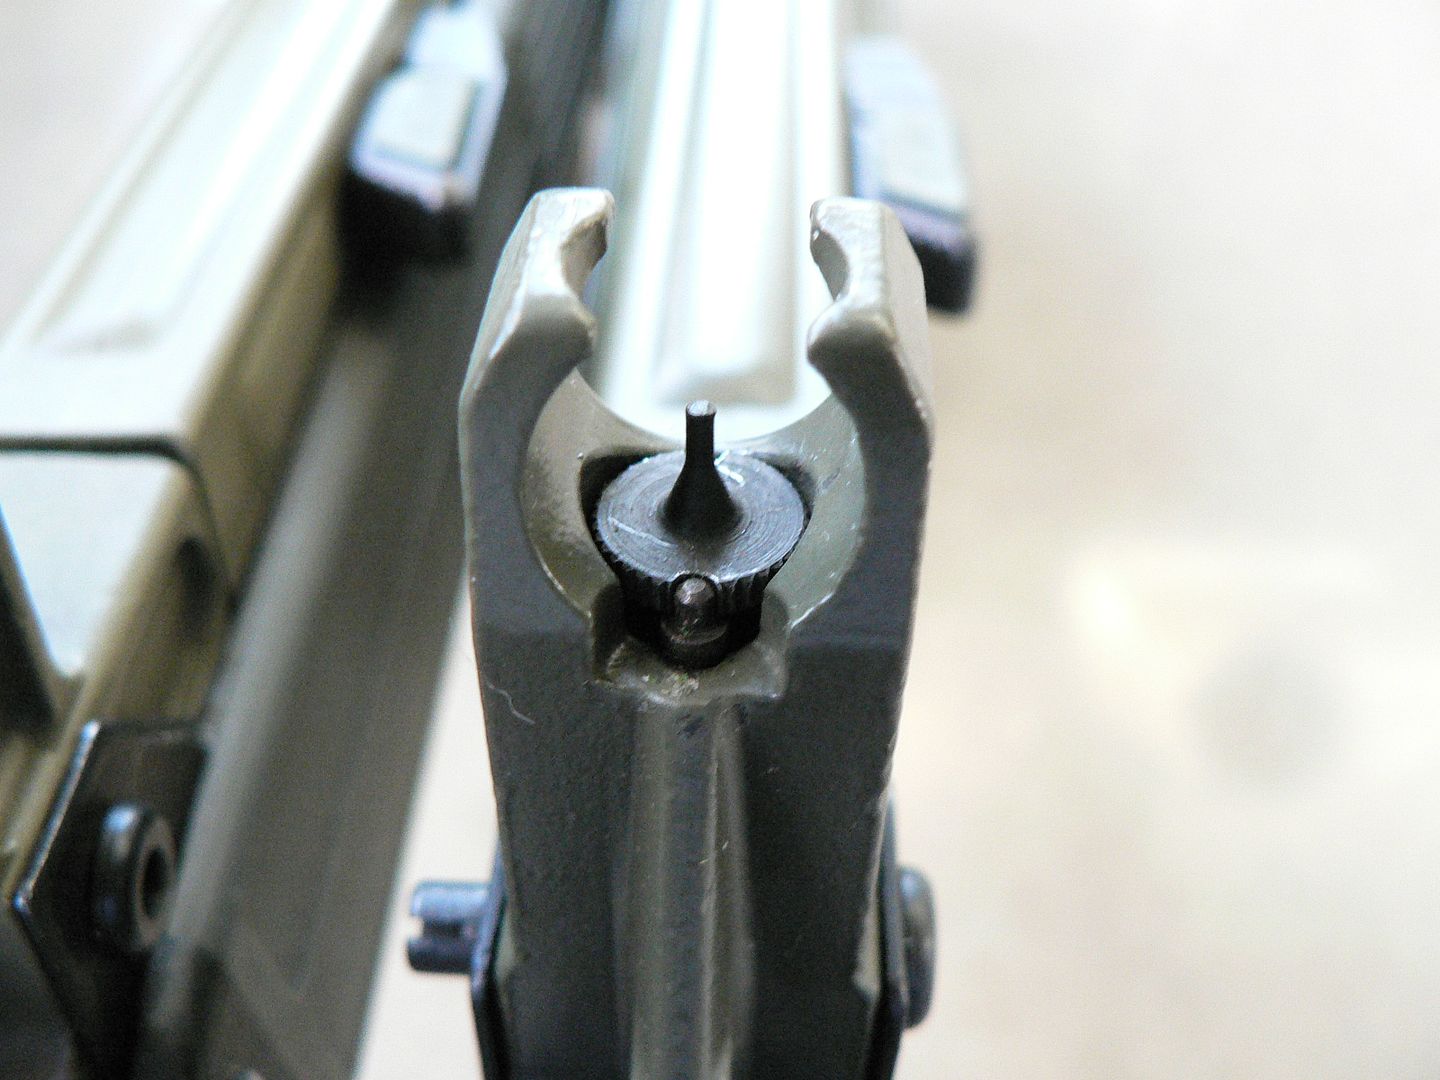
    That's it for this post. In the next, we'll begin looking at details starting at the muzzle. Now I gotta go get some beauty sleep. Judging by the way I look, I'm not getting enough by a long shot!
     
    Last edited:

    Combloc

    Stop Negassing me!!!!!
    Nov 10, 2010
    7,245
    In a House
    You are most welcome my friend! Thank you for taking the time to read it. I know I can be long winded sometimes but pretty pictures aren't much good unless you know what you are looking at!
     

    DivingDriver

    Ultimate Member
    MDS Supporter
    Jan 14, 2016
    1,514
    Nanjemoy MD
    The more info the better. Every time I read one of your posts on guns I am impressed of your knowledge of the subject. Thanks
     

    Combloc

    Stop Negassing me!!!!!
    Nov 10, 2010
    7,245
    In a House
    You are quite welcome sir.


    As promised, we'll begin the details at the muzzle:
    P1180860_zpsw9k7g4v5.jpg


    P1180861_zpsciuhfgjk.jpg

    That's a nitride finish on the barrel. Pretty isn't it?
    Yeah.....very nice.
    It's not real. Well, the nitride finish is real but the barrel isn't.
    What??
    It's just an extension.

    Let me explain. If my research is right, early LC's did in fact have a standard length 15.75" barrel but that was quickly changed to a 12.6" barrel. Almost certainly, the parts kit this one was rebuilt from had the shorter barrel. And that's exactly what MCM installed. That way, you can order your LC as an SBR. Or, you can opt for what I've pictured here which is the same barrel with an extension installed to bring the length to 16".
    When you look closely at the rear of the flash hider, you'll notice that there is no gap between it and the barrel because it's all machined from one piece of steel:
    P1190019_zpsqoumkwnt.jpg

    Ordering your rifle this way increases the price $75 but it's clear that MCM put a LOT of work into this to make it almost indistinguishable from a standard barrel so the slight price increase is justified if you ask me.They were initially considering just installing an XM177 style flash hider. That would have been less expensive but it also would have been completely inauthentic looking. In the end, they decided to go this route in order to keep the rifle more original looking. I couldn't be more pleased with the result! While we are talking about barrels, ALL Cetme barrels manufactured by MCM, short or long, standard weight or heavy, are cold hammer forged and sport a nitride finish. Neither of those things can be said about an original barrel.


    For legality reasons, the extension had to be semi-permanently attached and MCM used a blind pin method. This detail is clearly seen on the bottom of the extension just in front of the front sight base:
    P1190018_zpsvvuwlnnb.jpg

    Understanding that some customers would prefer to submit their own Form 1 instead of waiting for a Form 4, MCM did not dress the weld so that it would be easy to find for removal when the end user's Form 1 was approved.


    So now you know why there was a spare flash hider included in the box. It's an original Spanish part refinished by MCM. Earlier ones were a three prong design and later they switched to a birdcage. If you ask nicely, MCM will include whichever your prefer. Otherwise, it's luck of the draw. I was fine with either and received a three pronger:
    P1180856_zpswz6fgr56.jpg


    P1180857_zpsm6b9yrxs.jpg

    It's most likely never get used because I have no intention of making an SBR out of this jobber.


    Next up is the front sight assembly:
    P1180862_zpsan1ngchw.jpg

    This part is different on LC than the one installed on an L or LV and it's proof that the rifle this part came from had a short barrel when it left the factory. Do you see what's different?


    Here is another illustration with a standard L rifle in the background:
    P1180863_zps2tfxutgt.jpg

    In case you still don't see the difference, the LC does not have a bayonet lug but the L/LV models do. On the CETME, the bayonet mounts over top the barrel and attaches to the little rectangular lug sticking out from the face of the sight tower. This lug is absent on the LC because the barrel is too short to mount a bayonet. Whether the LC sight tower is just a standard one with the lug ground off or is an entirely different forging, I cannot say. If you look carefully at the contours of the reinforcement rib running down the front of each sight tower, you'll notice they are quite different. This lends evidence to the different forging line of thought. But, there is considerable variation in some other parts of the rifle over time so it is also possible that there were variations in sight tower forgings anyways and the LC sight tower is still just a modified standard one. How many licks does it take to get to the Tootsie Roll center of a Tootsie Pop? The world may never know. Man, that's a whole lot of words right there!


    On the L and LV models, MCM has modified the front sight to make them both easier to adjust and more precise. One is pictured below:
    P1180865_zpstaaesmsg.jpg

    The original front sight blade with its coarse threads was removed and a new one with finer threads was manufactured by MCM. Consequently, the sight tower was rethreaded. Additionally, the sight was also redesigned so that the adjustment detent indexes with notches cut into the base. This means the four holes in the sight base are only there for fitment of an adjustment tool (it's designed for an AR-15 tool but a bullet tip works just fine too) and have nothing to do with locking the sight in place.


    And here is the same view on an LC:
    P1180866_zpst4azjdr4.jpg

    Everything you are looking at here is an original Spanish part only refinished by MCM. Notice that the detent locks into the adjustment hole to lock it from turning. Also, there are only two adjustment holes (the second one is hidden from view by the sight post) instead of the four seen on the MCM sight. This arrangement is harder to adjust and less precise but it's 100% original. MCM chose to not modify this assembly because of the rarity of it. I would have made exactly the same decision. Schweet!


    In the next post, we'll keep on rolling. We'll start by talking a little bit about color shades and finish hardness and then we'll look at pretty much every single weld to see if MCM does good work or is as sloppy as a two year old with a box of dull crayons. Spoiler alert......their little welder robot dude is A-OK in my book. See you soon!
     
    Last edited:

    erwos

    The Hebrew Hammer
    MDS Supporter
    Mar 25, 2009
    13,886
    Rockville, MD
    I see MCM is selling Ls for $1050 for Black Friday, that's not bad at all.

    I have my LV kit with flat, optics, etc. that I've been putting off sending out for a build because I was like "so much money", but now that I see MCM is selling them for $2k and the kits are super-rare, maybe I'll spend the money. I wonder what the TAC version will look like?
     

    Combloc

    Stop Negassing me!!!!!
    Nov 10, 2010
    7,245
    In a House
    Next up, I feel I should briefly touch on color shade. For some, this seems to have been a big deal since the beginning and I talked to the folks at MCM at length about this subject when I spent the day with them last spring. Quite simply put, with regards to original rifles, there was a LARGE spectrum in terms of shades of green both in the plastic furniture and the paint used on the steel parts. In fact, many of the plastic parts were even shades of grey. I went into quite a bit of detail on this topic when I wrote about the standard rifle so I'm not going to rehash all of that. But, I do want to post one picture of a very few original pistol grips just to give you an example of what I'm talking about:
    P1170144_zpstpebwnzi.jpg

    I feel confident that it is obvious..... there are at least two different shades to be seen. I didn't take pictures of a bunch of the original finish painted bits so you'll just have to trust me when I tell you that they vary quite a bit as well. MCM cannot be reasonably expected to reproduce every shade so they had to settle on one and they arrived at that by picking and average of all the shades they had. Personally, I was quite happy with the colors they picked for both furniture and paint but, like everything in life, no matter what you do, some folks will complain. Go figure.

    Once the LV and LC kits were unpacked and laid out, MCM discovered that all had a remarkably similar shade of paint so, in the spirit of recreating these as closely to original as possible, it was decided to have Cerakote mix a special shade of green to perfectly match the kits. The result was "MarColMar Green". While they were at it and although it was expensive, MCM decided to upgrade to Cerakote's Elite Series, the strongest firearms coating offered by Cerakote. MCM liked the resulting color so much they decided to use it on all models, not just the LV and LC. Let's take a look.
    Here is an indoor shot of an early production MCM (at top) compared to a newest production LC:
    P1180870_zpsymt4mbob.jpg

    It's hard to capture an object's true color in photographs but we can clearly see that the LC is a different shade. While I am perfectly happy with the earlier shade, it is kinda' neat to know that the newest shade is no longer an average but rather an exact duplicate of a shade actually used by Santa Barbara in Spain.


    Here is another picture taken outside in which the color gradient is even more noticeable:
    P1190015_zpsqbd8w3je.jpg

    In this case, we have a Hill and Mac example at the top, the new color MCM LC in the middle and the older MCM L at the bottom. Are you tired of hearing about colors? Are you tired of reading the word "shade"? I know I'm tired of typing it. OK....we'll move on.


    Next, we're going to look at every single weld I could find that was done by MCM. After paint shade, welds are the number one question I get. MCM uses and fancy dancy high tech robot for all the welds and then, if I understood correctly, touches them up by hand where necessary. The result is some very nice work if you ask me. Referring back to my first MCM CETME last winter, other than the top cocking tube weld, I was very pleased with MCM's work and even the weld in question was not bad. But, my self appointed job is to scrutinize so that you can make an informed decision about whether or not you wish to spend your hard earned dough so I'm pretty picky. I'm happy to report that the welds on both the LV and LC I recently received meet or exceed those on my first purchase. But rather then read my blather, you'd rather see what I'm talking about wouldn't you? Fair enough......let's go!

    We'll start with the left side rear sight welds:
    P1180873_zpsp0tepomd.jpg

    Are they as good as what is on my HK? Nope. Are they as good or better than an original Spanish made CETME? Yep. And we are talking about a reproduction here aren't we? Yep. Would you like to see what these welds look like on an original rifle? Well, I took pictures of that. Just refer to the article I mentioned earlier and you can check 'em out.


    Left side button weld:
    P1180871_zpsd7illtni.jpg

    While it doesn't bother me, the less than perfect finish on the magazine catch may be a gripe for some. On standard rifles, MCM refinishes all parts regardless of how the original finish looks. Mr. Bane told me that all of the LC and LV kits looked to be in unissued or near unissued condition but he did not mention whether or not all of the small bits was refinished. However, I think it a safe bet to say that they were as that would be standard MCM practice.


    Rear of magazine well:
    P1180872_zps7n277shq.jpg


    Rear of trunnion:
    P1180874_zpsreuhozwk.jpg

    This is one weld that continues to vex me. On every original rifle I've seen, this weld is actually two welds. One is at the top and it's so well finished that it looks like a flat ramp. Then there is a bottom weld which also looks like a flat ramp. The middle is left unfinished. To illustrate, here is a picture I took of an original:
    P1170109_zps3hoopmsc.jpg

    Now, MCM explained to me that to weld this area as was originally done allows some gas blowback and I did witness that first hand when shooting the rifle pictured. To remedy this, they weld the entire area, in effect sealing it. It IS a reasonable and smart decision and it works. Still, I wish they would dress it a bit better to make this weld look as spic and span as an original. I'm sure I'm in the minority but I'd personally pay 50 or 60 bucks or whatever it cost extra to have this particular weld hand done to look as clean as an original. This is the ONLY gripe I have (and have had since the beginning) about MCM's welds. But I guess it's a small price to pay for such an otherwise exemplary reproduction.


    Left side cocking tube:
    P1180875_zpszfrqhoca.jpg


    Front of magazine well:
    P1180876_zpsdknjkcmx.jpg

    The raised bead is original correct.


    Right side cocking tube:
    P1180877_zpsreyy77xu.jpg


    Right side of trunnion:
    P1180892_zpsknocjj34.jpg


    Right side button welds:
    P1180879_zps1yifxlgv.jpg


    Right side of rear sight:
    P1180882_zpsua44djdj.jpg

    If you are familiar with an original rear sight adjustment wheel, the one shown above may look slightly different than what you are used to. That's because MCM has redesigned and manufactured this part and the axle screw new, replacing the originals which were prone to breakage. If you plan on actually shooting your rifle, you'll be happy they did this.


    Top of cocking handle tube:
    P1180888_zpswzacubra.jpg

    This is the weld that was a little wonky on my early rifle. It appears MCM has addressed this as it looks A-OK now.


    Rear of magazine well again:
    P1180919_zpsimmpbo1x.jpg


    And finally, the strengthening block at the rear of the receiver:
    P1180917_zpsi6byeu3n.jpg


    P1180915_zpsfdliyau9.jpg


    P1180918_zpsiqwruama.jpg

    The work here is on par with my Swiss made 551.


    That's all for tonight. Next time we'll start by looking at pictures of some receiver details that really impress me and continue from there. Until then.....HAPPY THANKSGIVING to you all!!! I sincerely hope each and every one of you feels as blessed as I do. May God bless you all and this Great country we live in!
     
    Last edited:

    calicojack

    American Sporting Rifle
    MDS Supporter
    May 29, 2018
    5,385
    Cuba on the Chesapeake
    Are these Maryland legal? Excellent post by the way.

    [EDIT] I also want to say that initially, the association with CETME kind of put me off as I was equating these with the CETME HK 91 clones. But looks like these are very well put together. Thanks again for a very informative thread.
     

    Combloc

    Stop Negassing me!!!!!
    Nov 10, 2010
    7,245
    In a House
    Are these Maryland legal? ……………….

    [EDIT] I also want to say that initially, the association with CETME kind of put me off as I was equating these with the CETME HK 91 clones. But looks like these are very well put together...……...

    Not one part will switch out with an HK91/CETMC C/HK93. This rifle most certainly is communist state legal.

    Although the Santa Barbara machining on the bolt group is a tad rough compared to its German cousins, The Quality of MCM's work is every bit as good as my HK's and possibly even better in some areas. I highly recommend picking up one of these rifles before the tyrants do indeed manufacture some flimsy excuse to ban them.
     

    calicojack

    American Sporting Rifle
    MDS Supporter
    May 29, 2018
    5,385
    Cuba on the Chesapeake
    I wonder if you would consider the PTR-32 a reasonable 7.6x39 alternative? Like the CETME L, it is a roller-delayed blowback design that takes widely available mags in an economical caliber. Pretty close to the same price. Apples and oranges otherwise; guess it depends on what you want.
     

    Combloc

    Stop Negassing me!!!!!
    Nov 10, 2010
    7,245
    In a House
    While I've seen and handled them, I've never fired a PTR-32. They appear to be good quality though. What I can tell you is that I prefer the CETME L to an HK93 at the range. Some will consider the following blasphemy but I think that, from a shooting perspective, the CETME is more refined. For combat, I'd pick the HK but then I'm not in combat am I?
     

    Combloc

    Stop Negassing me!!!!!
    Nov 10, 2010
    7,245
    In a House
    Howdy everyone. I hope you all had an nice Thanksgiving and your feast was such that you needed to loosen your belts. I know I did and I also had a nice nap afterwards. Tonight is going to be a relatively short post covering some details about the receiver that I really like and they illustrate just how detail oriented MCM is with these builds. But before I get to that, I'd like tell you about an email I received on Thanksgiving day. Apparently, somebody at MCM is reading my review because I was contacted by their customer service department and they offered to send me a new magazine catch free of charge. I declined their generous offer because it's fine the way it is but I gotta say...THAT'S customer service! And it's also a perfect example of why I am so enthusiastic about their products. Alrighty.....lets get to looking at some stuff.


    We'll start off by looking at how well the rear sight base, an original part, fits the contours of the receiver, a new made part:
    P1180885_zpssthltpre.jpg

    Notice that the rear sight base is relieved to accommodate the reinforcement rib running atop the receiver. And also note how perfectly the MCM rib fits that relief cut. Schweet!


    Here's a shot illustrating the rear of the sight base:
    P1180884_zpstjbda7gf.jpg

    Again, the MCM reinforcement rib perfectly mimics the shape of the relief cut. Also interesting is the little divot in the sight base to accommodate a clamp on scope mount. Not all rear sights have this feature but many do. I'd love to get the chance to document one of those mounts. If you have one, please contact me. I promise you'll get it back in the same condition you sent it.


    Here we see the empty case deflector flare:
    P1180883_zpssipmklyk.jpg

    If you're familiar with the Hill and Mac CETME L, you'll know they omitted this feature entirely. It's the hardest part of the stamping to pull off and MCM has done a great job at it. For comparison, here's an original:
    P1170100_zpsmeu0x8tl.jpg

    MCM did a fine job at recreating it.


    Here is the front of the trunnion:
    P1180893_zpshbmdsyqg.jpg

    The barrel is pressed in and a cross pin holds it in place. This should look very familiar to all you HK guys.

    On the right side of the receiver, MCM has placed their logo (filled in with white enamel) and manufacturer's mark:
    P1180891_zps9ox3wemy.jpg

    It captures the spirit and compares nicely with the original Santa Barbara logo:
    P1170065_zps4opjxhmw.jpg


    The serial number and selector markings are also finely rendered and filled with enamel, just as original examples were:
    P1180907_zpshmvhobn9.jpg

    The scratches in the finish around the selector are unavoidable and caused by rotation of the selector switch.
    Again, here is an original for comparison:
    P1170091_zpsy2emoob0.jpg

    If you use it, its gonna get scratched. There's just no way around it.


    A closeup of the markings and reinforcement ribs on the magazine well:
    P1180908_zpszuiss7x7.jpg

    And an original:
    P1170082_zpsffrk0fgu.jpg

    I do not know but I suspect that the slight variation in nomenclature was due to ATF regulations. Otherwise, I'm quite confident that MCM would have copied it perfectly. Notice how well the reinforcement ribs and general contours have been recreated. Schweet!!


    Let me pull back so that you can see more general view of the magazine well while I go over a couple things pertaining to magazine fitment and reliability:
    P1180902_zpsfn9hpmlu.jpg

    The original rifles used a proprietary magazine that was intended to be a direct copy of an FN FNC magazine. Generally, an FNC magazine will work just fine in an AR-15/M16 and vice versa. And so, theoretically, a CETME magazine will do the same. Still, there ARE differences between CETME/FN magazines and the ubiquitous STANAG magazine available to the US consumer. Add in the fact that original CETME's suffered somewhat from poor quality control and the magazines were even less up to snuff. The resulting sum of these various factors combined is a recipe for less than stellar reliability with regards to original rifles. Marcolmar understood that this would be totally unacceptable to customers so they redesigned the magazine well just enough to guarantee reliability with an in spec US GI magazine while keeping the receiver looking visually original. The tradeoff was that the magazine well was so tight that only perfectly in spec magazines would seat and even they would not drop free when the magazine release was pressed, meaning the magazine had to be physically pulled out instead of dropping out from their own weight. OKAY industries produced in spec magazine so that's what MarColMAr has supplied with each and every rifle since day one.

    Realizing that this was a less than perfect solution, MCM recently redesigned the magazine well again, loosening the inner dimensions, changing the angle a magazine sat at slightly and raising it in the well a few thousandths of an inch. Raising the magazine necessitated relieving the bottom of the bolt carrier slightly too. They are calling rifles with these modifications "GEN 2" and it's how all models will be built going forward. So now, pretty much all US GI magazines should fit AND feed reliably. Additionally, most magazines will drop free when the magazine release button is depressed. We'll look at the bolt carrier relief cuts later on. In case you are wondering, GEN 1 rifles work perfectly fine (at least mine does) but you need to know that not all magazine will fit and pretty much none will drop free. My advice if you have a Gen 1 rifle is to buy yourself a few OKAY industries magazines directly from MCM specifically for use in your Gen 1 CETME and you'll be perfectly happy. That's what I did and I've had 100% reliability to date.


    The last thing I want to bring to your attention in this post is the collapsible stock in situ on the receiver:
    P1180889_zps0lcvrk4a.jpg

    You might be thinking that, just like an HK, you can swap just out stocks between the L and the LC and keep on a rollin'. You would be wrong. The internal bits are different. Specifically, the recoil spring assembly, bolt carrier and cocking tube support are mutually exclusive between the two rifles. We'll go over that in detail when we look at the stock and insides of the LC. But that's it for tonight because I'm tired. Bye for now!
     

    Combloc

    Stop Negassing me!!!!!
    Nov 10, 2010
    7,245
    In a House
    Before we look at the innards, there are just a couple more things I'd like to show details of on the exterior of the rifle.
    The first thing is the front sight attachment pin:
    P1180890_zpsmhd3ioaq.jpg

    I've removed the handguard so you can see it. It's not much to see, just a heavy duty multiple wound pin. I'm sure there is a technical name for this thingee but I'm no engineer. It's a little surprising that one pin is all that holds the front sight on but that's how it was designed and it seems to work just fine. The larger hole above is for the handguard retainer pin.


    Speaking of hand guards, the originals (and all the plastic furniture for that matter) were pretty beat up and deteriorating on most of the kits so MCM decided to make their own from Nylon 66, sourcing them from, of all places, a casket manufacturer in Indiana! In the piece I did on the L model, I went over every little minute detail when comparing original furniture to reproduction but I'll spare you that here. Rather, I'll just go aver the highlights. The MCM handguard is on top in the following three pictures:
    P1160559_zps3c1lyfxs.jpg


    P1160560_zpskzxwuybf.jpg


    P1160563_zpsgge5gn47.jpg

    Pretty good job huh? I'd go so far as to say an almost perfect job. Beat up the MCM one a little bit and you'd be hard pressed to tell which is which until you saw the MCM logo and "MADE IN USA" print. Also, the MCM brass fittings are threaded for standard screws.


    Two more shots with MCM on the left:
    P1160557_zpsknzdrxgp.jpg


    P1160555_zpsxzjuv5bc.jpg


    Pistol grips with MCM on the left:
    P1160578_zpsp1nzx0im.jpg


    P1160580_zpsphdkrywq.jpg


    P1160581_zps9ifdqxxj.jpg


    MCM on top:
    P1160583_zpsd6rkwoek.jpg


    P1160585_zpsfamdtjkg.jpg

    Schweet!!


    The same steel wrapped in rubber butt pad was used on both the rifle and carbine and MCM has reproduced that as well.
    Which is which?:
    P1160548_zps8o13xzhl.jpg

    The usually unseen underside reveals the answer:
    P1160551_zpsl5xgsvft.jpg

    Also MCM uses hex instead of flat head screws.

    Excepting trails and very early production rifles, all versions used a simple flip aperture for the rear sight with settings for 200 and 400 meters. MCM has reused the original flip sight but they ever so slightly relieved the 200M aperture to give you a better sight picture.
    Here is the 400M:
    P1180928_zpszdvs01ok.jpg


    And the 200M:
    P1180929_zpseli9k0a0.jpg

    Original specimens had the numbers filled in white, a detail I would like to see MCM reproduce. I guess it's easy enough to do at home but I'm sloppy and I'd have to disassemble the sight to prevent making a mess with the paint so I'll just leave it alone.


    Something interesting I noticed on this particular sight that I've not seen before are the two little recesses above the 200M aperture:
    P1180927_zpsnwo3d5wt.jpg

    This is only a guess but I wonder if that's not for luminescent paint? Verrrrry interesting...….


    I'm not going to go over how you disassemble this thing. That's not really the point of this review but, just like an original, it's very easy until you get to removing the selector lever; then it can get quite fidgety. But it gets much easier with practice and familiarity. Anywho, if you want to learn before buying one, head on over to marcolmarfirearms.com and you can download the entire manual for free.


    There are four what have come to be known as "HK style" pins that hold the whole rifle together and they come in three lengths:
    P1180909_zpscwrpotnl.jpg


    P1180913_zpspnwx3z9p.jpg


    P1180914_zpssa7n93qm.jpg

    The two on the left hold the stock on (and one of those also passes through the rear of the trigger box). The next holds the front of the trigger box in place and the one on the for right secures the front of the handguard. In case you are wondering, the rear of the handguard locks into the front of the trunnion, just like an HK.


    Unlike an HK where you remove the selector switch and the trigger box (complete with the trigger group) can be removed from the trigger housing, the CETME has no separate box. Instead we just have a trigger box that contains all the mechanical bits. Here is the left side:
    P1180946_zpsszuzoxzh.jpg

    Rather than modify original trigger boxes to semi-auto only, MCM has opted to manufacture their own box. Both new and originals are made of aluminum. The trigger group itself is modified original with new made springs. The mechanics of it are very similar to an HK.


    Right side of the trigger box:
    P1180948_zpssitbe9fv.jpg

    At the front you can see that part of the side is relieved:
    P1180949_zpszmvpzccg.jpg

    This mates with a piece of steel welded into the receiver designed to prevent the insertion of a full-auto trigger box:
    P1180920_zpsuojuf1ti.jpg

    You nefarious types might be thinking, "what's to keep me from just modifying a select fire box to fit?" Well, you can do that but you'll be milling away the area where the trip lever needs to be in the process. MCM really thought this out so just enjoy it the way it is.


    Part of the modifications to the trigger group included modifying the selector switch:
    P1180941_zpsiv5tv9p4.jpg


    P1180942_zpspyt0wavc.jpg


    P1180943_zps0zosy3bs.jpg

    In addition to reducing the circumference of the end of the axle (their trigger box will only accept this reduced size axle), it was also modified so that it cannot be moved to the full-auto position.


    The rear of the receiver:
    P1180916_zpskou58wc6.jpg


    P1180917_zpsi6byeu3n.jpg

    Notice how perfectly uniform the two sides are, each a mirror image of the other. MCM clearly spent money on quality jigs.
     
    Last edited:

    Combloc

    Stop Negassing me!!!!!
    Nov 10, 2010
    7,245
    In a House
    Here we see the left side of the receiver with the trigger box removed:
    P1180944_zpspfawitya.jpg

    The reason the hole for the selector lever is oblong is because the trigger box must be slid to the rear during disassembly for the selector to be removed.


    A view from the rear of the receiver showing, from top to bottom, the faintly visible rear of the cocking tube support, rear of trunnion and breach face and the rear of the milled and welded in place magazine well:
    P1180921_zpsl3qsrwmf.jpg

    The spring near the bottom of the picture is wound around the magazine catch axle.


    Here, we are looking up through the bottom of the magazine well:
    P1180931_zpsxkonjdbq.jpg

    I have illuminated the left side locking roller recess. The right side is directly opposite. One drawback of a delayed roller blowback is that is gets DIRTY. When cleaning, do your best to clean these recesses plus the whole inside of the trunnion and breach face but understand that you'll NEVER get it perfectly clean. In fact, if you do, you're overcleaning and probably doing more harm than good. Just use a few solvent soaked patches and your finger. It's fidgety and it kinda' hurts but that's all you need here. Continue with this until the patch comes out reasonably clean and then follow up with a dry patch. You're done at that point. If you go back and stick your finger in there the next day, you're 100% guaranteed going to find more funk. That's OK and it's normal...just leave it alone. Like a good woman, they're supposed to be a little dirty, even when clean. Remember that and you'll get along just fine.


    Like an HK and unlike most modern self-loading rifles, the CETME has no automatic bolt hold open but it does have a manual one. To engage it, use the charging handle to pull the bolt assembly all the way to the rear, press the serrated button shown below on the right side of the rear sight and then return the charging handle to its forward position:
    P1180882_zpsua44djdj.jpg

    The bolt will now remain locked to the rear.


    To release the bolt group, you can pull the charging handle all the way to the rear until you hear an audible "click" and then release the handle but the preferred and proper way is to press the button shown below located on the left side of the rear sight:
    P1180873_zpsp0tepomd.jpg

    Releasing the bolt group this way ensures that it will drive home with maximum force which is necessary to reliably remove a round from the magazine and lock the bolt head in battery.


    In this shot, we are looking up into the receiver from the bottom and seeing the bolt hold open in the resting (non-engaged) position:
    P1180933_zps3rwhwayg.jpg


    And here, we see it in the engaged position:
    P1180937_zps6wc8id0q.jpg


    When depressed, the bolt hold open mechanism catches this step machined into the rear of the bolt carrier:
    P1180940_zpsgyea8fz6.jpg

    As much as I respect Ian McCollum, the hole you see towards the front of the bolt carrier IS NOT designed to be used as a forward assist. It's actually the hole where the locking lever pin is fitted. While I guess it works, absolutely nowhere in the original manual does it tell you to use this hole in such a fashion. Generally speaking, if a bolt does not go into battery naturally, forcing it is most likely only going to make the problem worse.


    Okiedokie. That's it for this post. In the next one, we'll start looking at the bolt group and we'll also discover why you can't simply convert a CETME L to a CETME LC by switching out the stock. Unlike an HK it's a bit more complicated than that. Later, we'll also go over the most neato feature of the LC, the sliding stock. Until then, do your best to anger a liberal, buy a modern sporting rifle!
     

    Combloc

    Stop Negassing me!!!!!
    Nov 10, 2010
    7,245
    In a House
    Next up is the bolt group:
    Front 3/4 view:
    P1180996_zps1fda3ikt.jpg


    Rear view:
    P1180995_zpsxsokbqyk.jpg

    It looks like Eric Cartman.

    Oblique top view showing the locking lever:
    P1180997_zpskmcds6xs.jpg


    Disassembled:
    P1190001_zpsvp3tfu0u.jpg

    If you are familiar with an HK91 or HK93, this will immediately look familiar to you because, while NONE of the parts will interchange, the mechanics themselves are absolutely identical and they disassemble in exactly the same way. If you hare or are familiar with a CETME L, something might look a little off. There's a reason for that.....


    Below is a comparison of CETME L (top) and LC (bottom) bolt groups:
    P1180987_zpsdkavhoyz.jpg

    They are different because, on the L, the recoil assembly is housed in the stock. The collapsible stock on the LC precludes such placement of the recoil assembly and so it (the recoil assembly) had to be redesigned. This also meant that the "tail" at the back of the standard L bolt had to go and the resulting loss of mass was compensated for by lengthening the nose. The longer nose necessitated a shorter cocking tube support. In short, lots of stuff had to be redesigned. However, the trigger group remained unchanged. Now, you might say, "Wouldn't it have been simpler to just omit the cavity in the fixed stock and use the LC design in the L?" Wellllllll…...yes and no. Yes, it would have been logistically simpler to do so because both models would then use common internal parts. But the much beefier recoil assembly on the L model makes for a significantly more controllable rifle in full-automatic mode. Having shot both a CETME L and an HK33 (select fire version of the civilian HK93) in both full auto and semi-auto modes, I can tell you from experience that there is a marked difference in both recoil and controllability between the two rifles with a definite slant towards the CETME. Although I haven't shot the LC, I expect it to feel pretty much identical to the HK93.


    Here we see the stock, recoil assembly and bolt from both an L and LC laid out in approximately the same position they would rest if the rifle were assembled:
    P1180982_zpsorwzvffw.jpg

    The LC recoil assembly is longer than we see here but part of it is hidden within the bolt carrier. Notice that the L has two springs, a long recoil spring and a short (and very stout) buffer spring. The LC has a buffer spring too but it's built into the stock and not visible unless the stock is disassembled; something we are not going to do.


    I mentioned earlier that the cocking tube support is not interchangeable between the two rifles. That part is not normally removed from the rifle unless a repair is necessary so, in order to show you those bits, I'm going to recycle a picture of a pre-production MCM LC I took a while back when I visited their factory:
    P1170052_zpssp2h6vnn.jpg

    Starting from the top left, we have an LC cocking tube support, bolt group and recoil assembly. Then we have the same parts from an L. The receivers are identical between the two rifles with only the internal parts varying. SO, you CAN convert one rifle to the other if you have the right parts but sourcing the parts might be a bit of a challenge. I think it far easier to just buy the one you want preassembled or, better yet, buy one of each!


    Here is a comparison of just the two recoil assemblies:
    P1180983_zpsoryftbqm.jpg


    The white part at each end is some sort of polymer/pvc/plain ol' plastic of some sort:
    P1180984_zpstwdwbpsm.jpg

    One of my ends was a bit chewed up. Consequently, the assembly will only fit into the bolt carrier one way but I believe it's supposed to be able to fit in either way. No biggie so long as it works.


    Earlier, I briefly explained that MCM has executed some changes to the rifles since they were first introduced. Reliability wasn't the issue but rather magazine fitment. As a result, MCM refers to rifles before the changes as "GEN 1" and rifles after the changes as "GEN 2". So how do you know which one you have? That's easy. All GEN 2 models have relief cuts in the bottom of the bolt carrier:
    P1180992_zpsvxvcm36k.jpg

    That's the GEN 2 on the bottom. This was necessary because, on a GEN 2, MCM has raised by a few thousandths of an inch where the magazine sits in the magazine well. I should point out here that on both GEN 1 and GEN 2 rifles, you will most likely notice over time that the finish near the front of the feed lips is worn away. This is normal.


    Here is a more detailed shot of the recesses on a GEN 2 bolt carrier:
    P1180994_zpspjmj1vc8.jpg


    A full bottom view of just the bolt carrier:
    P1190004_zpslaturmib.jpg

    Notice the marks on the bottom of the nose. Let's take a closer look at those:
    P1190003_zpsipjgxidb.jpg

    These are brass kisses form when the rifle was test fired. I don't know why but I like stuff like this.


    The front of the carrier after disassembly of the bolt group:
    P1190002_zpseogbr6k0.jpg

    Many will say that all of this is copied from HK. The fact is that, while I have no doubt the Spanish evaluated an HK33 during the design phase of this rifle, you have to remember that the original 7.62 HK was developed from the CETME C which preceded it. While this may seem blasphemy to some, I find that the CETME L/LC/L is, in many subtle ways more refined than the HK33. While HK chose to simply scale down the 7.62 rifle to create the 5.56 one, Spain decided design the 5.56 from the ground up AS a 5.56 rifle. While exploration of exactly why this may actually be the better solution is beyond the scope of this article, I recommend that you keep an open mind and do some research of your own to arrive at an unbiased conclusion. You should also keep in mind that the 5.56 CETME was also designed exclusively for Spanish government forces with no eye to export.


    The locking wedge:
    P1190010_zpsml8dtwag.jpg


    P1190011_zpsm7pim4wf.jpg


    Firing pin and spring:
    P1190013_zpsztuymn5q.jpg


    Just the tip:
    P1190014_zpseqhtwsfe.jpg

    Get your mind out of the gutter please.


    And the bolt head:
    P1190009_zpsiqqjfsnq.jpg

    Usually, you see these with a phosphate finish but, according to Dave Bane, almost all of the LC kits came with this part in the white and almost all of the LC kits appeared to be unissued. He has also found that some of the standard kits also have bolt heads with no finish. This has led him to believe (but he cannot prove) that a phosphate bolt head denotes a refurbished part. If that is true, then ALL 5.56 CETME rifles had bare steel bolt heads when they initially left the factory. Normally, MCM refinishes all of the steel parts including this part but it was decided to leave it unfinished on the LV model for the sake of originality.


    Front showing the bolt face and extractor:
    P1190005_zpsjhyqrwd7.jpg

    Just as MCM replaces all of the other springs during the rebuild process, they replace the extractor spring as well. For this part, chrome silicon which I am told is the best available in the industry.


    Rear:
    P1190006_zpsxqiytr5a.jpg


    Top:
    P1190007_zps60n84n6z.jpg


    Bottom:
    P1190008_zpseynnzx8k.jpg

    The machining leaves something to be desired but it works just fine. My L model runs like a top. While I didn't take a picture of them, the rollers are smooth and finely machined.


    And that's it for now. The last thing we need to look at for now is the stock so I'll leave it to you to figure out what we'll be looking at next time. See ya then!
     
    Last edited:

    Users who are viewing this thread

    Latest posts

    Forum statistics

    Threads
    275,385
    Messages
    7,279,603
    Members
    33,445
    Latest member
    ESM07

    Latest threads

    Top Bottom