Help me with Enfield stock repair

The #1 community for Gun Owners of the Northeast

Member Benefits:

  • No ad networks!
  • Discuss all aspects of firearm ownership
  • Discuss anti-gun legislation
  • Buy, sell, and trade in the classified section
  • Chat with Local gun shops, ranges, trainers & other businesses
  • Discover free outdoor shooting areas
  • View up to date on firearm-related events
  • Share photos & video with other members
  • ...and so much more!
  • toolness1

    Ultimate Member
    Jan 5, 2014
    2,723
    BFE, Missouri
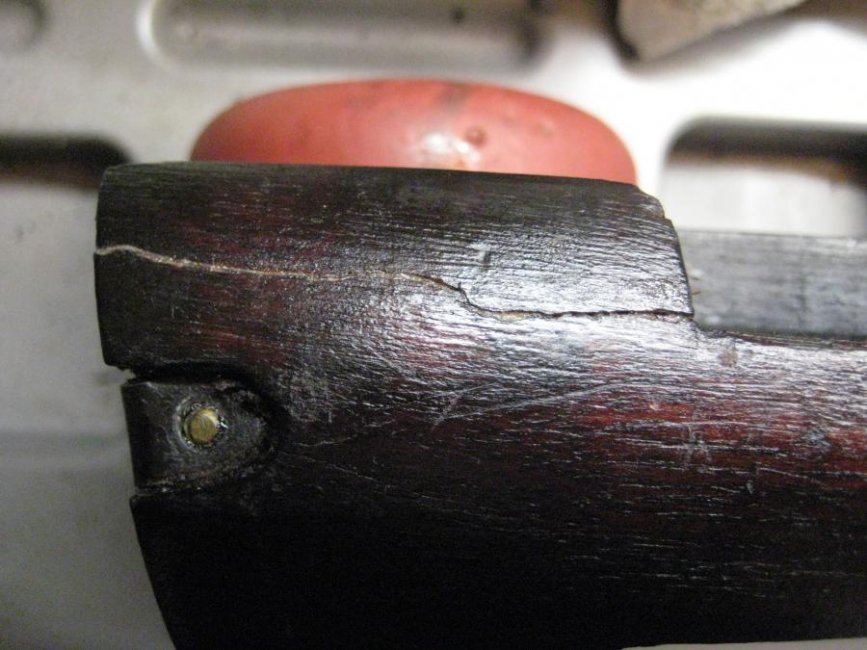
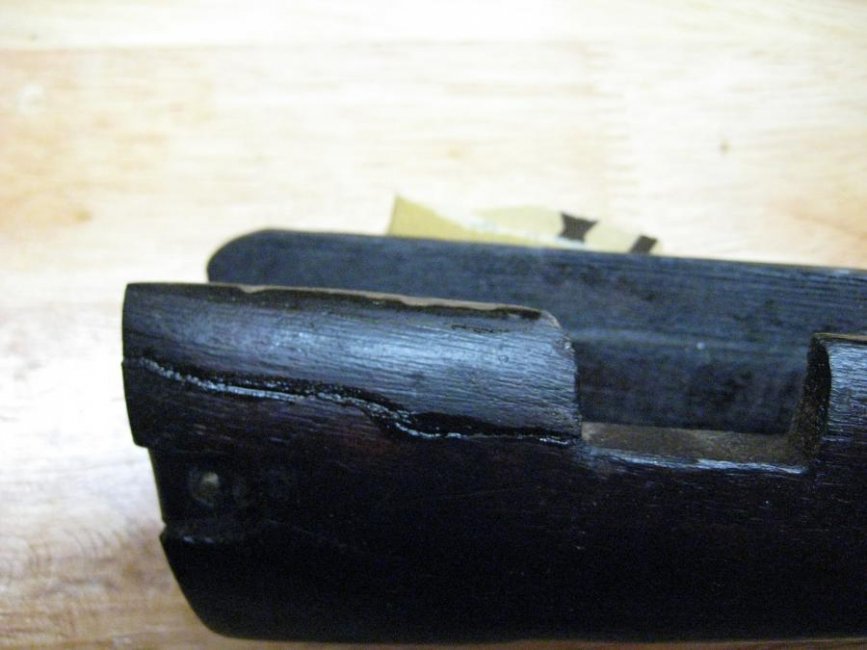
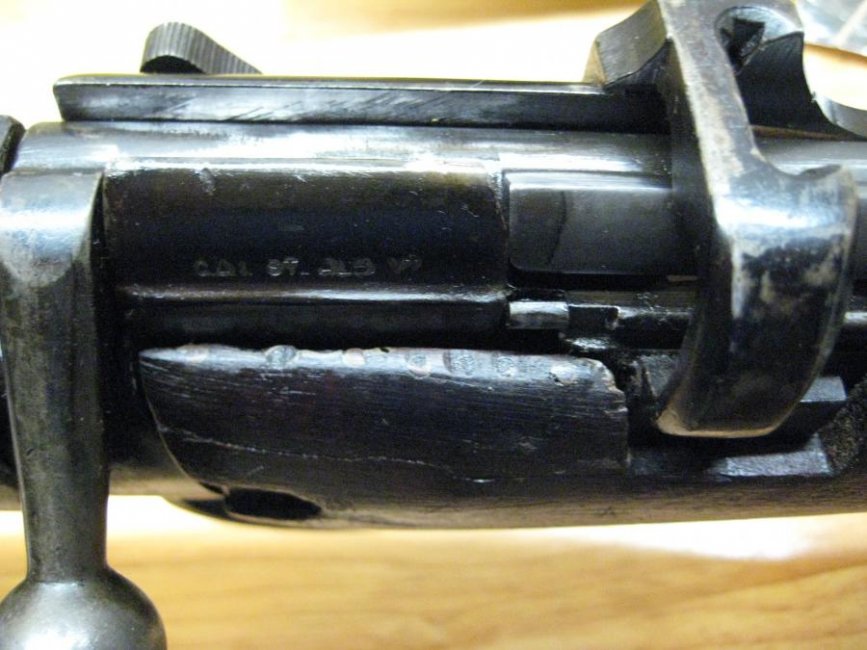
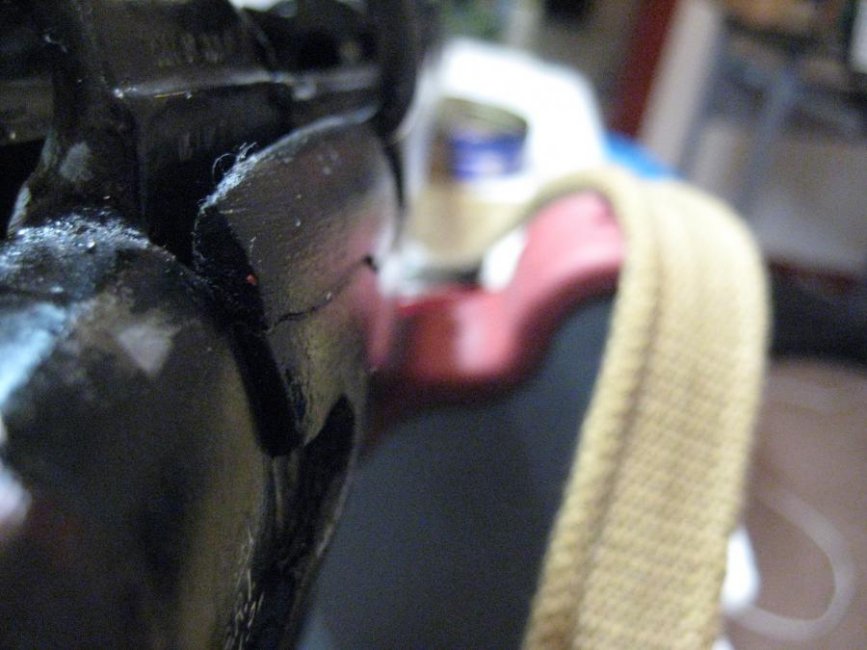
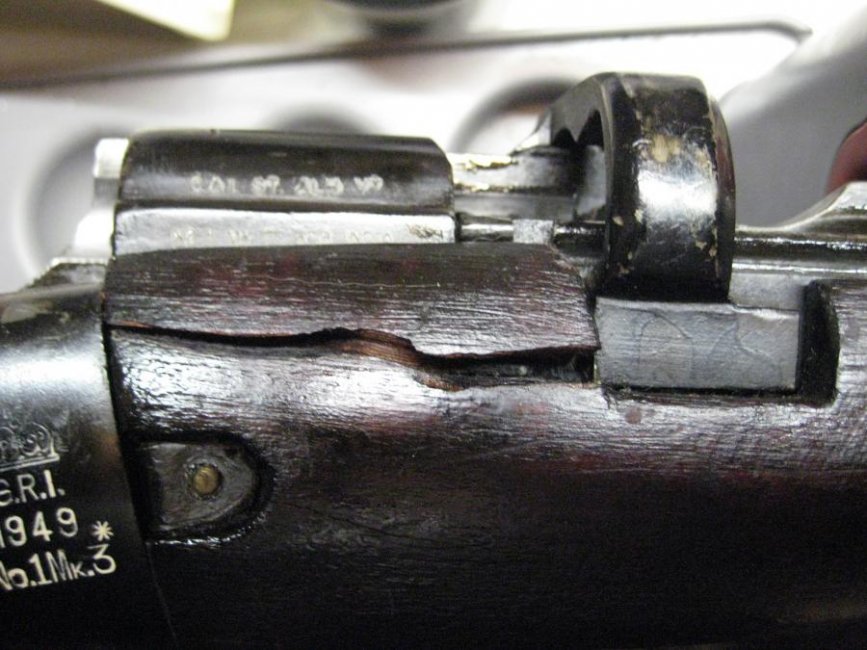
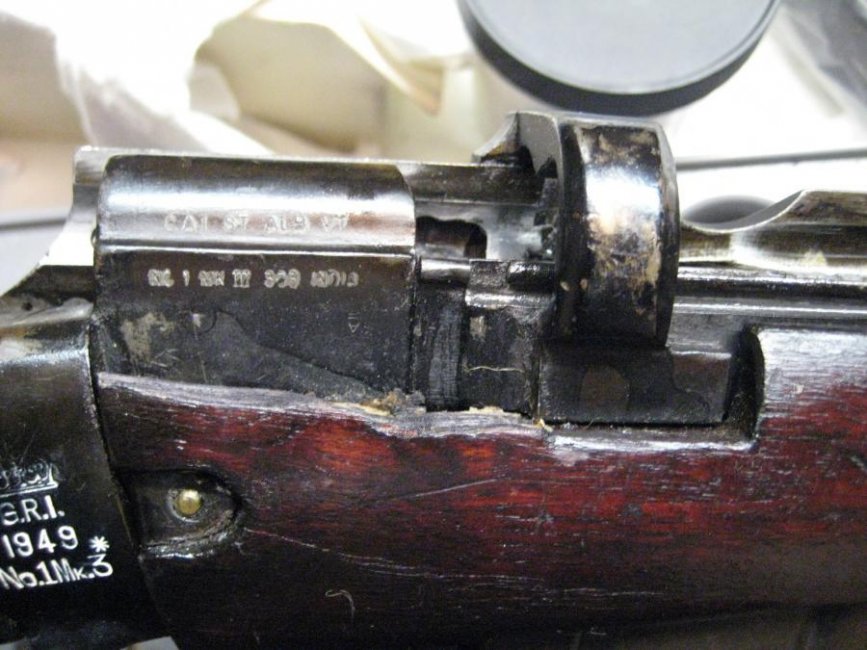
    I was shooting my No.1 Mk III a few weeks ago and this chunk broke off the stock.

    I tried degreasing the wood and using JB Weld wood glue, but it broke off after a few shots.

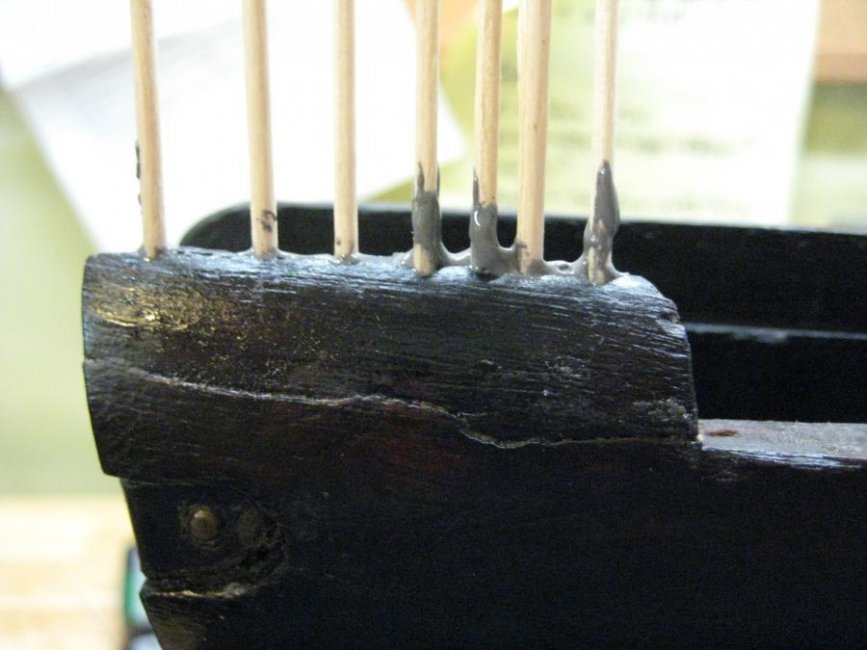
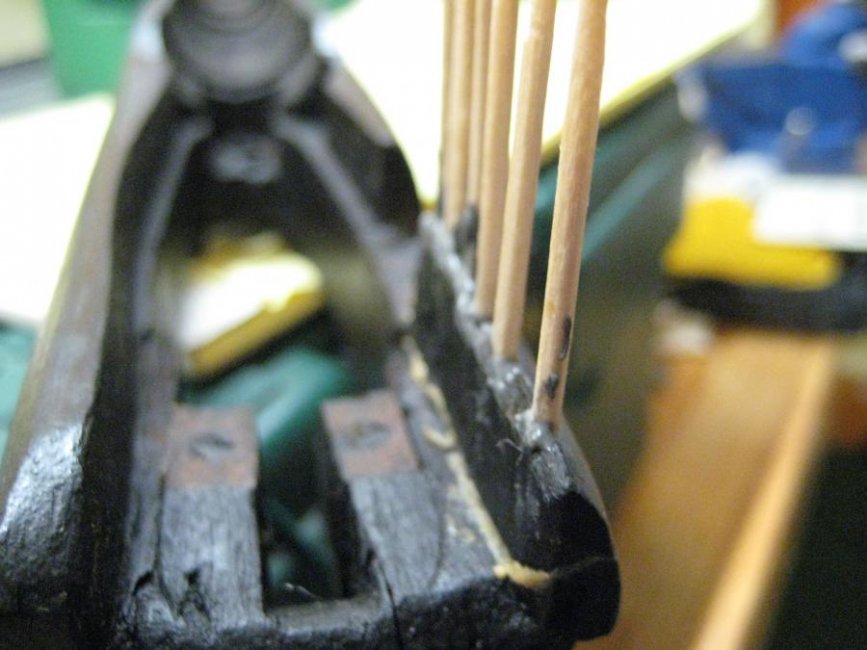
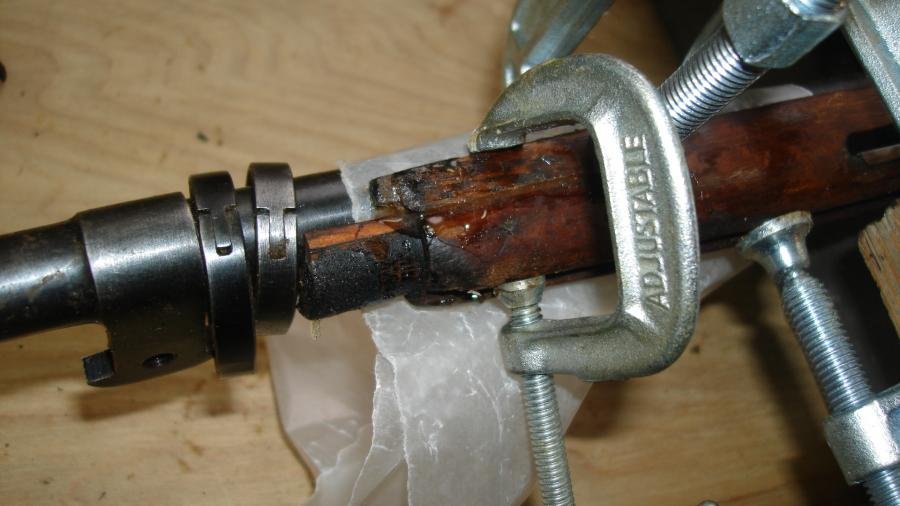
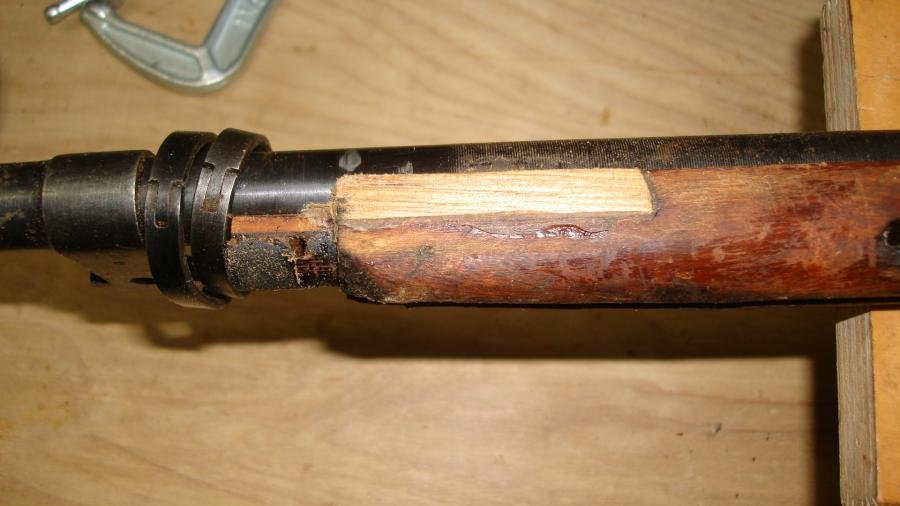
    I am guessing I'm gonna have to use some brass rod or wood dowels, but I am new to stock repair and don't know the best way to go about doing so.

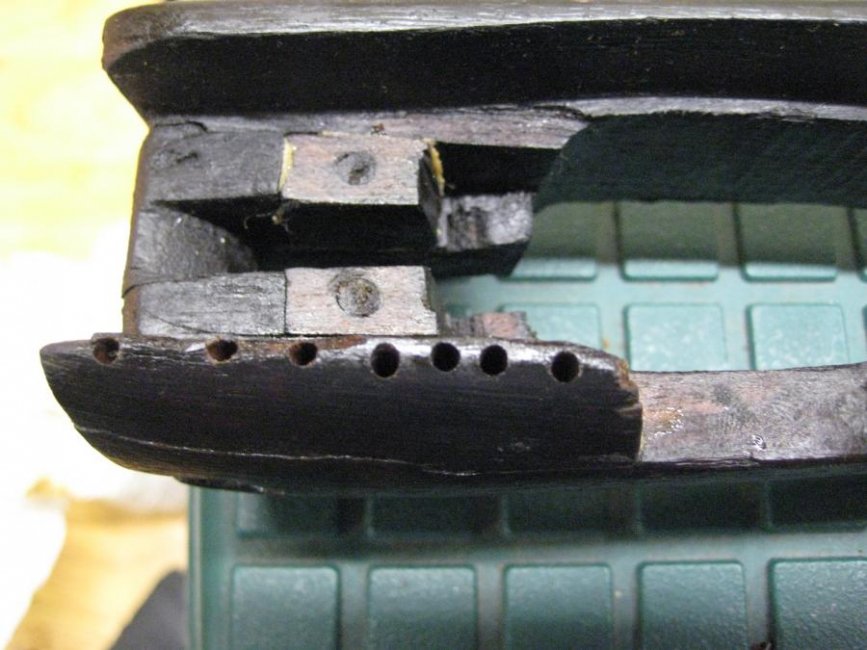
    I am not sure what the best way is to make the holes for the brass screw/rod or wood dowel.

    The top of this piece is angled, so drilling is going to be pretty tricky.

    I would love some suggestions on how to fix this.

    I searched around on the net and found a picture of another stock where there were two brass screws or pins holding an identical crack in place, but I don't know how the heck they did it.


    The only idea I had was to put the piece in place, and drill down through it and into the stock with a very small drill bit, then use bits of increasing size to get the holes big enough for the brass rod or screw, or wood dowel.

    I think if I use a small enough bit, I could get a bite in it even at that angle, but it wouldn't be easy.

    I do have a drill press so I can probably clamp the rifle in place and hold that broken chunk in place while I drill it.


    Thanks for any help!
     

    Attachments

    • back view.jpg
      back view.jpg
      67.1 KB · Views: 658
    • side in place.jpg
      side in place.jpg
      87 KB · Views: 705
    • side no piece.jpg
      side no piece.jpg
      87.8 KB · Views: 706
    • top view.jpg
      top view.jpg
      77.8 KB · Views: 706

    j8064

    Garrett Co Hooligan #1
    Feb 23, 2008
    11,635
    Deep Creek
    toolness1,

    Either "dowel" method 303_enfield and iH8DemLibz suggest to reinforce the repair will work well. They are the similar methods, but slightly different.

    Personally I prefer wood for the pegs in my repairs because it's more easily shaped to contours if needed in finishing. Plus wood can be stained to be more invisible if you like. I like the strength of bamboo skewers or tiny hardwood dowels over toothpicks, but once the adhesive has cured there's probably little difference.

    I also prefer epoxy for stock repairs. It's easy to work with, lasts and has always bonded my projects very well. Another plus is resin can be removed with heat - just in case...

    The challenge you have is drilling holes to accept the reinforcing dowels. In my repairs like this the reinforcement is done after initial gluing of the broken piece. Clamps are your friends - you can never have too many clamps. Rifle stocks don't normally have a lot of flat surfaces. Duh. With several small clamps and enough patience you can get the piece re-glued into proper position long enough for the resin to harden.

    After that, using a low speed hand drill with a sharp bit it's not difficult to place peg holes. The holes are then filled with resin and the dowels inserted.
    Once the repair has completely cured, the area can be dressed and finished.

    Notice in a couple of the pics iH8DemLibz posted of how the toothpicks are visible when the repair is shaped and finished. But they are only visible inside the stock. You won't see that repair externally. That's what you want to achieve. :thumbsup:

    Back to clamps. Having many different size C-Clamps, shims masking tape and all kinds of stuff available will help you position the broken piece into position for resin. Sometimes having the action in the stock helps when clamping. Waxed paper protects parts from resin where you don't want it. Getting it right takes patience. Make a few dry runs to clamp the piece in place before you add the adhesive.

    The pics below are of a missing stock piece being replaced with material from a donor stock. After the area was dressed several small skewers were inserted through the top in the same manner as described.

    It's not hard to do repairs like this. It just takes time and patience.

    Good luck. We want to see pics of your successful repair.

    :thumbsup:
     

    Attachments

    • DSC01040.jpg
      DSC01040.jpg
      53.7 KB · Views: 622
    • DSC01042.jpg
      DSC01042.jpg
      57.8 KB · Views: 623
    • DSC01045.jpg
      DSC01045.jpg
      48.9 KB · Views: 626

    toolness1

    Ultimate Member
    Jan 5, 2014
    2,723
    BFE, Missouri
    Awesome info guys, thanks.

    I appreciate the suggestions, and it's given me some added confidence that I can do this.

    I will take pics for sure.

    I have some bamboo skewers now that I think about it, so I'll check the size and decide which would be better, skewers, toothpicks, dowels, etc.

    I think this JB wood epoxy is good stuff, so I will use it again. It just wasn't strong enough without reinforcement.

    I'll do a dry run with clamps (oh yeah, I have a TON of clamps!)

    Then I'll glue the piece back on, allow to dry.

    Then I will drill holes for whicever type of wood reinforcement I decide

    Then epoxy those into place, and cut/sand/etc to finish it up, then stain the reinforcement dowels.


    Thanks again. Not sure when I'll do this, probably next week. I'll come back to the thread with pics.
     

    ohen cepel

    Ultimate Member
    Feb 2, 2011
    4,514
    Where they send me.
    Surgical tubing is great for stock repairs also, wrap it tight and tie it off. Won't mar the wood like a clam may and puts even pressure on it. Also, conforms to the stock very well.

    May not work here, but good to have on hand.
     

    toolness1

    Ultimate Member
    Jan 5, 2014
    2,723
    BFE, Missouri
    Surgical tubing is great for stock repairs also, wrap it tight and tie it off. Won't mar the wood like a clam may and puts even pressure on it. Also, conforms to the stock very well.

    May not work here, but good to have on hand.

    Good idea, I need to get some. In the past I've used wax paper and wrapped rubber bands, but they aren't quite strong enough
     

    toolness1

    Ultimate Member
    Jan 5, 2014
    2,723
    BFE, Missouri
    Ok, got this thing done. I learned a lot, and would definitely do a better job next time. It is NOT pretty. I know a couple things I did wrong that could have made it turn out better.

    The unevenness of the finished job is partly because the top of the chunk that broke came to a point, and this area had a horizontal crack in it. I thought about just sanding down and straightening that out, I still may do that... I have a good stain that matches pretty well.

    So, I had an uneven surface where I was drilling the holes for the toothpicks since a chunk came off while drilling.

    The area was not large enough to use the bamboo skewers.

    I have not shot it yet, but I think it's going to hold well.

    I screwed up a bit and got more of a seam than I should have where the part was first glued back in place. This is the part I feel most stupid about. I tried clamps and I tried rubber tubing, but everything I tried pushed the part inward a tad and left that seam. Also, it had been previously glued and broke again, so it didn't fit perfectly back in place even after I removed all the old glue I could. CRAP!

    This chunk was soft, not a real good area or piece to work with. Luckily it's not a pretty stock in the first place, so my feelings aren't hurt too bad when I look at my crappy job :)

    I used:
    JB Woodweld to initially glue the chunk in place
    Toothpicks coated in regular JB Weld
    Minwax Dark Walnut stain pen.


    Here's some pics. Be gentle, it was my first.

    Should I go back and just sand that area flat and re-stain?
     

    Attachments

    • glued 1.jpg
      glued 1.jpg
      82.3 KB · Views: 518
    • drilling 1.jpg
      drilling 1.jpg
      77.1 KB · Views: 419
    • holes.jpg
      holes.jpg
      75 KB · Views: 418
    • holes filled.jpg
      holes filled.jpg
      63.4 KB · Views: 422
    • holes filled 2.jpg
      holes filled 2.jpg
      63.4 KB · Views: 426
    • wet stain.jpg
      wet stain.jpg
      56.2 KB · Views: 419
    • done and done.jpg
      done and done.jpg
      77.3 KB · Views: 434
    • done.jpg
      done.jpg
      77.9 KB · Views: 421

    toolness1

    Ultimate Member
    Jan 5, 2014
    2,723
    BFE, Missouri
    Harbor freight has soft plastic cups that fit onto the contact surfaces of most steel C clamps. They're nice to have around if you need to use a clamp on wood.

    I have every type of clamp you can imagine, and I love Harbor Freight. The problem with this area was that the chunk that broke was like a half-moon shape, so when you go to clamp it, it angles the piece inwards no matter what you do.

    It was a difficult area to work on, not great for a first timer on stock repair.
     

    toolness1

    Ultimate Member
    Jan 5, 2014
    2,723
    BFE, Missouri
    I thought about making a new thread but I'll try this first:


    My repair has already broken and I realized why, the "recoil bridge" is rotten and the action is hitting against the spot I repaired when the rifle recoils.

    my plan is to get some hard wood scraps and fashion some replacement blocks, has anyone done this before?

    I have heard that if you don't fit them right, you can cause your stock to crack in other areas. I haven't found any very good advice or a guide on how to do this during my searches so I would appreciate any advice from the stock GURUS.

    I am also going to have to drill those toothpicks back out and totally redo that repair I did previously because it's hardly holding on right now.

    About 20 rounds of HXP surplus did the damage, that's all I've shot it since I repaired it.

    Thanks for any help!
     

    mawkie

    C&R Whisperer
    Sep 28, 2007
    4,353
    Catonsville
    Australian SMLEs used coachwood, which is very soft, and this same problem occurred. So they used copper plates inletted to the draw where the action pushes against the forestock. Believe the Indians would sometimes use hard rubber plates instead. If you google smle, copper recoil plates you'll find a vast trove of info. Years ago John Jovino bought and imported all the spare parts that the Australian govt had in storage. There were many stocks that didn't have these recoil plates installed as this was usually done by the armorer at unit or arsenal level when replacing a broken forestock. So there are web articles with dimensions for the recoil plates along with instructions how to fit them. I've done this once before and it's not difficult. You just need to be deliberate and careful. The only issue might be if the original forestock is solid enough in the first place. If that soft Indian native wood is too far gone then it might be time for a new forestock if you intend to shoot it.
     

    toolness1

    Ultimate Member
    Jan 5, 2014
    2,723
    BFE, Missouri
    Thanks I'll do some searching.

    The stock is pretty oil soaked but I'm hoping I can repair it because replacements aren't easy to find. I may have to shoot cast bullets only from now on to go easy on the stock...

    Sent from my SM-G920R4 using Tapatalk
     

    buellsfurn

    Ultimate Member
    Dec 1, 2015
    5,951
    southern end of Maryland
    Ok, got this thing done. I learned a lot, and would definitely do a better job next time. It is NOT pretty. I know a couple things I did wrong that could have made it turn out better.

    The unevenness of the finished job is partly because the top of the chunk that broke came to a point, and this area had a horizontal crack in it. I thought about just sanding down and straightening that out, I still may do that... I have a good stain that matches pretty well.

    So, I had an uneven surface where I was drilling the holes for the toothpicks since a chunk came off while drilling.

    The area was not large enough to use the bamboo skewers.

    I have not shot it yet, but I think it's going to hold well.

    I screwed up a bit and got more of a seam than I should have where the part was first glued back in place. This is the part I feel most stupid about. I tried clamps and I tried rubber tubing, but everything I tried pushed the part inward a tad and left that seam. Also, it had been previously glued and broke again, so it didn't fit perfectly back in place even after I removed all the old glue I could. CRAP!

    This chunk was soft, not a real good area or piece to work with. Luckily it's not a pretty stock in the first place, so my feelings aren't hurt too bad when I look at my crappy job :)

    I used:
    JB Woodweld to initially glue the chunk in place
    Toothpicks coated in regular JB Weld
    Minwax Dark Walnut stain pen.


    Here's some pics. Be gentle, it was my first.

    Should I go back and just sand that area flat and re-stain?

    looks good get yourself a dark mahogany furniture repair wax stick warm it up some with a lighter it will drip rub it across the crack filling it no worries with the extra get a rag and buff it off if you feel artistic get a old butter knife put a little bend in it heat tip and lightly rub it across the wax smoothing it let it cool for a minute use the rag over it repeat if needed
     

    Users who are viewing this thread

    Latest posts

    Forum statistics

    Threads
    275,401
    Messages
    7,280,198
    Members
    33,449
    Latest member
    Tactical Shepherd

    Latest threads

    Top Bottom