CXD Arms
Member
EDIT: 08-04-2015
I finished a second lower which went even faster than the first.
The second post of this thread shows a pic but essentially I drilled out additional material as well as using a 1/4" center cutting end mill to 'drill' out as much material as possible. Now I just need to get my post count up so I can sell the jig.
Hello all,
I just wanted to post my experience using the 80% Arms "Easy Jig". I seem to be a little late to the 80% AR party but when I searched on MD Shooters for peoples experiences with 80% AR lowers I couldn't find much. I moved here from California last year and Calguns.net has a much bigger forum community. I'm guessing it's partly due to the population size but they have also been fighting for gun rights longer in part because of the restrictions and liberal (oxymoron in this case) zealots which want to curb specific constitutional rights. But, I digress.
I recently went to to the SAR East show in Harrisburg, PA and I had hoped to pick up a couple of completed lowers for $50-70. Of course, the PA dealers won't sell lowers because they can be used to make a pistol (or at least that was their excuse), but that's fine. I had already wanted to complete a lower for the heck of it and since Maryland's laws are comparable to CA, I decided to take the plunge.
Since I'm stationed in MD I'd like to contribute to the local community here. The whole process took about 10 hours start to finish and that included trying to sand/file/grind the inside of the lower to clean up the machining marks. The write-up was done after the fact and I tried to remember things that stuck out to me while I was doing the 'routing'.
If there is anything that need clarifying or is confusing, let me know and I'll edit accordingly.
SO here goes:
I purchased the 80% Arms Easy Jig as well as lowers from Tactical Machining as well as Anderson Mfg.
Here is the link for the jig:
http://www.80percentarms.com/collections/lower-jigs/products/80-ar-15-easy-jig
The Tactical Machining lowers were somewhat rougher than the Anderson Mfg. ones. I have pictures below of the lowers for comparison but I want to limit this thread to the review of the jig. If someone have questions about the lowers, I'm still happy to answer if needed.
So the jig came in a nice box and I received it within 2 days of ordering it. 80% Arms answered my e-mail questions quickly and since they are in CA, I looked then up on Calguns. There are reviews of their jig on Calguns and as far as I could tell, it was a quality product.
For anyone's background, the Easy Jig doesn't require a drill press (though it helps) but it does require a router. They show it with a laminate or 'trim' type router which uses a 1/4" collet, but a larger full-size router can also be used. I happen to have a Porter Cable 892 router as I also am a woodworker. My 892 came with a 1/4" collet, but I hadn't used it yet as I use 1/2" router bits for wood.
I was a little concerned about using a a full size router but there is a YouTube video where someone uses a full size router and it can be done. Knowing that I am probably going to spend more time and money to make a lower rather than just purchasing one, helped to set my expectations. As a quick note, at least for me, I seem to think when I start a project like this that I will somehow end up with a higher quality product for a cheaper price than if I had just gone ahead a purchased a completed product. Since I also want to do an 80% 1911, I try to keep this obscure and un-obtainable reality in check.
I read the directions several times to get a feel for everything and at first it was a little overwhelming. I was concerned about messing something up, and several other people's posts echoed though my head…"for the first lower, go slow and follow the directions…" followed with "Once you get the hang of it, it's pretty simple and goes super fast for any additional lowers."
I decided to use a Tactical Machining lower first because I bought 3 for the cheaper pricing in case I messed up 1 and/or possibly more.
I assembled the jig and thereupon had my first issue. The jig consists of two side plates which clamp the lower together. 4 bolts clamp the two side plates sandwiching the lower, with 2 of the bolts going through the front and rear take-down pin holes. The left side plate is threaded for the bolts which is where my issue laid. You have to tighten and/or loosen the 4 bolts to not just make sure you have clamped the lower snugly but also make sure the side plates are parallel. Whenever you tighten one bolt, it draws that particular corner closer than the others. You have to adjust one bolt and then possibly re-adjust another to make sure you are still parallel.
Here is the picture where the side plate are slightly askew:

I promise the side plates are off, even though the picture may not seem like it.
This is after I adjusted the bolts to correct the lack of parallel and perhaps with the two, you can see the slight difference which was WAY more apparent in person:

So, with that corrected I was ready to attach the drilling template , set the depth for the drill bit and commence drilling.
REMEMBER TO ALWAYS USE SAFE SHOP PRACTICES- Eye protections is a MUST, and using a router is very loud- Use ear protection.
I also wore a long sleeve button up shirt to protect myself from the aluminum shavings. If you have a vacuum hooked up WHILE routing, it may or may not be needed depending on how much shaving are flying around
Below is the template for the rear shelf and trigger opening which has the trigger pocket depth gauge on the back. - Kudos to 80% Arms for having the required depth gauge on the back of the template you are not currently using and vice versa!
This pic shows the setup with drilling mostly done. I taped off the rear shelf with tape to remind myself NOT to drill the rear shelf. If the particular 80% lower you have needs to be drilled, you would set the depth according to the instructions for those last two holes.

The jig comes with two router templates with depth gauges for the corresponding depth, one for the main trigger pocket, and one for the rear shelf. Since the Tactical Machining (Gen 2) lowers already have the shelf, some of the steps in the instructions wouldn't apply.
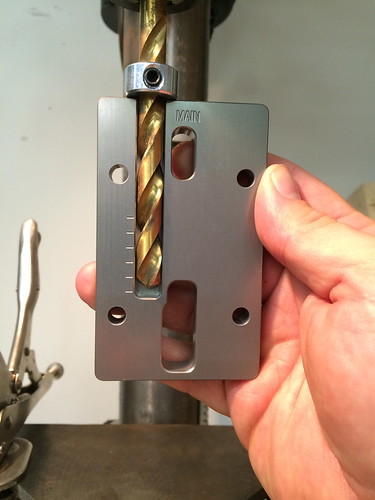
I had ordered the drill and end mill package with the jig but I also happened to have a basic B&D Titanium Nitride drill bet set, which is why you see the yellow drill bit.
Side note: I didn't remember if the Tac. Mac. lowers were 7075 or 6061, but 80% Arms states that the 7075 would take WAY longer to complete due to the additional hardness of the 7075 composition. With my TiN. drill bits, and a little bit of Do-Drill from Brownells, I didn't notice at all. In fact, with the drill press speed set according to the directions, I was creating the nice spiral swarf seen below. I had to look up later to see if the Tac. Mac. lowers were in fact 6065 because of how quickly the drilling portion went. (They are 7075)
At this point I was very happy with how things were progressing and was hopeful the milling portion would go as nicely.
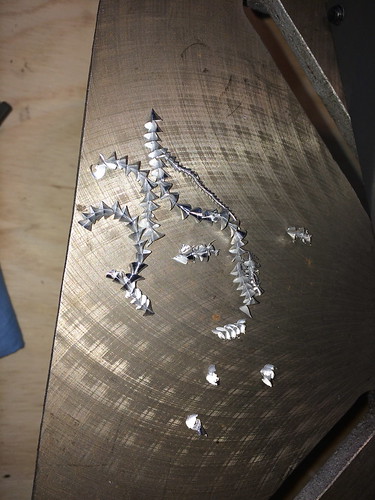
This pic shows the very nice spiral swarf.
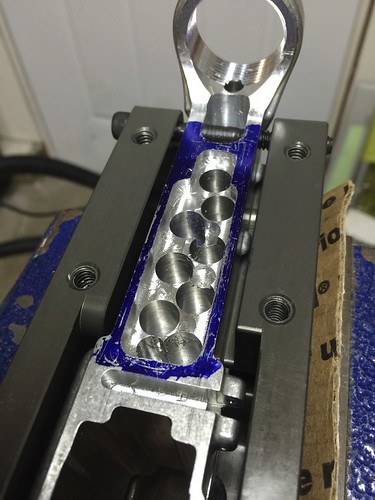
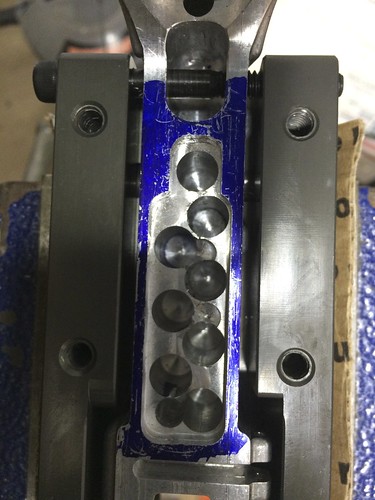
This pic shows the opening over the trigger pocket where I could vacuum out the swarf. So far, everything was going great. So great in fact, that I decided I should try drilling out a few more holes to remove as much trigger pocket material as possible.
This pic shows the 8 regular 3/8" holes, in addition to the couple of 1/4" holes where I got zealous. Since I knew that drilling would be quicker than milling, I tried drilling out those few more holes. 1/4" was just a little too big and the bits would wander towards the 3/8" holes. At this point I decided to stop pressing my luck and proceed to just mill out the remainder. What I should have done was use a 3/16" bit to drill out between the 3/8" holes. You may also notice that I've done some of the routing. I didn't remember to take a picture before I started routing because I was eager to jump into it
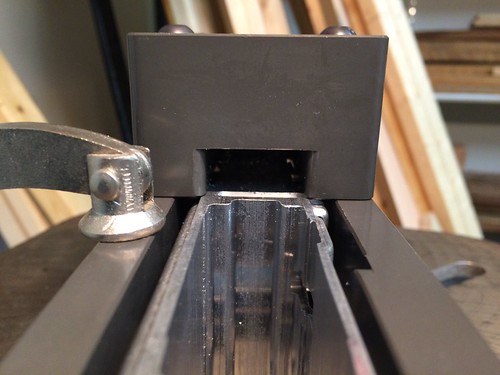
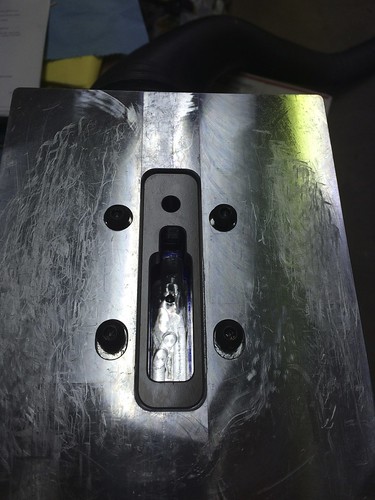
Next I proceeded to attach the spacer and trigger pocket template as well as the router support base. The three pieces are attached to the jig with 4 Allen button head screws, and there was a little play until I tightened everything down. I was concerned about the router support plate because the flange for the screws is very thin. Since I have a regular router table, I am used to seeing router base plates that are 1/4", and the Easy Jig router base isn't, but the jig was designed with the laminate/ trim type routers, not a full size router.
This pic shows the complete setup, with most of the routing done. My router scratched the base plate, but it's only cosmetic.
The instructions say to route/mill in increments of 1/4-1/3 of a hash mark, (You can see the hash marks in the drill bit pic above.) and I would say that 1/4 of a hash mark is the max for 7075. I say this from my experience with using the 1/4" end mill and my full size router. Since my 892 has a speed control, I adjusted it a few times trying to find a sweet spot. I own a Sherline lathe and used to own a Sherline Mill. The Sherline machines are small and are similar to the Taig lathe/mills. Now, having used the Sherline lathe and Mill as a hobbyist does not a machinist make. I would say that even though I have machined several items, I am still a novice when it comes to machining.
Having said that, I at least knew that a 4" long 1/4" Dia end mill would not be able to make deep cuts. That was one of the reasons why I tried to drill out as much material as possible. For the amount of material that you need to remove between the 3/8" holes, a roughing end mill would be better, or perhaps a 3/8" end mill would be better suited. The problem is that the trigger pocket has 1/4" radiuses which the template duplicates. Since you are routing a template (I shudder to say milling because routing seems a better word for what following a template is) you need to match the radiuses of the template.
With the router you need to SERIOUSLY crank down on the collet and my particular 892 needs a 1-1/8" wrench to do that. I nearly broke the locking lug that allows one handed tightening of the collet. Since I happened to have two 1-1/8" wrenches', I was able to tighten the collet just enough to avoid the end mill from slipping in the collet. I say avoid because I could not stop it completely. That is why I saw to make as shallow as possible of cuts because the end mill WILL pull itself down. This became apparent when I would go over a portion of the pocket that I knew I had already routed, and the bit was cutting more material.
Also, with this bit you are going to create some very fine shavings. So fine that they will be going everywhere unless you have some sort of vacuum setup WHILE you are routing. At first I did not and I would have to stop and try to vacuum out the swarf/shavings that collected in the holes made by the 3/8" bit. This is tricky with the spacer, template and router base attached. A word of caution; removing the 3 aforementioned pieces will change the positioning of the template when you reattach them to the jig. This is because of the tolerances of the jig and the result of this can be seen in the following pic.
You can see the lines in the side of the trigger pocket where the template shifted slightly because of the removal of the 3 pieces. You can also see the chatter marks from the end mill where it dug into the side of the trigger pocket. I tried to avoid climb cuts whenever possible by routing in a counterclockwise direction (If you were six and the jig in front of you was 12- that would be correct)

As you get close to the correct depth of 1.249", take lighter cuts and check the depth more frequently. (Once again, you will have to remove the 3 pieces to do this or add in the thickness of the 3 pieces to get the correct depth.)
Remember that the inside will be rough and that you will have to sand/grind/blast to smooth out the inside (if you wish) or leave as is.
Again, keeping your expectations in check helps to determine what you think your finished product needs to look like. As I said before, if I don't determine in advance what I'm willing to accept, I usually get disappointed with the results if they aren’t perfect the first try. This isn't the fault of any particular person or thing, but I would say that when you are spending $150+ for a jig and the same amount of money for an 80% lower as completed lowers are advertised everywhere for, knowing what you are expecting your finished lower to look like helps to keep those expectations in check.
Anyway, once the trigger pocket and rear shelf (if not already done by mfr.) are done you need to drill a 19/64" hole for the trigger hole in the bottom of the FCG pocket. I started off using the 80% Arms 19/64" drill pit and
quickly realized why 80% Arms recommends using the 6061 lowers. The 19/64" drill bit almost couldn't drill through the Tac. Mac. 7075 lower. I didn't have a 19/64" TiN bit, but I did have a 5/16" bit which is 1/64" over, which equals .0156". The trigger hole template was larger than the 5/16" bit, so I knew I wasn't drilling oversize. Additionally, the hole in the template that is used to line up 19/64" drill bit was large enough to accept the 5/16" bit. (
again- not sure if the particular hole should not have been able to accept a 5/16" bit or this was a happy accident.)
Either way, the TiN bits saved the day and I routed out the trigger hole. I was VERY concerned about how far the router bit had to stick out of the collets in order to mill out the oval trigger hole, but with light cuts it was fine.
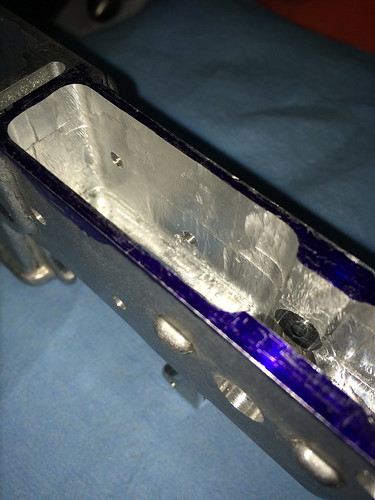
This last picture is the trigger pocket completed and also shows were I went ahead and used the jig to route out the rear shelf

I forgot to take a pic before I drilled out the selector and hammer/trigger pin holes but those were very easy. (with the TiN 3/8" and 5/32" bit) The hardest part was lining up the two templates as spacers underneath the jig to make space for the 4 jig bolts. After setting the jig on the two templates, I used my drill press clamp to make sure everything didn't move.
Once all of the 'machining' was done I cleaned everything out and sanded the sides of the FCG pocket. I also deburred the selector and hammer/ trigger pin holes by using the corresponding drill bit in reverse to 'ream' (using that term loosely) the holes as needed. I also needed to ream the take-down pin holes (1/4") as they had some small burrs from Tac. Mach.
IN CONCLUSION:
Here is a summary of what I learned/ experienced.
1. Using a full size router helped and hurt. I had to use the spacer for the rear shelf which isn't required when using the trim type routers. My 892 does have speed control which helped to dial in the best speed.
2. The drill bit/ end mill package it not worth it if you are using the forged 7075 lowers which is what may companies sell. Forged 7075 is also what is call for in the MIL-SPEC.
I would say to buy a TiN drill bit set or buy the 5/32", 19/64" (or 5/16") and 3/8" separately. Most 20 piece sets will have the 5/32", 5/16" and 3/8".
3. The end mill that 80% Arms sells is basically the same price from McMaster/ MSC, etc. and with shipping will probably be more. Get it from 80% Arms.
4. Buy a second end mill in case you damage the first. No sense in waiting for another end mill to arrive.
5. Use some sort of vacuum accessory to get into the crevices of the jig or have a vacuum attached to the jig somehow to continuously remove the swarf/shavings.
I have a dust collector and secured the 4" hose to the jig to keep the shavings under control while I routed. Routing metal is WAY more filthy than wood.
6. Do your best not to remove the spacer/ template/ router base because you will end up with lines in the sides FCG pocket.
Sanding/grinding/ filing Aluminum is not a simple task and I'm not sure sandblasting will remove those lines. This is also avoided by taking as shallow and light as possible of a cut when following the template.
The router (end mill actually) will want to dig into the lower. You need to maintain firm control of the router, which is where a smaller trim router may be beneficial.
If you have a variable speed router and experience chatter, reduce speed and/ or increase feed. (this is a a common machining practice from what I have read.)
7. Routers are NOT designed to MILL. Collets are NOT ideal for holding end mills. With this, using this jig is not ideal, but can be done so long as you make sure to tighten your collet as much as possible. (Then tighten again.)
8. Tighten your collet each time you adjust the depth, even if you are adjusting the depth with the router's depth stop. As the collet heats up from the friction, it tends to loosen.
All in all the jig was easy to use within reason and I will use the jig to make a few more lowers. With my expectations in check I can say that my first ever 80% AR lower turned out quite well and with more time using the jig I'm sure that the next few lowers will turn out even better.
Bottom line: Would I recommend it- YES. In fact, I hope someone else wants to buy mine so they can complete an 80% lower as well once I'm done with it.
Questions, comments, concerns?
I finished a second lower which went even faster than the first.
The second post of this thread shows a pic but essentially I drilled out additional material as well as using a 1/4" center cutting end mill to 'drill' out as much material as possible. Now I just need to get my post count up so I can sell the jig.
Hello all,
I just wanted to post my experience using the 80% Arms "Easy Jig". I seem to be a little late to the 80% AR party but when I searched on MD Shooters for peoples experiences with 80% AR lowers I couldn't find much. I moved here from California last year and Calguns.net has a much bigger forum community. I'm guessing it's partly due to the population size but they have also been fighting for gun rights longer in part because of the restrictions and liberal (oxymoron in this case) zealots which want to curb specific constitutional rights. But, I digress.
I recently went to to the SAR East show in Harrisburg, PA and I had hoped to pick up a couple of completed lowers for $50-70. Of course, the PA dealers won't sell lowers because they can be used to make a pistol (or at least that was their excuse), but that's fine. I had already wanted to complete a lower for the heck of it and since Maryland's laws are comparable to CA, I decided to take the plunge.
Since I'm stationed in MD I'd like to contribute to the local community here. The whole process took about 10 hours start to finish and that included trying to sand/file/grind the inside of the lower to clean up the machining marks. The write-up was done after the fact and I tried to remember things that stuck out to me while I was doing the 'routing'.
If there is anything that need clarifying or is confusing, let me know and I'll edit accordingly.
SO here goes:
I purchased the 80% Arms Easy Jig as well as lowers from Tactical Machining as well as Anderson Mfg.
Here is the link for the jig:
http://www.80percentarms.com/collections/lower-jigs/products/80-ar-15-easy-jig
The Tactical Machining lowers were somewhat rougher than the Anderson Mfg. ones. I have pictures below of the lowers for comparison but I want to limit this thread to the review of the jig. If someone have questions about the lowers, I'm still happy to answer if needed.
So the jig came in a nice box and I received it within 2 days of ordering it. 80% Arms answered my e-mail questions quickly and since they are in CA, I looked then up on Calguns. There are reviews of their jig on Calguns and as far as I could tell, it was a quality product.
For anyone's background, the Easy Jig doesn't require a drill press (though it helps) but it does require a router. They show it with a laminate or 'trim' type router which uses a 1/4" collet, but a larger full-size router can also be used. I happen to have a Porter Cable 892 router as I also am a woodworker. My 892 came with a 1/4" collet, but I hadn't used it yet as I use 1/2" router bits for wood.
I was a little concerned about using a a full size router but there is a YouTube video where someone uses a full size router and it can be done. Knowing that I am probably going to spend more time and money to make a lower rather than just purchasing one, helped to set my expectations. As a quick note, at least for me, I seem to think when I start a project like this that I will somehow end up with a higher quality product for a cheaper price than if I had just gone ahead a purchased a completed product. Since I also want to do an 80% 1911, I try to keep this obscure and un-obtainable reality in check.
I read the directions several times to get a feel for everything and at first it was a little overwhelming. I was concerned about messing something up, and several other people's posts echoed though my head…"for the first lower, go slow and follow the directions…" followed with "Once you get the hang of it, it's pretty simple and goes super fast for any additional lowers."
I decided to use a Tactical Machining lower first because I bought 3 for the cheaper pricing in case I messed up 1 and/or possibly more.
I assembled the jig and thereupon had my first issue. The jig consists of two side plates which clamp the lower together. 4 bolts clamp the two side plates sandwiching the lower, with 2 of the bolts going through the front and rear take-down pin holes. The left side plate is threaded for the bolts which is where my issue laid. You have to tighten and/or loosen the 4 bolts to not just make sure you have clamped the lower snugly but also make sure the side plates are parallel. Whenever you tighten one bolt, it draws that particular corner closer than the others. You have to adjust one bolt and then possibly re-adjust another to make sure you are still parallel.
Here is the picture where the side plate are slightly askew:
I promise the side plates are off, even though the picture may not seem like it.
This is after I adjusted the bolts to correct the lack of parallel and perhaps with the two, you can see the slight difference which was WAY more apparent in person:
So, with that corrected I was ready to attach the drilling template , set the depth for the drill bit and commence drilling.
REMEMBER TO ALWAYS USE SAFE SHOP PRACTICES- Eye protections is a MUST, and using a router is very loud- Use ear protection.
I also wore a long sleeve button up shirt to protect myself from the aluminum shavings. If you have a vacuum hooked up WHILE routing, it may or may not be needed depending on how much shaving are flying around
Below is the template for the rear shelf and trigger opening which has the trigger pocket depth gauge on the back. - Kudos to 80% Arms for having the required depth gauge on the back of the template you are not currently using and vice versa!
This pic shows the setup with drilling mostly done. I taped off the rear shelf with tape to remind myself NOT to drill the rear shelf. If the particular 80% lower you have needs to be drilled, you would set the depth according to the instructions for those last two holes.
The jig comes with two router templates with depth gauges for the corresponding depth, one for the main trigger pocket, and one for the rear shelf. Since the Tactical Machining (Gen 2) lowers already have the shelf, some of the steps in the instructions wouldn't apply.
I had ordered the drill and end mill package with the jig but I also happened to have a basic B&D Titanium Nitride drill bet set, which is why you see the yellow drill bit.
Side note: I didn't remember if the Tac. Mac. lowers were 7075 or 6061, but 80% Arms states that the 7075 would take WAY longer to complete due to the additional hardness of the 7075 composition. With my TiN. drill bits, and a little bit of Do-Drill from Brownells, I didn't notice at all. In fact, with the drill press speed set according to the directions, I was creating the nice spiral swarf seen below. I had to look up later to see if the Tac. Mac. lowers were in fact 6065 because of how quickly the drilling portion went. (They are 7075)
At this point I was very happy with how things were progressing and was hopeful the milling portion would go as nicely.
This pic shows the very nice spiral swarf.
This pic shows the opening over the trigger pocket where I could vacuum out the swarf. So far, everything was going great. So great in fact, that I decided I should try drilling out a few more holes to remove as much trigger pocket material as possible.
This pic shows the 8 regular 3/8" holes, in addition to the couple of 1/4" holes where I got zealous. Since I knew that drilling would be quicker than milling, I tried drilling out those few more holes. 1/4" was just a little too big and the bits would wander towards the 3/8" holes. At this point I decided to stop pressing my luck and proceed to just mill out the remainder. What I should have done was use a 3/16" bit to drill out between the 3/8" holes. You may also notice that I've done some of the routing. I didn't remember to take a picture before I started routing because I was eager to jump into it
Next I proceeded to attach the spacer and trigger pocket template as well as the router support base. The three pieces are attached to the jig with 4 Allen button head screws, and there was a little play until I tightened everything down. I was concerned about the router support plate because the flange for the screws is very thin. Since I have a regular router table, I am used to seeing router base plates that are 1/4", and the Easy Jig router base isn't, but the jig was designed with the laminate/ trim type routers, not a full size router.
This pic shows the complete setup, with most of the routing done. My router scratched the base plate, but it's only cosmetic.
The instructions say to route/mill in increments of 1/4-1/3 of a hash mark, (You can see the hash marks in the drill bit pic above.) and I would say that 1/4 of a hash mark is the max for 7075. I say this from my experience with using the 1/4" end mill and my full size router. Since my 892 has a speed control, I adjusted it a few times trying to find a sweet spot. I own a Sherline lathe and used to own a Sherline Mill. The Sherline machines are small and are similar to the Taig lathe/mills. Now, having used the Sherline lathe and Mill as a hobbyist does not a machinist make. I would say that even though I have machined several items, I am still a novice when it comes to machining.
Having said that, I at least knew that a 4" long 1/4" Dia end mill would not be able to make deep cuts. That was one of the reasons why I tried to drill out as much material as possible. For the amount of material that you need to remove between the 3/8" holes, a roughing end mill would be better, or perhaps a 3/8" end mill would be better suited. The problem is that the trigger pocket has 1/4" radiuses which the template duplicates. Since you are routing a template (I shudder to say milling because routing seems a better word for what following a template is) you need to match the radiuses of the template.
With the router you need to SERIOUSLY crank down on the collet and my particular 892 needs a 1-1/8" wrench to do that. I nearly broke the locking lug that allows one handed tightening of the collet. Since I happened to have two 1-1/8" wrenches', I was able to tighten the collet just enough to avoid the end mill from slipping in the collet. I say avoid because I could not stop it completely. That is why I saw to make as shallow as possible of cuts because the end mill WILL pull itself down. This became apparent when I would go over a portion of the pocket that I knew I had already routed, and the bit was cutting more material.
Also, with this bit you are going to create some very fine shavings. So fine that they will be going everywhere unless you have some sort of vacuum setup WHILE you are routing. At first I did not and I would have to stop and try to vacuum out the swarf/shavings that collected in the holes made by the 3/8" bit. This is tricky with the spacer, template and router base attached. A word of caution; removing the 3 aforementioned pieces will change the positioning of the template when you reattach them to the jig. This is because of the tolerances of the jig and the result of this can be seen in the following pic.
You can see the lines in the side of the trigger pocket where the template shifted slightly because of the removal of the 3 pieces. You can also see the chatter marks from the end mill where it dug into the side of the trigger pocket. I tried to avoid climb cuts whenever possible by routing in a counterclockwise direction (If you were six and the jig in front of you was 12- that would be correct)
As you get close to the correct depth of 1.249", take lighter cuts and check the depth more frequently. (Once again, you will have to remove the 3 pieces to do this or add in the thickness of the 3 pieces to get the correct depth.)
Remember that the inside will be rough and that you will have to sand/grind/blast to smooth out the inside (if you wish) or leave as is.
Again, keeping your expectations in check helps to determine what you think your finished product needs to look like. As I said before, if I don't determine in advance what I'm willing to accept, I usually get disappointed with the results if they aren’t perfect the first try. This isn't the fault of any particular person or thing, but I would say that when you are spending $150+ for a jig and the same amount of money for an 80% lower as completed lowers are advertised everywhere for, knowing what you are expecting your finished lower to look like helps to keep those expectations in check.
Anyway, once the trigger pocket and rear shelf (if not already done by mfr.) are done you need to drill a 19/64" hole for the trigger hole in the bottom of the FCG pocket. I started off using the 80% Arms 19/64" drill pit and
quickly realized why 80% Arms recommends using the 6061 lowers. The 19/64" drill bit almost couldn't drill through the Tac. Mac. 7075 lower. I didn't have a 19/64" TiN bit, but I did have a 5/16" bit which is 1/64" over, which equals .0156". The trigger hole template was larger than the 5/16" bit, so I knew I wasn't drilling oversize. Additionally, the hole in the template that is used to line up 19/64" drill bit was large enough to accept the 5/16" bit. (
again- not sure if the particular hole should not have been able to accept a 5/16" bit or this was a happy accident.)
Either way, the TiN bits saved the day and I routed out the trigger hole. I was VERY concerned about how far the router bit had to stick out of the collets in order to mill out the oval trigger hole, but with light cuts it was fine.
This last picture is the trigger pocket completed and also shows were I went ahead and used the jig to route out the rear shelf
I forgot to take a pic before I drilled out the selector and hammer/trigger pin holes but those were very easy. (with the TiN 3/8" and 5/32" bit) The hardest part was lining up the two templates as spacers underneath the jig to make space for the 4 jig bolts. After setting the jig on the two templates, I used my drill press clamp to make sure everything didn't move.
Once all of the 'machining' was done I cleaned everything out and sanded the sides of the FCG pocket. I also deburred the selector and hammer/ trigger pin holes by using the corresponding drill bit in reverse to 'ream' (using that term loosely) the holes as needed. I also needed to ream the take-down pin holes (1/4") as they had some small burrs from Tac. Mach.
IN CONCLUSION:
Here is a summary of what I learned/ experienced.
1. Using a full size router helped and hurt. I had to use the spacer for the rear shelf which isn't required when using the trim type routers. My 892 does have speed control which helped to dial in the best speed.
2. The drill bit/ end mill package it not worth it if you are using the forged 7075 lowers which is what may companies sell. Forged 7075 is also what is call for in the MIL-SPEC.
I would say to buy a TiN drill bit set or buy the 5/32", 19/64" (or 5/16") and 3/8" separately. Most 20 piece sets will have the 5/32", 5/16" and 3/8".
3. The end mill that 80% Arms sells is basically the same price from McMaster/ MSC, etc. and with shipping will probably be more. Get it from 80% Arms.
4. Buy a second end mill in case you damage the first. No sense in waiting for another end mill to arrive.
5. Use some sort of vacuum accessory to get into the crevices of the jig or have a vacuum attached to the jig somehow to continuously remove the swarf/shavings.
I have a dust collector and secured the 4" hose to the jig to keep the shavings under control while I routed. Routing metal is WAY more filthy than wood.
6. Do your best not to remove the spacer/ template/ router base because you will end up with lines in the sides FCG pocket.
Sanding/grinding/ filing Aluminum is not a simple task and I'm not sure sandblasting will remove those lines. This is also avoided by taking as shallow and light as possible of a cut when following the template.
The router (end mill actually) will want to dig into the lower. You need to maintain firm control of the router, which is where a smaller trim router may be beneficial.
If you have a variable speed router and experience chatter, reduce speed and/ or increase feed. (this is a a common machining practice from what I have read.)
7. Routers are NOT designed to MILL. Collets are NOT ideal for holding end mills. With this, using this jig is not ideal, but can be done so long as you make sure to tighten your collet as much as possible. (Then tighten again.)
8. Tighten your collet each time you adjust the depth, even if you are adjusting the depth with the router's depth stop. As the collet heats up from the friction, it tends to loosen.
All in all the jig was easy to use within reason and I will use the jig to make a few more lowers. With my expectations in check I can say that my first ever 80% AR lower turned out quite well and with more time using the jig I'm sure that the next few lowers will turn out even better.
Bottom line: Would I recommend it- YES. In fact, I hope someone else wants to buy mine so they can complete an 80% lower as well once I'm done with it.
Questions, comments, concerns?
Last edited:

")