Polish P83...More Than Meets The Eye

The #1 community for Gun Owners of the Northeast

Member Benefits:

  • No ad networks!
  • Discuss all aspects of firearm ownership
  • Discuss anti-gun legislation
  • Buy, sell, and trade in the classified section
  • Chat with Local gun shops, ranges, trainers & other businesses
  • Discover free outdoor shooting areas
  • View up to date on firearm-related events
  • Share photos & video with other members
  • ...and so much more!
  • Combloc

    Stop Negassing me!!!!!
    Nov 10, 2010
    7,268
    In a House
    I wanted one of these pistols and one of the P64's when they were imported several years ago but I didn't get either one because I just couldn't get past the awful import stamp on their slides. Then they disappeared and I wished I had bought them. I have a Polish AKM built from a matching parts kit, a Polish RPD built from a matching parts kit and a MAG98 pistol, but I didn't have a P64 or a P83 because of that stupid import stamp.
    Well, both came around again and I picked both up. The P64, as you all know, is a typical Warsaw Pact blowback pistol chambered in 9x18 Makarov made the same way they all used to be; that is to say milled from solid stock. Neat and fun but, lets face it, nothing much in the innovation department. At first glance, theP83 is more of the same. It's a simple Warsaw Pact blowback built in the quadrillions to arm the proletariat armies in the defense of the motherland against the impending Capitalist hoards. From a functional design standpoint, that is true. The trigger pull is long, creepy and heavy. The safety lever is tiny and hard to manipulate. The hammer is huge and lacks ergonomics. The safety dot paint looks like a three year old did it with his eyes closed on a bus with poor suspension an a cobblestone street. The sights are tiny and the finish is rough compared to even other Eastern Bloc offerings. But it's dead reliable and that's what really counts in the end.
    There is nothing special and a lot copied in the P83. While it does have a couple interesting and original design details, the magazine and cartridge are pure Soviet PM. The takedown block is straight off the Sauer 38H and the trigger mechanism is an only slightly modified copy of that used in the Walther P38. The way the firing pin lowers when the safety is applied and the cutout in the hammer to accommodate this is also taken from Walther's P5. So there is nothing special about the design when seen in that light. I knew that and expected that. I also knew that the pistol was made primarily from stamped parts and that fact alone was what has intrigued me since I learned about it some years ago. Anybody who knows me or knows my work knows that I am absolutely fascinated by anything made of pressed metal, especially firearms. While the fact that the P83 is a stamped pistol is generally known, no real details about construction are available online so I knew I had to buy one to find out just how it was all put together. What I found so amazed me that I felt compelled to take some pictures to share with you all.
    This little essay is not about how the P83 works or about documenting every part and mark, but rather about how it is built. When I took the slide and grips off of this thing to clean the storage cosmoline out of all the nooks and crannies, I was blown away by the sophistication and complexity exhibited in its construction. Although execution of the build and finish are crude by Western standards, the innovation hidden in this otherwise ordinary looking pistol is on par with it's grandfather, the Jager Pistole of 1914 and its contemporary, the HK P9S. If placing ANY Warsaw Pact pistol on the same level as an HK sounds wacko to you, trust me, I would laughed had you made the same statement to me just a couple days ago. I never expected to see such genius of manufacture embodied in a communist design; it just didn't seem possible......but it is. Let's get to some pictures and I'll show you what I mean.


    This will take a few posts and I'm not doing them all at this moment. However, it should be done by tomorrow night so check back.

    A Radom P83 made just before the fall of the iron curtain in 1989:


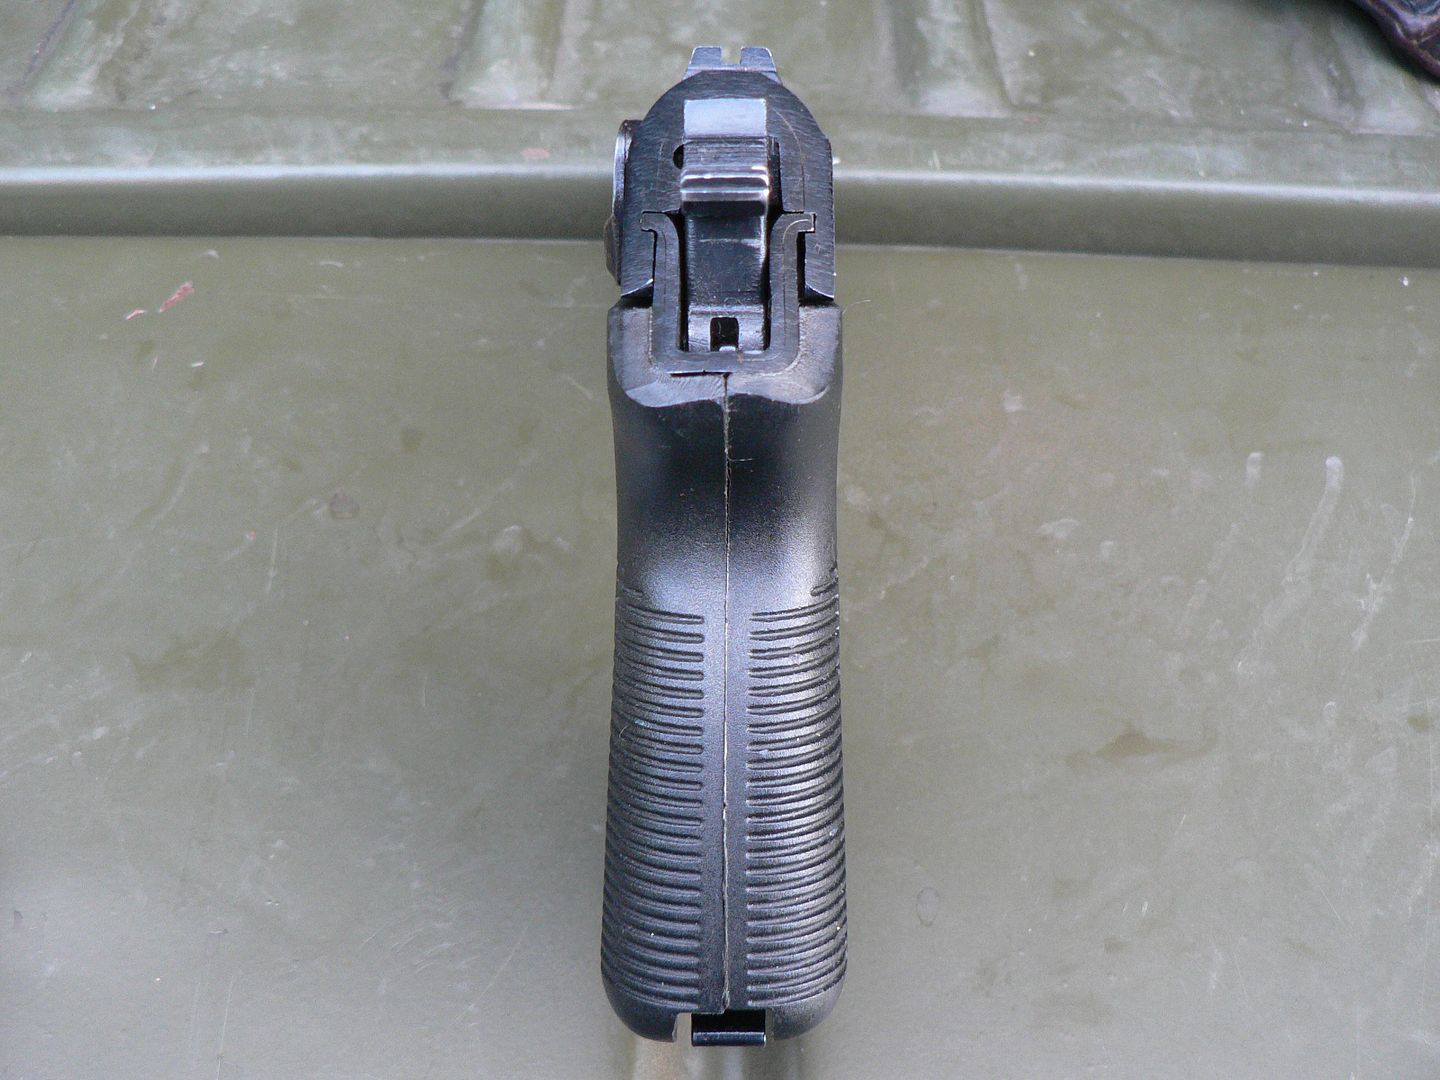
    This particular pistol came from Widener's for the princely sum of $200 plus shipping. It has two matching magazines and a nicely worn in patina to it, just the way I like them. That means it helped make history instead of just passing through it. It also came with a cleaning rod but there isn't a picture of that because I only discovered it after I was finished with the camera. I'm not too bright.


    Lets get a some comparison shots out of the way first. Here are couple pictures showing a size comparison between the P83, it's predecessor the P64 and an Izhevsk produced PM:


    And here we see it compared to the worlds first use of pressed metal construction in a firearm, the Jager of 1914 and it's stamped contemporary, the HK P9S:


    Here, the takedown block is lowered for disassembly. Below is an the Sauer 38H with its takedown block lowered for disassembly. Neato!


    Let's look at the takedown block a little closer.
    Up and ready for use:


    The little hole in the trigger guard is for the ball detent in the takedown block to pop into and lock the block in place.


    Down and ready for disassembly:


    You can see the detent ball through the hole.


    On the left is a P83 magazine and on the right is one from an East German produced Makarov:


    Last edited:

    Combloc

    Stop Negassing me!!!!!
    Nov 10, 2010
    7,268
    In a House
    Now for the fun stuff. We'll start with the slide. It was NOT machined from billet as normal slides are. Instead, it started out as a flat piece of steel and was bent into an upside down "U" shape. Then a machined steel block was inserted into the front and welded or brazed (I don't know which but I will use the word "weld" or "welded" from here on for the sake of convenience) in place. Take a look at the picture below:


    You can easily see the seam where the milled barrel bushing block meets the stamped slide. Notice that the front sight is part of the barrel bushing and sticks up through a notch cut into the slide.


    Here is the bottom front of the slide:


    If you look carefully, you can see a line where the body and barrel bushing meet. The two slots cut are for clearance where the frame dust cover runs. There is an inspection stamp visible too.


    Here's a shot of the entire slide as seen from the bottom:


    And here is a close-up of the breech block in the slide:


    It sure looks like one machined part but it's not. The entire machined breech block is inserted up in there and welded in place. Then final machining was done giving the appearance of a monolithic part.


    The giveaway is seen at the rear of the slide. Here, we see the seem between the two parts just above the rail slot:


    While we're back here, lets look at how the safety interacts with the firing pin. In this picture, we see the firing pin with the safety in the "fire" position:


    The sprung firing pin is free to move forward when struck by the hammer.


    In this picture, the safety has been applied and it has pushed the rear of the firing pin down:


    When in this position, there is a notch cut in the bottom of the firing pin forming a hook which catches on the rear of the firing pin hole in the breach block. This prevents the firing pin from going forward and contacting the primer in the cartridge should any force be applied to the rear of the firing pin. When the safety is applied with the mechanism cocked, the hammer drops but there is a bar which stops it before it ever touches the firing pin. As additional insurance, there is a recess milled out of the hammer face (shown below) so that it cannot contact the firing pin should this bar fail.


    Here, the hammer is lowered with the safety off and we can just barely see the hook at the rear of the firing pin:


    Here is another angle of the hammer lowered and the safety off. The hammer cannot go any farther forward and strike the firing pin unless the trigger is pulled:


    The safety/firing pin disassembled:


    Up top is the slide with it's ever so well painted red dot. Next down is the firing pin clearly showing the hook at the rear. Below that is the firing pin spring and safety. At the bottom is the safety detent and its spring.

    Here, I have turned the firing pin so that you can see it from the bottom:


    DO NOT DO NOT disassemble your safety unless you are willing to fiddle with it for hours trying to get it back together. Once you know the trick, it's easy but it takes a while to learn the trick....just leave it alone.


    Even the safety is made of both milled and stamped parts. The barrel is machined while the lever is stamped and welded to it. Note the seam where they meet:


    So, to sum up the safety features. When the safety is off and the hammer is down, there is a bar preventing the hammer from hitting the firing pin if dropped or otherwise struck. When the safety is applied, the rear of the firing pin is pushed down and hooks the breach block, effectively locking it from moving forward. At the same time, the hammer is dropped but is prevented from striking the firing pin because of the already mentioned bar. Even if the firing pin hook broke for some reason and the stop bar broke too, the hammer STILL couldn't hit the firing pin because it is hollowed out so that it cannot contact the firing pin when it is pushed down by the safety barrel. The mechanism is double redundant. Schweet!!


    The pistol has a loaded chamber indicator on the left rear of the slide which protrudes when there is a cartridge in the chamber.

    Empty chamber:


    Loaded:


    The indicator is left in the white so that it's easily visible at a glance and sticks out far enough that it is easily felt when looking isn't possible.


    Last thing to see before we move on to the frame is be backside of both grips. Not much to say other than they are plastic and numbered to the pistol. Here is the left one:


    The whitish looking stuff is just the way it molded. It kinda feels rough there.

    The right grip:


    It was numbered "664" but someone scratched it out and marked it "663". Being that they are consecutive numbers, I assume that it was a screw up during production. oops!

    That's it for now. Next, we'll look at the frame. The way that's put together is the neatest part of the entire pistol. See you soon!
     
    Last edited:

    Bob A

    όυ φροντισ
    MDS Supporter
    Patriot Picket
    Nov 11, 2009
    31,015
    First, thank you for your efforts.

    Second, respectful admiration for the breadth and quality of your collection, and for your insight and expertise.

    Third, a couple questions: How secure, in your judgement, are the various welds, at the bushing, the breech, and the safety lever? Also, I was unable to see how the loaded chamber indicator operated within the slide; is there much opportunity for a failure of the indicator at the chamber?

    There seems to be a bit of work on the magazine lips of the P83. Is this uniform with respect to both mags, or was there hand-fitting involved?

    Looking forward to more, thanks again.
     

    BigDaddy

    Ultimate Member
    Feb 7, 2014
    2,235
    Fantastic presentation. You ought to publish in one of the print magazines.
     

    toolness1

    Ultimate Member
    Jan 5, 2014
    2,723
    BFE, Missouri
    Great posts, I was looking at the slide on mine when I got it trying to figure out what I was looking at, noticing the seams you talked about.

    Very glad I picked mine up from Wideners for 200 bucks also. My slide seems smoother and more of a polished blue. I'll have to dig it out and compare to your pics.

    Looking forward to the rest of the review!
     

    Daddyursus

    Trusted Shellback
    Jan 11, 2013
    431
    In a van down by the river
    A few years ago, I basically lost my mind over the P-64 and attempted to buy a copy of every year it was produced. And of course, I had to have the replacement P-83. Parts wear out in the old P-64 and this brought me to make friends with a Pole named Gregorzy. Last year he told me that he was part of the GROM special forces that took part in Iraq in 2003 and still had his issued P-83 holster and mag pouches. Of course I had to have them. Like our own SOF, he could not share pictures of himself but provided the following picture. Note the handle of the pistol in this picture.
     

    Attachments

    • 1280px-Polish_patrol_Babylon_DF-SD-04-16537.jpg
      1280px-Polish_patrol_Babylon_DF-SD-04-16537.jpg
      159.7 KB · Views: 1,574
    • P-83-2.JPG
      P-83-2.JPG
      116.8 KB · Views: 1,632

    Combloc

    Stop Negassing me!!!!!
    Nov 10, 2010
    7,268
    In a House
    First, thank you for your efforts.

    Second, respectful admiration for the breadth and quality of your collection, and for your insight and expertise.

    Third, a couple questions: How secure, in your judgement, are the various welds, at the bushing, the breech, and the safety lever? Also, I was unable to see how the loaded chamber indicator operated within the slide; is there much opportunity for a failure of the indicator at the chamber?

    There seems to be a bit of work on the magazine lips of the P83. Is this uniform with respect to both mags, or was there hand-fitting involved?

    Looking forward to more, thanks again.


    First, you are welcome. I enjoy doing this stuff.

    Second, you are too kind! Thank you for such a nice compliment!!

    Third, this thing is built like a tank. I would lay a years salary on it that it will take just as much abuse as any of my other Warsaw Pact pistols. As for the loaded chamber indicator, I was tempted to disassemble it but I decided to leave it alone for fear of marring up the extractor pin. The indicator works off of the extractor. When there is a round in the chamber, the front of the extractor is naturally pushed out. Just as with any other pin mounted extractor, it rotates on is mounting pin. The extractor is very long and the mounting pin is located very near the front of the extractor. Thus, a little outward movement at front of the extractor pivots the rear of the extractor through a much greater arc in the opposite direction i.e. INTO the slide. The rear of the extractor rests against the loaded chamber indicator and so pushes it out the other side of the slide. I hope that makes sense. It sounds complicated but it's actually quite simple and ingenious. I really can't imagine anything that could go wrong or disturb the reliability of this arrangement.

    The feed lips do not appear to be hand fitted to this pistol. Any marks you are seeing are nothing more than an artifact of the manufacturing process IMO. Yes, the magazines are numbered to the pistol but that was standard practice. I believe it had more to do with inventory than it ever did reliable function. I would feel comfortable using any and all P83 magazines in any and all P83's.


    Now it's time to look at the frame.
    First is the right side:


    And the left side:


    If you have ever seen a P38 with the grips off, you will immediately recognize the similarities between its design and that of the P83. But we're not really interested in all of that for our purposes. We're focusing on how the frame is put together. It's made out of five primary parts and four of them are stamped. The milled part is what I'm calling the trunnion. The trunnion is the heart of the frame and the only part of it you can see when the pistol is assembled is the upper inner part of the trigger area. The stamped parts are a left side plate, a right side plate, the back strap and the trigger guard.

    First is the trunnion. Since I'm not willing to destroy the pistol to get at it, well have to visualize it and I'll show what little of it I can to you. It's a milled block hidden right in the center of the frame. The left and right side plates are welded to it and the welds are ground smooth so you can't really even tell there are joints unless you are looking for them. The top of the trunnion extends above the sideplates and is bored out to become the barrel mounting block. The barrel is pressed and pinned into it. Let's look at that:


    In the above picture, we're looking at a close-up of the left center side of the frame with the slide removed. Forward is to the left. The part with some inspection stamps on it is the barrel mounting block (AKA the top of the trunnion). The barrel can be seen extending from of it to the left and exiting out of frame. At the front of the barrel mounting block is the pin that holds the barrel in place. Notice that there are lots of either grinding or milling marks visible. That's typical internal Combloc firearms finishing! Just below the inspection stamps at the rear of the block is a line that extends forward the entire length of the block, intersecting the bottom of the barrel pin hole as it does so. Below this line is smooth metal contrasting with the grind marks above the line. That line is the joint between the milled trunnion and the pressed metal left side plate. The entire left side of the frame is one piece of stamped steel folded into shape and welded to the trunnion. The right side is the same. These two halves form a shell that wrap around the trunnion, enclosing and hiding it. Where the left and right frame plates meet along the dust cover and the front of the grip, they are welded together and then ground smooth thus hiding the joint. I can't get a picture of it but if you get the light to shine just right on the front grip strap and the bottom outside of the dust cover, you will see that there is a line running down the center of each where the bluing is of a slightly different color. That's the weld joint. The inside of the front grip strap is ground flush and polished too so that the magazine slides in freely but the weld joint is clearly visible on the inside of the dust cover:


    We can see other telltale joints too. Look at the picture below:


    See the hole where the trigger (which is painted or anodized alloy and not steel) exits the frame? That's the bottom of the trunnion. The stamped side plate is beveled to meet the trunnion and there is a joint line visible at the edge of the bevel.


    If we could cut one sideplates off of the trunnion and look at it by itself, it would bear more than a passing resemblance to the one used on the German Jager Pistole built about 75 years earlier in 1914 and pictured below:


    Incidentally, the Jager is the first known use of stamped parts in a firearm. Amazingly, it is almost completely unknown today but it represented a revolution in the way future firearms would come to be manufactured. Prior to the Jager, stamped parts in a firearm were unknown. Today, almost nothing is made without them. If you want to learn more about the Jager, I did one of my "in detail" essays about it in 2010 and it's posted here:

    http://luger.gunboards.com/showthread.php?23660-Some-detailed-Jager-pictures

    Ian McCollum of Forgotten Weapons also used my Jager to do a youtube video about it here:

    https://www.youtube.com/watch?v=VKkUUr4wSrM

    OK....back on topic.


    The trigger guard is stamped too. At the top, extends up inside the frame and is welded in place. We can see it here:


    Notice that it has a hole in it. This is where the takedown detent ball rests when the pistol is assembled, thus holding the takedown block locked in the up position.


    At the bottom, the trigger guard intersects both the trunnion and the side plates. Look closely in the picture below and you can see a small pin holding the trigger guard in place:


    Here's the other side:


    You can't see it because of the glare and the fact that they did a better job polishing this side but the pin is present here too. However, you can clearly see the joint line.


    If you look closely in the following picture, you can see grind marks where they cleaned up the weld joint where the trigger guard meets the front strap:


    Just below the trigger guard on the front strap, you might notice what looks to be a small rounded area of darker bluing in the center of the strap. This is part of the weld joint I mentioned earlier.


    Looking down into the top of the frame, we can see more of the trunnion:


    The feed ramp is clearly visible. Below that is a hollowed out area. Let's get that more in focus:


    This milled out area serves an important purpose as a lightening cut to reduce weight. This pistol is heavy. Even though it is made primarily of stampings, it weighs in at 25.5 ounces unloaded. That's EXACTLY the same weight as my Soviet Makarov and 1/2 an ounce more than my East German one. Weight is always a concern of military firearms and this area of the trunnion was a good place to shave some unwanted weight. Just below the lightening cut we can see a line running side to side in the magazine well. This is where the trunnion ends and the side plates begin. On the other side of that line on the ouside of the frame is the bottom of the trigger guard.


    Okiedokie. One more post and we're done!
     
    Last edited:

    Combloc

    Stop Negassing me!!!!!
    Nov 10, 2010
    7,268
    In a House
    Let's now move to the back of the frame to finish up.
    First up is the ejector. It's simple stamped out as part of the left side plate:


    Should it ever break, it's not replaceable and will most likely render your pistol junk unless you know a talented welder. I wouldn't worry about it.


    Here is the decocker plat/plunger/thingee. Call it what you want but it's the part that gets pushed down to decock the pistol when you engage the safety:


    For some reason, it's numbered to the pistol. I think I screwed up earlier when I said that there is a stop bar what prevents the hammer from striking the firing pin when the pistol is decocked by applying the safety. There IS a bar and it IS in place to stop the hammer....most of the time. The only times it will NOT stop the hammer from full forward travel is when the hammer is cocked and either the trigger is pulled or the safety is applied. So what stops the hammer from hitting the firing pin when the safety is applied and the hammer falls? Two things. The cutout in the hammer and the fact that the firing pin is hooked to the rear of the slide thus preventing it from moving forward. So then, the safety system is NOT double redundant, just redundant. Got it?? Good!


    On the left side of the frame is the slide stop:


    What do you think it's made out of? You guessed it....pressed metal. Notice that it's a nice plum color. That's one very hardened part there!


    Here we see the right side of the magazine well:


    Why there are both electropenciled and stamped numbers is unclear to me. Perhaps one was applied during manufacture and the other was applied when the pistol was finished? I don't know. The main reason we're looking at this picture is to note the little dimples pressed into either side of the cutout running up the entire length of the frame. These provide the minimum necessary surface for the magazine to slide against on the inside of the frame. This reduces friction and aids in ejection of the magazine. When you push the heel mounted magazine release button, there is absolutely no need to pull the magazine out. Rather, it shoots out on its own quite smartly. The other reason for minimizing magazine to inner grip contact is to enhance reliability. It provides areas for dirt and funk to go rather than jamming up the works when you try to insert a new magazine. That's intelligent design!


    The final part of the frame and the last thing we need to look at is the back strap. Of course, it's stamped too and is slid down into the frame from above before finally being welded to the side plates. We see it here from the rear with the grips removed:


    You can see that it fits inside the side plates, doubling the thickness of the frame material in this area. This doubling doesn't matter down here in the grip area but it comes in quite handy when we get up to the slide rails and lockwork components.


    Here is the rear of the frame:


    Notice that we see two thicknesses of material again. The outer is the sideplate and the inner is the back strap. In effect, the whole rear of the frame is double thick laminated steel. All of the axle pins for the lockwork components pass through this area and so are amply supported, enhancing longevity. There is zero chance of any holes becoming egged out through use. Additionally, the back strap forms part of the double thick slide rails. Below is shown the left one but the right one is similar:


    Here's one last shot of the back strap as seen from above and forward of the lockwork showing how it fits in between the side plates:


    Well, that about covers it. Now you know.....if you own of these little marvels, you're holding quite a bit of engineering genius in your hand. From the outside, it looks like an unassuming cracker jack communist pistol, nothing special. But once you think about how it was actually built, you come to realize that it's really something quite special. It's an example of one of those exceedingly rare and wonderfully magnificent times that someone (Ryszard Chełmicki and Marian Gryszkiewicz in this case) was allowed to think way outside of the box and come up with a completely different way of doing something mundane....and it worked. That's really saying something in any established industry here in the West. But for it happen deep inside the Iron Curtain at the height of the cold war? Now THAT'S something really special. The more I study this little guy, the more I see that it's very much just a modernized and better built Jager. I guess to some (maybe even most), a pistol made almost entirely of stamped parts is nothing more than a way to build something as cheaply as humanly possible. If seen in that light, then yes, the P83 is kinda' sad really. But it's sturdy, reliable and works as well as any other machined pistol. It's the same answer just arrived at by a different road. If you see it in that light, then maybe you'll tip your hat to Mr. Chełmicki and Mr. Gryszkiewicz. I'm always on the side of those folks who think a little differently. These guys certainly did and this little gem is prove positive of that fact. I'd be proud to have my name associated with such a design and I bet they are too!
    Well, I'm done. I hope you enjoyed this half as much as I enjoyed writing it. Thanks for your time and I'll see you at the range!
     
    Last edited:

    Bob A

    όυ φροντισ
    MDS Supporter
    Patriot Picket
    Nov 11, 2009
    31,015
    Great stuff. You should forward this to ATF and suggest this pistol be considered for C&R status :)

    NRA Museum curator would have that kind of pull.

    I had been thinking along these lines as well, after reading the first installment. Of course, that thought was initiated by the hope of using my C&R, instead of going through the pricey HQL route, cheap SOB that I am.

    But again, you make an excellent case for this curious Cold War relic.
     

    toolness1

    Ultimate Member
    Jan 5, 2014
    2,723
    BFE, Missouri
    NRA Museum curator would have that kind of pull.

    I had been thinking along these lines as well, after reading the first installment. Of course, that thought was initiated by the hope of using my C&R, instead of going through the pricey HQL route, cheap SOB that I am.

    But again, you make an excellent case for this curious Cold War relic.

    I know it doesn't count for squat, but I feel real bad for you guys having to go through all that commie crap with the HQL. :mad54::mad54::mad54:
     

    WatTyler

    Ultimate Member
    This is the best write-up of the P-83 that I have ever seen, in any language. I love mine; like so many well-engineered things, it just does the job it's designed for, and will continue to do so for a long, long time. Back in the 70s, we used to ignorantly mock things Polish. Since I exclusively collect Combloc guns, I don't laugh so much these days. Thanks for a great job.
     

    Combloc

    Stop Negassing me!!!!!
    Nov 10, 2010
    7,268
    In a House
    Yesterday I finally got a chance to take the little P83 to the range. Now, I always say that I'm not a very good shot.....because I'm not and so I'm sure the P83 is capable of much better than I'm going to show below. For comparison purposes, I took a SIG P210 along too. I took 100 rounds for each pistol. For the P83, I took some of the old burgundy box Barnaul and I took a mixture of Federal and GECO 115 grain for the SIG. Both pistols were aimed at the center of the orange dot at a distance of 15 yards. 92 of the 100 for each pistol were fired at the target and the other 8 were for playing around shooting at the berm. I had both pistols so hot that you couldn't touch the barrel and the SIG was getting pretty warm up in the trigger guard so I wasn't exactly slow firing. While the P83 shot a little low and to the left, I was perfectly happy with the results.

    So, 92 rounds semi quick fire at 15 yards for the P83:


    And, for comparison, 92 rounds semi quick fire at 15 yards for the SIG:


    The SIG is capable of putting all 92 rounds into the orange dot at that distance so that should give you some idea of just how bad a shot I am. In YOUR hands, the P83 should be an extremely capable shooter.

    Obviously, both pistols functioned 100%. The P83 is a little snappy compared to a Makarov and the trigger is not as good (especially compared to an East German Mak) but it's completely manageable and comfortable enough to shoot all day. Yes, it feels absolutely primitive compared to the SIG but that's not really a fair comparison. So in my final judgment, the little Radom is a keeper. I give it a double thumbs up and I would recommend it to anyone!!
     

    Users who are viewing this thread

    Latest posts

    Forum statistics

    Threads
    275,639
    Messages
    7,289,385
    Members
    33,491
    Latest member
    Wolfloc22

    Latest threads

    Top Bottom