As mentioned in a past MD Shooters post on known distance events, Project Appleseed has a reputation as a 22@25 (22LR at 25 yards) organization, although we coach on how those skills translate out to 500-yards. But practicing is just as valuable as preaching.
We are lucky in Maryland to have several 200-yard events each year at the excellent Delmarva Sportsman Association club in Sudlersville, MD. The 200-yard rimfire events are particularly valuable as 22LR bullet drop is exaggerated between 50 and 200 yards and you must make significant sighting adjustments at each range.

At one of these long-range rimfire events earlier this year, a student brought a Tech Sighted Marlin 60 with the front sight modified to provide sufficient reach out to 200 yards. Unfortunately, the front sight came loose during the event and he was unable to really test its potential.

But it did inspire a question: could an iron sighted 22LR score on a full-range AQT?
200-Yard Rimfire with Optics is Challenging Enough!
Shooting 22LR at 200 yards, even with optics, typically requires a degree of specialization. For a standard cross-hair reticle scope, a 20-MOA elevated base is required or the scope will run out of upward adjustment at about 150 yards. Scopes need to be of sufficient quality for these events as well. Typical scope problems at long range include:
The 6X Primary Arms ACSS scope on my Tippmann M4-22 conforms to the range indicators for 50 and 100 yards, but does not conform to the 150-yard mark (requiring use of the next unmarked line down on the BDC) or 200 mark (requiring an additional 4 MOA of elevation dialed into the knobs) with high velocity 22LR. Part of the Appleseed long range clinic is verifying zero at range to understand these required changes from expectations.
So if 200-yard rimfire is that complicated with scoped rifles, what would be the ideal iron sights set-up for 200 yards?
Where to Start with Long-Range Rimfire Irons
There are a few different styles of iron sights available for rimfire rifles that would be appropriate for long-range shooting.
It was clear that stock OEM iron sights were out: most of them are “set it and forget it” – using a hammer to drift the sights between courses of fire is bad enough for making discreet adjustments at 25 yards, much less 200. And with the significant adjustment range required, and consistent return to several other zero points during a course of fire, these were out.
Tech Sights were certainly an option that other people were trying. The TS 200 sights for Ruger have elevation adjustments on both the front and rear sights. So between both, there could be enough elevation. If that does not work, the other option is to either file down or replace the front sight with a shorter model (remember FORS: Front-Opposite, Rear-Same – a lower front sight means higher elevation).
Maybe that is my next test rig, but it wasn’t my first choice. First, the click feel on Tech Sights is ok but I have trouble counting them perfectly. Second, it takes time more time to adjust than an optic or other styles of iron sights. While prep periods are untimed for Appleseed, you still want to move quickly. Third, you would have to keep track, most likely, of both rear and front adjustments conforming to your expected POI very carefully. Losing track would be pretty disastrous during an AQT without target feedback you might get with a scope.
That led to two other options – aperture target sights and graduated tangent sights.
Aperture Target Sights
There are a number of OEM and aftermarket rimfire aperture target sights available, though mostly tailored to bolt actions. And these are standard sights for competitions so you will find them on such fine rifles as an Anschutz. That rifle would probably be a bit overkill for Appleseed but it is an indicator of their potential precision.
One OEM rifle that comes with a good set of aperture target sights is the Savage MK II FV-T bolt action. The Savage MK II is a quality rifle with a heavy target barrel, Williams sights, and strong aftermarket support. The main complaint is about the poor quality of the stock, but replacements are available and recommended. I already have a Savage MK II that was an excellent Appleseed rifle so common magazines and platform familiarity nearly pushed me in this direction. And it would provide to be a quality set-up, as I will discuss later, in someone else’s hands.
Graduated Tangent Sights
The CZ 452, 455, and 457 Training models (and some of the Ultra Lux models as well) have tangent rear sights with marked distances of 25, 50, 75, 100, 125, 150, 175, and 200 yards. There is also an intermediate position between each of these settings which provides even more flexibility. Simply move the slider to move to a different range and the sight elevates or depresses appropriately.
25 yard setting:

200 yard setting:
The rear sight is also horizontally adjustable for zero, with one full turn of the aperture screw moving the point of impact (POI) 4 MOA (1 inch at 25 yards) in the same direction as travel. Not as simple as dialing in an MOA on a scope for wind, but more than accurate enough for establishing or correcting an initial zero.
The 6-MOA front sight is adjustable vertically to help establish your initial zero. There are two Allen screws in the front face of the front sight. The top screw locks and unlocks the post for movement. The bottom screw raises or lowers the POI 3 MOA for every 1/6 of a turn. Due to FORS, it is a bit confusing so I will simplify the instructions: turn clockwise to LOWER your POI, counter-clockwise to RAISE your POI.
You definitely want to minimize your front sight adjustments and rely on the rear tangent sight from elevation during an event – I found the 1/6 of a turn harder to measure with a tiny Allen wrench on the line and tended to over-adjust. Not something to try to do consistently during a course of fire!
Downselecting and Establishing Confidence with the Rifle
It became clear that I was going to have to get a bolt action rifle. Bolt actions are great options for Appleseed at 25 yards and beyond. They require practice and concentration to maintain a proper cheek weld while working the bolt. I own a CZ 455 Scout with Tech Sights that is very fun, though challenging, to shoot at 25 yards. I reviewed it here.
With the magazine and familiarity argument nullified between my two choices, I decided that the CZ 455 trainer was better looking (if I am being honest) and required fewer modifications because the stock was usable as-is (argument I would have used with my wife if she had objected – she did not and is an amazing woman). I chose the 455 over the newly released 457 because it was less expensive (clearance sale at my local gun store) and more common with my other 455. My biggest regret is that I could have had, essentially, the best of both worlds as I once owned a CZ 452 Ultra Lux with Brno target aperture sights but sold it years ago. Lesson learned – never sell a quality rifle!
While I was already a CZ 455 user and the 200-yard rimfire event has several opportunities to define and verify zero at 50 yards and beyond, I decided to spend a few months getting to know the rifle, sighting system, and ammunition options.
I do not have a good outdoor range near me so I went to Elite Shooting Sports in Manassas, VA, an excellent indoor range with 25, 50, and 100 yard options. I always opted for the 50-yard range to match the 50-yard initial zero at the rimfire event. Live fire was supplemented by a significant amount of dry-fire practice in my basement “25-foot range”.
The first couple range trips were frustrating. I am not the greatest shooter in the world but do regularly shoot practice and real AQTs with iron sights to qualify in the low 230s. But I was grouping much worse than normal with the rifle and can share some lessons learned.
Ammunition Choices
200-yard rimfire doesn’t require specialized target ammunition but ammunition variables grow in importance as you move beyond 25-yards.
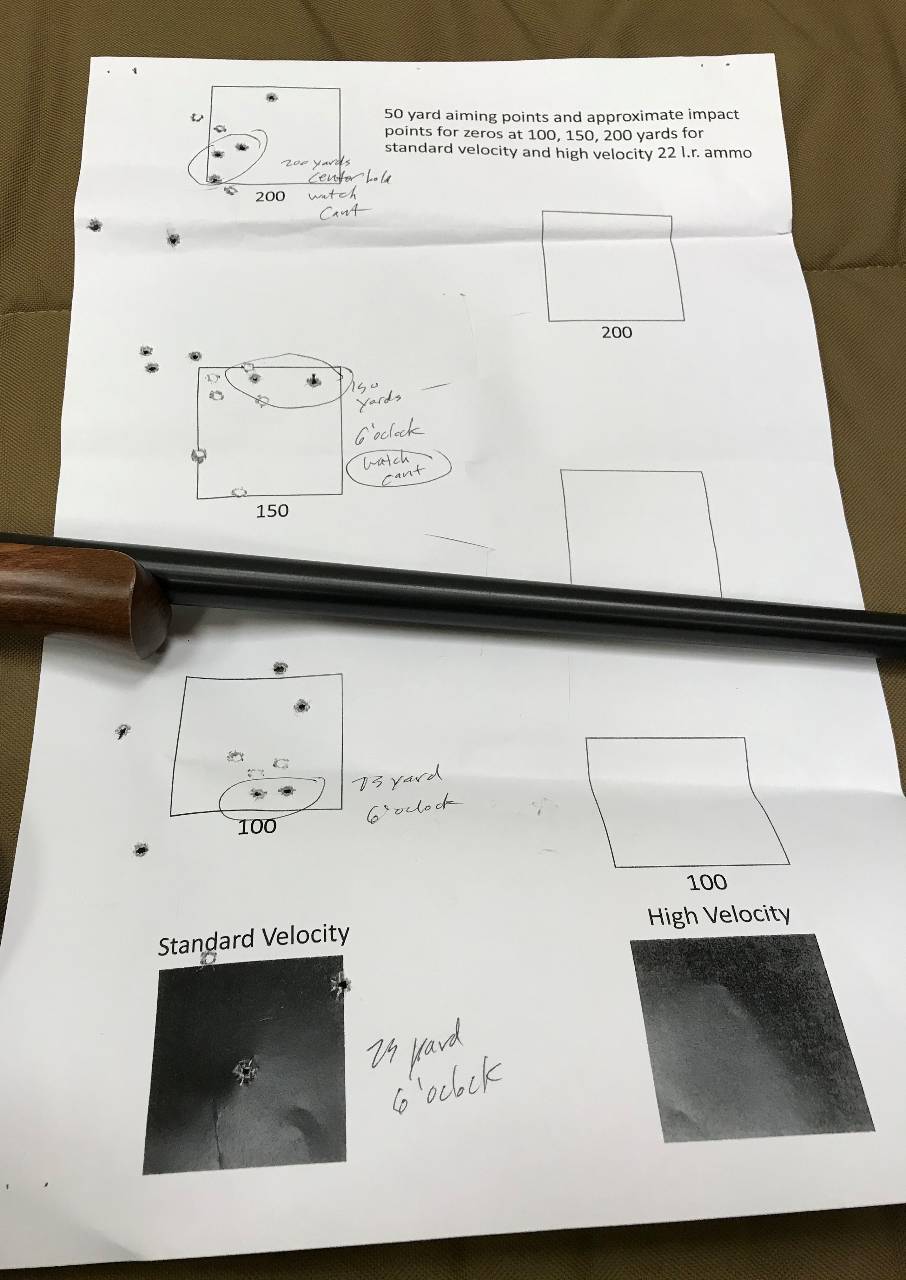
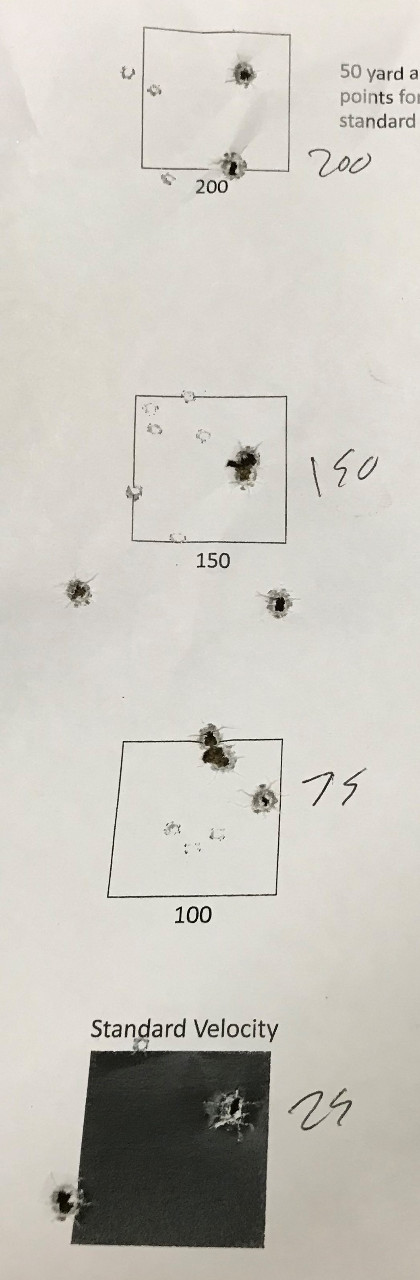
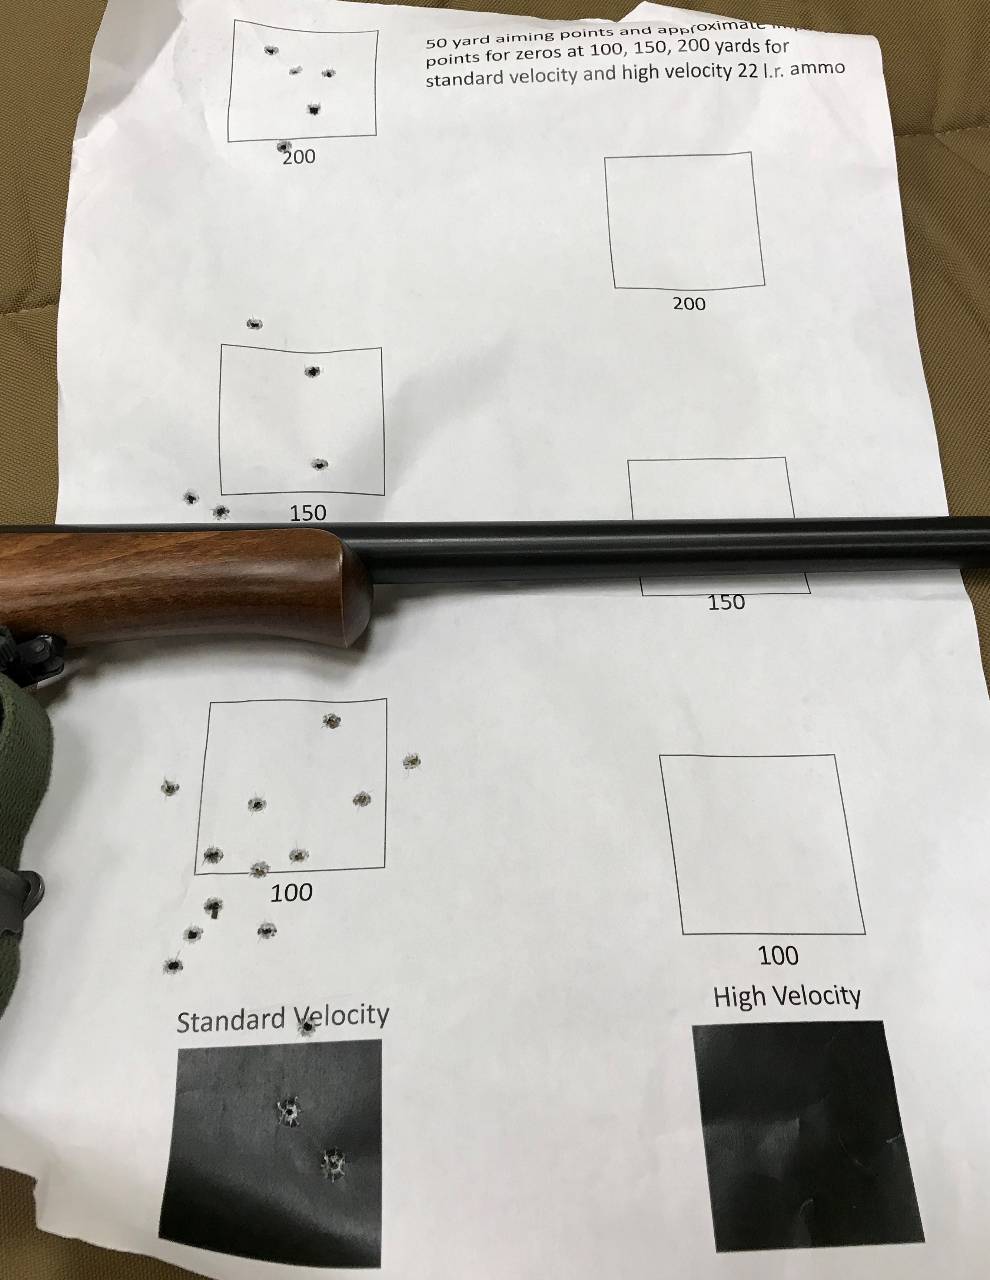
The first consideration is whether to use standard or high velocity ammunition. MDshooter, a Maryland IIT that has spearheaded development of our 200-yard curriculum and course of fire, develop a set of 200-yard rimfire squares targets. They have a point of aim (POA) square scaled for 50 yards and estimated POI come-ups for both SV and HV rimfire ammunition through 200 yards. Though they are designed for 50-yards, they can be easily scaled to 25-yard and even 25-foot varieties – an MOA is an MOA after all, and this target proves it! High velocity ammunition will have less drop than standard velocity between 50 and 200 yards and therefore requires less elevation adjustment. But the case for HV is not so clear-cut.
The CZ graduated tangent sights are designated for specific ranges and must assume one velocity or the other since they are so different. Likewise, different manufacturers advertise and deliver different muzzle velocities, use different bullet weights, have different standard deviations of velocity between different rounds or boxes of ammunition, and so on. Long range rimfire shooters also debate whether HV can be as accurate as SV due to transonic deceleration, barrel whip, and other physics magic, perhaps real, perhaps imagined. Finally, most people agree that different rimfire rifles have different “favorites” for reasons that specs can’t explain.
I am largely a standard velocity shooter for Appleseed but knew I should try out different options to match the rifle and sights.

Blade vs. Aperture Rear Sight
The CZ tangent sights are mounted mid-length on the rifle (as is standard for that style sight) and have a standard blade/partridge rear – a notch the front sight fits into with “equal height, equal light” being the goal. I found it very hard to focus on the front sight and confirm sight picture and alignment with the rear sight and the target.
Since I am more used to aperture sights, I decided to see if there were any options. J&P Custom Products makes a set of rear sight apertures that replace the blade sight very quickly and with little to no impact on zero. J&P offers 1/16", 3/32", and 1/8" apertures - I read multiple reviews on the “ideal” size and found no one quite agreed so I bought a set with all three.
My testing was done in an indoor range and the basement dry fire “range” and I found that the 3/32” aperture provided the best balance of light and target contrast at 50 yards. I also found the front sight hard to pick-up in the darkness of the indoor environments and took off the front sight hood.
Establishing and Verifying Preliminary DOPE
During several range trips I tested out different ammunition and aperture options. The results were not always pretty and there was a lot more trial and error than I am used to. It is harder to get feedback from iron sights than scopes – sending out and bringing back target carriers takes time and breaks your NPOA. The groups are larger at 50 yards than 25. The contrast between a black square and the 6 MOA black front sight is poor. These aren’t meant to be excuses – they are the challenges that I had to overcome to build confidence with my rifle and sighting system.
Over the first two trips, I developed what I thought was a good zero and validated settings for the Eley Force HV ammunition. However, the next time I went to the range the POI was not the same and groups were larger than required. I came home frustrated (again).
I decided to switch to the SK Standard Plus SV ammo and I started to get more consistent groups which made it easier to test the ladder against the standard targets. I also started using a spotting scope on the mat so I could improve feedback.
Two weeks before the event, I ran a final test on a 25 yard scaled target and was satisfied that my DOPE was workable.
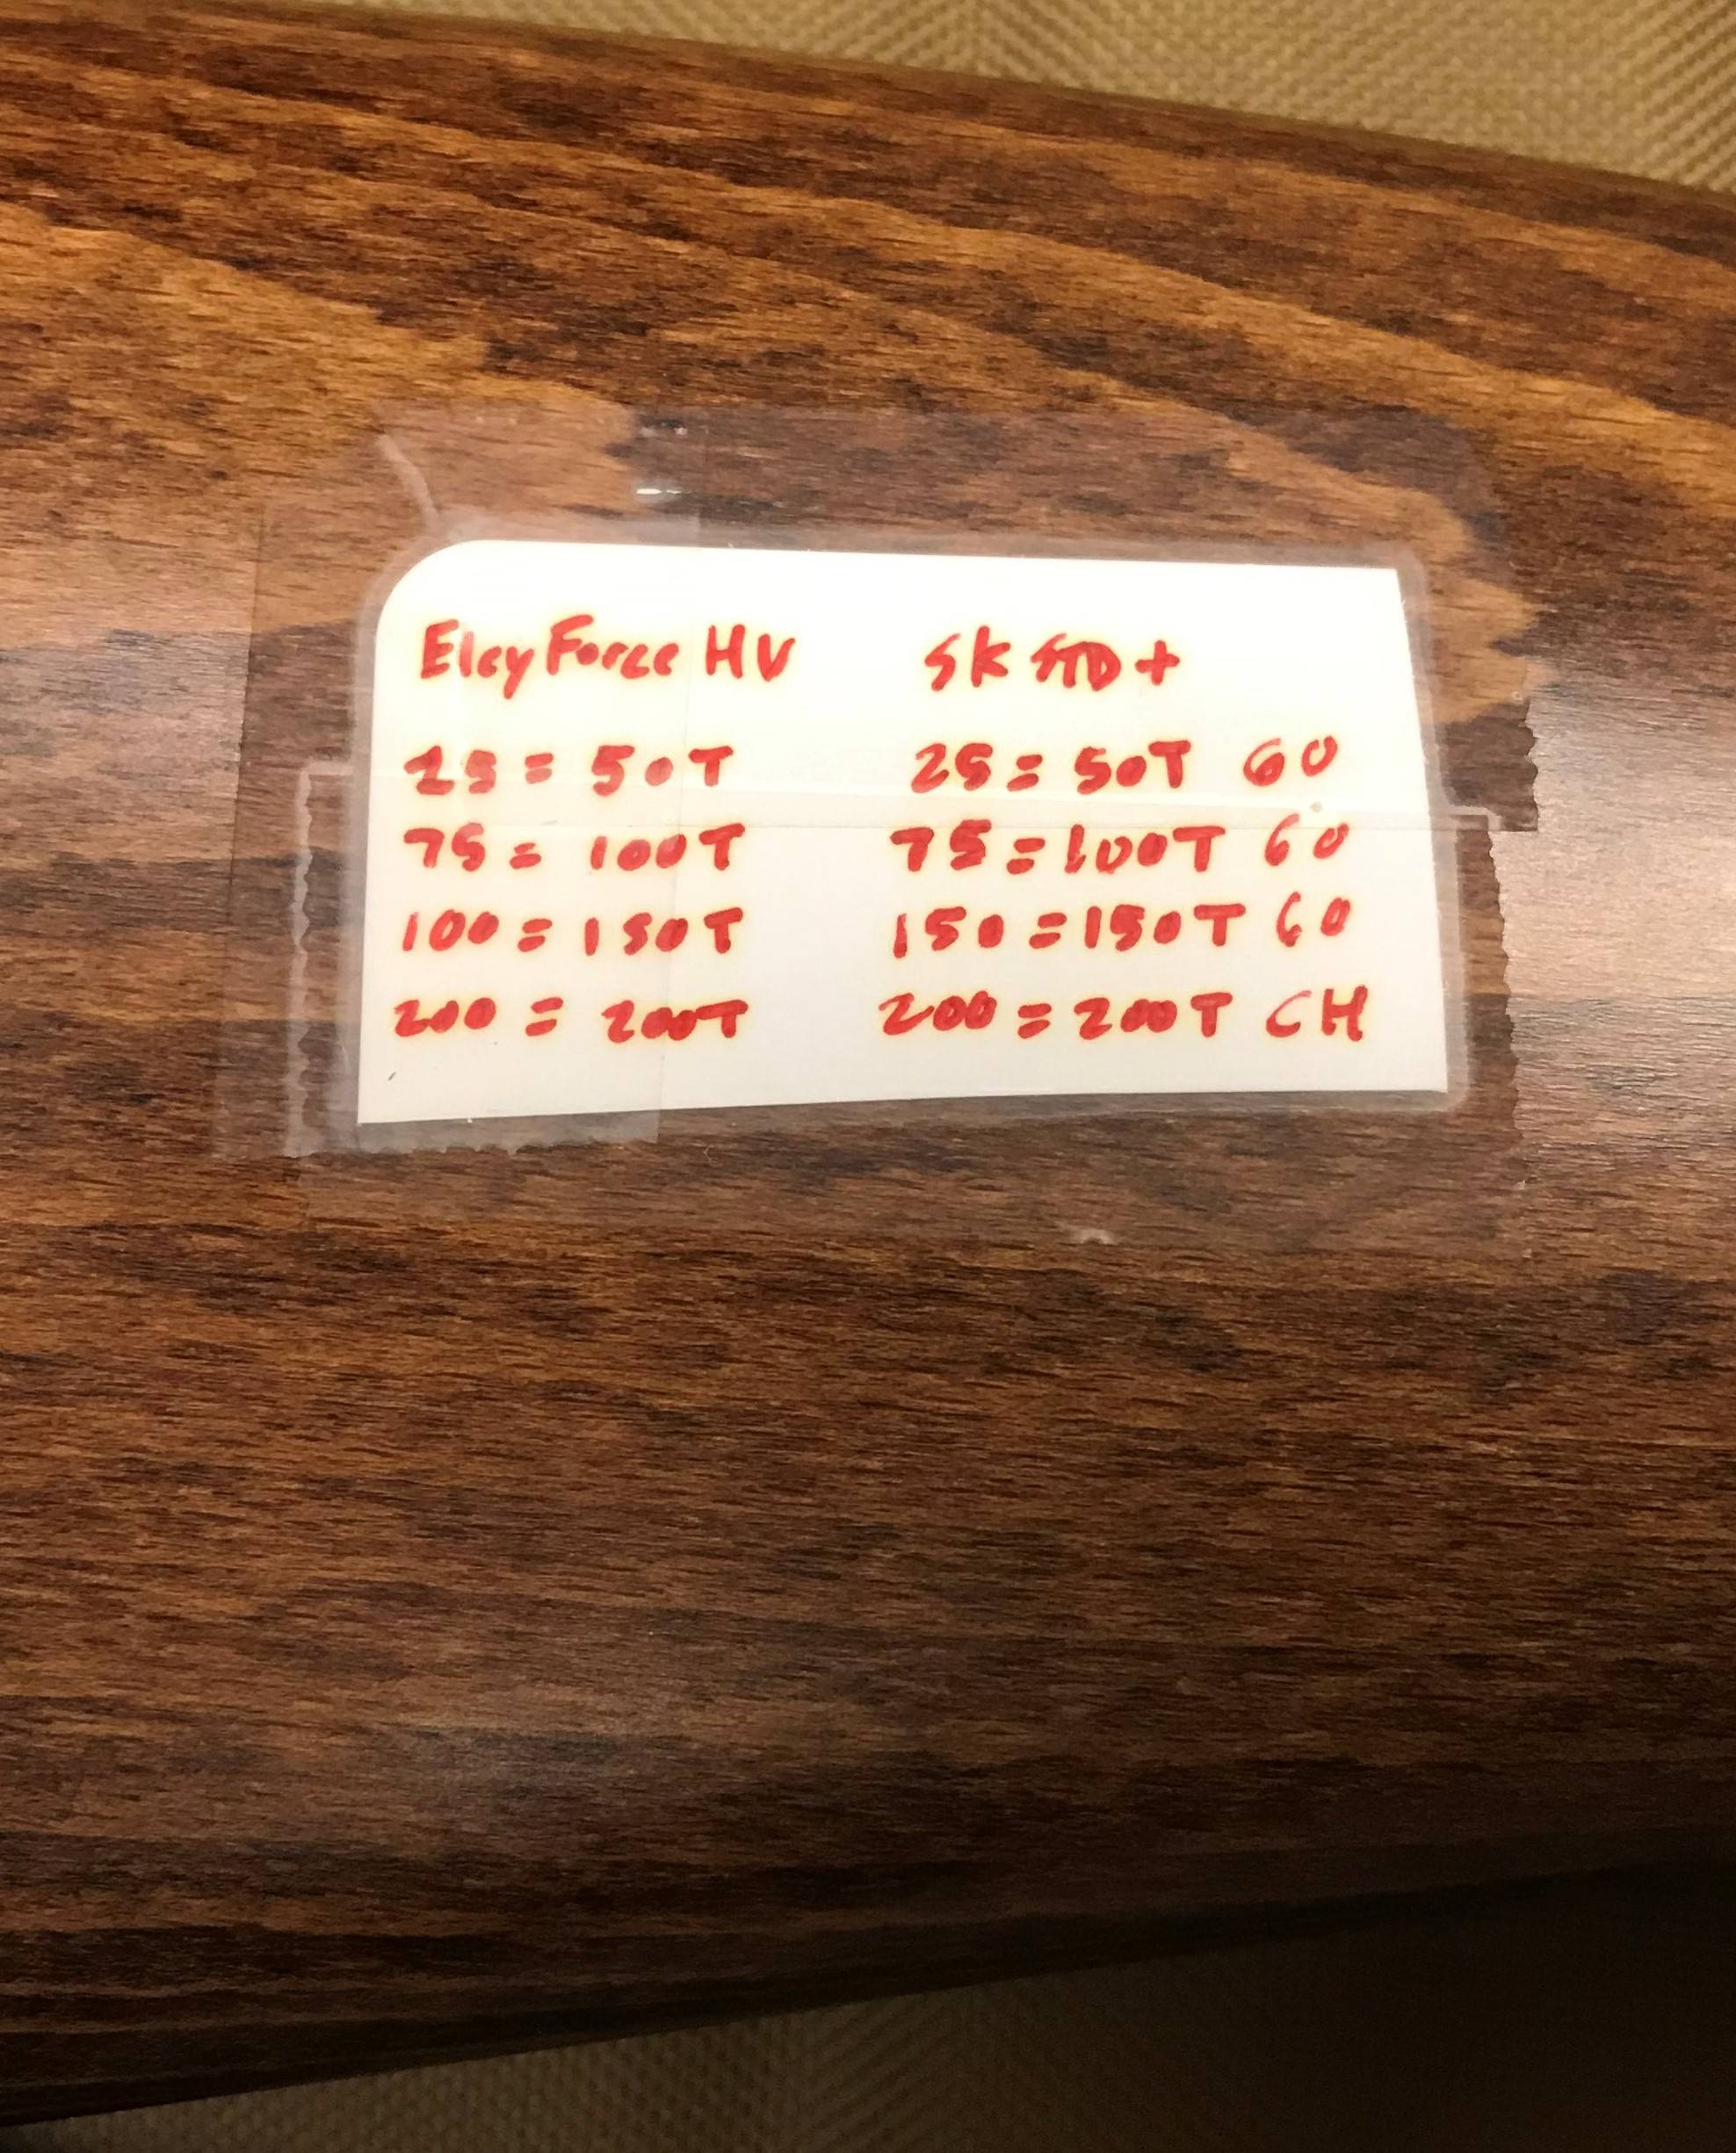
I created a data card for the rifle for its preferred SV ammo, and, just in case, the best settings I had worked up for HV.
The clinic was on September 30, 2019 - a full AAR of the event is available here.
The Clinic: Confirming Zero on the 50 Yard Range
We started the day with a standard Red Coat target at 50-yards on the Pistol Range. Those of us with iron sights realized that this was going to be a long day – the smallest targets were not visible at all. The low morning sun was also directly in our faces and that made it harder to resolve the front sight. I really wished I had the front sight hood I had removed.
We then switched over to verify our 50-yard zero on a 4-MOA square from the prone position. I found I was grouping lower than expected from my initial zero from the indoor range. The bright sunlight of the outdoor range made it hard to get a crisp front sight so I switched to the smallest 1/16” aperture – it worked much better. Luckily, that change was easily done on the mat and a windage correction was dialed in easily from there. I did struggle a bit with elevation – as I mentioned earlier, front sight adjustments are not that easy and I significantly over corrected the first time.
We then started inputting our sight adjustments to test whether our elevation adjustments would put us in the expected POI for 100, 150, and 200 yards. I found that my preliminary DOPE work-up was spot-on. After working up to 200, I went back down to my 50 yard setting to ensure everything was working correctly. Good-to-go.
The Clinic: Confirming Zero at Range
We then switched over to the 200-yard range to shoot at paper targets to verify that the predicted POI of the squares matched our actuals. Time-called practice seated at 100 and prone at 150 and 200 yards gave me a feel for the cadence that would be required when we began AQTs – bolt actions are slower to operate and re-establishing focus on the front sight and target within time is not easy.
The wind was also worse than most days at this particular range (which is mostly shielded from the wind from most directions) - we definitely saw the effects on POI at the 200-yard distance and it meant a greater effort to read the wind for the rest of the day. However, I also learned more about over-correcting: my 6 MOA front sight made holding the wind a bit harder than I expected. But I was able to confirm my zero from the squares, which also matched my pre-clinic work-up.
After the practice rounds, it was time to switch to the Appleseed Qualification Targets (AQTs)!
The Clinic: First AQT
AQTs were conducted on steel using the “hits count” method on a round white target. There are 50 available points/hits over the course of the AQT: 2 10-round slow fire prone stages at 200 yards, 1 10-round standing transition to prone stage at 150 yards, 1 10-round standing transition to seated stage at 100 yards, and 1 10-round standing stage at 50 yards. A 40 qualifies as Rifleman.
We worked the first AQT backwards - we did the 2 slow fire prone stages from the covered firing line first and then moved the firing line into the grass progressively toward the target line. I did not have any issues with time despite the bolt action – I was able to finish most stages with 5-10 seconds to spare.

We were not told our scores on any of the stages. We ended at 50-yards standing and I took my time to fuss every shot – I was able to score 10 out of 10. And that was significant because I qualified with a 40 on the first AQT! I had hit 15 out of 20 on the 200-yard target, which I am also proud of. The Shoot Boss found it a bit anti-climactic – maybe this is too easy – but I was relieved and found it plenty hard.

The Clinic: Second AQT
We then worked back toward the covered firing line for the second AQT in the normal stage order.
With the stress of qualifying behind me, my focus was to clean a few things up and try to increase my score. I dropped a point each in seated and prone from pushing up too hard on my magazine and having the top round pop out! Anyone who tells you that only semi-automatics are liable to malfunctions just aren’t running a bolt action hard and fast enough. I should also try keeping the bolt closed on reloads in the future.
I ended up scoring in the high 30s and did not requalify. However, another participant qualified with the aperture sighted Savage MK II FVT mentioned above during the second AQT. His groups in practice had been tighter than mine and he finally broke through. I was happy to be first but also happy not to be the only!

The Clinic: Third AQT
It is very unusual to get more than two AQTs done in a one-day clinic, especially a full distance steel shoot that requires moving the line, taking scores, repainting the steel, etc. We have some clinics where we only finish one AQT. So when we were asked about a third AQT, everyone volunteered to give it one more go despite being tired and dehydrated Maybe I shouldn’t have – I scored in the mid-20s. When I go south shooting irons, I go WAY south. But I had already accomplished my mission and was satisfied with the day.
Conclusions and Lessons Learned
I found the whole experience – deciding to take on the challenge, to picking a rifle, testing the sights with different ammunition options, and running it full speed under pressure – to be extremely rewarding.
While I am a relatively experienced Appleseeder and Shoot Boss, I find that I am always learning from each clinic I go to as a participant or instructor. I was grateful that there was room on the line for this event.
To summarize my lessons learned:
We are lucky in Maryland to have several 200-yard events each year at the excellent Delmarva Sportsman Association club in Sudlersville, MD. The 200-yard rimfire events are particularly valuable as 22LR bullet drop is exaggerated between 50 and 200 yards and you must make significant sighting adjustments at each range.
At one of these long-range rimfire events earlier this year, a student brought a Tech Sighted Marlin 60 with the front sight modified to provide sufficient reach out to 200 yards. Unfortunately, the front sight came loose during the event and he was unable to really test its potential.
But it did inspire a question: could an iron sighted 22LR score on a full-range AQT?
200-Yard Rimfire with Optics is Challenging Enough!
Shooting 22LR at 200 yards, even with optics, typically requires a degree of specialization. For a standard cross-hair reticle scope, a 20-MOA elevated base is required or the scope will run out of upward adjustment at about 150 yards. Scopes need to be of sufficient quality for these events as well. Typical scope problems at long range include:
- Poor Tracking: Shooters are dialing in a substantial number of clicks between 50 and 200 yards. If tracking is poor (1 click does not actually and consistently conform to the advertised MOA), it will be difficult to retain consistent zero at different ranges over multiple AQTs. The “box test” is a good validation of scope tracking and is easy to measure with the Appleseed Squares target.
- Poor Click Feel: Similar to above, if the shooter is unable to tell how many clicks they have dialed in, they can get lost easily. Using scope markings and counting rotations can help, but for fine adjustment a better click is, well, better.
- Undefined Adjustment Range: One of the ways we help students learn about their 50-yard zero is to verify it, count the clicks all the way to the bottom stop of the scope, add back in that value, and confirm zero again. That way if they lose track of clicks at different ranges, they can get back to a starting value. However, some poor quality scopes will not “bottom-out” – the knobs will continue to rotate without changing inputs or they will break at the bottom of the range.
The 6X Primary Arms ACSS scope on my Tippmann M4-22 conforms to the range indicators for 50 and 100 yards, but does not conform to the 150-yard mark (requiring use of the next unmarked line down on the BDC) or 200 mark (requiring an additional 4 MOA of elevation dialed into the knobs) with high velocity 22LR. Part of the Appleseed long range clinic is verifying zero at range to understand these required changes from expectations.
So if 200-yard rimfire is that complicated with scoped rifles, what would be the ideal iron sights set-up for 200 yards?
Where to Start with Long-Range Rimfire Irons
There are a few different styles of iron sights available for rimfire rifles that would be appropriate for long-range shooting.
It was clear that stock OEM iron sights were out: most of them are “set it and forget it” – using a hammer to drift the sights between courses of fire is bad enough for making discreet adjustments at 25 yards, much less 200. And with the significant adjustment range required, and consistent return to several other zero points during a course of fire, these were out.
Tech Sights were certainly an option that other people were trying. The TS 200 sights for Ruger have elevation adjustments on both the front and rear sights. So between both, there could be enough elevation. If that does not work, the other option is to either file down or replace the front sight with a shorter model (remember FORS: Front-Opposite, Rear-Same – a lower front sight means higher elevation).
Maybe that is my next test rig, but it wasn’t my first choice. First, the click feel on Tech Sights is ok but I have trouble counting them perfectly. Second, it takes time more time to adjust than an optic or other styles of iron sights. While prep periods are untimed for Appleseed, you still want to move quickly. Third, you would have to keep track, most likely, of both rear and front adjustments conforming to your expected POI very carefully. Losing track would be pretty disastrous during an AQT without target feedback you might get with a scope.
That led to two other options – aperture target sights and graduated tangent sights.
Aperture Target Sights
There are a number of OEM and aftermarket rimfire aperture target sights available, though mostly tailored to bolt actions. And these are standard sights for competitions so you will find them on such fine rifles as an Anschutz. That rifle would probably be a bit overkill for Appleseed but it is an indicator of their potential precision.
One OEM rifle that comes with a good set of aperture target sights is the Savage MK II FV-T bolt action. The Savage MK II is a quality rifle with a heavy target barrel, Williams sights, and strong aftermarket support. The main complaint is about the poor quality of the stock, but replacements are available and recommended. I already have a Savage MK II that was an excellent Appleseed rifle so common magazines and platform familiarity nearly pushed me in this direction. And it would provide to be a quality set-up, as I will discuss later, in someone else’s hands.
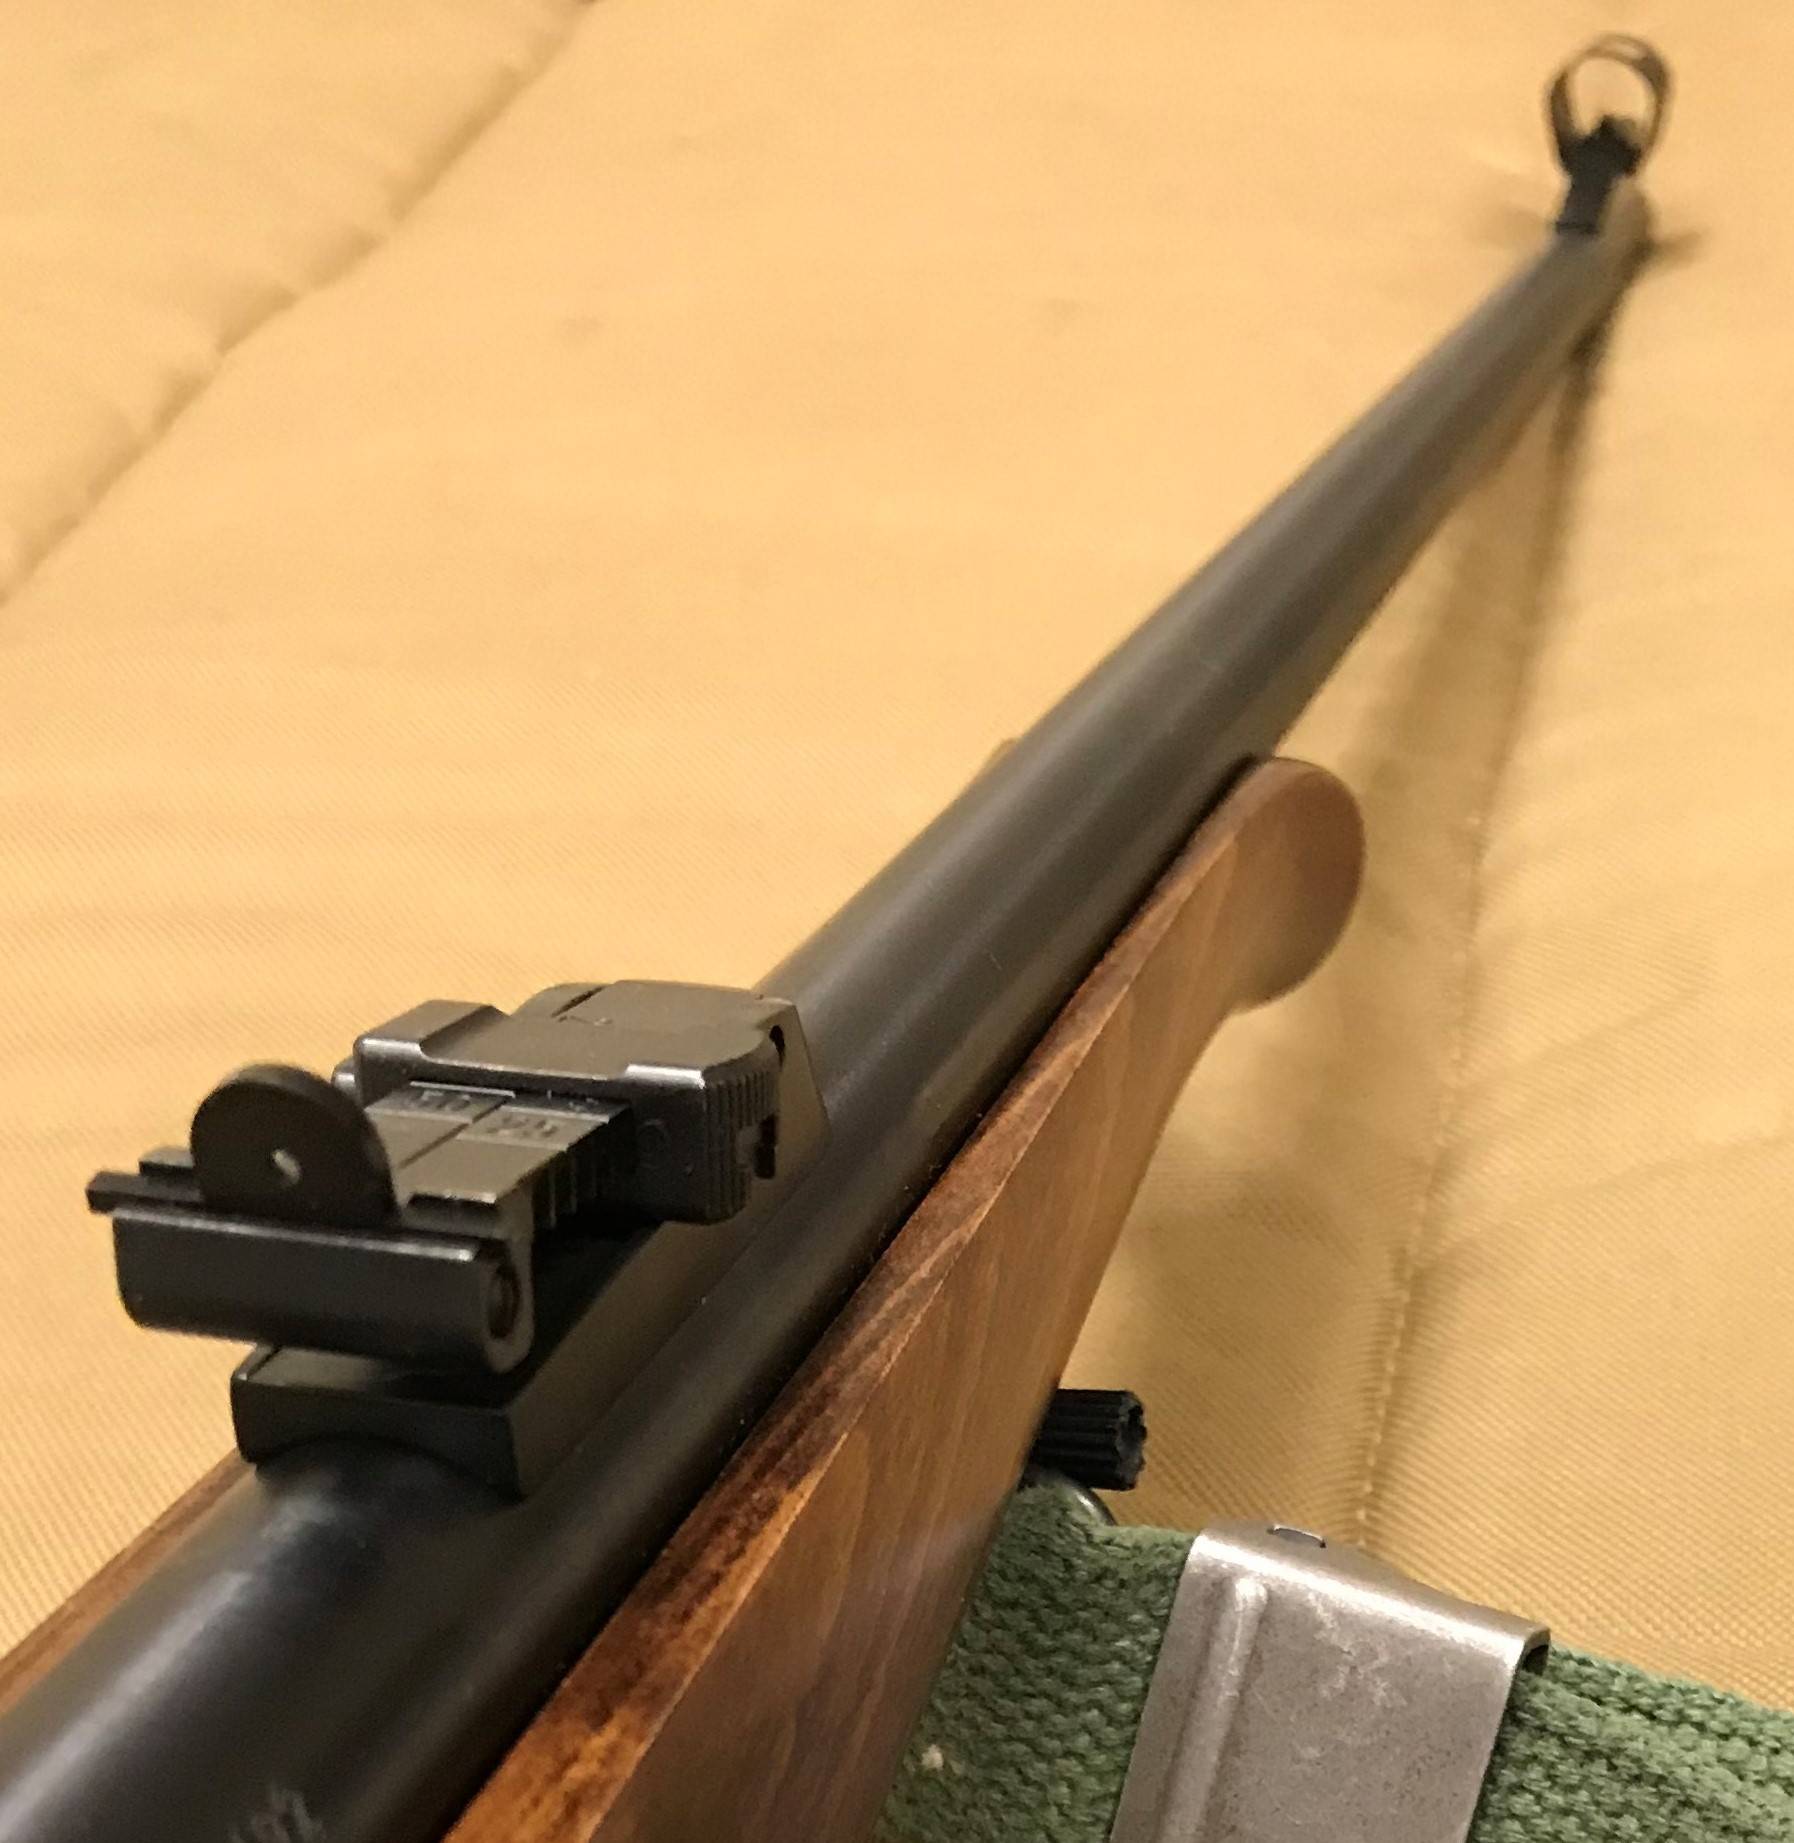
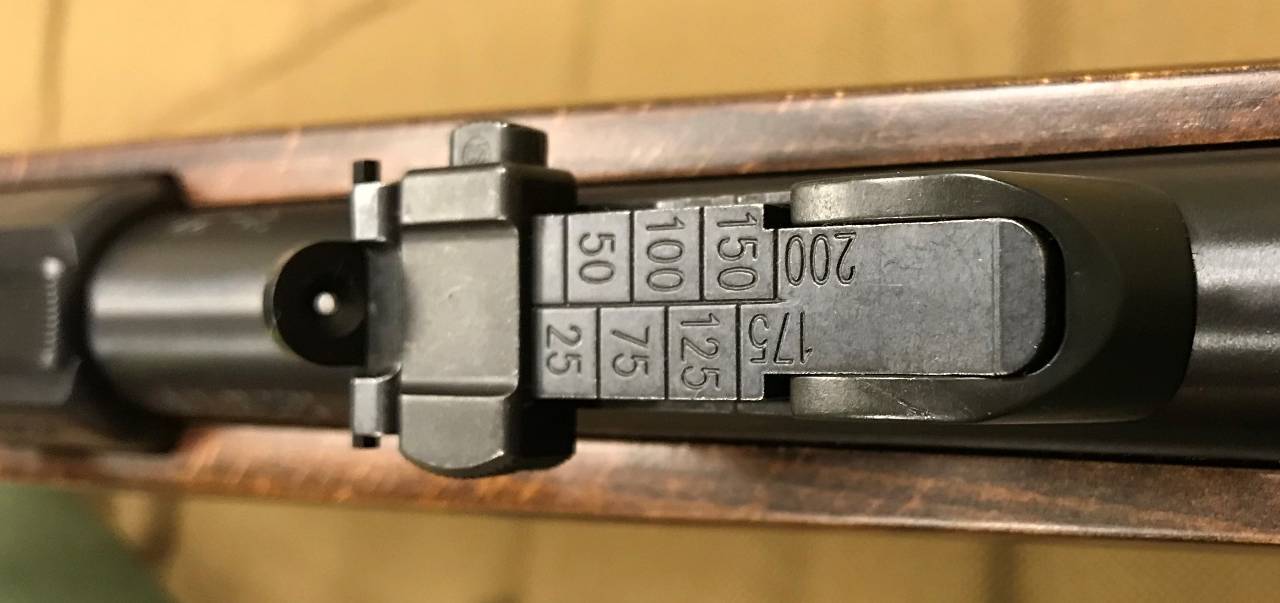
Graduated Tangent Sights
The CZ 452, 455, and 457 Training models (and some of the Ultra Lux models as well) have tangent rear sights with marked distances of 25, 50, 75, 100, 125, 150, 175, and 200 yards. There is also an intermediate position between each of these settings which provides even more flexibility. Simply move the slider to move to a different range and the sight elevates or depresses appropriately.
25 yard setting:
200 yard setting:
The rear sight is also horizontally adjustable for zero, with one full turn of the aperture screw moving the point of impact (POI) 4 MOA (1 inch at 25 yards) in the same direction as travel. Not as simple as dialing in an MOA on a scope for wind, but more than accurate enough for establishing or correcting an initial zero.
The 6-MOA front sight is adjustable vertically to help establish your initial zero. There are two Allen screws in the front face of the front sight. The top screw locks and unlocks the post for movement. The bottom screw raises or lowers the POI 3 MOA for every 1/6 of a turn. Due to FORS, it is a bit confusing so I will simplify the instructions: turn clockwise to LOWER your POI, counter-clockwise to RAISE your POI.
You definitely want to minimize your front sight adjustments and rely on the rear tangent sight from elevation during an event – I found the 1/6 of a turn harder to measure with a tiny Allen wrench on the line and tended to over-adjust. Not something to try to do consistently during a course of fire!
Downselecting and Establishing Confidence with the Rifle
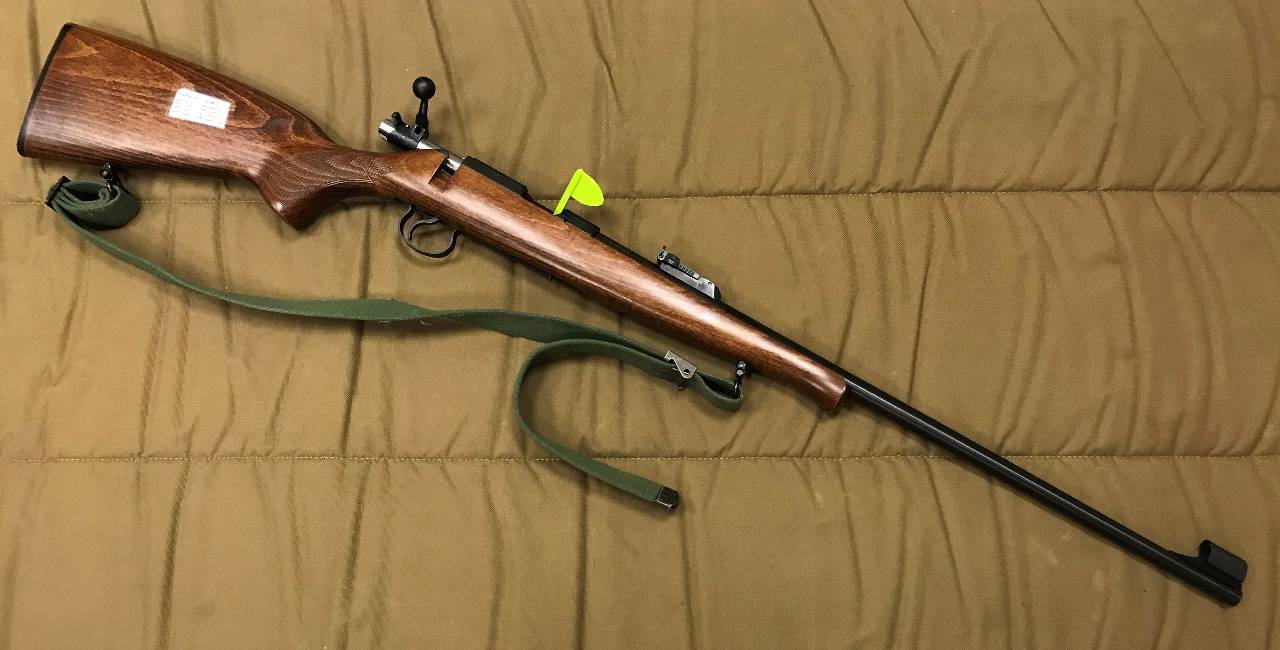
It became clear that I was going to have to get a bolt action rifle. Bolt actions are great options for Appleseed at 25 yards and beyond. They require practice and concentration to maintain a proper cheek weld while working the bolt. I own a CZ 455 Scout with Tech Sights that is very fun, though challenging, to shoot at 25 yards. I reviewed it here.
With the magazine and familiarity argument nullified between my two choices, I decided that the CZ 455 trainer was better looking (if I am being honest) and required fewer modifications because the stock was usable as-is (argument I would have used with my wife if she had objected – she did not and is an amazing woman). I chose the 455 over the newly released 457 because it was less expensive (clearance sale at my local gun store) and more common with my other 455. My biggest regret is that I could have had, essentially, the best of both worlds as I once owned a CZ 452 Ultra Lux with Brno target aperture sights but sold it years ago. Lesson learned – never sell a quality rifle!
While I was already a CZ 455 user and the 200-yard rimfire event has several opportunities to define and verify zero at 50 yards and beyond, I decided to spend a few months getting to know the rifle, sighting system, and ammunition options.
I do not have a good outdoor range near me so I went to Elite Shooting Sports in Manassas, VA, an excellent indoor range with 25, 50, and 100 yard options. I always opted for the 50-yard range to match the 50-yard initial zero at the rimfire event. Live fire was supplemented by a significant amount of dry-fire practice in my basement “25-foot range”.
The first couple range trips were frustrating. I am not the greatest shooter in the world but do regularly shoot practice and real AQTs with iron sights to qualify in the low 230s. But I was grouping much worse than normal with the rifle and can share some lessons learned.
Ammunition Choices
200-yard rimfire doesn’t require specialized target ammunition but ammunition variables grow in importance as you move beyond 25-yards.
The first consideration is whether to use standard or high velocity ammunition. MDshooter, a Maryland IIT that has spearheaded development of our 200-yard curriculum and course of fire, develop a set of 200-yard rimfire squares targets. They have a point of aim (POA) square scaled for 50 yards and estimated POI come-ups for both SV and HV rimfire ammunition through 200 yards. Though they are designed for 50-yards, they can be easily scaled to 25-yard and even 25-foot varieties – an MOA is an MOA after all, and this target proves it! High velocity ammunition will have less drop than standard velocity between 50 and 200 yards and therefore requires less elevation adjustment. But the case for HV is not so clear-cut.
The CZ graduated tangent sights are designated for specific ranges and must assume one velocity or the other since they are so different. Likewise, different manufacturers advertise and deliver different muzzle velocities, use different bullet weights, have different standard deviations of velocity between different rounds or boxes of ammunition, and so on. Long range rimfire shooters also debate whether HV can be as accurate as SV due to transonic deceleration, barrel whip, and other physics magic, perhaps real, perhaps imagined. Finally, most people agree that different rimfire rifles have different “favorites” for reasons that specs can’t explain.
I am largely a standard velocity shooter for Appleseed but knew I should try out different options to match the rifle and sights.
- Federal Premium Gold Medal Target HV 40 Grain Lead Round Nose: At 13 cents per round, I had high hopes for this ammunition but the CZ didn’t like it at all. Groups opened up and it did not match the sights at all. It also choked out my Tippmann M4-22 that has been reliable with everything else.
- Eley Force Semi-Auto HV 42 Grain Lead Round Nose: Also 13 cents per round and it first appeared to be a favorite of the CZ. Groups were a little larger than SV but it was more consistent. The Tippmann loves it as well and it was decently aligned to its ACSS BDC.
- Geco 22 Long Rifle Bolt Action Ammo 40 Grain Lead Round Nose: Found it on sale for 4 cents a round last year and it had good reviews. I have found it underperforms CCI SV, which is just a bit more expensive.
- CCI SV 40 Grain Lead Round Nose: About 5 cents per round and shot well through the CZ. Noticed a bit more spread than the other SV round but plenty good for 200-yards.
- SK Standard Plus SV 40 Grain Lead Round Nose: About 9 cents per round and shot very well through the CZ. This is the ammunition I use for 200-yard rimfire with my 10/22 and to take any potential ammunition issues out of the equation, this is what I used for this event.
Blade vs. Aperture Rear Sight
The CZ tangent sights are mounted mid-length on the rifle (as is standard for that style sight) and have a standard blade/partridge rear – a notch the front sight fits into with “equal height, equal light” being the goal. I found it very hard to focus on the front sight and confirm sight picture and alignment with the rear sight and the target.
Since I am more used to aperture sights, I decided to see if there were any options. J&P Custom Products makes a set of rear sight apertures that replace the blade sight very quickly and with little to no impact on zero. J&P offers 1/16", 3/32", and 1/8" apertures - I read multiple reviews on the “ideal” size and found no one quite agreed so I bought a set with all three.
My testing was done in an indoor range and the basement dry fire “range” and I found that the 3/32” aperture provided the best balance of light and target contrast at 50 yards. I also found the front sight hard to pick-up in the darkness of the indoor environments and took off the front sight hood.
Establishing and Verifying Preliminary DOPE
During several range trips I tested out different ammunition and aperture options. The results were not always pretty and there was a lot more trial and error than I am used to. It is harder to get feedback from iron sights than scopes – sending out and bringing back target carriers takes time and breaks your NPOA. The groups are larger at 50 yards than 25. The contrast between a black square and the 6 MOA black front sight is poor. These aren’t meant to be excuses – they are the challenges that I had to overcome to build confidence with my rifle and sighting system.
Over the first two trips, I developed what I thought was a good zero and validated settings for the Eley Force HV ammunition. However, the next time I went to the range the POI was not the same and groups were larger than required. I came home frustrated (again).
I decided to switch to the SK Standard Plus SV ammo and I started to get more consistent groups which made it easier to test the ladder against the standard targets. I also started using a spotting scope on the mat so I could improve feedback.
Two weeks before the event, I ran a final test on a 25 yard scaled target and was satisfied that my DOPE was workable.
I created a data card for the rifle for its preferred SV ammo, and, just in case, the best settings I had worked up for HV.
The clinic was on September 30, 2019 - a full AAR of the event is available here.
The Clinic: Confirming Zero on the 50 Yard Range
We started the day with a standard Red Coat target at 50-yards on the Pistol Range. Those of us with iron sights realized that this was going to be a long day – the smallest targets were not visible at all. The low morning sun was also directly in our faces and that made it harder to resolve the front sight. I really wished I had the front sight hood I had removed.
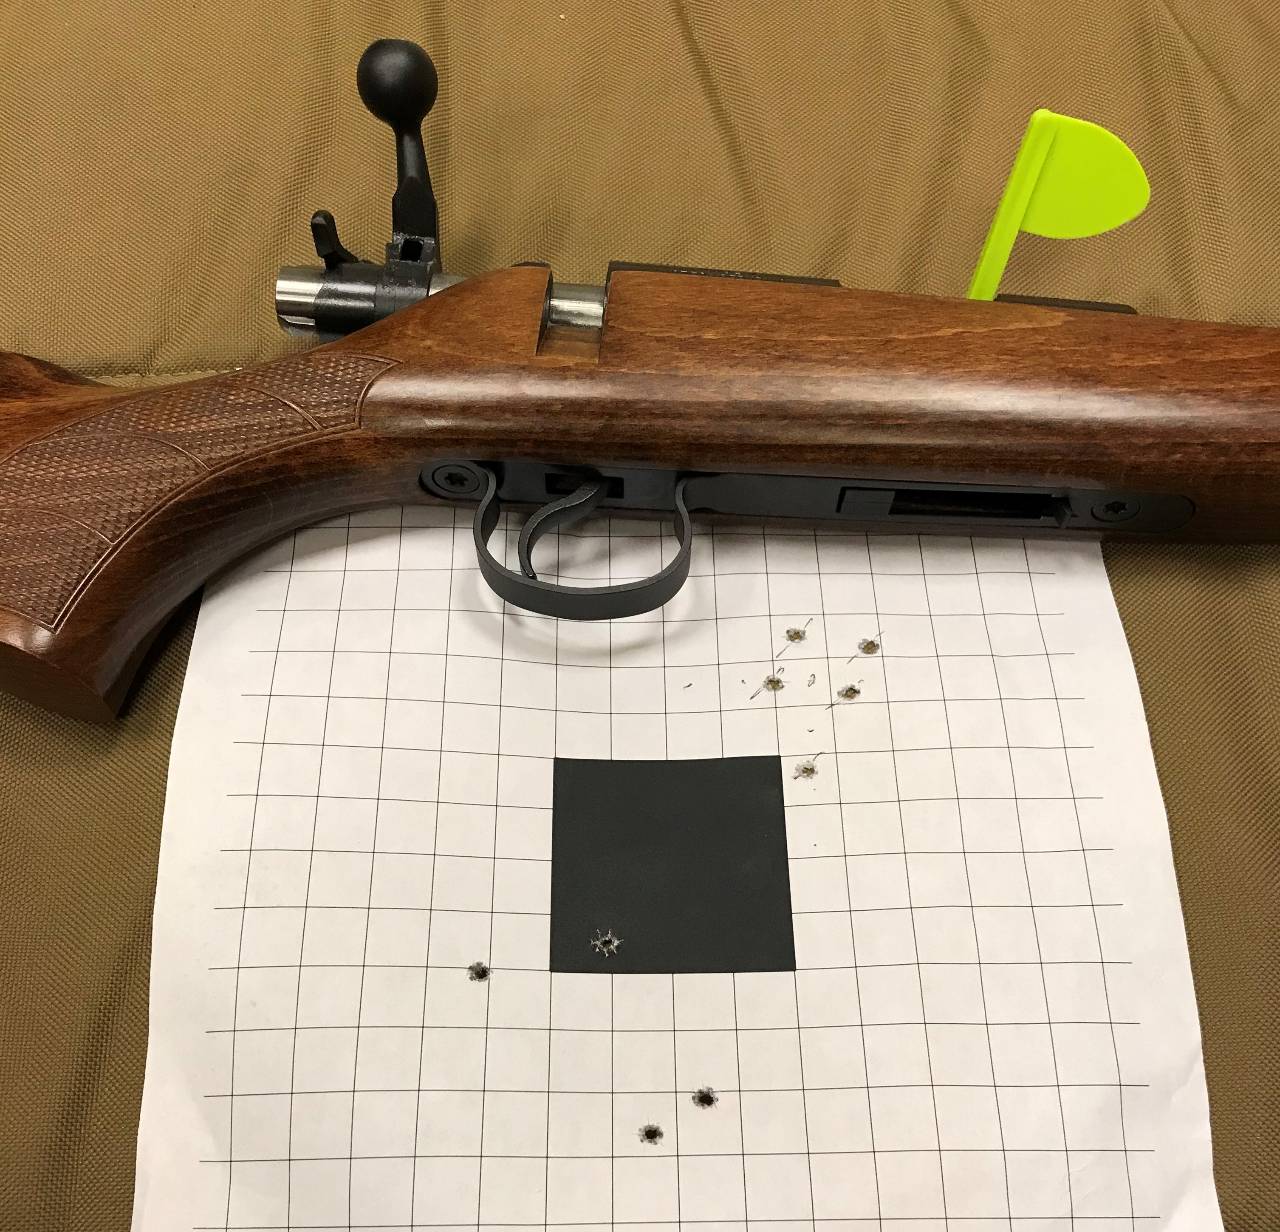
We then switched over to verify our 50-yard zero on a 4-MOA square from the prone position. I found I was grouping lower than expected from my initial zero from the indoor range. The bright sunlight of the outdoor range made it hard to get a crisp front sight so I switched to the smallest 1/16” aperture – it worked much better. Luckily, that change was easily done on the mat and a windage correction was dialed in easily from there. I did struggle a bit with elevation – as I mentioned earlier, front sight adjustments are not that easy and I significantly over corrected the first time.
We then started inputting our sight adjustments to test whether our elevation adjustments would put us in the expected POI for 100, 150, and 200 yards. I found that my preliminary DOPE work-up was spot-on. After working up to 200, I went back down to my 50 yard setting to ensure everything was working correctly. Good-to-go.
The Clinic: Confirming Zero at Range
We then switched over to the 200-yard range to shoot at paper targets to verify that the predicted POI of the squares matched our actuals. Time-called practice seated at 100 and prone at 150 and 200 yards gave me a feel for the cadence that would be required when we began AQTs – bolt actions are slower to operate and re-establishing focus on the front sight and target within time is not easy.
The wind was also worse than most days at this particular range (which is mostly shielded from the wind from most directions) - we definitely saw the effects on POI at the 200-yard distance and it meant a greater effort to read the wind for the rest of the day. However, I also learned more about over-correcting: my 6 MOA front sight made holding the wind a bit harder than I expected. But I was able to confirm my zero from the squares, which also matched my pre-clinic work-up.
After the practice rounds, it was time to switch to the Appleseed Qualification Targets (AQTs)!
The Clinic: First AQT
AQTs were conducted on steel using the “hits count” method on a round white target. There are 50 available points/hits over the course of the AQT: 2 10-round slow fire prone stages at 200 yards, 1 10-round standing transition to prone stage at 150 yards, 1 10-round standing transition to seated stage at 100 yards, and 1 10-round standing stage at 50 yards. A 40 qualifies as Rifleman.
We worked the first AQT backwards - we did the 2 slow fire prone stages from the covered firing line first and then moved the firing line into the grass progressively toward the target line. I did not have any issues with time despite the bolt action – I was able to finish most stages with 5-10 seconds to spare.
We were not told our scores on any of the stages. We ended at 50-yards standing and I took my time to fuss every shot – I was able to score 10 out of 10. And that was significant because I qualified with a 40 on the first AQT! I had hit 15 out of 20 on the 200-yard target, which I am also proud of. The Shoot Boss found it a bit anti-climactic – maybe this is too easy – but I was relieved and found it plenty hard.
The Clinic: Second AQT
We then worked back toward the covered firing line for the second AQT in the normal stage order.
With the stress of qualifying behind me, my focus was to clean a few things up and try to increase my score. I dropped a point each in seated and prone from pushing up too hard on my magazine and having the top round pop out! Anyone who tells you that only semi-automatics are liable to malfunctions just aren’t running a bolt action hard and fast enough. I should also try keeping the bolt closed on reloads in the future.
I ended up scoring in the high 30s and did not requalify. However, another participant qualified with the aperture sighted Savage MK II FVT mentioned above during the second AQT. His groups in practice had been tighter than mine and he finally broke through. I was happy to be first but also happy not to be the only!
The Clinic: Third AQT
It is very unusual to get more than two AQTs done in a one-day clinic, especially a full distance steel shoot that requires moving the line, taking scores, repainting the steel, etc. We have some clinics where we only finish one AQT. So when we were asked about a third AQT, everyone volunteered to give it one more go despite being tired and dehydrated Maybe I shouldn’t have – I scored in the mid-20s. When I go south shooting irons, I go WAY south. But I had already accomplished my mission and was satisfied with the day.
Conclusions and Lessons Learned
I found the whole experience – deciding to take on the challenge, to picking a rifle, testing the sights with different ammunition options, and running it full speed under pressure – to be extremely rewarding.
While I am a relatively experienced Appleseeder and Shoot Boss, I find that I am always learning from each clinic I go to as a participant or instructor. I was grateful that there was room on the line for this event.
To summarize my lessons learned:
- If you find something is getting easy, make it harder. Some Appleseeders are chasing Rifleman, Distinguished, or a perfect 250 score. Some are working through their IIT PCs and some are working toward their 100-shoot pin. Always have another goal in the program as a student or instructor.
- Learning to use a variety of rifles and sighting systems will make you a better Instructor – after all, participants bring a lot of different rifles and sighting systems to our events. It may also make you a better shooter!
- There are some potential students that opt out of Appleseed because they think their equipment isn’t “preferred.” I have had people say they won’t go because we don’t like bolt actions or some other rifle they own. Of course we encourage people to “run what they brung” but it is good to provide an example to show people we mean it.
- Trust, but verify your equipment. I had to do a lot of work ahead of the event to better understand the combination of rifle, sights, and ammunition. If I had been doing that for the first time at the clinic, I would have failed.
Last edited:
")

")