Building a 1911

The #1 community for Gun Owners of the Northeast

Member Benefits:

  • No ad networks!
  • Discuss all aspects of firearm ownership
  • Discuss anti-gun legislation
  • Buy, sell, and trade in the classified section
  • Chat with Local gun shops, ranges, trainers & other businesses
  • Discover free outdoor shooting areas
  • View up to date on firearm-related events
  • Share photos & video with other members
  • ...and so much more!
  • pilotguy299

    Ultimate Member
    Sep 26, 2010
    1,809
    FredNeck County, MD
    I spent a few hours this morning playing around with mine and trying to see how all the parts fit together. The problem I have run in to is that although the sear engages at both points when you pull the hammer back, after pulling and holding the trigger it will not reengage at all if you manually pull the hammer back. If I hold the trigger and cycle the slide, the sear will engage at the first (half-cocked) point.

    The sear and the disconnector are very snug in the frame, so I am guessing that it is hanging up and not rotating to it's full position. I am going to look around for some more info on this type of malfunction, and maybe look to polish the inside & the sides of the sear some more.

    DSC03709_zpsfuathbc1.jpg
     

    730dc

    Active Member
    Mar 11, 2013
    341
    If you hold the trigger the sear will not catch in less you rack the slide . It should go into half cock though
     

    inkd

    Ultimate Member
    Aug 4, 2009
    7,542
    Ridge
    I spent a few hours this morning playing around with mine and trying to see how all the parts fit together. The problem I have run in to is that although the sear engages at both points when you pull the hammer back, after pulling and holding the trigger it will not reengage at all if you manually pull the hammer back. If I hold the trigger and cycle the slide, the sear will engage at the first (half-cocked) point.

    The sear and the disconnector are very snug in the frame, so I am guessing that it is hanging up and not rotating to it's full position. I am going to look around for some more info on this type of malfunction, and maybe look to polish the inside & the sides of the sear some more.

    DSC03709_zpsfuathbc1.jpg

    If you are holding the trigger back and trying to manually cock the hammer, it won't engage.

    Check the height of your hammer hooks. If you have a .018 feeler gauge, lay it across the flats of the hammer, against the hammer hooks. They should be even with the feeler gauge at .018. Too high and your trigger will be crappy, too low and you may get hammer follow, which sounds like what you may have.

    If you have it fully assembled, lock the slide back and insert an empty mag, emphasis on empty :-), and release the slide, see if the hammer falls to half cock. If it does, that's hammer follow. Could be too short hammer hooks or not enough bend on the middle spring, I think, of the leaf spring. I could be wrong about which spring. I don't have my notes with me.
     

    730dc

    Active Member
    Mar 11, 2013
    341
    Could it half to do with you not having the plunger tube and possible the safety moving?
     

    pilotguy299

    Ultimate Member
    Sep 26, 2010
    1,809
    FredNeck County, MD
    If you are holding the trigger back and trying to manually cock the hammer, it won't engage.

    Check the height of your hammer hooks. If you have a .018 feeler gauge, lay it across the flats of the hammer, against the hammer hooks. They should be even with the feeler gauge at .018. Too high and your trigger will be crappy, too low and you may get hammer follow, which sounds like what you may have.

    If you have it fully assembled, lock the slide back and insert an empty mag, emphasis on empty :-), and release the slide, see if the hammer falls to half cock. If it does, that's hammer follow. Could be too short hammer hooks or not enough bend on the middle spring, I think, of the leaf spring. I could be wrong about which spring. I don't have my notes with me.

    I will take it apart next weekend and measure the hooks and see where it is. I think the problem may be in the trigger itself. The trigger from the sarco kit isn't exactly a perfect rectangle, and I can feel the magazine hanging up on it a bit. The back side of the trigger didn't look very square either.
     

    iH8DemLibz

    When All Else Fails.
    Apr 1, 2013
    25,396
    Libtardistan
    They looked OK, if a bit gritty on the finish. The extractor didn't slide easily in to the slide, and the firing pin stop is a bit too big with the finish that is on it. I got them both in, but the firing pin hangs on the stop, and the stop is rubbing against the top of the frame. I'm not sure if I should work on the firing pin stop, or on the top of the frame.

    I am going to have to widen the area the barrel sits in the frame so that it moves freely, as well as try to figure out how the grip safety is really supposed to fit in the frame.

    But all in all, I am pleased so far based on the price. That may change as I break stuff trying to make it all fit and work! lol

    Have you considered purchasing some really good books on how to build a 1911 correctly.

    Guns aren't Lincoln Logs.
     

    inkd

    Ultimate Member
    Aug 4, 2009
    7,542
    Ridge
    I will take it apart next weekend and measure the hooks and see where it is. I think the problem may be in the trigger itself. The trigger from the sarco kit isn't exactly a perfect rectangle, and I can feel the magazine hanging up on it a bit. The back side of the trigger didn't look very square either.

    Trigger shouldn't cause the problems you are having. All the trigger does is set things in motion. It won't cause your hammer to go to half cock. Again, the hammer not catching while being manually cocker and the trigger held back is not a failure. So don't go looking for a cause.


    If you have a flat stone, with the trigger installed, hold the frame on it's side and slide the flat stone in the mag well so it is laying flat on the side of the magwell. Slide it all the way towards the front of the grip. Press the trigger back as if shooting. If the stone moves back with the trigger, then the trigger bow is bowed to far in and a magazine would contact it. If it does, you should use a trigger stirrup die and a feeler gauge to stretch the trigger bow a little bit. It's nothing that will cause a failure, but it's something that will effect trigger pull smoothness.
     

    iH8DemLibz

    When All Else Fails.
    Apr 1, 2013
    25,396
    Libtardistan
    Yes, but I am going to try videos first. I learn better by watching instead of reading.

    Those really good books have pitchers in them to look at and they're usually written by guys who are considered gods in the 1911 world.

    And not to rain on your parade, but you have no way of knowing whether that sack of SARCO parts are in or out of tolerance. Sear. Hammer hooks. Safety. Disconnector. Etc.

    Believe it or not, the 1911 is a finely tuned machine when built properly.
     

    pilotguy299

    Ultimate Member
    Sep 26, 2010
    1,809
    FredNeck County, MD
    ...
    If you have it fully assembled, lock the slide back and insert an empty mag, emphasis on empty :-), and release the slide, see if the hammer falls to half cock. If it does, that's hammer follow. Could be too short hammer hooks or not enough bend on the middle spring, I think, of the leaf spring. I could be wrong about which spring. I don't have my notes with me.

    After putting away a weeks worth of laundry while watching a couple of episodes of the walking dead, I sat down and tried to take a closer look at what is happening mechanically.

    I followed "inkd's" suggestion, and each time the hammer followed the slide forward to the half cock position. After doing that a few times I left the slide locked back and examined the hammer. If I pulled the hammer back slightly the sear would engage and the hammer would stay in the fully cocked position when the slide was released, even if the trigger was held to the rear.

    But that really is enough for this weekend. Next comes a coffee with baileys, a hot tub, and the rest of the walking dead marathon!
     

    Magnumite

    Ultimate Member
    Dec 17, 2007
    6,577
    Harford County, Maryland
    If after dropping the hammer, the trigger is held back, the hammer will not recock manually since the disconnector has not been pushed down by the slide. No problem there.

    If the hammer is dropped, trigger is held back and the slide cycled with the hammer going to half cock or even dropping fully then: (1) the trigger is moving too far rearward releasing sear spring pressure (or pushing the sear or disconnector too far back; (2) the hammer face or top of the hammer is too low to move the hammer hooks past the sear nose; (3) the sear is very long preventing the hammer hooks from rotating past the sear nose; (4) too little pretravel; (5) disconnector too short; (6) as noted earlier, parts binding for some reason...

    These causes are not all inclusive, there are other dimesional problems which can cause improper lockwork operation. Proceed with caution and use all the safety checks each time something is changed or refitted.

    A book will allow much closer study of the lockwork. Get a book, watch the video, study the book....
     
    Last edited:

    pilotguy299

    Ultimate Member
    Sep 26, 2010
    1,809
    FredNeck County, MD
    so when I got home I decided to take the gun completely apart, and placed the sear and hammer on the outside of the gun, and used their pins to hold them in place. I then moved them about to get a better idea of how that parts interact with each other.

    I then took them off and took a digital caliper to the parts to see how they were in relation to specs.

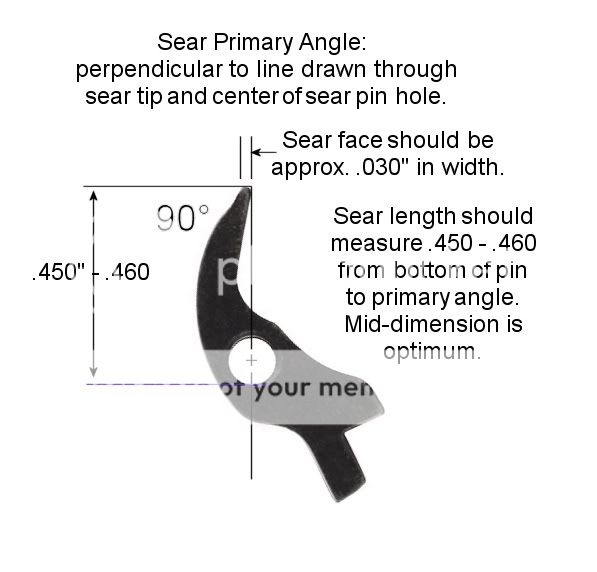
    The sear should measure as per the below pic:

    1911-sear-dimensions-recommended.jpg


    when I measured the sear it was closer to 0.467". Looks like I am going to have to get a stone and drop it down to 0.455" to 0.460".

    I then measured the hammer hooks, and both of them were at 0.030". I may look to drop that to 0.025".

    But before I do either, I am going to do a lot more reading on what others are doing, and in what order.
     

    inkd

    Ultimate Member
    Aug 4, 2009
    7,542
    Ridge
    so when I got home I decided to take the gun completely apart, and placed the sear and hammer on the outside of the gun, and used their pins to hold them in place. I then moved them about to get a better idea of how that parts interact with each other.

    I then took them off and took a digital caliper to the parts to see how they were in relation to specs.

    The sear should measure as per the below pic:

    1911-sear-dimensions-recommended.jpg


    when I measured the sear it was closer to 0.467". Looks like I am going to have to get a stone and drop it down to 0.455" to 0.460".

    I then measured the hammer hooks, and both of them were at 0.030". I may look to drop that to 0.025".

    But before I do either, I am going to do a lot more reading on what others are doing, and in what order.

    I'll have to dig out my notes, if I'm not mistaken, you would want to measure from the primary angle to the center of the hole in the sear.

    So you would insert the pin gauge through the hole and measure from the bottom of the gauge to the top of the primary angle, then subtract half the diameter of the pin gauge from that measurement and that would be the proper measurement of sear length, from center of hole to tip of primary angle.

    .030 is way long for hammer hooks. You can take them down to .025 but you still may have problems as that's still pretty long.
     

    Juche90

    Active Member
    May 10, 2014
    414
    Do all 1911 parts require some type of fitting? I've been poking around the 1911 forums and seem the sentiments are to use parts from
    Brownells or Wilson as they are closer to spec while Sarco kits seem to need a lot of tweeking. Considering a build and in the research phase. I'm trying to decide if it would be worth it to spend the extra money on parts that might be easier to fit.
     

    Magnumite

    Ultimate Member
    Dec 17, 2007
    6,577
    Harford County, Maryland
    That .018" hook length is acknowledged as a safe minimum value. Erring on the side of safety is prudent. I typically go no shorter than .020"'on my general purpose blasters. On defensive guns (1911) I prefer .021" to .022" hooks. Good trigger quality may still be obtained using those hook lengths.

    I would seriously consider a jig if you plan on servicing/honing the sear.
     

    pilotguy299

    Ultimate Member
    Sep 26, 2010
    1,809
    FredNeck County, MD
    I'll have to dig out my notes, if I'm not mistaken, you would want to measure from the primary angle to the center of the hole in the sear.

    So you would insert the pin gauge through the hole and measure from the bottom of the gauge to the top of the primary angle, then subtract half the diameter of the pin gauge from that measurement and that would be the proper measurement of sear length, from center of hole to tip of primary angle.

    .030 is way long for hammer hooks. You can take them down to .025 but you still may have problems as that's still pretty long.

    I've seen measurements saying to go from the primary angle to the top, center, and bottom of the sear pin hole. Taking into account the diameter of the sear pin hole, they all end up at the same length.

    I fiddled around with measuring the lengths, and finding the exact center of the sear pin hole seems only so accurate & repeatable.

    It seems like it might be more accurate if measuring using the top & bottom locations with the sear pin installed. Then there is a hard stop for one end of the digital calipers, and an opportunity to verify the length from two measuring points.

    Thoughts?
     

    inkd

    Ultimate Member
    Aug 4, 2009
    7,542
    Ridge
    I've seen measurements saying to go from the primary angle to the top, center, and bottom of the sear pin hole. Taking into account the diameter of the sear pin hole, they all end up at the same length.

    I fiddled around with measuring the lengths, and finding the exact center of the sear pin hole seems only so accurate & repeatable.

    It seems like it might be more accurate if measuring using the top & bottom locations with the sear pin installed. Then there is a hard stop for one end of the digital calipers, and an opportunity to verify the length from two measuring points.

    Thoughts?

    A gauge pin is the way to go for that reason, it has an area with good repeatability for your calipers to rest on.

    What I've got in my notes says to use a gauge pin, the sear pin will be too loose of a fit, and measure from the bottom of the gauge pin to the top of the primary angle and subtract half the diameter of the gauge pin .

    My measurements in the notes says it should be .402-.404

    I'll try and call the instructor today and verify.
     

    pilotguy299

    Ultimate Member
    Sep 26, 2010
    1,809
    FredNeck County, MD
    Say it isn't so...

    Embracing my inner self, I decided to go full rogue last night. The next part is not suitable reading for anyone who really knows what they are doing, or has the proper tools.

    I took a couple of hobby files and 2000 grit sandpaper to the hammer hooks and the sear last night.

    I took the hammer hooks down to about 0.025", and the sear length to 0.458", and smoothed them out as best I could with the sandpaper. I then placed them on the outside of the frame using the pins to hold them in place and examined how they fit together.

    They appeared to fit flush with each other, and I did not see any visible gaps between any surface of the sear with the hammer hooks. I moved the surfaces against each other several times and didn't feel any grit or sticking as they moved against each other.

    I put all of the parts back in to the frame and crossed my fingers. Surprisingly it worked! I function checked the gun about 20 times, and each time the hammer locked into position with the sear as it should. Despite repeated attempts to make it malfunction, including tapping the back of the back of the hammer with the safety's disengaged, it stayed put. Hopefully I can get to the range this weekend and see if it actually fires and cycles as it should.

    Now before everyone piles in on me, I know this wasn't the preferred way to work on the gun, nor is it the way the gun is going to stay for long. This was simply my attempt at trying to get a basic understanding of how the parts fit and interact together.

    I have a higher quality set of parts on order, and already have ordered the proper tools to work on the sear and hammer the correct way.

    More to come...
     

    Users who are viewing this thread

    Latest posts

    Forum statistics

    Threads
    275,499
    Messages
    7,284,138
    Members
    33,471
    Latest member
    Ababe1120

    Latest threads

    Top Bottom